Craft a Cozy Retreat: Your Easy, Textured Crochet Pillow Cover with Super Bulky Yarn
There’s an undeniable charm to creating something beautiful with your own hands, and for me, crochet has become a truly cherished pastime. The rhythmic motion of the hook and yarn is incredibly soothing, offering a perfect escape from daily stresses. What makes crochet even more appealing is its portability; I can easily pack a project for car rides, trips to the park with my children, or cozy gatherings at a friend’s house. There’s a profound satisfaction in watching a skein of yarn transform into a tangible, lovely object, adding a personal touch to my home decor.
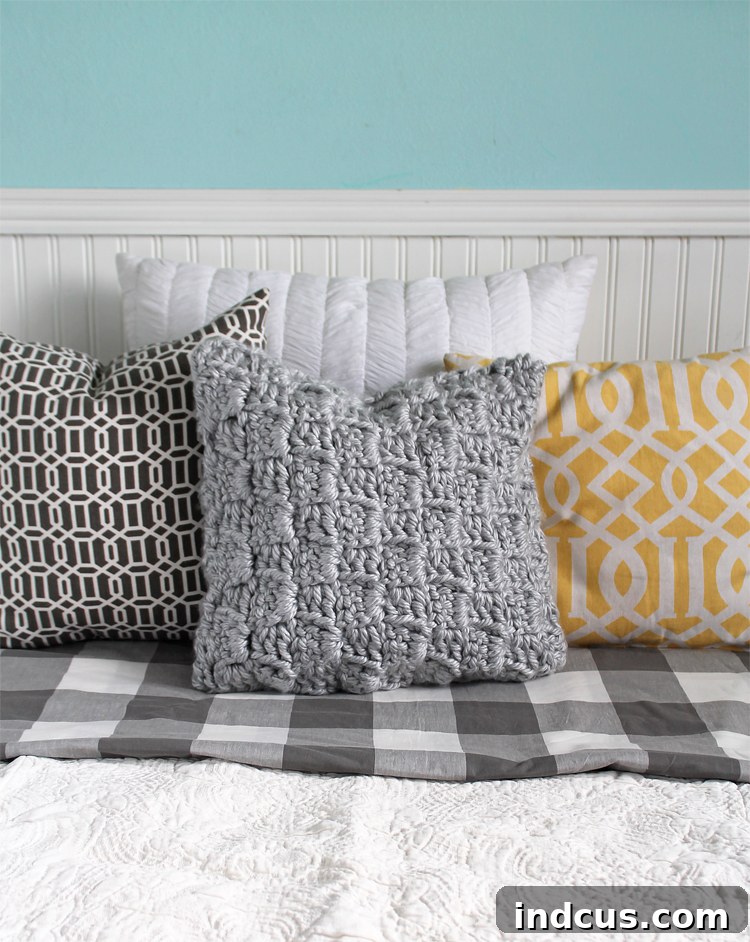
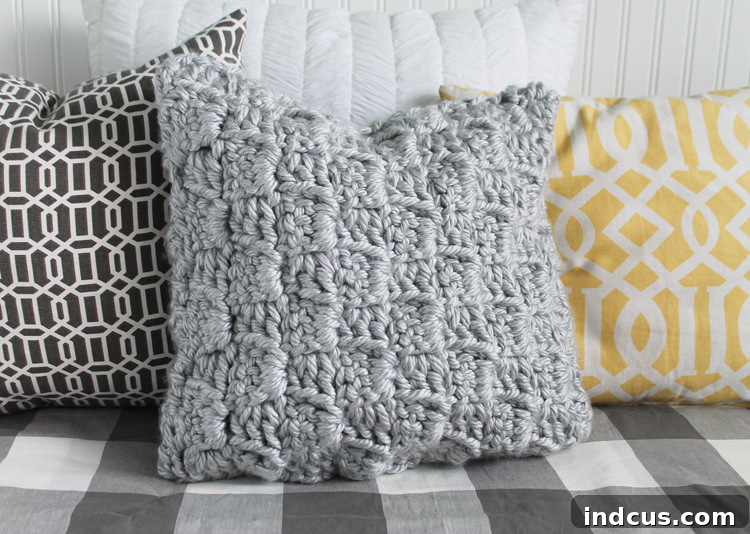
My journey into crochet home decor began with a simple throw pillow, and I was so delighted with the outcome that it sparked an immediate desire to explore further. This time, I set out to create something with even more visual interest and tactile appeal. The result is this stunning crochet pillow cover, featuring a unique stairstep pattern that’s rich in texture. I absolutely adore how it turned out! The secret to its quick completion and wonderfully plush feel lies in the use of super bulky yarn. This not only speeds up the crafting process significantly but also yields a wonderfully soft and substantial fabric. I’m thrilled to share this free pattern and detailed tutorial with you, so you can experience the joy of making your own!
Why This Easy Crochet Pillow Pattern is Perfect for Your Home
Whether you’re a seasoned crocheter looking for a quick weekend project or just starting out and eager to create something impressive, this pattern offers a rewarding experience. It’s designed to be approachable while delivering a sophisticated, handmade finish that will effortlessly elevate any living space. The stairstep stitch, often referred to as a corner-to-corner (C2C) variation, creates a beautiful diagonal texture that looks intricate but is surprisingly simple to master with just a few basic stitches. The significant advantage here is the use of super bulky yarn, which means fewer stitches per row, making your project grow before your eyes – perfect for those who love instant gratification!
Imagine snuggling up on your couch with a luxuriously soft pillow you crafted yourself, knowing it came together quickly and effortlessly. This quick crochet pillow cover is not just a decorative item; it’s a testament to the power of a simple stitch combined with the right yarn choice. It adds warmth, texture, and a personalized touch that mass-produced items simply can’t offer. Ready to dive into this exciting project and transform your home decor? I’ll guide you through the complete written pattern first, followed by an extensive step-by-step photo tutorial, ensuring you have all the visual aids you need to succeed in crafting your very own chunky crochet pillow.
Chunky Crochet Pillow Pattern: Materials and Detailed Instructions
For your utmost convenience, sign up for our newsletter at the bottom of this post. We’ll send you a free printable PDF version of this detailed pattern directly to your inbox, making it easy to follow along offline or on the go.
Essential Materials Needed to Get Started on Your Project
Gathering the right materials is the crucial first step towards a successful and enjoyable crochet project. For this particular chunky crochet pillow cover, we’ve carefully selected items that ensure both ease of use and a stunning, high-quality finished product. The choice of super bulky yarn is paramount to achieving that desirable quick-to-make factor and the wonderfully plush texture that defines this design.
- 4 skeins Bernat Mega Bulky yarn in Light Heather: This specific yarn is a true game-changer for projects where speed and softness are key. Its impressively thick gauge means your pillow cover will work up incredibly fast, often feeling like you’re making progress with every single stitch. The acrylic blend offers exceptional durability, making it perfect for an item that will see a lot of love, and a wonderfully cozy, inviting feel. The “Light Heather” shade provides a beautifully versatile, neutral tone that complements a wide range of interior decors, from modern minimalist to cozy farmhouse. However, don’t hesitate to unleash your creativity and choose a color that best suits your personal style and existing home aesthetic!
- Size N (10.0 mm) crochet hook: A large hook is absolutely essential when working with super bulky yarn. The Size N hook (which measures 10.0 mm) is perfectly matched to the Bernat Mega Bulky yarn, allowing for loose, even stitches that contribute significantly to the pillow’s soft drape, flexible fabric, and prominent texture. Using the correct hook size is vital; a hook that is too small will result in a stiff, dense fabric, while one that is too large might create a very loose, holey fabric that doesn’t hold its shape well.
- Large Eye Blunt Tip Embroidery Needle: Also universally known as a tapestry needle or yarn needle, this tool is an indispensable part of your crochet toolkit. It’s perfect for neatly weaving in all those loose yarn ends, giving your project a professional and polished finish, and for seamlessly seaming your crochet pieces together. Its blunt tip is designed to prevent splitting yarn fibers, which can be particularly tricky with bulky yarns, and its large eye easily accommodates the thick strands of super bulky yarn.
This particular pattern is specifically designed to create a cover that perfectly fits an 18-inch pillow form. Therefore, it’s a good idea to ensure you have an appropriate pillow form ready for stuffing once your crochet squares are complete. The dimensions are, however, easily adjustable if you wish to make a smaller or larger pillow; simply adjust the number of increase and decrease rows accordingly until your squares reach the desired size. Always remember to check your gauge if precise sizing is critical for your project.
Step-by-Step Instructions: The Textured Stairstep Crochet Stitch Pattern
This pattern employs a clever increase and decrease method that, when combined, creates the distinctive stairstep, or C2C (corner-to-corner) look. It’s a wonderfully engaging technique that builds blocks of stitches diagonally, resulting in a rich, textured fabric that is both visually appealing and incredibly soft. Don’t be intimidated by its unique appearance; each step is broken down for absolute clarity and ease of understanding, making it accessible even for those new to this stitch.
Part 1: Increasing Rows (Building Your Square Diagonally)
The increasing section forms the first half of your square, where each subsequent row adds a new block of stitches, gradually expanding the fabric diagonally from a single corner outwards.
- Row 1: Begin by chaining 6 stitches (ch 6). Then, work a double crochet (DC) into the 4th chain from your hook. Continue by working a double crochet (DC) into the next 2 chain spaces. Congratulations, you’ve just completed your very first block! This foundational block consists of a chain-3 space (formed by the initially skipped chains) and three perfectly placed double crochets.
- Row 2: Start this row by chaining 6 stitches (ch 6). Work a double crochet (DC) into the 4th chain from your hook, followed by a double crochet (DC) into the next 2 chain spaces. Now, carefully flip your work (turn it over – a helpful video tutorial for this essential “flip” technique is available at the very end of this post for clear visual guidance). Slip stitch (sl st) into the chain-3 space of the previous row’s block. Chain 3 (ch 3). Work 3 double crochets (3 DC) into the same chain-3 space you just slip stitched into. You’ve now formed two distinct blocks connected diagonally.
- Row 3: Begin again with a chain of 6 stitches (ch 6). Work a double crochet (DC) into the 4th chain from your hook, followed by a double crochet (DC) into the next 2 chain spaces. Then, repeat the following sequence: *slip stitch (sl st) into the next chain-3 space of the previous row; chain 3 (ch 3); work 3 double crochets (3 DC) into the same chain-3 space*. Repeat this sequence from * twice more, diligently working into each subsequent chain-3 space you encounter across the row. Turn your work. You should now clearly have three blocks across.
- Row 4: Commence with a chain of 6 stitches (ch 6). Work a double crochet (DC) into the 4th chain from your hook, followed by a double crochet (DC) into the next 2 chain spaces. Then, repeat the following sequence: *slip stitch (sl st) into the next chain-3 space of the previous row; chain 3 (ch 3); work 3 double crochets (3 DC) into the same chain-3 space*. Repeat this sequence from * three times more. Turn your work. You should now observe four blocks neatly positioned across your growing square.
- Rows 5-9: Continue following the established pattern of increasing one block on each row. This means you will consistently start each row with a ch 6, followed by a 3 DC block (DC into 4th ch from hook, DC in next 2 ch spaces), then you will work into the chain-3 spaces of the previous row to connect and add new blocks. Repeat this increasing process until you have a total of 9 blocks across the widest part of your square. This measurement should be perfectly sufficient for an 18-inch pillow form, providing a snug and attractive fit. However, if you’re aiming for a different size, you can easily adjust by adding or subtracting rows to match your desired finished pillow dimensions.
Part 2: Decreasing Rows (Shaping Your Square Back to a Corner)
Once you reach the desired maximum width (which is 9 blocks across for an 18-inch pillow), it’s time to begin the decreasing section. This phase will gradually reduce the number of blocks per row, shaping the other half of your square until you arrive back at a single block, completing the perfect square form.
- Rows 10-18: To initiate a decrease row, you will slip stitch (sl st) across the first 3 double crochets of the block directly below you. This crucial maneuver effectively “eliminates” or skips the first block of the previous row and prevents an unwanted increase at the beginning of the current row. Then, you will continue across the row by repeating the following sequence: *work (slip stitch, chain 3, 3 double crochet) into the next chain-3 space of the previous row*. Repeat this sequence from * across the row until you reach the very last chain-3 space. Finish by working a slip stitch (sl st) into that final chain-3 space. Turn your work. You will notice that each subsequent decrease row will have one fewer block than the row before it. Continue repeating this consistent decreasing pattern until you have only one block remaining, at which point your beautiful and perfectly shaped square is complete.
Finishing the Squares:
Once your first square is complete, fasten off your yarn, ensuring you leave a tail long enough to weave in securely. Don’t forget this essential step of weaving in all loose ends for a truly neat, professional, and durable finish.
Repeat the entire pattern (encompassing both the increasing and decreasing sections) to meticulously create a second identical square. This perfectly matched square will form the back panel of your bespoke crochet pillow cover.
Assembling Your Crochet Pillow Cover: The Finishing Touch
The final and most exciting step brings your two beautifully crocheted squares together to form the complete pillow cover. This is where your large eye blunt tip needle becomes an invaluable tool!
- Carefully align your two completed crochet squares, making sure their edges match up perfectly. Take your time to ensure all corners meet and the sides are flush for a professional, seamless look.
- Using your large eye blunt tip needle, thread it with a generous length of your Bernat Mega Bulky yarn (or a coordinating yarn if you prefer).
- Starting from one distinct corner, use a whip stitch to sew around three sides of the stacked squares. The whip stitch is an excellent choice for joining crochet pieces as it creates a sturdy, relatively seamless, and neat edge. Work consistently through both loops of the stitches on the edges of both squares to ensure maximum security and an even appearance.
- Crucially, leave the fourth side completely open. This opening is purposefully left for you to easily insert your pillow form.
- Gently and carefully insert your 18-inch pillow form into the partially sewn cover. Take care to ensure it’s positioned snugly and evenly inside, pushing it into all four corners for a plump and well-shaped pillow.
- Once the pillow form is comfortably and correctly in place, continue to whip stitch the remaining fourth side closed. Maintain the same consistent tension you used on the other three sides for a smooth, cohesive finish.
- To finalize your project, tie off your yarn securely with a knot that won’t unravel, then use your needle to weave in any remaining loose ends discretely into the body of the pillow cover. This ensures a durable and tidy finish that will stand the test of time.
Congratulations! Your new, super soft, wonderfully textured, and utterly unique crochet pillow cover is now complete and ready to grace your home!
Crochet Pillow Photo Tutorial: Visualizing Each Essential Step
Sometimes, seeing a stitch being formed in real-time or through clear imagery makes all the difference in understanding a pattern. This comprehensive photo tutorial provides clear visual guidance for each critical step of the stairstep crochet stitch, perfectly complementing the written instructions provided above. Pay close attention to the precise placement of your hook and yarn throughout these stages for the best results and to ensure your pillow cover turns out beautifully.
Step 1: Starting Your First Block – The Foundation
Begin by chaining 6 stitches. Then, work a double crochet (DC) into the 4th chain from your hook. This action establishes the solid foundation for your very first block of the stairstep pattern.
Step 2: Completing the First Block – Adding Body
Continue with double crochet (DC) into the next 2 available chain spaces. At this point, you now have a neat cluster of 3 double crochets and a chain-3 space (which was formed by the initial skipped chains), completing your first C2C-style block.
Step 3: Beginning the Next Row – Initial Chain 6
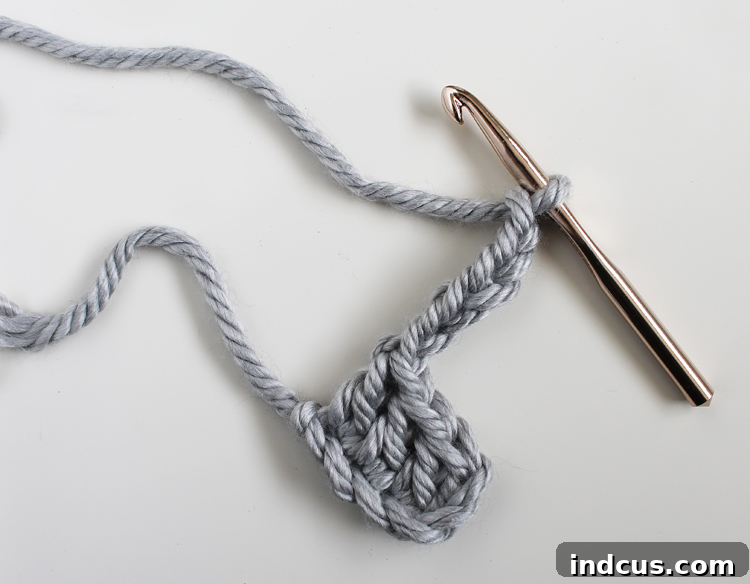
For the subsequent row and to continue building your square, chain 6 stitches again. This chain forms the essential starting point for your new block, which will be connected diagonally.
Step 4: Forming the New Block & The Crucial ‘Flip’ Technique
Work a double crochet (DC) into the 4th chain from your hook, then follow this with a double crochet (DC) in the next 2 stitches. This sequence creates your new block. Now, here’s the important and often initially challenging part: FLIP your work. This action reorients your project, preparing it to connect with the previous row’s block diagonally. (If you need a clearer visual, please refer to the video below for a detailed demonstration of this ‘flip’ technique).
Step 5: Connecting Blocks with a Slip Stitch and Chain 3
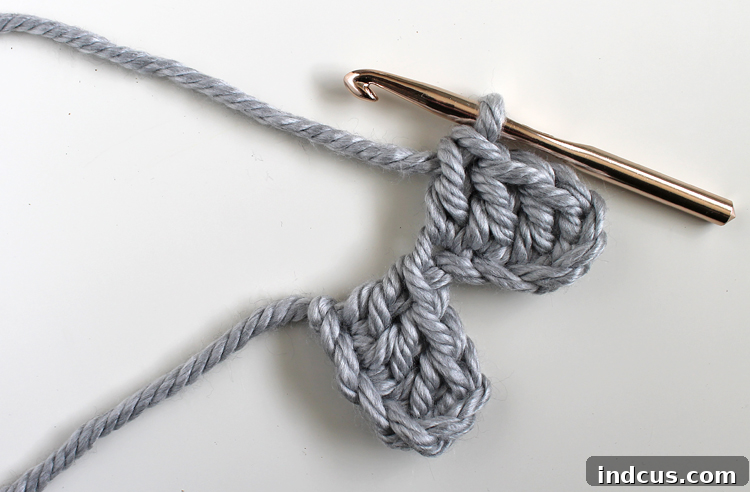
Work a slip stitch (sl st) into the corner of the first square (more specifically, into the chain-3 space of the block from the previous row). Immediately after, chain 3 stitches (ch 3). This slip stitch seamlessly joins the newly formed block to the existing fabric, and the chain 3 acts as the foundational “first stitch” of your next 3 DC cluster.
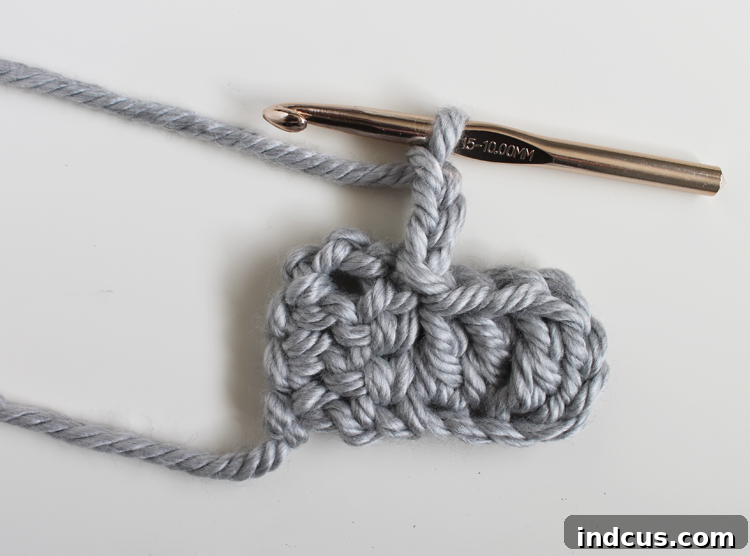
Step 6: Completing the Connected Block – Adding More Double Crochets
Work 3 double crochets (3 DC) into the exact same chain-3 space where you just made your slip stitch. This action successfully completes the second block of your current row, which is now elegantly connected diagonally to the first block, continuing the stairstep pattern.
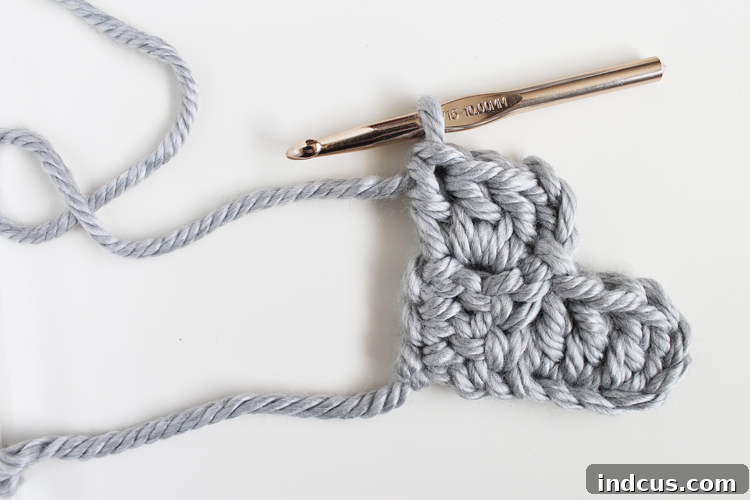
Step 7: Beginning the Next New Block
To continue increasing your square and form the next segment of your stairstep design, you’ll now start a new block. First, chain 6 stitches (ch 6).
Then, work a double crochet (DC) into the 4th chain from your hook. Follow this immediately with 2 more double crochets (DC) into the next available chain spaces. This forms the initial segment of your next increasing block, ready to be connected.
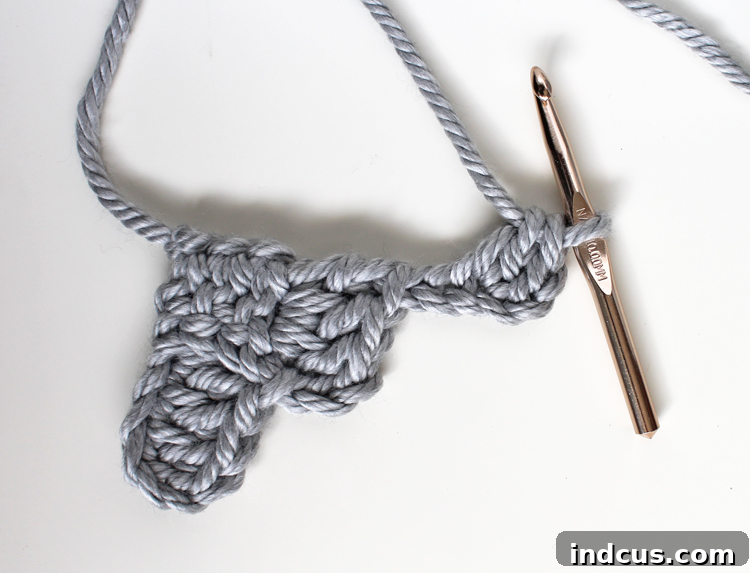
Step 8: Completing the Block and Flipping Again for Continuity
Work a double crochet (DC) in the next 2 stitches to fully finish your current block. Following this, FLIP your work once more. This consistent ‘flip’ is absolutely crucial for maintaining the precise diagonal direction of your project and ensuring the stairstep effect is continuous and even.
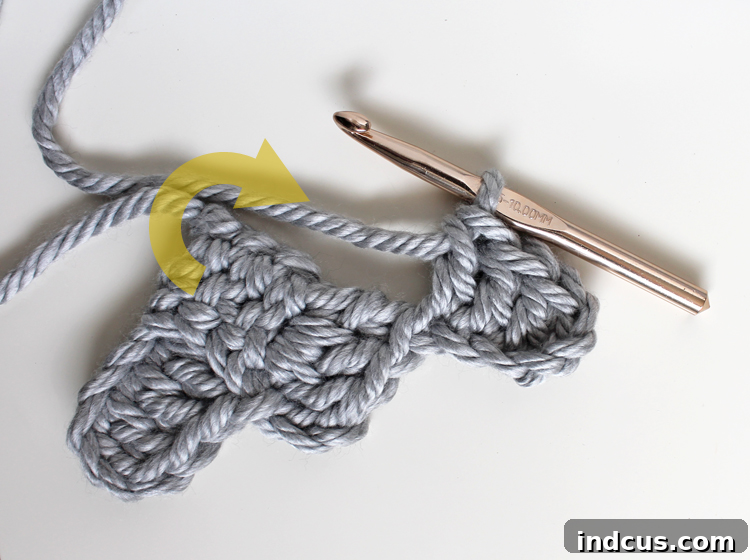
Step 9: Connecting to the Previous Row’s Block – Advancing the Diagonal
Work a slip stitch (sl st) into the corner of the round 2 square (specifically, into the chain-3 space of the next available block from the previous row). This action efficiently continues the diagonal connection across your increasing rows, expanding the fabric.
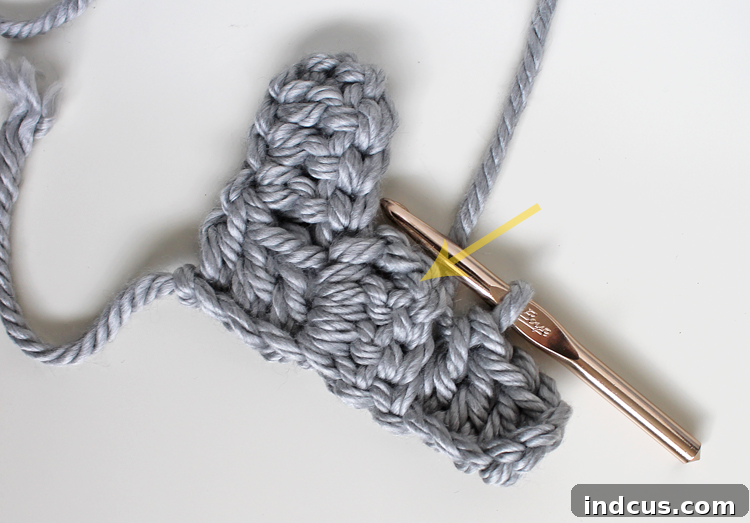
Step 10: Continue Increasing Until Desired Width is Achieved
Diligently follow this increasing pattern – consistently starting with a new block, flipping your work, and then connecting to previous blocks via a slip stitch and subsequent block formation – until you have successfully created nine rows across. This will form the widest point of your square, making it ready for the decreasing phase.
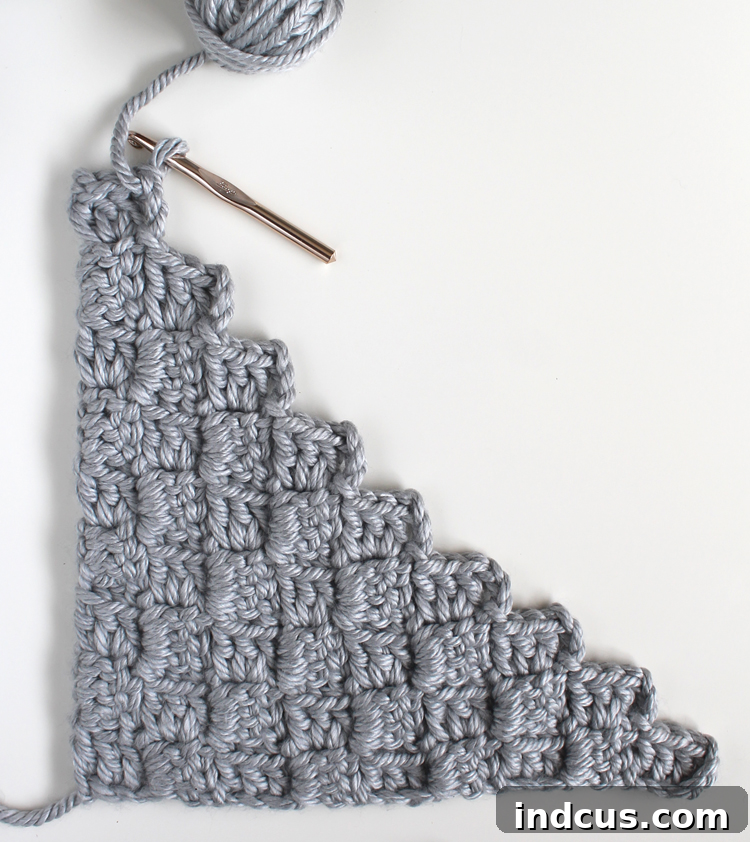
Step 11: Beginning the Decrease – The Initial Slip Stitch Across
To gracefully start the decreasing section of your square, work a slip stitch (sl st) across the top three stitches of the very first block from the previous row. This clever maneuver effectively “eliminates” that block from your current row, initiating the perfect decrease and shaping of your square.
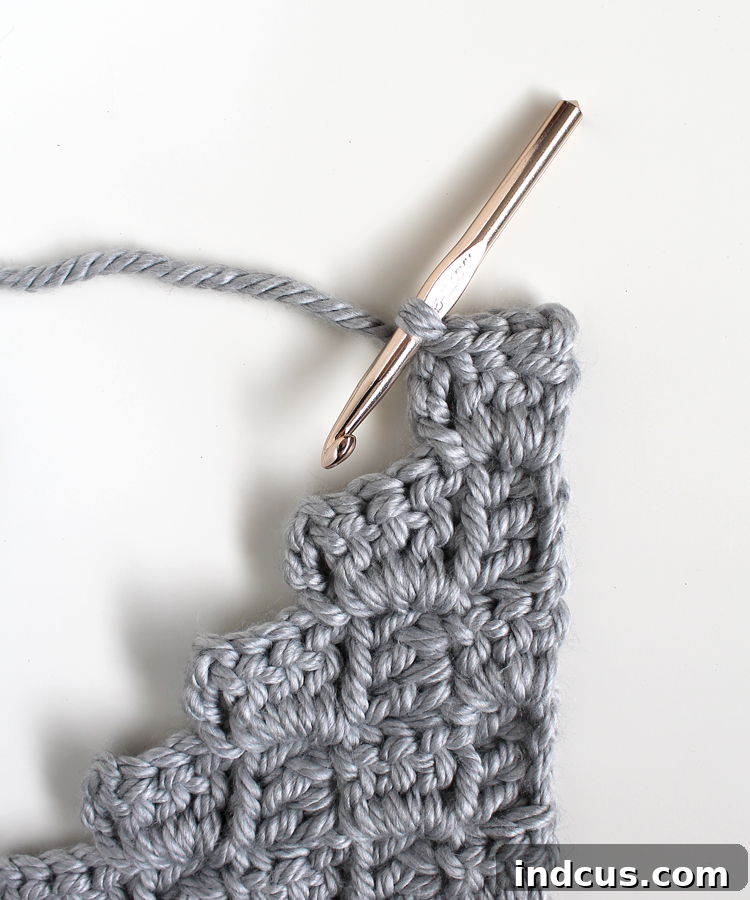
Step 12: Forming Decrease Blocks – Maintaining the Pattern
After successfully slipping across the initial stitches, chain 3 (ch 3), then work 3 double crochets (3 DC) into the next available chain-3 space. Immediately follow this with a slip stitch (sl st) into the subsequent chain-3 space. This sequence efficiently forms your first decreasing block, continuing the stairstep pattern while reducing the row length.
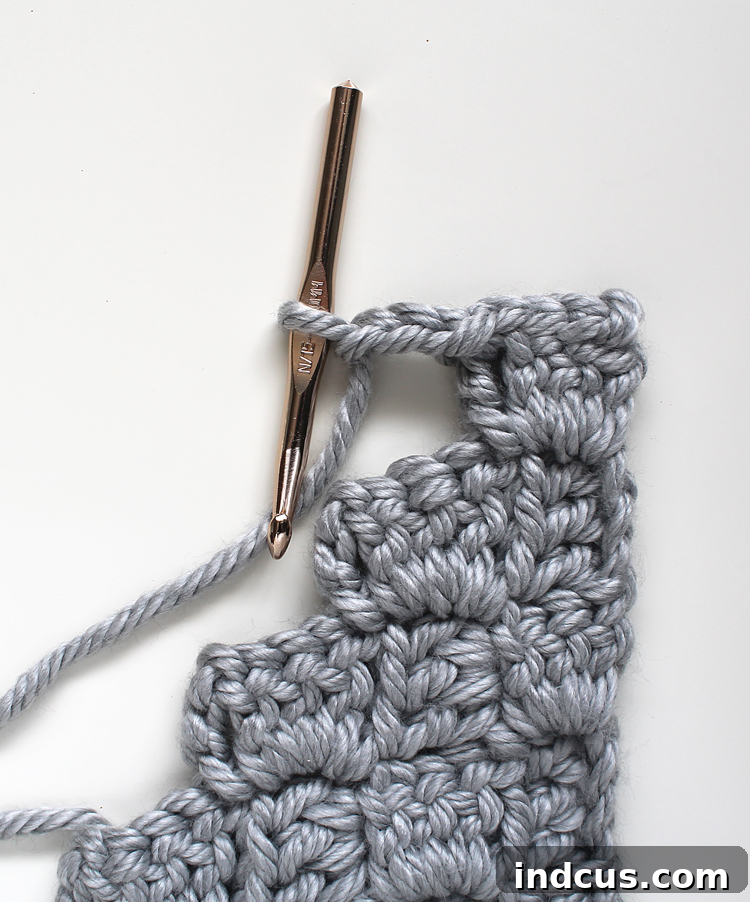
Step 13: Continuing the Decrease Pattern Across the Row
Continue diligently working the decrease pattern across the entire row, always ensuring you end with a slip stitch (sl st) into the final chain-3 space of that row, and then turning your work. With each consecutive row, you will notice one fewer block, gradually bringing your square to its final point.
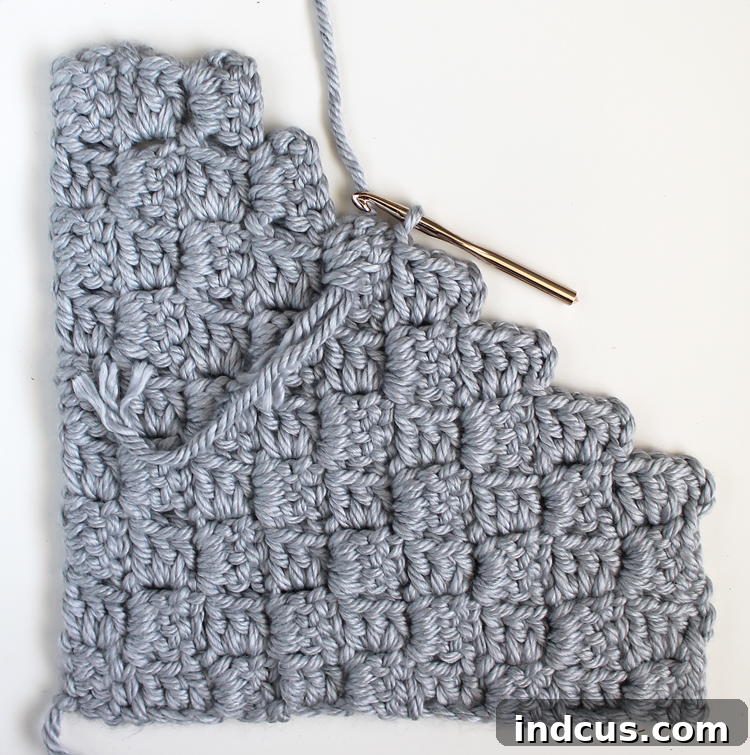
Step 14: Completing Your First Square – The Final Block
Persist with the established decreasing pattern until you have only one block remaining. This signifies the triumphant completion of your first perfect crochet square! Once done, fasten off your yarn securely and take the time to weave in all loose ends for a clean and professional finish.
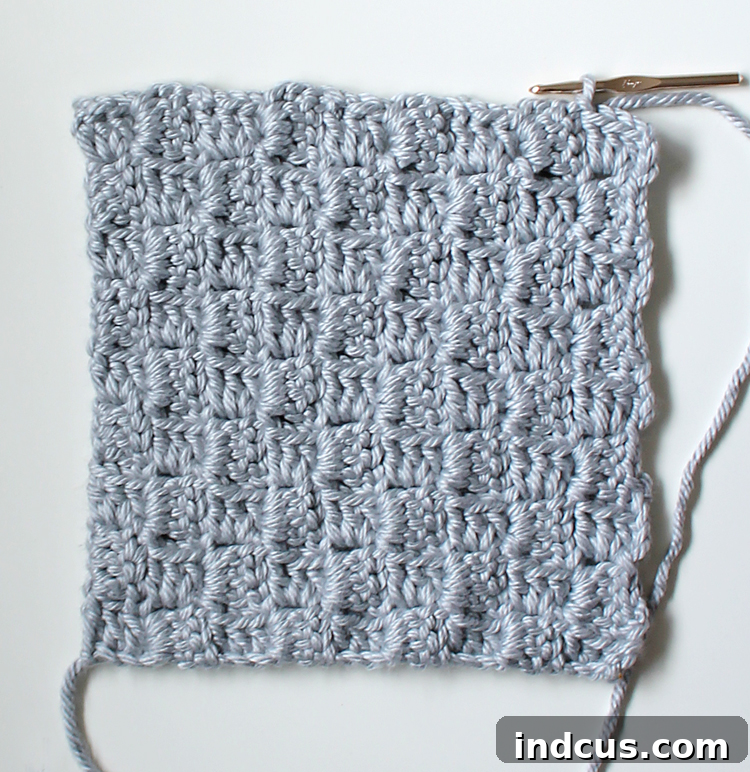
Step 15: Creating the Second Identical Square
Repeat the entire pattern from start to finish, meticulously following all the increasing and decreasing steps, to create a second identical square. This perfectly matched panel will serve as the back of your charming crochet pillow cover.
Step 16: Preparing for Assembly – Aligning Your Panels
Once both squares are complete, carefully sandwich them together, ensuring all the edges align perfectly. Take your time to meticulously match up the corners and sides for a professional and seamless finish that will enhance the final appearance of your pillow.
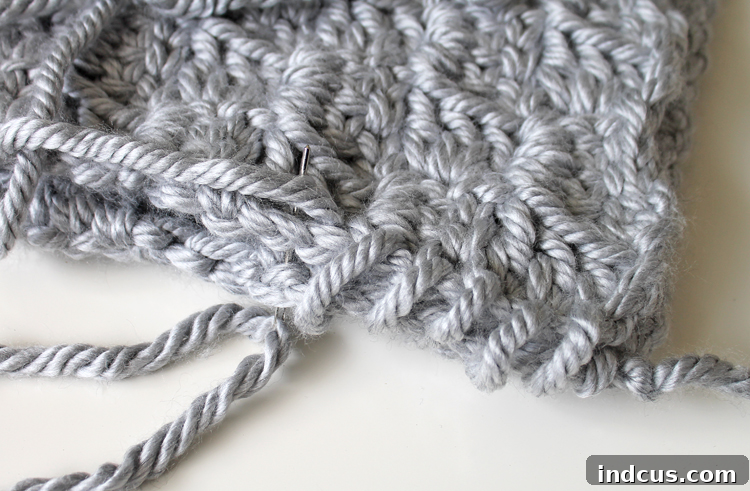
Step 17: Whip Stitching Three Sides Together for Durability
Using your large eye blunt tip needle and a generous length of your chosen yarn, begin to whip stitch around three sides of the stacked squares. The whip stitch creates a strong, neat, and relatively invisible seam that holds the pieces together securely. Be consistent with your stitches for a clean and even edge, working through both loops of the corresponding stitches on each square.
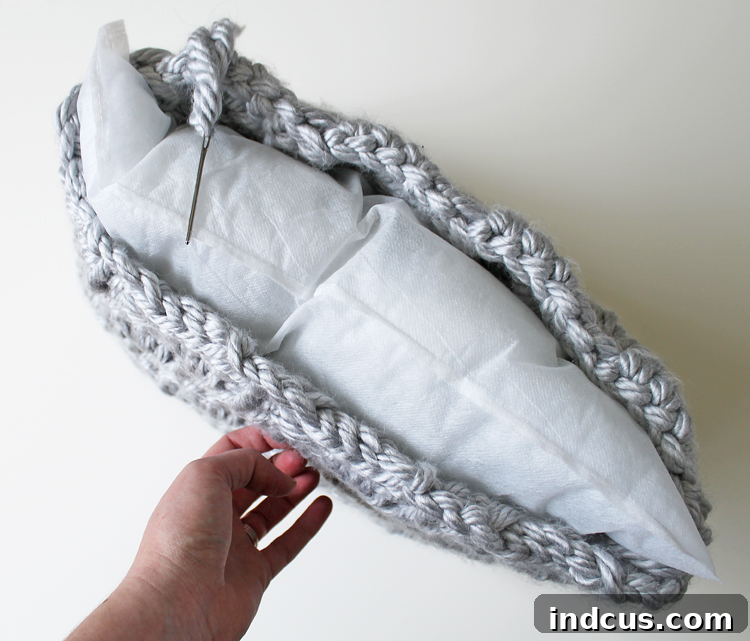
Step 18: Inserting the Pillow Form – Bringing Your Pillow to Life
With three sides securely sewn, you now have a convenient opening. Gently and carefully insert your 18-inch pillow form into the cover. Take care not to stretch the crochet fabric excessively, and work the pillow form into all corners for a plump, even, and well-filled look.
Step 19: Closing the Fourth Side and Weaving in Ends – The Final Touches
Once the pillow form is comfortably and evenly nestled inside, continue to whip stitch the remaining fourth side closed. Maintain the consistent tension you used on the previous sides for a smooth and cohesive finish. Finally, tie off your yarn securely with a sturdy knot, then use your needle to weave in any remaining loose ends neatly and discreetly into the body of the pillow cover. This ensures a durable and tidy finish that will last for years.
Mastering the “Flip”: A Quick Video Guide for Seamless Crocheting
While this stairstep crochet pillow pattern is generally straightforward and incredibly rewarding, there’s one particular instruction that can sometimes pose a slight challenge for visual learners: the “FLIP” at the beginning of each new row. This seemingly simple action is absolutely crucial for maintaining the correct diagonal direction and the beautiful texture of your C2C project. To ensure absolute clarity and confidence in your crafting journey, I’ve included a short, exceptionally helpful video demonstration. This visual aid will meticulously walk you through the correct and most efficient way to flip your work, making sure your diagonal blocks align perfectly every single time and your project maintains its beautiful, consistent texture without any twists or errors.
Essential Tips for Working with Super Bulky Yarn
Super bulky yarn (often categorized as Weight 6 or 7) is an absolute dream for those seeking quick projects that make a big impact. However, like all yarn weights, it does have its own unique characteristics and quirks. Here are a few invaluable tips to make your experience with this gorgeous, thick yarn even smoother and more enjoyable:
- Check Your Gauge for Consistency: Even when using large hooks, your personal tension can vary significantly. While an exact gauge isn’t critically important for a decorative pillow cover, striving for consistent tension across your work ensures that your two crochet squares will turn out the same size. If your squares are coming out noticeably too big or too small, don’t hesitate to adjust your hook size up or down slightly (e.g., from N to P, or N to M) until you achieve the desired fabric density and size.
- Maintain a Loose, Relaxed Grip: Because the yarn strands are inherently thick, it’s surprisingly easy to unconsciously pull your stitches too tight. This can lead to a stiff, unyielding fabric and, unfortunately, hand fatigue. Make a conscious effort to maintain a relaxed grip on both your hook and yarn. Looser stitches not only contribute to the desired plush, soft drape and squishy texture of your pillow but also make the crocheting process much more comfortable.
- Join New Skeins Seamlessly: When the time comes to add a new skein of yarn, aim to join it in a less conspicuous spot within your work, ideally within a block rather than right at the very edge of a row. A popular technique for bulky yarns is the magic knot, which creates a very strong and almost invisible join. Alternatively, you can simply overlap the ends of the old and new yarn and crochet over them for a few stitches before neatly weaving in the remaining tails.
- Weave in Ends Thoroughly and Securely: Thicker yarn naturally means thicker ends that need to be secured. Take your time weaving in these ends carefully and thoroughly to prevent them from gradually working their way out of the fabric over time. For extra security and to minimize bulk, you can gently split the yarn strands with your needle if necessary, then weave them in opposite directions through several stitches to make them virtually unnoticeable within the fabric.
Caring for Your Handmade Crochet Pillow: Longevity and Freshness
To ensure your beautiful new crochet pillow cover stays lovely, plump, and inviting for many years to come, proper care is absolutely essential, especially when dealing with super bulky yarn. Since this particular project utilizes Bernat Mega Bulky, which is an acrylic blend, it’s generally quite resilient and easy to care for, making it a practical choice for home decor:
- Washing Instructions: Most acrylic bulky yarns are machine washable, which is a huge convenience! It’s best to wash your pillow cover (always remove the pillow form first) on a gentle cycle using cold water. To provide an extra layer of protection against snagging or stretching in the washing machine, place your pillow cover inside a mesh laundry bag.
- Detergent Choice: Always opt for a mild detergent. It’s crucial to avoid harsh chemicals or bleach, as these can significantly damage the synthetic yarn fibers, leading to fading, pilling, or weakening of the fabric over time.
- Drying Method: The safest and most recommended method for drying handmade crochet items, especially those made with bulky yarn, is to lay them flat to dry. Place your pillow cover on a clean, dry surface (like a clean towel on a flat rack) and gently reshape it as it dries to maintain its original square form. Avoid hanging it, as the substantial weight of the wet yarn can cause it to stretch out of shape and distort the stitches. While tumble drying on a very low heat setting can sometimes be an option, air drying is always the safest bet to preserve the integrity and appearance of your handcrafted piece.
- Storage Best Practices: When your pillow cover is not in use or during seasonal rotations, store it in a clean, dry place away from direct sunlight. Prolonged exposure to sunlight can lead to gradual fading of the yarn’s color. Ensure it’s stored in a breathable container or bag to prevent any mustiness.
Styling Your New Textured Pillow Cover: Integrating Art into Your Space
This chunky stairstep crochet pillow cover isn’t just a cozy accessory; it’s a versatile statement piece that brings unique texture and warmth to any room! Its distinctive texture and substantial feel make it incredibly adaptable for various home decor styles, allowing it to seamlessly integrate into your existing aesthetic or inspire a fresh look:
- Modern Minimalist Elegance: The clean lines and geometric nature of the stairstep stitch, especially when crafted in a sophisticated neutral shade like Light Heather, perfectly complement a modern minimalist aesthetic. Pair it with sleek, understated furniture and a simple, uncluttered color palette for an elegant, contemporary touch that speaks volumes without being overtly decorative.
- Boho Chic Comfort: Layer this pillow with other textured pillows, soft throws, and natural elements like rattan, macrame, or reclaimed wood to effortlessly create a wonderfully cozy, free-spirited, and bohemian vibe. The authentic handmade quality of the pillow inherently enhances the artisanal and curated feel that is characteristic of boho decor.
- Farmhouse & Rustic Charm: Its chunky texture, robust construction, and comforting presence fit perfectly into a rustic or modern farmhouse setting. Combine it with classic plaid patterns, distressed wooden furniture, and a palette of warm, earthy tones to cultivate an inviting and homely atmosphere that exudes warmth and authenticity.
- Transitional Harmony: This adaptable crochet pillow can expertly bridge the gap between traditional and contemporary styles. It adds warmth, a touch of handcrafted personality, and visual interest without overwhelming the existing decor. It’s a fantastic way to subtly update a space or add a cozy layer to more formal settings.
Don’t be afraid to experiment with placement and pairings! Your handmade pillow adds a truly personal touch and a unique character that mass-produced store-bought items simply can’t replicate. It’s a reflection of your creativity and passion.
Embrace the Joy of Handmade Home Decor and Crafting
There’s something uniquely satisfying and deeply personal about adorning your home with items you’ve lovingly crafted yourself. Each stitch in this crochet pillow cover carries a piece of your dedication, your time, and your inherent creativity, gradually transforming a simple living space into a warm, personalized sanctuary. This easy crochet pillow cover project is an excellent entry point into the fulfilling world of handmade home decor, offering a beautiful and tangible result with a remarkably minimal time commitment, thanks to the efficiency of the super bulky yarn. It’s far more than just a pillow; it’s a potential conversation starter, a source of cozy comfort during quiet evenings, and a proud testament to your growing crochet skills and artistic talent.
I genuinely hope you find as much joy in the process of making and ultimately using your new textured crochet pillow as I did. It’s a truly wonderful and rewarding feeling to add a touch of handmade comfort, unique style, and personal warmth to your home. Happy crafting, and may you enjoy every single stitch of this delightful project!
Don’t forget to sign up for our newsletter below to receive a free printable PDF version of this detailed crochet pattern directly in your inbox! This convenient, downloadable format allows you to easily take the pattern with you anywhere, even without internet access, ensuring your crafting never has to stop.