
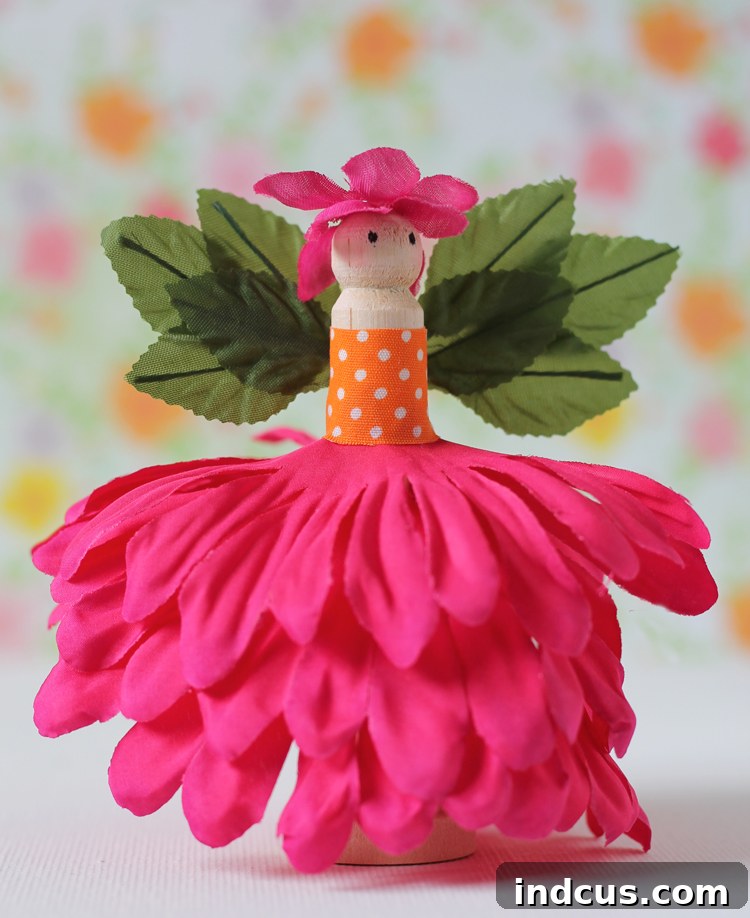
DIY Clothespin Flower Fairies: Craft Enchanting Dolls from Silk Flowers and Wooden Pegs
Unleash your creativity and step into a whimsical world by crafting your very own miniature flower fairies! This delightful DIY project, inspired by a wonderful reader, promises endless fun and a truly rewarding creative experience. Imagine turning simple wooden clothespins and vibrant silk flowers into charming little beings, each with its own unique personality. It’s a craft that’s not only easy to master but also incredibly satisfying, allowing you to create beautiful decorations, thoughtful gifts, or simply enjoy a moment of peaceful artistry.
From the moment you begin assembling these tiny treasures, you’ll discover the joy of watching them come to life. This craft is perfect for anyone looking for an engaging project – whether you’re an experienced crafter seeking a whimsical escape, a parent searching for a delightful activity to share with your children, or someone just starting their creative journey. The simplicity of the materials combined with the boundless possibilities for customization ensures that no two fairies will ever be exactly alike, making each creation a unique piece of art. Get ready to fall in love with making these enchanting clothespin flower fairies!
What Are Clothespin Flower Fairies?
Clothespin flower fairies are charming, miniature dolls crafted primarily from wooden doll clothespins and artificial silk flowers. They capture the essence of nature and fantasy, transforming ordinary craft supplies into magical figures. The wooden clothespin forms the fairy’s body, providing a sturdy base, while the colorful petals and leaves of silk flowers become their exquisite skirts, delicate wings, and whimsical hats. These adorable figures are known for their simplicity in design yet boast incredible potential for intricate details and personal expression. They embody a rustic charm combined with ethereal beauty, making them a beloved craft for all ages.
Beyond being a delightful crafting project, these fairies can serve multiple purposes. They make lovely decorative accents for shelves, windowsills, or potted plants, adding a touch of natural beauty to any space. They can also be incorporated into larger fairy gardens, terrariums, or even used as unique party favors or gift toppers. Their small size and customizable nature make them incredibly versatile. The real magic lies in the creative process itself, as each choice of flower, petal, and color breathes a distinct character into your fairy, making the journey as enjoyable as the finished product.
Essential Materials for Your Flower Fairies
Gathering your supplies is the first exciting step towards bringing your flower fairies to life. The beauty of this craft lies in its accessibility, using readily available and affordable materials. While we recommend specific items for the best results, feel free to explore your local craft store for variations or even repurpose items you might already have!
Materials Checklist: (Affiliate links are provided for your convenience)
- Assorted Silk Flowers: Choose a variety of sizes, colors, and petal shapes. Larger, flatter flowers work well for skirts, while smaller blossoms can be used for hats or accents. Consider daisies, hydrangeas, peonies, or any flower with easily detachable petals.
- Silk Rose Petals: Ideal for creating elegant wings, layered skirts, or rolled hats. Their natural shape and soft texture add a delicate touch.
- Mini Leaves: Perfect for creating unique, nature-inspired wings or adding decorative elements to your fairy’s attire.
- Wooden Doll Clothespins: These are the core of your fairy. Look for the “doll” or “peg” style clothespins, which have a round top for the head and a tapered body.
- Doll Clothespin Stands: Optional, but highly recommended for displaying your finished fairies upright. They provide stability and elevate the presentation.
- Fabric Tape: Use this for creating “belts” or bodices, neatly covering raw edges of the flower petals and adding a polished finish. Washi tape or thin ribbon can also work.
- Hot Glue Gun and Glue Sticks: Essential for securely attaching all the components. Always use with caution and adult supervision, especially when crafting with children.
- Sharp Scissors: For separating flower parts and making precise cuts in petals.
- Q-tips: Used for applying a delicate blush to your fairy’s cheeks.
- Black Sharpie Marker: For drawing expressive eyes on your fairy’s face. Fine-tipped markers work best.
- Pink Chalk or Oil Pastel: For adding a subtle, rosy glow to the cheeks. A touch of red or pink crayon can also be used.
Step-by-Step Guide: Crafting Your Enchanting Flower Fairies
Now that you have all your materials ready, let’s dive into the magical process of creating your very own clothespin flower fairies. Follow these detailed instructions to bring your unique vision to life, step by step.
1. Prepare Your Silk Flowers
Begin by carefully separating the individual flower blossoms and petals from their main stems and plastic centers. Most silk flowers are designed to be easily disassembled; a firm but gentle pull is usually all it takes to detach the components. If you encounter resistance, you might need to snip a small wire or dab of glue with your scissors. For flowers with multiple layers of petals, separate them so you have individual petals or smaller clusters to work with. This step is crucial for customizing the size and fullness of your fairy’s skirt and other embellishments.
2. Customize the Flower Center for the Clothespin
Many silk flowers come with a small hole in their center. To fit this comfortably around the wooden clothespin, you’ll likely need to enlarge it. Take a sharp pair of scissors and carefully snip small slits around the existing center hole. Make incremental cuts, widening the opening gradually until it’s just large enough to slide over the narrower body of the wooden doll clothespin. Be mindful not to cut too much, as you want the flower to sit snugly rather than loosely. This snug fit will help create a beautiful, full skirt for your fairy.
3. Create the Fairy’s Skirt
With your flower prepared, gently slide it onto the wooden clothespin from the bottom, bringing it up to where the “waist” of your fairy would be (just below the round head). Once positioned, apply a small dab of hot glue to secure the flower firmly in place. Ensure the glue is applied evenly and allows the flower petals to flare out, forming a lovely skirt. You can experiment with different types of flowers here: a single large daisy can create a simple, elegant skirt, while layering several rose petals can achieve a fuller, more luxurious look. This step truly defines the silhouette of your fairy.
4. Add a “Belt” or Bodice Detail
To give your fairy a neat and finished look, apply a piece of fabric tape around the “waist,” covering the top edges of the flower petals where they meet the clothespin. This step not only conceals any raw edges or glue but also adds a decorative element, resembling a belt or bodice. Choose a fabric tape that complements the color of your flower or provides a nice contrast. Washi tape, thin ribbon, or even a narrow strip of coordinating felt can also be used here, allowing for further personalization and a polished touch.
5. Attach Elegant Wings
Every fairy needs wings! Select two silk rose petals or mini leaves of your choice. Arrange them on the back of your fairy, just below the head, to mimic elegant wings. Apply a small amount of hot glue to the center back of the clothespin and carefully press the petals or leaves into place. You can overlap them slightly or position them to fan out, depending on the look you desire. Experiment with different colors and shapes of petals or leaves to create a diverse collection of winged beauties. For a more ethereal look, consider layering sheer fabric or tulle behind the petals.
6. Design a Whimsical Hat or Hairstyle
Give your fairy a charming hat or a hint of a hairstyle. A single, small hydrangea blossom, with its naturally cupped shape, makes a perfect, ready-made hat. Simply secure it to the top of the clothespin’s head with a dot of hot glue. Other options include rolling up a silk flower petal to form a conical hat, using a tiny fabric bow, or even gluing small strands of yarn for a whimsical hairstyle. This step adds immense character and helps define your fairy’s unique personality. Think about what kind of hat would best suit her overall style!
7. Bring Your Fairy to Life with Facial Features
The final touch is to give your fairy a sweet face. Using a black Sharpie marker, carefully draw two small dots for eyes on the round head of the clothespin. For a soft, rosy glow, rub the end of a Q-tip on some pink chalk or an oil pastel. Then, gently dab a bit of this “blush” onto your fairy’s cheeks. You can even add a tiny, subtle smile if you wish. These small details instantly transform the wooden peg into a lively character, making your fairy truly come to life with charm and personality.
Creative Variations and Personalization
The true magic of crafting clothespin flower fairies lies in the endless possibilities for customization. Once you’ve mastered the basic steps, you’ll find yourself eager to experiment and create a whole garden of unique fairy friends. Here are some ideas to inspire your next creations:
Explore Different Skirt and Wing Combinations
- Leafy Wings & Fuller Skirt: As seen in some of our examples, instead of rose petals, use small silk leaves for a more earthy, woodland fairy vibe. Combine this with a fuller, multi-layered daisy skirt for a robust and playful appearance. Experiment with different shades of green leaves for varied effects.
- Princess Hat & Layered Petal Skirt: For a regal look, roll a single, longer flower petal into a conical shape and glue it to the head for a delicate princess hat. Pair this with a skirt made of several overlapping rose petals, creating a sense of volume and elegance.
- Daisy Sunhat & Rose Leaf Skirt: A wide, flat daisy blossom makes an excellent sunhat, offering a cheerful and innocent look. Complement this with a skirt crafted from individual rose leaves, creating a unique texture and natural flow.
- White Rose Petal Skirt with Color Accents: A skirt made from carefully folded white rose petals exudes purity and grace. Add a splash of color by folding smaller blue daisies or other contrasting petals around the wings or at the waist, creating a stunning visual contrast.
Beyond the Basics: More Customization Ideas
- Hair & Accessories: Instead of or in addition to a hat, consider gluing small strands of yarn or embroidery floss for hair. You can braid it, tie it, or leave it flowing. Tiny beads, sequins, or glitter can also be added to their skirts, wings, or hats for extra sparkle.
- Wing Materials: While rose petals and leaves are beautiful, don’t limit yourself! Try using small pieces of tulle, lace, organza, or even stiffened felt for different wing textures and translucencies. Butterflies made from craft foam or paper can also be repurposed as wings.
- Themed Fairies: Create fairies based on seasons (e.g., autumn leaves for fall fairies, white and silver for winter fairies), holidays, or specific flower gardens. Imagine a “Sunflower Fairy” with yellow petals and brown centers, or a “Lavender Fairy” with purple hues.
- Facial Expressions: While simple dots work, you can experiment with tiny arched eyebrows, a slight smile, or even tiny dots for noses to give each fairy a distinct personality.
- Stands & Bases: If not using the wooden doll clothespin stands, consider gluing your fairies into small decorative pots, on top of moss-covered stones, or incorporating them into miniature fairy gardens.
By exploring these variations, you’ll not only enhance your crafting skills but also build a diverse and enchanting collection of unique clothespin flower fairies, each telling its own magical story.
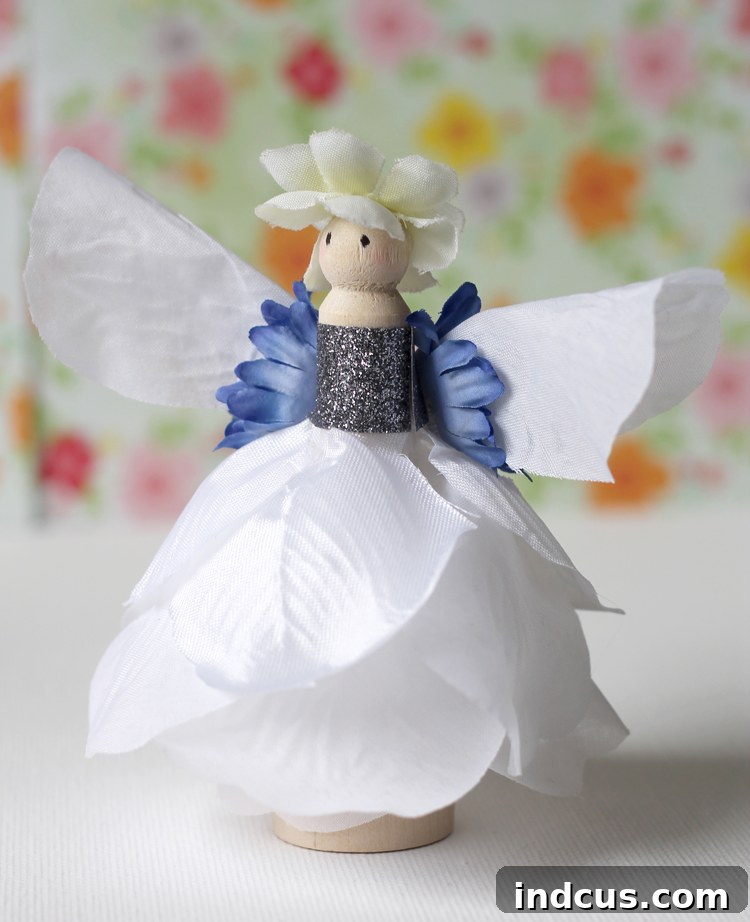
Each fairy truly takes on a life of its own, imbued with individual character and charm. The joy of seeing them all lined up, a little community of your own making, is incredibly rewarding and guaranteed to bring a smile to your face.
Display and Enjoy Your Handcrafted Fairies
Once your magical collection of clothespin flower fairies is complete, it’s time to find them the perfect home where they can bring joy and whimsy. These little creations are versatile and can enhance various spaces in your home or be given as thoughtful, handmade gifts.
- Enchanting Home Decor: Line them up on a sunny windowsill, arrange them on a shelf amongst books and plants, or let them perch on the edge of a picture frame. Their vibrant colors and delicate forms add a touch of natural beauty and imaginative flair to any room.
- Fairy Gardens and Terrariums: Clothespin fairies are ideal residents for miniature fairy gardens, whether indoor or outdoor (if protected from harsh weather). Their size perfectly complements tiny plants, moss, and decorative pebbles, creating a magical landscape.
- Thoughtful Gifts: These handmade fairies make incredibly sweet and personal gifts for birthdays, holidays, teacher appreciation, or just to brighten someone’s day. Package a few together in a small box, perhaps with a little note about their creation.
- Party Favors or Decorations: Planning a nature-themed party, a baby shower, or a whimsical gathering? Use your flower fairies as charming party favors, or string them together to create a unique garland that will delight your guests.
- Kids’ Room Accents: For a child’s room, these fairies can inspire imaginative play and stories. Place them on a nightstand or bookshelf, bringing a friendly, magical presence.
No matter how you choose to display or share them, these handmade flower fairies are a testament to your creativity and a source of simple, enduring delight.
Benefits of This Charming Craft
Engaging in the creation of clothespin flower fairies offers much more than just a beautiful end product. This craft provides a wealth of benefits for both children and adults, fostering development and well-being.
- Boosts Creativity and Imagination: From choosing color palettes to designing unique outfits and expressions, this craft encourages boundless imagination. Crafters can invent stories and personalities for each fairy, enhancing their creative thinking skills.
- Develops Fine Motor Skills: The precise actions of separating petals, snipping centers, and delicately gluing small components help refine fine motor skills and hand-eye coordination, particularly beneficial for younger crafters.
- Encourages Patience and Focus: While relatively simple, the step-by-step process requires attention to detail and patience, especially when working with hot glue or small elements. Completing each fairy provides a sense of accomplishment.
- Stress Relief and Mindfulness: For adults, crafting can be a meditative and calming activity, offering a mindful escape from daily stresses. The repetitive motions and focus on a pleasant task can be incredibly therapeutic.
- Affordable and Accessible: Using readily available and often inexpensive materials like silk flowers and clothespins makes this an accessible craft for almost any budget, removing barriers to creative exploration.
- Personalized Gifts and Decor: Creating handmade items offers the unique satisfaction of giving a personal gift or decorating your space with truly one-of-a-kind pieces that reflect your style and effort.
- Educational for Children: Kids learn about different flower types, colors, and basic construction. Under supervision, they can gain confidence in using tools like scissors and glue guns. This craft also sparks conversations about nature and fantasy.
Whether you’re crafting alone or with loved ones, these flower fairies provide a delightful opportunity to connect with your creative spirit and enjoy the simple pleasure of making something beautiful with your own hands.
Safety First: Tips for Crafting with Hot Glue
While making these charming fairies is a joyous experience, it’s important to prioritize safety, especially when using a hot glue gun. Follow these guidelines to ensure a safe and enjoyable crafting session:
- Adult Supervision is Key: For children, hot glue guns should always be used under strict adult supervision. Consider low-temperature glue guns or craft glue for younger kids to minimize burn risks.
- Read Instructions: Always read the manufacturer’s instructions for your specific glue gun model.
- Work on a Protected Surface: Place a silicone mat, craft paper, or old newspaper under your work area to protect surfaces from drips and spills.
- Keep Fingers Away from Nozzle: The nozzle and the dispensed glue are very hot. Use a craft stick, pencil, or the blunt end of a Q-tip to press down materials, rather than your fingers.
- Test Glue Temperature: Before starting, do a small test dab on scrap material to get a feel for how the glue flows and dries.
- Unplug When Not in Use: Never leave a hot glue gun unattended. Unplug it immediately after you’re finished crafting or if you need to step away.
- Proper Storage: Once cooled, store your glue gun safely in a designated craft bin, away from flammable materials and out of reach of small children.
By following these simple safety precautions, you can ensure that your fairy-making adventure remains a happy and burn-free experience for everyone involved.
Flower Fairy Video Tutorial
Watch our step-by-step video tutorial to see exactly how these enchanting clothespin flower fairies come to life. Perfect for visual learners!
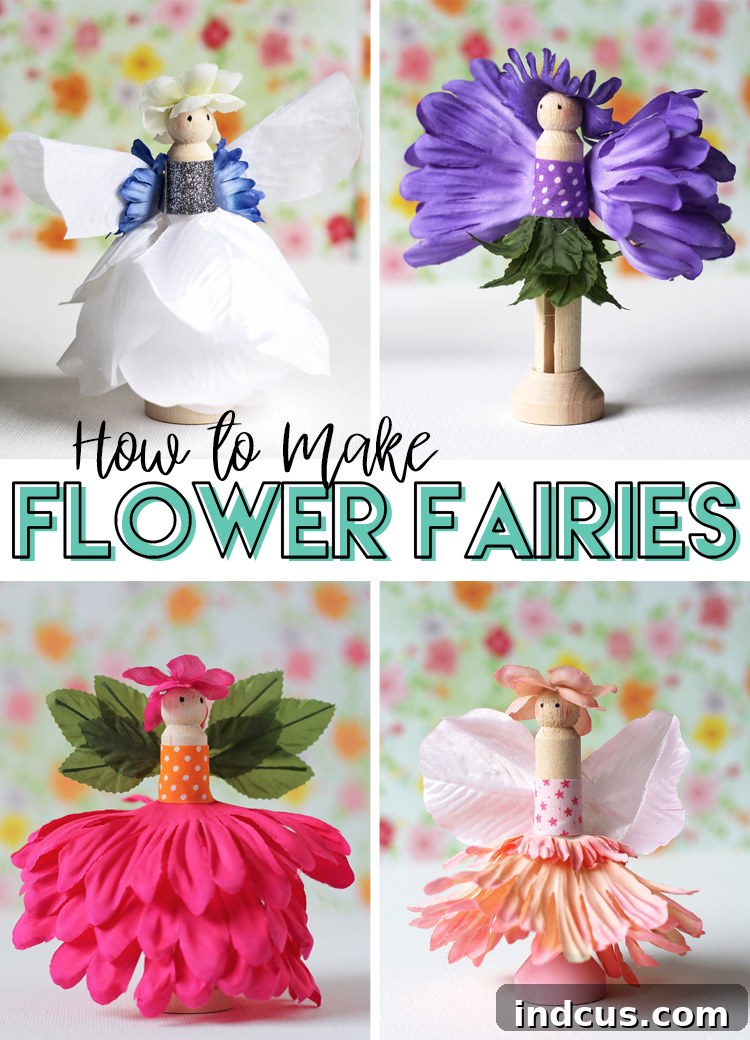
This charming craft proved to be a huge hit with my own children. They were able to follow the instructions and create their fairies with minimal assistance, primarily just needing a bit of supervision when handling the hot glue gun. If you’re searching for an engaging, hands-on activity that sparks creativity and provides hours of fun, making these beautiful clothespin flower fairies is an absolute winner. It’s a wonderful way to spend quality time together, fostering imagination and creating lasting memories (and adorable little dolls!).







