
Craft a Stunning DIY Kraft Paper Fringe Wreath: A Comprehensive Guide to Textured Home Decor
As the holiday season fades and a new year dawns, many of us feel a fresh desire to refresh our living spaces. Swapping out festive decorations for pieces that embrace simplicity, texture, and natural charm can breathe new life into any room. Today, we’re diving into an exciting craft tutorial that allows you to create an absolutely captivating DIY wreath made entirely from kraft wrapping paper. This project is not only incredibly fun and satisfying but also offers an amazing opportunity to introduce unique, handmade artistry into your home decor. Get ready to embark on a creative journey that promises a beautiful, budget-friendly focal point!
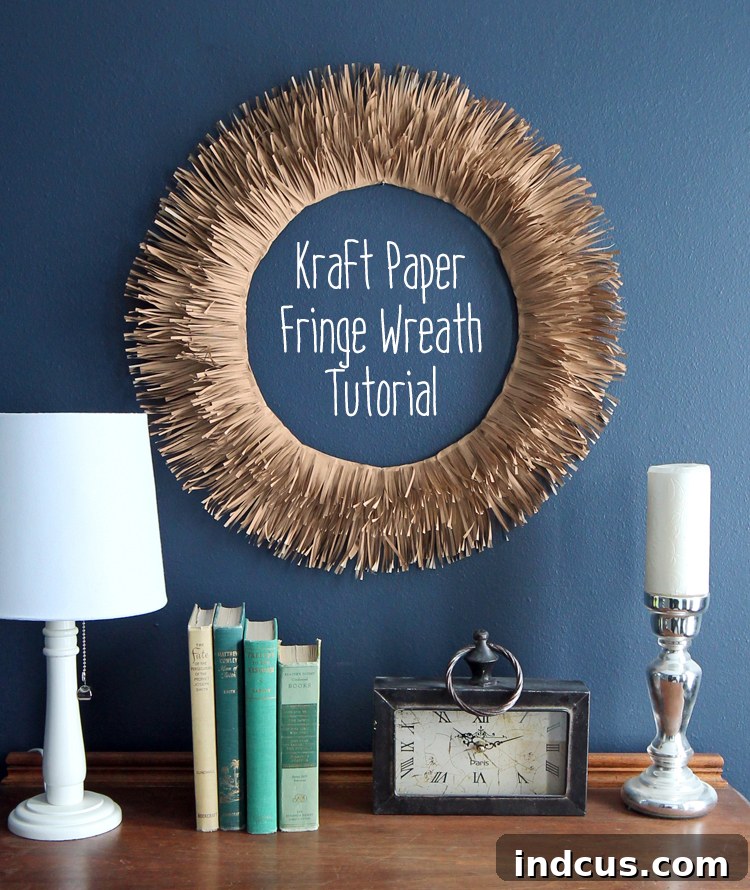
Prepare to be amazed: this striking wreath, brimming with character and visual interest, is crafted from humble kraft paper! What truly sets this piece apart is the brilliant combination of the rustic, earthy texture of the kraft paper with the playful, dynamic movement of its fringe. This inherent versatility means your finished wreath can effortlessly adapt to a myriad of interior design styles. Imagine it as a serene, neutral accent in a modern farmhouse setting, or a quirky, artistic statement in an eclectic London flat. Its distinct design even evokes a subtle tribal or bohemian vibe, adding an unexpected layer of global-inspired flair to your walls. Beyond a standalone wreath, consider a creative twist: attach a round mirror to its center to transform it into a stunning DIY sunburst mirror, amplifying its impact and reflecting light beautifully.
The Allure of Kraft Paper: Sustainable, Affordable, and Stylish
Before we dive into the creation process, let’s appreciate the star material: kraft paper. This versatile, unbleached paper is celebrated for its strength, durability, and most importantly, its naturally appealing aesthetic. Its warm, muted brown tone provides a perfect neutral base that complements virtually any color scheme. Choosing kraft paper for your DIY projects also aligns with a more sustainable approach to crafting, often being made from recycled materials and being recyclable itself. Its affordability makes it an ideal choice for large-scale projects or for experimenting with new techniques without breaking the bank. The textural quality it brings to this wreath is simply unmatched by other papers, offering a tactile experience that enhances its visual charm.
Gather Your Crafting Essentials: Materials for Your Fringe Wreath
Creating your own beautiful brown paper wreath is a straightforward process, but gathering the right tools and materials beforehand will ensure a smooth and enjoyable crafting experience. Here’s everything you’ll need to bring this unique piece of home decor to life:
Materials Needed
- Kraft Paper Roll: A large roll will give you plenty of material to work with. Look for rolls that are at least 18-24 inches wide to allow for longer strips. The thickness of the paper can also affect the final look; a medium-weight paper works best for holding its shape and creating crisp fringe.
- Wire Wreath Form: The foundation of your wreath. While the original project used a jumbo 18-inch form, feel free to choose any size that suits your space and desired impact. Smaller forms are great for subtle accents, while larger ones make a bold statement. Consider the number of rings on your form, as each will be layered with paper fringe.
- Fringe Scissors: These specialized scissors are a game-changer for this project, allowing you to create multiple, even cuts simultaneously, saving significant time and effort. If you don’t have them, regular sharp scissors can be used, but be prepared for a more time-consuming process.
- Hot Glue Gun and Glue Sticks: Your primary adhesive. A reliable hot glue gun with a fine tip is ideal for precise application. Ensure you have plenty of glue sticks on hand, as you’ll be attaching many strips of paper. Always exercise caution when using a hot glue gun to prevent burns.
Step-by-Step Guide: Crafting Your Textured Kraft Paper Wreath
Now that you have all your materials ready, let’s get down to the creative process. Follow these detailed instructions to construct your stunning, textured kraft paper fringe wreath. Each step is designed to guide you toward a beautiful and professional-looking finished product.
Step 1: Preparing Your Kraft Paper Strips for Layering
Begin by carefully cutting long strips of kraft paper from your roll. The key to creating a wreath with beautiful depth and fullness lies in varying the width of these strips. For the outermost layer of your wreath, cut strips approximately 4 inches wide. As you progress inward towards the center rings of the wreath form, gradually decrease the width of your strips. For example, the next layer might be 3.5 inches, then 3 inches, with the smallest innermost strips ending up around 2.5 inches. This gradient in width ensures that each layer builds upon the last, creating a rich, textured appearance without overwhelming the inner rings. Aim for strips that are long enough to wrap around at least half, if not a full section, of your wreath form, typically 12-24 inches depending on your wreath’s diameter. Precise, straight cuts will contribute to a neater final product, but don’t worry too much about absolute perfection – the fringe will add a wonderfully organic touch.
Step 2: Adding Playful Fringe to Your Paper Strips
With your kraft paper strips cut to size, it’s time to introduce the characteristic fringe. Take each strip and, using your specialized fringe scissors, carefully add fringe along one long edge. These scissors are designed to cut multiple thin strips simultaneously, creating a consistent and appealing fringe with ease. If you are using regular scissors, meticulously cut small, parallel slits about 3/4 to 1 inch deep along one edge. The closer together your cuts, the fuller and finer your fringe will appear. The fringe should be approximately 0.5 to 1 cm wide, creating a delicate, feathery texture. This step is where the magic truly begins, transforming flat paper into a dynamic, textured element that will give your wreath its unique charm. Ensure the fringe is consistent across all strips for a cohesive look.
Step 3: Attaching the Fringe Strips to Your Wreath Form
Now for the assembly! Begin with your widest strips (e.g., the 4-inch strips) and the outermost ring of your wire wreath form. Run a thin, continuous line of hot glue along the unfringed top edge of a kraft paper strip. Carefully align this glued edge with the outer ring of your wreath form. As you press the paper onto the wire, you’ll need to gently scrunch or gather the top edge of the paper. This technique is crucial for allowing the straight paper strip to conform smoothly to the curved shape of the wreath. Work in small sections, applying glue and then pressing and scrunching as you move around the ring. Overlap each subsequent strip slightly over the previous one, ensuring there are no gaps and that the fringe points outward, creating a full and lush appearance. Take your time, working around the entire outer ring until it is completely covered with fringed kraft paper, ensuring the fringe flows in a consistent direction.
Step 4: Layering Inner Rings and Completing Your Wreath
Once the outermost ring is fully covered, move inward to the next ring of your wire wreath form. Select the next size of kraft paper strips (e.g., 3.5-inch strips) and repeat the gluing process. Apply hot glue to the unfringed edge, scrunch the paper to follow the curve, and carefully attach it to the wire ring, ensuring that the new layer of fringe slightly overlaps the previous one. This layering technique is essential for achieving the beautiful depth and density that makes this wreath so visually appealing. Continue this process, progressively using narrower strips for each subsequent inner ring, until all the rings of your wreath form are completely covered with your charming kraft paper fringe. Once the final inner ring is complete, step back and admire your handiwork! You’ve successfully crafted a unique and stylish textured wreath that is ready to adorn your home.
Styling Your New Kraft Paper Wreath: Tips and Inspiration
As I often say, I am absolutely smitten with this wreath! Its abundance of texture and captivating visual interest for such a minimal investment is truly remarkable. It stands as another testament to the success and satisfaction found in DIY craft projects. The beauty of this kraft paper fringe wreath lies not just in its creation, but in its incredible versatility when it comes to styling and placement within your home.
Initially, I experimented by hanging the wreath in my entryway, where its rustic charm offered a warm welcome. However, its natural tones and unique texture beckoned for a more prominent display. I eventually moved it to the living room, where I layered it artfully on top of my giant chalkboard. This creates a striking contrast between the soft, organic texture of the paper and the smooth, dark surface of the chalkboard, resulting in a dynamic and artful display. The layering effect adds another dimension of depth and interest, transforming a simple wall into a curated vignette.
I must admit, I absolutely adore how it looks here! Having embraced a completely neutral palette for the winter season, this kraft paper wreath integrates seamlessly, enhancing the serene and inviting atmosphere without adding any visual clutter. Its subtle warmth and rich texture are exactly what a neutral space needs to feel cozy and complete. Consider hanging it above a mantel, as a centerpiece on a gallery wall, or even gracing a bedroom wall for a touch of bohemian elegance. The possibilities for integrating this versatile piece into your existing decor are truly endless.
Creative Variations & Personalization
While the natural kraft paper offers a beautifully understated aesthetic, don’t hesitate to personalize your wreath even further. Consider painting the kraft paper strips before fringing them to introduce a pop of color that matches your decor. Shades of muted pastels, deep jewel tones, or even metallic sprays could create a dramatically different look. You could also experiment with different fringe styles – wider, shorter cuts for a fluffier appearance, or longer, thinner cuts for a more delicate, feathery effect. Embellish your finished wreath with small, artificial flowers, dried botanicals, beads, or even a string of delicate fairy lights for added sparkle. A simple loop of twine or a fabric ribbon can be added for hanging, or you could opt for an invisible wall hook to make the wreath appear as if it’s floating. The beauty of DIY lies in the freedom to make it uniquely yours!
The Enduring Charm of Handmade Decor
There’s an undeniable satisfaction that comes from creating something beautiful with your own hands, and this kraft paper fringe wreath is no exception. Beyond the joy of the crafting process, you’ll have a distinctive piece of decor that not only reflects your personal style but also carries the story of its creation. It’s an eco-friendly choice, an affordable way to update your home, and a wonderful conversation starter. So grab your supplies, unleash your inner crafter, and enjoy the process of making this delightful, textured wreath. P.S. I’m really loving how my living room is coming together with these thoughtful touches. Yay for successful DIYs and beautiful homes!







