
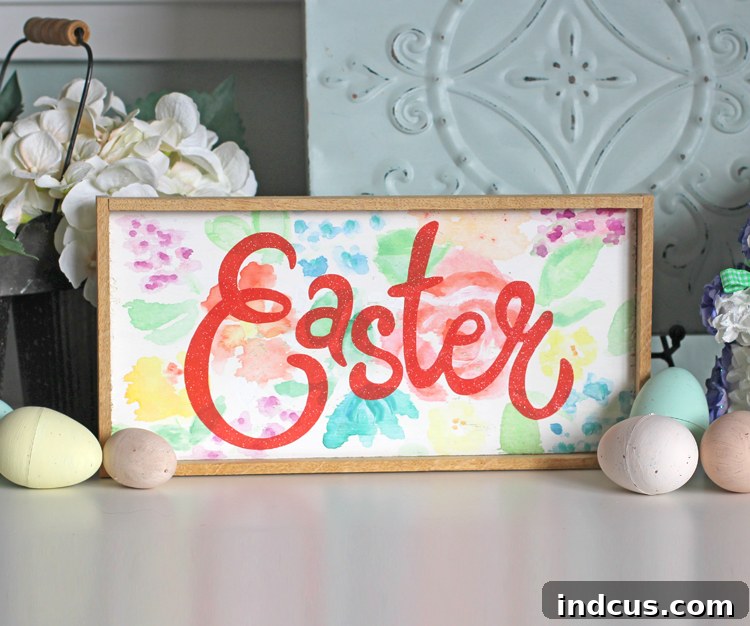
Easter is just around the corner, bringing with it the vibrant energy of spring and a wonderful opportunity for creative expression. If you’re looking to infuse your home with unique, handmade charm this season, you’ve come to the right place. We’re about to embark on a delightful crafting journey to create a stunning watercolor floral wooden sign, perfect for celebrating Easter and the arrival of warmer days. This project combines the rustic appeal of wood with the delicate beauty of watercolors and the crisp precision of vinyl lettering, resulting in a decoration that’s both elegant and full of personality.
I’ve been eager to experiment with watercoloring on wood, and Easter felt like the perfect occasion to dive into this captivating technique. The outcome? An absolutely adorable watercolor floral sign that radiates springtime joy. And because I believe crafting should be accessible and fun for everyone, I’m sharing a comprehensive tutorial along with a complimentary cut file for the word “Easter.” This playful, loopy lettering evokes a sense of happiness and fresh beginnings, making it an ideal addition to your seasonal decor.
Don’t let the word “watercolor” intimidate you! You don’t need to be a professional artist to achieve beautiful results. My secret, and soon to be yours, is simple: leverage the vast ocean of inspiration available online. A quick search for “watercolor florals” will present you with countless images. Find one that sparks your creativity, then use it as a guide as you paint. This method makes watercoloring approachable and incredibly rewarding, even for absolute beginners.
Why DIY Easter Decorations Add a Special Touch
In a world of mass-produced goods, handmade decorations stand out. They tell a story, reflect your unique style, and carry the warmth of personal effort. DIY Easter decorations, like this watercolor wood sign, offer several benefits:
- Personalization: You choose the colors, the design, and the overall aesthetic to perfectly match your home decor.
- Cost-Effectiveness: Often, crafting your own decor can be more budget-friendly than purchasing high-end items. You can utilize scrap wood and basic craft supplies.
- Creative Expression: It’s an opportunity to unwind, tap into your artistic side, and enjoy the satisfaction of creating something beautiful with your own hands.
- Unique Gifts: A handmade sign makes a thoughtful and cherished gift for friends and family.
- Sustainable Crafting: Repurposing materials, like a piece of scrap wood, is an eco-conscious way to decorate.
Materials You’ll Need for Your Watercolor Floral Easter Sign
Before we begin, gather your supplies. Having everything ready will make the crafting process smooth and enjoyable:
- Scrap Wood Piece: Any clean, smooth piece of wood will do. Pine, plywood, or even MDF can work. The size depends on your desired sign dimensions.
- White Chalk Paint (or Gesso/Primer): Essential for creating a light, even base for your watercolors if you’re not using raw wood.
- Watercolor Paints: A basic set of pan watercolors or tubes will suffice. Choose colors that evoke spring – pastels, brights, and earthy greens.
- Small Watercolor Brushes: A few different sizes will be helpful for details and washes.
- Water & Paper Towels: For cleaning brushes and blotting excess water.
- Silhouette Cutting Machine: (or Cricut, or similar vinyl cutter)
- Adhesive Vinyl: We used glitter adhesive vinyl in a coral shade. Choose a color that complements your watercolor design.
- Cutting Mat: For your cutting machine.
- Weeding Tool (or Straight Pin): For removing excess vinyl.
- Transfer Tape (or Clear Contact Paper): Crucial for transferring your vinyl design.
- Scraper Tool (or Old Gift Card): For pressing vinyl and transfer tape.
- Clear Sealant (Optional but Recommended): A matte or glossy spray sealant to protect your finished sign.
Step 1: Preparing Your Wooden Canvas
The foundation of your beautiful sign begins with preparing the wood. This step is crucial for how your watercolors will behave and how long your sign will last.
I started by painting my scrap piece of wood with white chalk paint. Chalk paint provides an excellent matte, porous surface that readily accepts watercolors without excessive bleeding. It also brightens the wood, making your watercolor hues pop. Alternatively, you could watercolor directly onto raw wood. Both methods yield lovely results; raw wood allows the natural grain to show through, offering a more rustic aesthetic, while a painted base provides a cleaner, brighter canvas. If using raw wood, ensure it’s sanded smooth to prevent your brush from catching on splinters.
For chalk paint application:
- Ensure your wood surface is clean and free of dust.
- Apply a thin, even coat of white chalk paint using a brush or foam roller.
- Allow the first coat to dry completely (check manufacturer’s instructions, usually 15-30 minutes).
- Apply a second thin coat if needed, ensuring full, opaque coverage.
- Once dry, you’ll have a perfect, bright canvas for your watercolor masterpiece.
Step 2: Unleashing Your Inner Watercolor Artist on Wood
Now for the fun part: adding vibrant floral designs! Painting with watercolor paints on wood shares many similarities with painting on paper, but there’s one significant difference to note: absorption. Wood tends to absorb paint more quickly and intensely than paper, meaning you’ll need significantly less water when mixing your colors. Too much water will cause the colors to bleed extensively, making it difficult to achieve crisp lines or distinct shapes.
Tips for Watercoloring on Wood:
- Less Water is More: Dip your brush in water, then blot most of it off on a paper towel before picking up paint. Aim for a creamy consistency rather than a watery wash.
- Layering: Start with lighter, translucent washes and build up color gradually. Allow layers to dry slightly between applications to prevent colors from muddling.
- Embrace Imperfection: Watercolors have a beautiful, organic flow. Don’t strive for absolute perfection; let the paint do its magic.
- Simple Floral Shapes: For easy florals, begin with basic petal shapes (circles, ovals, teardrops) and gradually add layers for depth. Green leaves and small berries or dots can fill in gaps and add detail.
- Inspiration is Key: Remember our “Google watercolor florals” tip! Keep an image handy for reference. Pay attention to how the petals overlap, how colors blend, and how leaves are structured.
- Drying Time: Watercolors on wood can take a bit longer to dry than on paper, especially if you’ve applied thicker layers. Be patient and allow your artwork to air dry completely before moving to the next step.
While my watercolor masterpiece (ahem…don’t laugh) was drying, I moved to my computer to design the custom lettering in Silhouette Studio.
Step 3: Crafting Your Custom Lettering with Silhouette Studio
The personalized touch of vinyl lettering elevates this sign from a simple painted board to a cohesive, decorative piece. Our free “Easter” cut file features a charming, whimsical font that perfectly complements the soft floral watercolors.
Once you download the file, open it in Silhouette Studio (or your preferred cutting machine software). If you’re new to cutting machines, Silhouette Studio is an intuitive program that allows you to manipulate designs, size them, and prepare them for cutting.
Working with Your Cutting Machine:
- Importing and Sizing: After opening the file, adjust the size of the “Easter” design to fit your wooden sign perfectly. Remember to measure your sign and consider the surrounding floral elements.
- Cut Settings: Select “vinyl” as your material in the software settings. This will automatically adjust the blade depth and speed for a clean cut. If you’re using a specialty vinyl (like glitter or holographic), you might need to test your settings or choose a specific preset for that material.
- Loading Vinyl: Place your chosen adhesive vinyl onto your cutting mat, ensuring it’s smooth and free of bubbles. The backing paper side should be down.
- Cutting the Word: Load your mat into the Silhouette machine and send the design to cut. The machine will precisely cut your word, leaving the design intact on the vinyl backing.
For this project, I used gorgeous glitter adhesive vinyl from Expressions Vinyl in a vibrant coral color. You can find it HERE. The sparkle it adds to the sign is truly captivating and provides a lovely contrast to the soft watercolors.
Step 4: The Art of Vinyl Application – A Foolproof Method
Applying adhesive vinyl might seem daunting at first, but with a systematic approach, it’s remarkably easy. Here’s my fail-proof method for flawlessly adhering vinyl to any project, ensuring your “Easter” lettering looks professionally placed.
Step-by-Step Vinyl Transfer:
Step 1: Weeding the Excess Vinyl.
Once your cutting machine has finished its work, you’ll need to “weed” the vinyl. This means carefully removing all the unnecessary vinyl surrounding your design, leaving only the parts you want to transfer. Gently peel away the outer vinyl layer. For the intricate inner pieces (like the center of an “A” or “e”), use a weeding tool or a straight pin. Work slowly and methodically to ensure you don’t accidentally pull up parts of your actual design. This step requires a bit of patience, but it’s essential for a clean finish.
Don’t forget the tiny pieces that need to be removed from the inside of letters like “a,” “e,” and “r.” A straight pin or a specialized weeding tool is your best friend here, allowing you to precisely lift these small remnants without damaging the surrounding design.
Step 2: Applying Transfer Tape.
Once your design is fully weeded, cover it with a piece of transfer tape or clear contact paper. This magical tape holds all the individual letters and elements of your design in their correct spacing, preventing you from having to place each piece by hand. Lay the transfer tape over your vinyl design, starting from one edge and smoothly pressing it down to avoid air bubbles. Use a scraper tool or an old gift card to firmly press the transfer tape onto the vinyl. Apply pressure across the entire design, ensuring every part of the vinyl adheres securely to the tape. This “burnishing” step is critical for a successful transfer.
I always keep an old gift card handy for this. It’s perfect for firmly pressing the tape to the vinyl, ensuring a strong bond without scratching your materials.
Step 3: Peeling the Design from the Backing Paper.
Now, carefully peel the transfer tape (with your vinyl design attached) away from the white backing paper. Do this slowly and at a sharp angle. If any part of the vinyl doesn’t stick to the transfer tape, simply lay the tape back down, re-burnish that spot with your scraper, and try again. Patience is key here to ensure all parts of your design lift cleanly.
Step 4: Centering and Applying to the Sign.
With your design now on the transfer tape, carefully center it onto your painted wooden sign. Hold it slightly above the surface to double-check its positioning. Once you’re happy with the placement and it’s perfectly straight, gently set it down onto the wood. Use your old gift card or scraper tool again to firmly press the vinyl onto the wood. Work from the center outwards to push out any air bubbles and ensure strong adhesion across the entire design.
Step 5: The Final Peel.
Once the vinyl is firmly adhered to the wood, it’s time for the grand reveal! Slowly and carefully peel away the transfer tape or contact paper at a sharp, low angle. Again, if any part of the vinyl tries to lift with the tape, simply lay the tape back down, press that section firmly with your scraper, and try peeling again. Once the transfer tape is removed, your sign is finished and ready to shine!
Finishing Touches and Displaying Your Masterpiece
Do you love how it turned out? I certainly do! The vibrant watercolor florals truly scream spring, bringing a burst of color and cheer to any space. What’s even better, the coral glitter vinyl matches the throw pillows on my couch perfectly, creating a cohesive and stylish look in my living room.
See? I told you it matches! The seamless integration with existing decor is one of the joys of DIY crafting. Your sign isn’t just a decoration; it’s a reflection of your personal style.
Optional: Sealing Your Sign for Longevity
To ensure your beautiful watercolor floral Easter sign lasts for many seasons to come, consider applying a clear sealant. A matte or glossy spray sealant (such as Mod Podge Ultra or a clear acrylic spray) will protect both the watercolors and the vinyl from dust, moisture, and fading. Apply thin, even coats in a well-ventilated area, following the product instructions for drying times between coats.
Display Ideas:
- Mantelpiece Marvel: Prop it up on your fireplace mantel, surrounded by spring flowers and other Easter accents.
- Entryway Welcome: Place it on an entryway table to greet guests with a festive touch.
- Shelf Styling: Integrate it into a bookshelf display alongside candles, books, and small decorative items.
- Gallery Wall Addition: If you have a gallery wall, this sign can be a wonderful seasonal addition.
- Thoughtful Gift: Package it beautifully and present it as a handmade gift to a loved one.
Beyond This Project: Expanding Your Creative Horizons
This watercolor floral wood sign is just the beginning! The techniques you’ve learned can be applied to countless other projects:
- Different Words & Phrases: Create signs for other holidays, special occasions, or inspiring daily affirmations.
- Varied Watercolor Designs: Experiment with different motifs like spring animals (bunnies, birds), geometric patterns, or abstract washes.
- New Surfaces: While wood is wonderful, watercolor techniques can also be adapted for canvas, heavy watercolor paper, or even ceramic bisque (with appropriate sealing).
- Mixing Media: Combine watercolors with acrylics, stenciling, or other embellishments for even richer textures and designs.
So, what do you think? Will you give this charming DIY watercolor floral Easter sign a try? It’s a rewarding project that allows you to flex your creative muscles and add a truly personal touch to your Easter celebrations. Don’t be afraid to experiment with colors and styles – the beauty of handmade lies in its uniqueness.
Happy crafting, friends! We can’t wait to see your wonderful creations!







