
Hello, fellow creatives and craft enthusiasts! I’m thrilled to be typing this message on my brand new computer – a truly magnificent upgrade after years of loyal service from my old laptop. The expansive 24-inch screen is an absolute game-changer, making every project, especially in Photoshop, an absolute breeze. The speed is exhilarating; I can now effortlessly juggle tasks like listening to my favorite tunes on Pandora while simultaneously uploading high-resolution images. Life, indeed, feels good in this streamlined digital workspace!
However, this transition wasn’t entirely without its challenges. The move meant losing everything from the old machine. While we wisely backed up all our precious family photos on an external hard drive (phew, crisis averted there!), I wasn’t quite as diligent with my creative assets. All my favorite fonts, custom Photoshop actions, cherished blog logos, and banners – essentially all the little personalized touches that define my digital creative space – vanished. It’s a significant setback, meaning I have a considerable amount of work ahead to re-establish my creative environment precisely the way I like it. But every challenge presents an opportunity, and this particular period of waiting and rebuilding sparked a wonderful creative journey.
During the interim, while I eagerly awaited the arrival and setup of my new computer, I found myself with a delightful surplus of creative energy and time. This led me to dive headfirst into a project that had been simmering in the back of my mind: crafting beautiful, handmade paper flowers for our baby’s nursery. You might recall I previously shared a few initial paper flowers I made for the nursery; well, consider that just the beginning! I must admit, I got a little carried away, in the best possible way. I did warn you how incredibly fun and addictive these projects can be!
Crafting a Whimsical Nursery: My Journey in DIY Paper Flowers
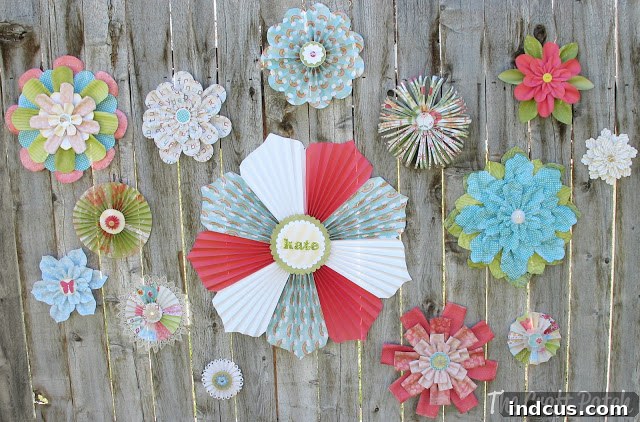
My extensive floral collection, which now adorns a significant portion of my crafting space, primarily stems from just two fundamental paper flower techniques: the classic basic paper flower tutorial and the charming accordion fold flower tutorial. It’s genuinely astonishing to see the vast array of unique variations and intricate designs I was able to conjure using just these two core concepts. This experience truly highlights the endless possibilities within simple paper crafting. Let’s delve deeper into some close-ups and uncover the subtle hints and innovative approaches I employed for each captivating bloom.
The Art of the Basic Paper Flower: Simple Cuts, Stunning Results
The foundation of many of my creations was the simple, yet infinitely versatile, basic paper flower. This method emphasizes the beauty of simple shapes and thoughtful arrangement. For these flowers, I began by cutting numerous rectangles of varying sizes to serve as petals. The key to giving them a soft, organic feel was to then use decorative scissors to gently round the end of each petal. This small detail makes a significant difference, transforming a simple paper shape into a delicate, realistic-looking bloom.
Another iteration of the basic paper flower involved the same process: cutting rectangles and then meticulously rounding their edges. What truly elevates this particular bloom, making it perfectly suited for a nursery, is the choice of paper. Adorned with a charming alphabet pattern, it adds an educational yet whimsical touch. Isn’t that alphabet paper absolutely perfect for a baby’s room, combining decoration with a subtle learning element?
Embracing the Elegance of Accordion Fold Flowers and Creative Combinations
Beyond the basic petal-by-petal construction, the accordion fold flower offers a completely different aesthetic, often creating a fuller, more architectural bloom. In one of my favorite arrangements pictured below, the two flowers on the right are beautiful examples of these accordion-style creations, while the one on the left represents one of my very first basic paper flowers. The contrast is lovely, and I’m particularly fond of how the gentle curve and soft edges of the basic petals contribute to such a wonderfully soft and feminine overall shape.
Adding Texture and Charm: Lace Embellishments and Color Customization
To infuse a touch of vintage charm and delicate texture into one of my accordion fold flowers, I experimented with embellishments. I carefully hot-glued a narrow strip of scrap vintage lace around its entire outside edge. The result was absolutely captivating! This small addition, simple as it may seem, dramatically elevated the flower’s aesthetic, adding an incredible depth of character and an undeniable romantic appeal. I’m completely in love with how much it enhances the overall piece. It’s these little details that truly make a handmade item special and unique.
Finding the perfect shade of pink paper proved to be a bit of a challenge. The closest option I could source wasn’t quite the warm, coral-pink I envisioned, and honestly, it started to really bug me after a while. Rather than giving up on this giant paper flower, I decided to take a creative risk. I pulled out my pastel chalks, a secret weapon in my crafting arsenal, and carefully colored the paper, adding a touch more yellow to shift its hue. Then, using a soft cotton ball, I gently rubbed the chalk into the paper until it achieved that coveted warm pink/coral shade I had been searching for. To my absolute delight, it worked like a charm! This technique is a fantastic way to customize paper colors when you can’t find the exact shade you need off the shelf, proving that a little ingenuity can go a long way in crafting.
On a related side note, as we prepare for the arrival of our little one, we’re fairly confident we’ve settled on the name Kate for the baby. However, one of the brilliant aspects of crafting your own decor is the flexibility it offers. Should my ‘crazy pregnant brain’ (a condition many expecting mothers can relate to!) have a change of heart before she makes her grand entrance, those glitter letters I plan to use can be easily removed without damaging the flower. It’s comforting to have that little ‘out’ built into the design, just in case!
Scalloped Edges and Smart Sourcing: Enhancing Accordion Flowers
Another delightful variation of the accordion fold flower incorporated charming scalloped edges. A crucial tip for achieving this look with ease is to cut the scalloped pattern into the paper before you begin the folding process. This makes the cutting much simpler and ensures a cleaner, more consistent finish. The scalloped detail introduces a wonderful softness to the entire aesthetic, creating a playful yet elegant appearance. And speaking of materials, the majority of the paper I used for these projects was a fantastic bargain from Michael’s, purchased during one of their incredible sales – 8 sheets for just $1! The remaining paper came from my rather embarrassingly large stash, which, I must admit, doesn’t get utilized nearly often enough to justify its considerable size. But it certainly came in handy for this project!
Inventive Designs: Pushing the Boundaries of Paper Flower Crafting
Now, let me share a particular flower design that I’m incredibly excited about because it was a completely original concept I “thunk up,” and to my immense satisfaction, it actually worked perfectly! This innovative 3D flower starts with two sheets of paper. The trick is to cut slits along the length of each sheet, stopping approximately 1.5 inches from each end, leaving a solid border. Then, you accordion-fold these solid, uncut edges. The result is a truly remarkable three-dimensional flower with incredible depth and visual interest. It’s a fantastic technique for creating a dynamic, voluminous bloom that really stands out. Truly cool beans!
Experimenting with texture can dramatically alter the feel of a paper flower. For this particular bloom, I intentionally crinkled the paper before assembling it. The effect was immediate and profound, completely changing its character. The crinkling lends it a very soft, almost antique-looking quality, making it appear less like rigid paper and more like delicate fabric. It’s a wonderful technique for adding a sense of age and elegance to your paper creations, providing a tactile and visual richness that smooth paper simply can’t replicate.
While this next flower shares a similar outside edge design on its petals to the previous crinkled bloom, it exudes a completely different vibe, proving how paper choice can dramatically shift a design’s personality. Crafted from striped paper, it projects a much more nautical and clean aesthetic. The crisp lines of the stripes give it a fresh, modern feel that contrasts beautifully with the softness of other designs. This one has quickly become one of my absolute favorites for its striking simplicity and strong visual impact.
The addition of vellum is a subtle yet incredibly effective way to introduce an ethereal quality to paper flowers. For this particular accordion fold flower, layering vellum within or around the petals adds an exquisite softness and a delicate, translucent touch. Vellum beautifully diffuses light, creating a gentle glow and an almost dreamlike quality that enhances the overall elegance of the bloom. It’s a fantastic material to work with when you want to add a touch of sophistication and lightness to your paper crafts, making this flower particularly enchanting.
Modern Touches and Efficient Crafting: The Ombre Effect
Perhaps one of the most straightforward yet visually impactful flowers in my collection is this basic design, made incredibly easy with the help of a paper cutter. The petals are simply rectangles, swiftly cut from different shades of paper to create a captivating ombre effect. This method is super fast, allowing for quick assembly without sacrificing aesthetic appeal. To imbue the flat rectangles with life and a natural curve, I gently curled their edges using a pencil. The result is a modern, vibrant flower with a playful ombre gradient that adds a dynamic pop of color and style. It’s a testament to how simple shapes, combined with smart color choices and minimal manipulation, can create a truly stunning piece of decor.
Bringing the Nursery to Life: Final Touches and Anticipation
With this delightful assortment of handmade paper flowers complete, my next exciting step is to meticulously arrange and hang them all across the wall directly above the crib in the nursery. I envision a vibrant, whimsical display that will serve as a beautiful focal point, instantly infusing the room with charm, personality, and a sense of handmade love. I truly believe it’s going to transform the space into such a cheerful and inviting room – the perfect sanctuary for our little girl.
Now, the only remaining task is to gently, but firmly, evict the “big kids” from their current occupation of what will soon be the nursery! Once the space is clear, I can fully immerse myself in the joyous process of getting everything perfectly ready for her arrival. The anticipation is building, and I couldn’t be more excited to complete this labor of love and welcome our newest family member into a room filled with handmade beauty. Hurray for little girls and the boundless joy they bring, inspiring us to create such wonderful, personal spaces!







