
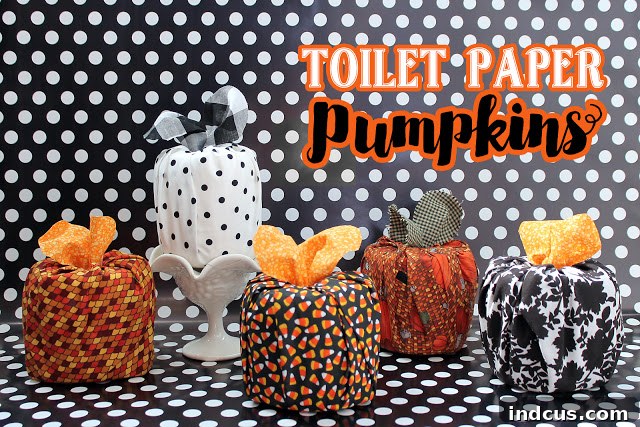
Craft Adorable No-Sew Fabric Pumpkins: The Secret Ingredient Will Surprise You!
As the leaves begin to change and a crisp chill fills the air, our thoughts naturally turn to the cozy comforts of autumn and the joyous anticipation of Halloween. Decorating our homes for the season is a cherished tradition, but who says it has to be complicated, expensive, or involve bulky storage solutions? Today, we’re thrilled to share an ingenious, incredibly simple, and utterly charming DIY project that will transform your home with festive fall flair: decorative fabric pumpkins, ingeniously crafted around an ordinary roll of toilet paper!
Forget the carving knives and the messy pulp. This quick and easy craft allows you to create beautiful, custom-designed pumpkins using just a few common household items and a dash of creativity. Whether you’re a seasoned crafter or just looking for a fun, accessible project, these no-sew fabric pumpkins are perfect for adding a touch of autumn magic to any space. Get ready to discover your new favorite fall decoration!
Why Choose Toilet Paper Pumpkins for Your Fall Decor?
You might be wondering, “Why toilet paper?” The answer lies in the brilliant simplicity and numerous advantages this unconventional core offers. These fabric pumpkins aren’t just cute; they’re incredibly practical and versatile, making them a standout choice for anyone looking to spruce up their seasonal decor.
-
Eco-Friendly & Smart Storage Solutions:
One of the biggest headaches with seasonal decor is finding space to store it once the holidays are over. Traditional decorative pumpkins, especially those made from foam or plastic, can be bulky and take up valuable storage real estate. Our toilet paper pumpkins solve this problem beautifully. When the season ends, simply unwrap your fabric, fold it neatly, and store it away with ease. The toilet paper roll can go right back into its intended place in the bathroom cupboard, making this a truly zero-bulk decorating hack.
-
Budget-Conscious Decorating:
Crafting can sometimes be an expensive hobby, but not this one! You’re likely to have a roll of toilet paper at home already, and fabric scraps from previous projects work wonderfully. This project is incredibly cost-effective, allowing you to create stunning decor without breaking the bank. It’s an accessible craft that delivers high visual impact for very little outlay.
-
Perfect for All Skill Levels:
Whether you’re a crafting novice or an experienced DIYer, this project is designed for success. There’s no sewing, no complicated patterns, and no intricate steps. It’s a straightforward process that yields impressive results every time, making it ideal for family crafting sessions or a relaxing solo activity.
-
Endless Versatility and Customization:
The beauty of using fabric is the sheer endless array of colors, patterns, and textures available. From rustic burlap to soft flannel, vibrant plaids to subtle solids, you can customize your pumpkins to perfectly match your existing home decor, a specific holiday theme, or your personal style.
Gathering Your Simple Supplies for This Fun DIY
The magic of these fabric pumpkins truly lies in their simplicity. You don’t need a craft store full of supplies; just a few basic items are all it takes to bring these charming decorations to life. Here’s what you’ll need:
-
The Core: A Standard Roll of Toilet Paper
This is the secret ingredient! Choose a new, unused roll for the best results, as its firm cylindrical shape provides the perfect base for your pumpkin. The sturdy cardboard core and tightly wound paper offer excellent stability, ensuring your fabric pumpkin maintains its shape.
-
The Main Fabric: One 22-inch Square of Fabric
This will be the “skin” of your pumpkin. The 22×22 inch dimension is ideal for a standard toilet paper roll, allowing for ample fabric to create those lovely pumpkin pleats and a full, rounded shape. Consider different fabric types:
- Cotton: Easy to work with, comes in a vast array of prints (fall leaves, plaids, stripes, solids).
- Flannel: Adds a soft, cozy, and rustic feel, perfect for autumn.
- Burlap: For a more natural, farmhouse-style aesthetic.
- Velvet or Corduroy: For a touch of luxury and rich texture, ideal for more sophisticated decor.
When selecting your fabric, think about the overall look you want to achieve. Plaids in warm reds, oranges, and greens scream fall, while solid creams or grays offer a minimalist, elegant touch. Fun patterns with bats or spiders can make for unique Halloween-themed pumpkins.
-
The Stem Fabric: One 2×10 inch Strip of Fabric
This smaller strip will form the stem of your pumpkin. You can choose a fabric that contrasts with your main fabric (e.g., a dark brown strip on an orange pumpkin) or one that complements it beautifully. Consider using a slightly stiffer fabric for the stem if you want it to stand up particularly well, or embrace a softer, floppier stem for a more whimsical look.
-
Essential Tools: A Pair of Sharp Scissors
Good quality scissors are crucial for clean, straight cuts, especially when dealing with fabric. This is the only tool you absolutely need!
Optional Additions for Personalization:
- Hot Glue Gun: Handy for securing the stem more firmly or attaching embellishments like faux leaves or berries.
- Twine or Jute Rope: Can be wrapped around the stem or used to tie a small bow for a rustic touch.
- Faux Leaves or Berries: Small artificial leaves, acorns, or berry sprigs can be tucked in at the base of the stem to add more natural detail.
- Cinnamon Sticks: A small cinnamon stick can make a wonderfully aromatic and authentic-looking stem.
- Essential Oils: A few drops of pumpkin spice, cinnamon, or orange essential oil can infuse your fabric pumpkin with a delightful autumn scent.
Your Step-by-Step Guide to Crafting a Perfect Fabric Pumpkin
Now that you have all your materials, let’s dive into the super easy process of creating your beautiful fabric pumpkins. The original project included a video tutorial, and we’ve distilled those visual steps into clear, concise instructions that anyone can follow.
-
Step 1: Prepare Your Workspace and Fabric
Find a clean, flat surface to work on. If your main fabric is wrinkled, give it a quick iron. A smooth fabric will result in a neater, more professional-looking pumpkin. Lay your 22-inch square of fabric flat on your workspace, positioning it like a diamond, with one corner pointing towards you.
-
Step 2: Position the Toilet Paper Roll
Carefully place the toilet paper roll directly in the center of your fabric diamond. Ensure it’s perfectly centered to allow for even fabric distribution around all sides.
-
Step 3: Begin the Wrapping Process – Bringing Up the Corners
Take the fabric corner closest to you and gently bring it up over the top of the toilet paper roll. Tuck the very end of this corner into the center hole of the toilet paper roll. Don’t push too much fabric in yet; just enough to secure it slightly.
-
Step 4: Create the Pleats – Working Your Way Around
Now, move to the next corner of the fabric (either the one to the left or right of the one you just tucked). Bring this corner up over the toilet paper roll and tuck its end into the center hole. As you do this, gently gather and fold the fabric between the first corner you tucked and this new one. These gentle gathers will start to form the characteristic “pleats” of a pumpkin. Continue this process, bringing up each corner and tucking it into the center hole, creating gathers and pleats as you go. Imagine you’re wrapping a gift, but instead of straight edges, you’re aiming for soft, rounded folds.
-
Step 5: Fill in the Gaps and Refine the Shape
Once all four main corners are tucked into the center, you’ll have fabric sections remaining between each corner. Continue bringing these sections up, one by one, and tucking them into the center hole. As you tuck each piece, gently smooth and arrange the fabric on the outside to create a pleasing, plump pumpkin shape. The more evenly you distribute the fabric and create soft pleats, the more realistic and attractive your pumpkin will appear. Don’t be afraid to pull the fabric taut around the roll to define the shape, then relax it slightly to create fullness.
-
Step 6: Craft the Stem
Take your 2×10 inch strip of fabric. To create the stem, roll or twist this fabric strip tightly lengthwise. You can either roll it straight or twist it gently to give it a more organic, twig-like appearance. The tighter you roll it, the more defined your stem will be.
-
Step 7: Attach the Stem
Once your stem is formed, insert one end of it firmly into the center hole of the toilet paper roll, where all the other fabric ends are tucked. Push it down until it feels secure and stands upright. If you’re using a hot glue gun, a small dab of glue inside the hole before inserting the stem can provide extra stability.
-
Step 8: Final Adjustments and Embellishments
Stand back and admire your pumpkin! Gently adjust any fabric pleats or gathers to achieve your desired look. Now is the time to add any optional embellishments. Hot glue a faux leaf or a small sprig of berries at the base of the stem, tie a piece of twine around the stem, or even replace the fabric stem with a real cinnamon stick for a fragrant touch. If you like, you can also add a few drops of essential oil to the fabric for an autumnal aroma.
Unleash Your Creativity: Variations and Personalization Ideas
The beauty of these DIY fabric pumpkins is how easily they can be customized. Don’t stop at just one design; experiment with different looks to create a unique collection that reflects your style!
-
Size Matters: From Mini to Mega
While a 22-inch square is perfect for a standard toilet paper roll, you can easily adjust the size of your fabric to create smaller or larger pumpkins. For mini pumpkins, use a smaller toilet paper roll (or even a paper towel roll cut down) and a fabric square around 16-18 inches. For larger, more dramatic pumpkins, you could use a larger fabric square (e.g., 28-30 inches) and potentially use a double-stacked toilet paper roll or add a bit of stuffing around the roll to create more volume before wrapping.
-
Fabric Frenzy: Mix and Match Textures and Patterns
Don’t be afraid to combine different fabrics! A burlap main body with a contrasting flannel stem, or a collection of pumpkins in varying plaid patterns, can add depth and visual interest. Consider using metallic or glitter-infused fabrics for a touch of glam, or soft faux fur for a truly luxurious feel.
-
Themed Decor: Beyond Basic Fall
Tailor your pumpkins to specific themes:
- Halloween: Use fabrics with subtle spiderweb prints, black and orange patterns, or even go for spooky stripes. You can even hot glue small plastic spiders or googly eyes onto your finished pumpkin!
- Rustic Farmhouse: Opt for distressed cotton, linen, ticking stripe, or chambray fabrics, paired with jute twine and real twigs for stems.
- Elegant Autumn: Velvet, satin, or damask fabrics in deep jewel tones like burgundy, emerald, or sapphire can create a sophisticated look.
- Kids’ Friendly: Use bright, cheerful patterns or character fabrics. These soft pumpkins are safe for little hands!
-
Beyond Fabric Stems: Creative Alternatives
While the fabric strip stem works perfectly, there are other creative options:
- Real Twigs: For an authentic natural look, gather small twigs from your yard.
- Cinnamon Sticks: As mentioned, these not only look great but add a wonderful scent.
- Wine Corks: A clever way to repurpose, especially for smaller pumpkins.
- Faux Berry Sprigs: Use a small bunch of artificial berries to create a festive stem.
-
Scented Autumn Bliss: Infuse with Fragrance
For an extra sensory experience, add a few drops of your favorite fall essential oil blend (like pumpkin spice, apple cinnamon, or frankincense) onto the tucked-in fabric inside the toilet paper roll. The fabric will subtly diffuse the scent, filling your room with the aromas of autumn.
-
Sparkle & Shine: Adding Embellishments
Consider hot gluing small buttons, decorative beads, small wooden cutouts (like leaves or acorns), or even a light dusting of glitter to the outer fabric for extra sparkle and personality.
Styling Your Home: Creative Ways to Display Your Fabric Pumpkins
Once you’ve crafted your beautiful collection of toilet paper pumpkins, it’s time to showcase them! Their versatility makes them perfect for almost any area of your home. Here are some ideas to inspire your seasonal styling:
-
Enchanting Centerpieces
Arrange a cluster of varying sizes and fabric patterns in the center of your dining table, coffee table, or kitchen island. Add some real fall leaves, candles, or pinecones for a stunning focal point that’s perfect for entertaining.
-
Cozy Mantels and Shelves
Line your fireplace mantel with your fabric pumpkins, perhaps interspersed with garlands of faux foliage, string lights, or other autumnal trinkets. They also look wonderful arranged on bookshelves, adding warmth and color to your literary displays.
-
Welcoming Entryways
Place a few pumpkins on a console table in your foyer or entryway to greet guests with a festive touch. Pair them with a decorative tray, a vase of dried flowers, or a “Welcome Fall” sign.
-
Festive Windowsills
Smaller fabric pumpkins are ideal for windowsills, adding a subtle seasonal accent that can be enjoyed from both inside and outside your home.
-
Kids’ Rooms and Nurseries
Because they are soft and safe, these fabric pumpkins make excellent decorations for children’s rooms or nurseries, providing a playful touch without any hard edges or breakable parts.
-
Incorporate with Natural Elements
Combine your fabric pumpkins with real gourds, mini hay bales, corn husks, or dried floral arrangements to create rich, layered displays that celebrate the bounty of the harvest season.
The Genius Behind the Toilet Paper Pumpkin: No More Bulky Storage!
We simply must reiterate the most brilliant aspect of this craft: the ingenious, space-saving storage solution it offers. In a world increasingly focused on decluttering and minimizing, these fabric pumpkins are a breath of fresh air for seasonal decorators.
-
Effortless Seasonal Transition
When Thanksgiving passes and it’s time to put away the fall decor, the process couldn’t be simpler. You just unwrap the fabric from the toilet paper roll. The roll itself is returned to its primary purpose (or, if it was an extra roll for crafting, placed back in storage with other household supplies). The fabric, being soft and pliable, can be easily folded or rolled and tucked into a small bin or drawer. This eliminates the need for large, dedicated storage bins that take up precious space in attics, basements, or garages.
-
Space-Saving for Craft Enthusiasts
For those who love to craft and accumulate various seasonal decorations, the lack of bulk is a true blessing. You can create a stunning array of fabric pumpkins each year, knowing that the “skeleton” of your decor vanishes when the season ends, leaving only a few neatly folded pieces of fabric to store. This encourages more creative freedom and experimentation without the fear of clutter.
-
Sustainable Decor Choice
By using a reusable core like a toilet paper roll, you’re embracing a more sustainable approach to decorating. You’re not buying single-use foam pumpkins that eventually end up in landfills; instead, you’re repurposing a common household item, reducing waste, and making conscious decorating choices.
-
Cost-Effective Year After Year
The minimal storage requirements also translate to long-term cost savings. You don’t need to purchase new bulky decor items annually or invest in large storage containers. Once you have your fabric, you’re set for many seasons to come, making this a truly economical and eco-friendly decorating solution.
Pro Tips for Flawless Fabric Pumpkins
To ensure your fabric pumpkins turn out perfectly every time, here are a few expert tips:
- Choose Your Fabric Wisely: Fabrics with a bit of body, like quilting cotton or flannel, tend to hold their shape and pleats better than very thin or very stretchy materials.
- Iron Your Fabric: A crisp, wrinkle-free fabric square will make the wrapping process smoother and result in a tidier pumpkin.
- Even Pleating is Key: Take your time to create even pleats around the toilet paper roll. This ensures a symmetrical and visually appealing pumpkin shape.
- Don’t Be Afraid to Adjust: The beauty of this no-sew craft is that you can easily pull out the tucked fabric and re-arrange it until you’re happy with the shape.
- Secure the Stem: If your stem feels a bit loose, a small dab of hot glue inside the toilet paper roll’s core where the fabric ends meet will secure it perfectly.
- Experiment with “Fullness”: If you want an even plumper pumpkin, you can lightly stuff some extra fabric scraps or batting around the toilet paper roll before you begin wrapping with your main fabric square.
Embrace the Autumn Spirit with Your Handmade Pumpkins
There you have it – a wonderfully simple, incredibly charming, and surprisingly clever way to decorate your home for fall and Halloween. These no-sew fabric pumpkins, with their secret toilet paper core, are not just a craft; they’re a statement of creativity, practicality, and sustainable seasonal joy. They invite warmth, personality, and a touch of handmade charm into your living spaces, transforming them into cozy autumn havens.
So, gather your fabrics, grab a roll of toilet paper, and let your imagination take flight. We encourage you to try this delightful DIY project and experience the satisfaction of creating beautiful, functional decor that’s easy to make, easy to store, and utterly delightful. Happy crafting, and happy autumn!







