
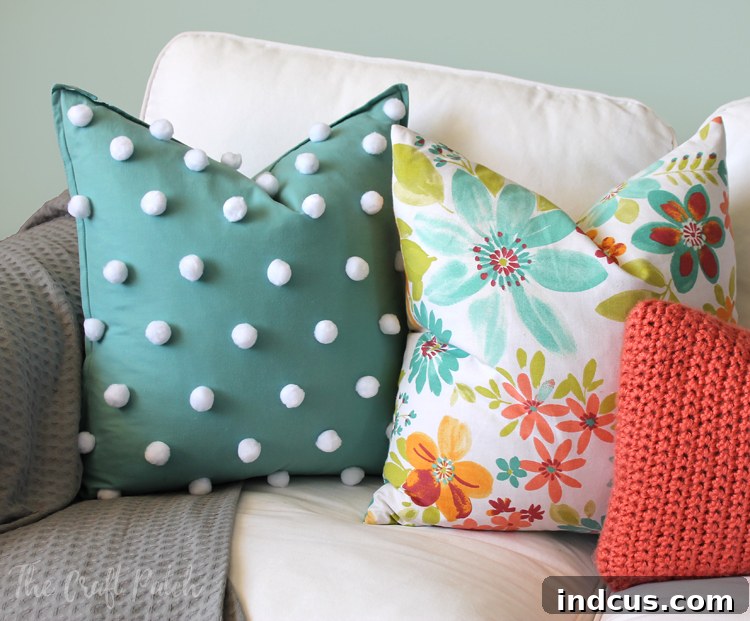
DIY Polka Dot Pom Pom Pillow: A Quick & Whimsical Home Decor Update
As I meticulously prepare my living room for its grand unveiling, one of my favorite tasks has been crafting an assortment of throw pillows. These decorative accents are, without a doubt, my go-to method for infusing a space with vibrant color and a unique personality. Among them, this delightful polka dot pom pom pillow truly stands out, brimming with character and a playful charm that’s simply irresistible!
What if I told you that you could create this eye-catching piece in under ten minutes, especially if you already have a solid-colored pillow cover at hand? Yes, it’s true! This project is not only incredibly simple but also remarkably quick, making it perfect for anyone looking to add a touch of handmade elegance without committing to a time-consuming craft. Dive into this fun DIY and discover how easy it is to customize your home decor with a splash of whimsy!
The Unmatched Power of Throw Pillows in Home Decor
Throw pillows are more than just cushions; they are versatile secret weapons in the world of interior design. They offer an instant, budget-friendly way to update a room’s aesthetic, introduce new color schemes, or inject essential texture. Whether you’re aiming for a cozy farmhouse feel, a modern minimalist vibe, or a bohemian retreat, the right throw pillows can tie a room together, soften hard lines, and provide an inviting layer of comfort. They allow you to experiment with trends, express your personal style, and easily swap out decor to match seasons or your changing moods. This DIY polka dot pom pom pillow is an excellent example of how a simple accessory can make a significant impact on your overall home decor, transforming a plain space into one that feels curated and full of life.
Gather Your Simple Supplies: Crafting Your Whimsical Pillow
The beauty of this textured polka dot pillow lies in its minimalist material list. To bring this lovely creation to life, you’ll need just two primary items, along with a few optional tools to ensure perfection:
- Pillow Cover: A solid-colored pillow cover provides the ideal canvas for your pom poms. Opt for durable fabrics like cotton, linen, or canvas, which can withstand the adhesive and regular use. White, cream, or light grey covers make the pom poms pop beautifully, but you can also choose a colored cover for a more monochromatic or subtle effect. Ensure it’s clean and wrinkle-free for the best results, as any creases can complicate the gluing process.
- Pom Poms: You’ll need at least two packages of pom poms. The original project used larger pom poms, but as noted, smaller ones can offer a more delicate and intricate look. Consider experimenting with different sizes for varied texture or sticking to a uniform size for a cohesive pattern. Yarn pom poms are soft and pliable, while felt pom poms offer a slightly firmer texture. Choose colors that complement your existing decor or introduce a bold new accent to your space. The choice of color and size can dramatically alter the final aesthetic.
- Adhesive: Your choice of glue is crucial for both durability and ease of application.
- Hot Glue: This is the speed demon of adhesives. It dries almost instantly, providing a strong bond quickly. It’s perfect for those ten-minute projects! However, be mindful that hot glue can sometimes seep through thinner fabrics or create a stiff spot. Always use a low-temp glue gun for safety and to prevent damage to delicate fabrics. Ensure you have plenty of glue sticks on hand.
- Fabric Glue: For a more flexible, washable, and potentially longer-lasting bond, fabric glue is an excellent alternative. It takes longer to dry but offers a more professional finish that integrates better with the fabric. Look for glues specifically designed for textiles to ensure durability through washes and regular handling. Always allow ample drying time as per the product instructions.
Optional Tools for Enhanced Precision:
- Ruler and Fabric Marker: If you prefer a perfectly symmetrical design, a ruler and a disappearing fabric marker (or chalk) will be invaluable for creating a grid or marking your pom pom placement points.
- Protective Surface: A piece of cardboard or an old towel placed inside the pillow cover can prevent glue from seeping through to the other side, protecting your work surface and the back of the pillow.
- Scissors: Useful for trimming any loose threads from the pom poms or the pillow cover for a neater finish.
Step-by-Step Guide: Crafting Your Pom Pom Masterpiece
Ready to transform a plain pillow into a personality-packed accent? Follow these simple steps for a quick and rewarding DIY experience:
1. Prepare Your Workspace and Pillow Cover
Find a clean, flat surface to work on. Lay down a protective sheet or newspaper to catch any stray glue. This also ensures your pillow remains pristine. Ensure your pillow cover is clean and ironed smooth. This crucial step eliminates any wrinkles that could distort your pattern. If using fabric glue, make sure you have enough ventilation, and always read the product instructions for drying times and curing. Place a piece of cardboard inside the pillow cover to prevent glue from seeping through to the other side.
2. Plan Your Polka Dot Pattern
Before you commit with glue, take a moment to plan your design. You can go for a perfectly uniform grid, a random scattering of dots, or even create a fun pattern like a heart or initial. If precision is your goal, use a ruler and a disappearing fabric marker to lightly sketch out where each pom pom will go. This creates a guideline that ensures even spacing. Alternatively, if you’re feeling adventurous like me, you can simply “eyeball” the placement for a more organic, free-spirited look. Lay out a few pom poms without glue first to visualize the final result and adjust spacing as needed before permanent adhesion.
3. The Gluing Process: Adhering Your Pom Poms
This is where the magic happens! Whether you choose hot glue or fabric glue, the technique is similar. Always work in small sections to prevent the glue from drying before you can attach the pom pom:
- For Hot Glue: Apply a small, pea-sized dab of hot glue to the flat back of a pom pom. Work quickly, as hot glue sets fast. Press the pom pom firmly onto your chosen spot on the pillow cover. Hold it in place for a few seconds to ensure a good bond.
- For Fabric Glue: Apply a slightly larger, but still modest, amount of fabric glue to the back of the pom pom. Fabric glue typically allows for a bit more repositioning time, giving you a chance to adjust placement. Press firmly and hold for the recommended time to ensure initial adhesion.
Repeat this process for all your pom poms, working your way across the pillow. Take care not to use too much glue, as excess can squeeze out around the edges of the pom pom and create a visible, stiff residue. It’s better to use slightly less and add more if needed.
4. Curing and Finishing Touches
Once all your pom poms are securely attached, allow the pillow to dry completely. If you used hot glue, this will be almost immediate, though it’s still wise to let it sit for a few minutes. For fabric glue, follow the manufacturer’s instructions strictly, which might suggest 24-72 hours for full curing and washability. This patience ensures a strong, lasting bond. Inspect your pillow to ensure all pom poms are firmly attached. Gently tug on them; if any feel loose, add a tiny bit more glue and press them back down. Your delightful new home decor accent is now ready to showcase!
Isn’t it absolutely charming? I am utterly smitten with the delightful texture and playful whimsy this pillow brings to my living room. It’s the perfect accent for brightening up a space, especially during the vibrant seasons of spring and summer! Reflecting on the process, if I were to embark on this project again, I might opt for slightly smaller pom poms to achieve an even more refined or delicate dot pattern. But as they say, live and learn – and despite that small consideration, my affection for this pillow remains strong!
Design & Styling Tips for Your New Pom Pom Pillow
Once your charming new pom pom pillow is complete, it’s time to integrate it into your home decor. Here are some tips to make it shine and enhance your living space:
- Color Harmony: Consider the existing color palette of your room. A white pillow with colorful pom poms can introduce a pop of vibrancy, while a colored pillow with contrasting pom poms can create a bold statement. For a subtle, sophisticated look, choose pom poms that are a shade lighter or darker than the pillow cover, creating a tone-on-tone effect.
- Layering with Other Pillows: Don’t let this pillow be lonely! Pair it with solid-colored pillows to highlight its unique texture, or mix it with other patterned pillows for an eclectic, bohemian vibe. Varying sizes, shapes, and textures of pillows on your sofa or bed creates a dynamic and inviting arrangement that adds depth and comfort.
- Seasonal Swaps: This pillow, with its cheerful polka dots and playful pom poms, is fantastic for spring and summer, evoking a light and airy feel. But don’t limit its use! By choosing pom poms in warmer tones like deep reds, oranges, or muted greens, you can easily create a cozy autumnal version. For the holidays, opt for metallic or jewel-toned pom poms to add a festive touch.
- Placement Power: This versatile pillow isn’t just for sofas. It can brighten an armchair, add a touch of whimsy to a child’s bed, or even become a cheerful accent on a window seat or a guest room bed, instantly elevating the space.
Maintaining Your Pom Pom Perfection: Care Tips
To ensure your delightful DIY pom pom pillow remains a cherished part of your decor for years to come, proper care is essential. Due to the delicate nature of the pom poms and the adhesive, machine washing is generally not recommended as it can loosen the pom poms or damage the fabric. Instead, opt for spot cleaning any spills or stains with a mild detergent and a damp cloth. Gently dab the affected area without harsh rubbing. For a more thorough refresh, gentle hand washing with cold water and air drying flat can be done, but always test a small, inconspicuous area first, especially if you used fabric glue, to ensure the pom poms remain securely attached. Avoid harsh scrubbing or wringing, which can distort the pom poms or compromise the glue. With a little care, your whimsical creation will continue to add joy and personality to your home for a long time.
Anticipating the Grand Living Room Reveal!
This charming polka dot pom pom pillow is just one small piece of a much larger puzzle – my exciting living room renovation! The transformation has been a labor of love, and I can hardly contain my excitement to share it all with you. This week is particularly thrilling, as my beautiful new rug and stylish chairs are scheduled to arrive, promising to bring a fresh elegance to the space. There are just a few more finishing touches to tackle, including installing the last few baseboards and applying some final touch-up paint to perfect every corner. Once those details are meticulously complete, I’ll be ready to pull back the curtain on the entire living room! I promise you, it’s going to be absolutely stunning. The newly refinished wood floors, in particular, turned out even more gorgeous than I imagined, adding warmth and character that ties everything together. Seriously, you are going to be amazed! I can scarcely wait to reveal every single detail and share all the decor inspiration. Stay tuned for the full tour and prepare to be inspired!







