Craft a Sweet Surprise: The Ultimate Candy Robot Valentine’s Day Craft for Kids
Valentine’s Day is a time for sharing love, and what better way to express affection than with a delightful, handmade gift? If you’re searching for a unique and engaging craft that promises both fun and a sweet treat, look no further than building an adorable robot entirely out of candy! This charming candy robot isn’t just a craft; it’s a personalized token of love, perfect for surprising your little ones, making in a classroom setting, or as a creative alternative to traditional paper cards for school exchanges. Imagine the joy on their faces as they receive a robot friend they can also munch on!
Why a Candy Robot is the Perfect Valentine’s Craft
Crafting a candy robot offers numerous benefits beyond just a sugary reward. It encourages creativity, fine motor skills, and problem-solving as kids (and adults!) figure out how to assemble the different candy shapes into a cohesive robot figure. It’s an excellent opportunity for quality family time, fostering connection and shared laughter. Moreover, a homemade gift carries a special sentiment that store-bought items often lack, making the recipient feel truly cherished. It’s also a fantastic way to minimize screen time and engage in hands-on learning and imaginative play.
Our Family’s Sweet Valentine’s Traditions
Does your family exchange gifts on Valentine’s Day, or is it exclusively for sweethearts? In our household, Valentine’s Day is a cherished family affair. My husband and I adore surprising our children with small, thoughtful gifts at the dinner table. We often pair this with a festive meal featuring pink or heart-shaped foods, turning an ordinary dinner into a memorable celebration of love. It’s a whimsical and heartwarming tradition that allows us to show our kids just how much they mean to us in a unique way. Creating these candy robots together or presenting them as gifts fits perfectly into this tradition, adding an extra layer of sweetness and personalized charm to our special day. We encourage you to start your own unique Valentine’s traditions, whether it’s through crafting, cooking, or simply spending quality time together.
Crafting Your Own Adorable Candy Robot: A Step-by-Step Guide
Ready to embark on this sweet crafting adventure? Building your own candy robot valentine is surprisingly simple and incredibly rewarding. The beauty of this project lies in its flexibility; while we provide a suggested list of candies, you’re free to unleash your creativity and use any treats you desire. The goal is to assemble a charming robot, and with a little imagination, almost any candy can find its place in your creation. Here’s what you’ll need to get started:
Essential Supplies You’ll Need
Gathering your materials is the first exciting step. We’ve curated a list of candies that work wonderfully for distinct robot parts, but feel free to substitute with your favorites or whatever you have on hand. Just ensure you have a variety of shapes and sizes to construct a recognizable robot form. This craft is also a fantastic way to use up leftover holiday candies!
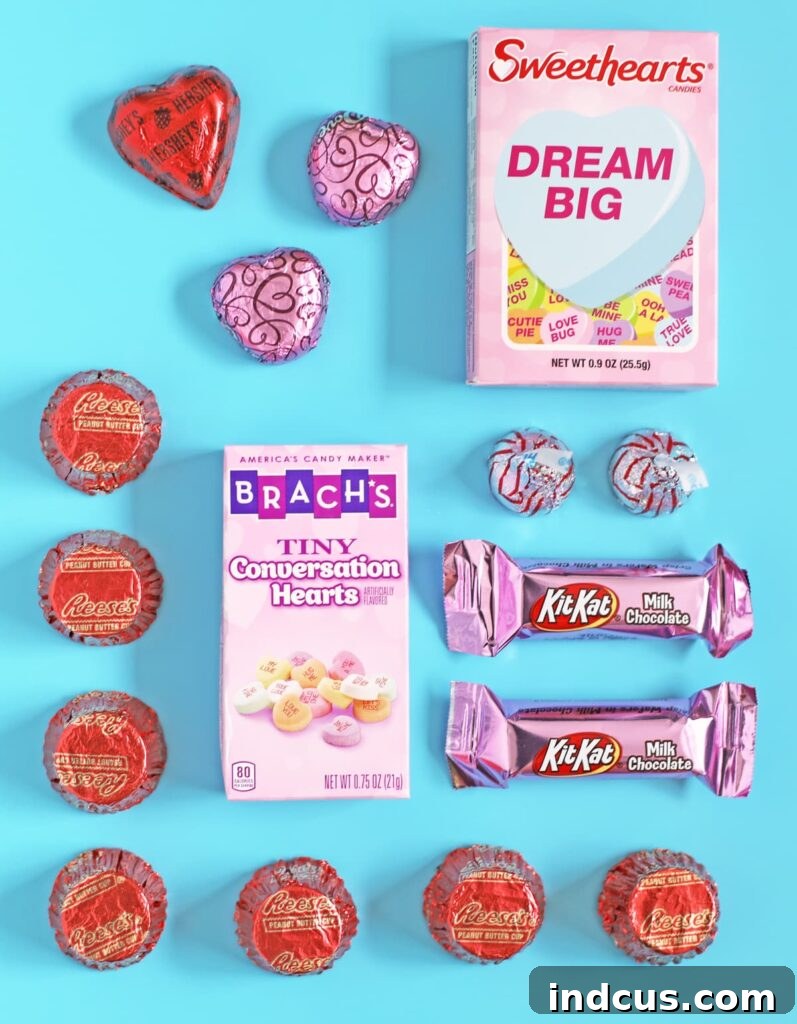
Detailed Materials List for Your Candy Robot
- Large Box Conversation Hearts: These are perfect for the robot’s main body, providing a sturdy and colorful base. Look for classic varieties or newer, updated flavors.
- Small Box Conversation Hearts: Ideal for the robot’s head, these complement the larger box beautifully, creating proportionate features.
- Reeses Mini Peanut Butter Cups: Excellent for crafting the robot’s neck, joints, or even stacking for legs due to their cylindrical shape and stable base.
- Individually Wrapped Kit Kats (or Smarties would work well too): These rectangular candies make fantastic arms and legs, offering a good length and easy attachment. Smarties tubes provide a similar effect.
- Hershey’s Kisses: With their iconic teardrop shape, Kisses are absolutely perfect for crafting adorable robot ears or small decorative buttons.
- Dove or Hershey’s Heart Shaped Chocolates: These are essential for the robot’s heart on its chest and can also be used as charming eye accents.
- Pink or Red Scrapbook Paper: Choose patterns and colors that match your Valentine’s theme or your robot’s personality. These will cover your candy boxes, providing a vibrant and appealing exterior.
- Hot Glue Gun + Gluesticks: The indispensable tool for assembling your robot. Ensure adult supervision when using a hot glue gun, especially with younger children.
Remember, this list is merely a suggestion to spark your imagination. Feel free to raid your pantry for other fun-sized candies, chocolate bars, or even lollipops that could be creatively incorporated into your robot design. The most important thing is to have fun with the process and let your unique robot emerge!
Step-by-Step Assembly Instructions: Let’s Build Your Sweet Robot!
Now that you have all your components ready, it’s time to bring your candy robot to life. Follow these simple instructions, and remember that slight variations are part of the creative process!
Let’s Build Your Sweet Robot!
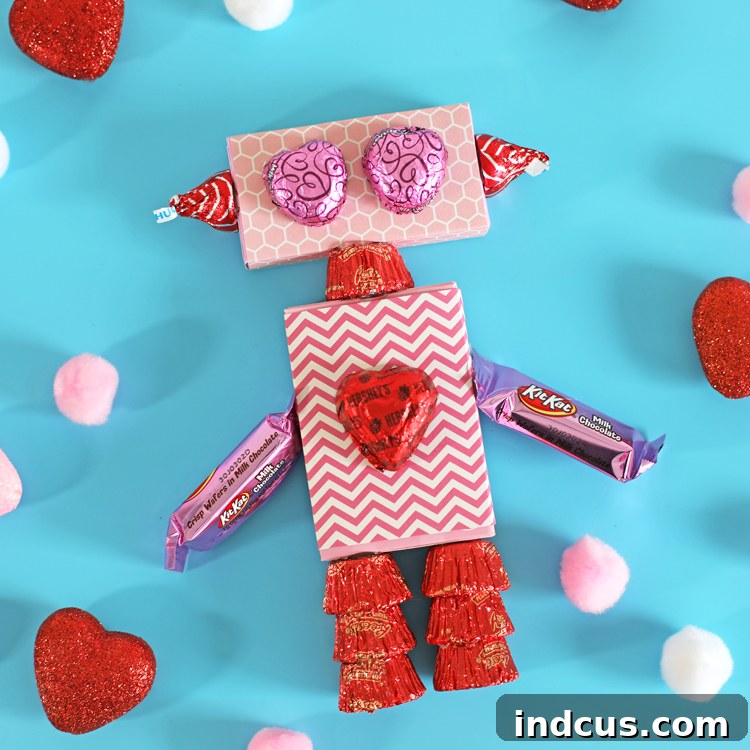
- Step 1: Prepare the Robot’s Core and Head. Begin by covering your large and small conversation heart boxes with your chosen scrapbook paper. This is a fantastic opportunity to use up those colorful scraps you’ve been saving. Measure and cut the paper to fit snugly around each box, then secure it with a thin layer of hot glue. Smooth out any bubbles for a neat finish. These covered boxes will form the main body and head of your robot.
- Step 2: Crafting the Head and Facial Features. Take the smaller, covered candy box (your robot’s head). With your hot glue gun, carefully attach two heart-shaped candies to the front for the eyes. Experiment with different angles to give your robot a unique expression! Next, glue a Hershey Kiss to each side of the head to serve as adorable, shiny ears. Ensure they are firmly attached for durability.
- Step 3: Connecting the Body and Head. The large covered candy box will be the robot’s robust body. To create a neck that connects the head to the body, glue a Reese’s Mini Peanut Butter Cup to the center top of the large box. Once secure, apply glue to the bottom of the small box (the head) and attach it firmly to the Reese’s cup. Hold it in place for a few seconds until the glue sets, ensuring the head is stable and upright.
- Step 4: Attaching the Robot’s Limbs (Arms). Now, it’s time to give your robot some arms! Take your individually wrapped Kit Kats or Smarties and glue one to each side of the larger box (the body). Position them slightly below the “neck” area. You can glue them straight down, or angle them slightly for a more dynamic pose, as if your robot is ready for a hug or to wave hello.
- Step 5: Constructing Sturdy Legs. For the robot’s legs, stack three Reese’s Mini Peanut Butter Cups together, gluing each one securely to the next, forming a small column. Repeat this process to create a second identical leg. Once both legs are assembled, attach them to the bottom of the large candy box, ensuring they are evenly spaced and stable enough to allow your robot to stand independently.
- Step 6: The Final Touch: A Heartfelt Emblem. To complete your charming creation, glue a beautiful heart-shaped candy to the chest area of your robot’s body. This serves as its glowing heart, symbolizing the love and effort put into its creation. You can use a larger heart chocolate for a prominent feature or a smaller one for a subtle touch.
Tips for a Successful Candy Robot Craft
- Hot Glue Safety: Always supervise children when using a hot glue gun. Ensure they understand proper handling to avoid burns. Low-temperature glue guns are a great option for kid-friendly crafting.
- Candy Choice Flexibility: Don’t feel limited by the suggestions! Get creative with different candy types. Gummy candies for eyes, licorice for antennae, or even small cookies for feet can add unique character.
- Pre-Planning: Before gluing, arrange the candies loosely on a flat surface to visualize your robot’s design. This helps prevent mistakes and allows for better aesthetic choices.
- Storage and Gifting: If making these ahead of time, store them in a cool, dry place to prevent melting. Package them in clear cellophane bags with a ribbon for a professional and charming gift presentation.
- Personalize and Decorate: Use markers to draw a tiny mouth on the robot’s head, or add small stickers for extra flair. You could even give each robot a unique name!
Sharing Your Sweet Creation
Once your candy robot is complete, it’s ready to bring smiles! These make fantastic gifts for classmates, teachers, friends, or family members. Imagine the delight of a child receiving such a personalized and edible Valentine. They’re also wonderful as centerpieces for a Valentine’s Day party or simply to display as a festive decoration before indulging in the sweet treats. The handmade nature of this craft speaks volumes, conveying thoughtfulness and affection in a truly memorable way.
And yes, despite being made of candy, your robot can proudly stand all on its own! It’s such a triumph of engineering and sweetness. Gah! Does it get any cuter? We think not! Each robot is a testament to imagination and the joy of crafting, creating a truly unforgettable Valentine’s Day experience.
Conclusion: A Valentine’s Day Memory in the Making
Creating a candy robot is more than just a craft; it’s an opportunity to build lasting memories and share joy. Whether you’re making one as a special gift or crafting a whole army of sweet robots with your kids, the process is filled with laughter, creativity, and, of course, delicious candy. This Valentine’s Day, step away from the ordinary and embrace the whimsical world of candy robots. Your efforts will undoubtedly be met with delighted smiles and happy hearts. We encourage you to try this delightful project and share your unique candy robot creations with us!