
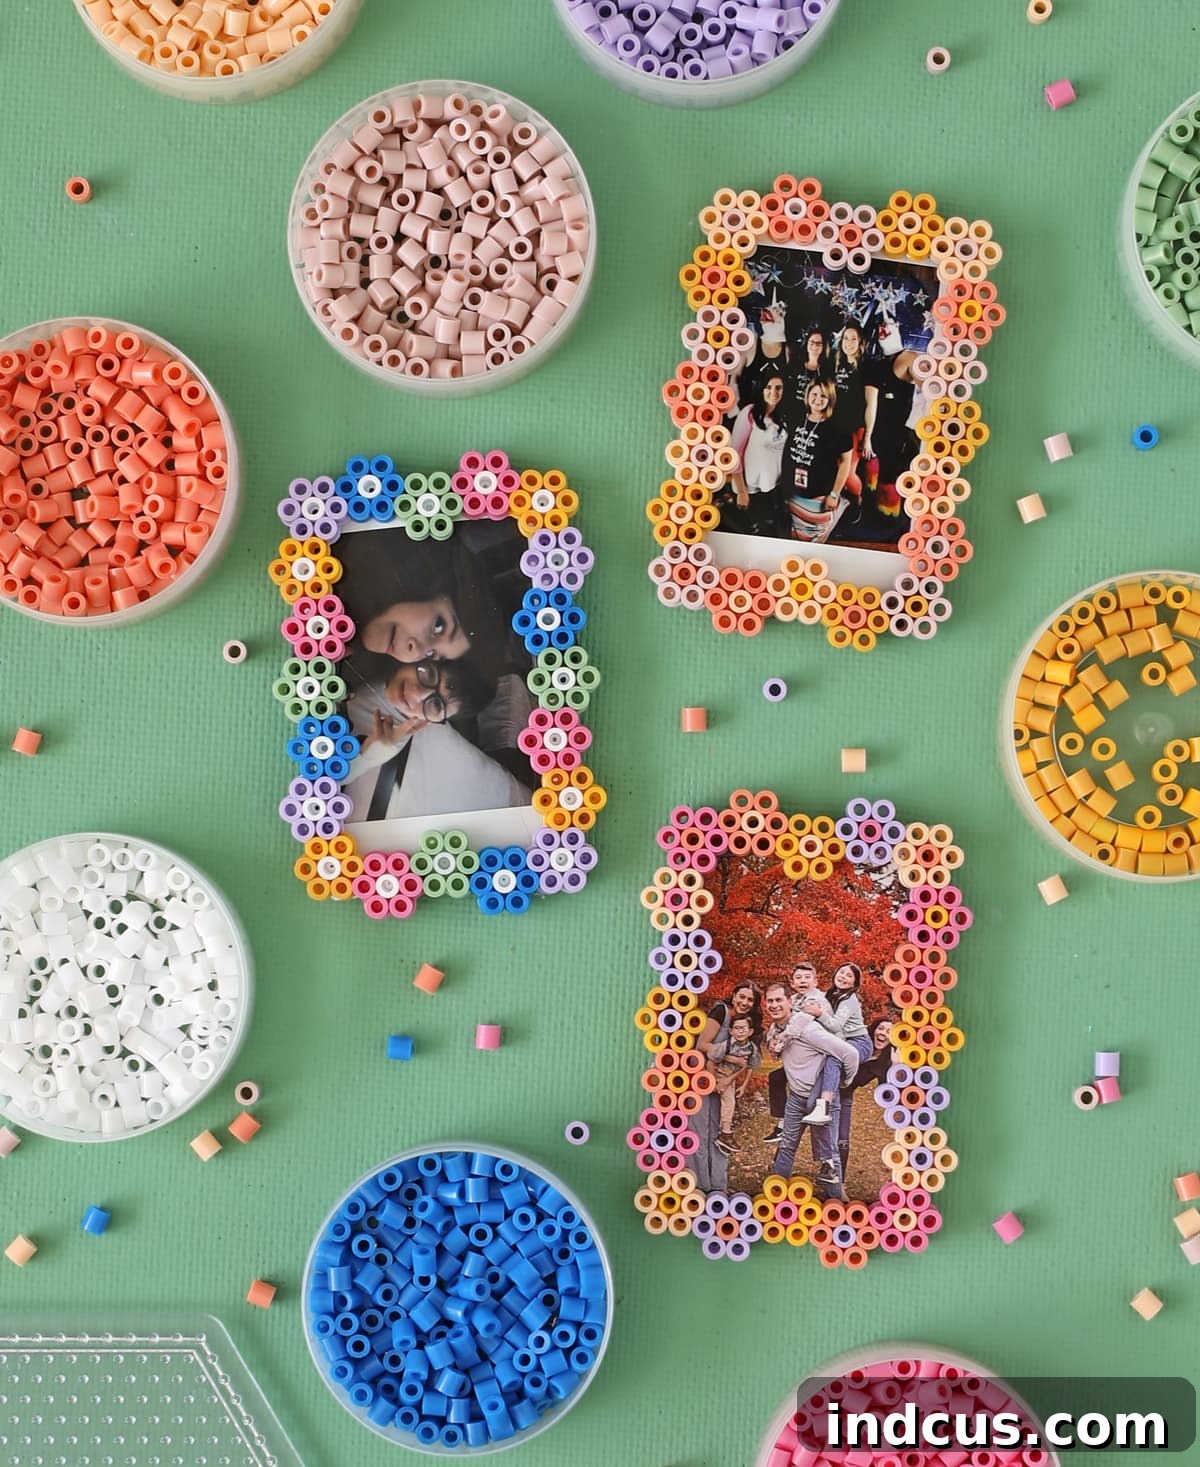
DIY Perler Bead Flower Photo Frames: Craft Adorable Mini Magnetic Displays
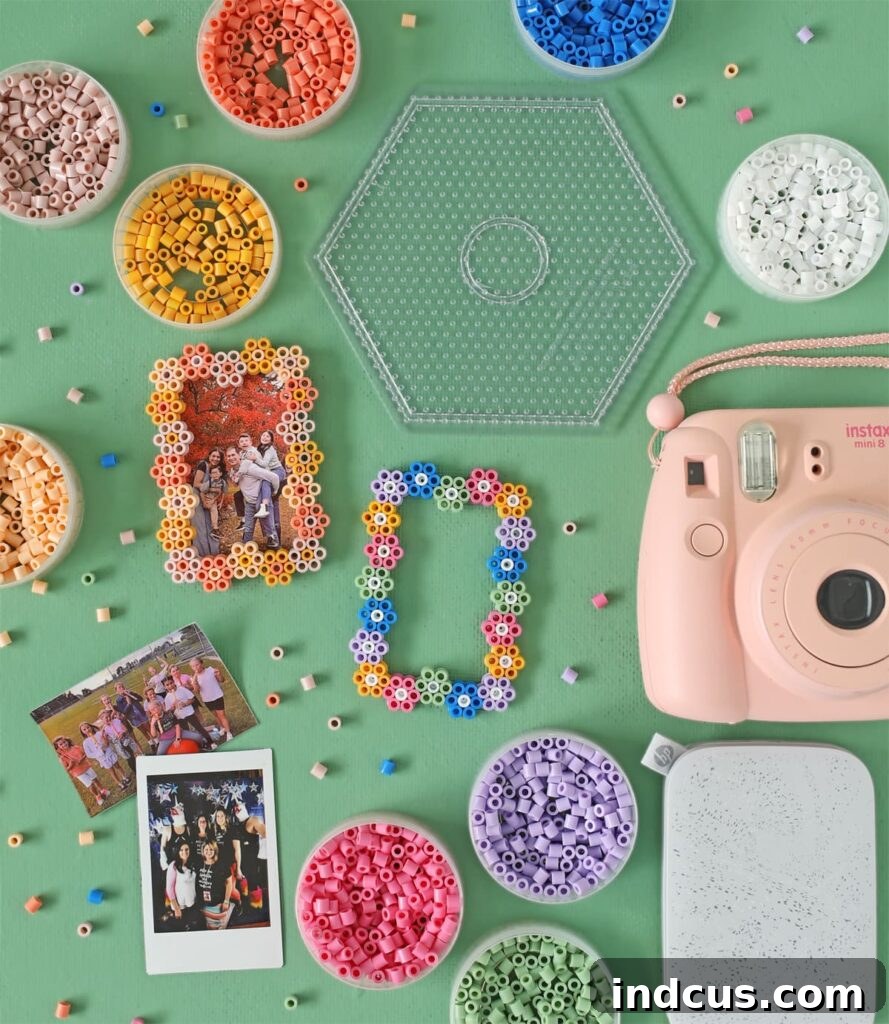
Welcome to a world of colorful creativity and heartfelt memories! Today, we’re diving into a delightful and simple craft project that transforms tiny plastic beads into charming decorative pieces. We’ll be crafting magnetic mini photo frames using Perler beads, also widely known as fuse beads. These whimsical frames feature a sweet and captivating floral pattern that is absolutely perfect for adding a touch of personalized flair to your space. Thoughtfully designed to cradle your beloved Instax or Sprocket instant photos, these frames are ideal for brightening up your refrigerator, personalizing a school locker, or organizing treasured snapshots on a magnetic whiteboard. Get ready to display your cherished moments in the most adorable and eye-catching way imaginable!
This project is not only fun and engaging for crafters of all ages – from older children and teens to creative adults – but it also offers a fantastic opportunity to produce unique, handmade gifts. Imagine the sheer joy of gifting a custom-made frame, complete with a favorite memory captured in a photo, to a friend or family member. It’s a craft that beautifully combines artistic expression with practical utility, resulting in a vibrant and functional piece of decor that truly captures attention and warms hearts. The process of arranging colorful beads is incredibly relaxing and satisfying, making it a wonderful activity for a quiet afternoon.
Let’s gather our crafting essentials and embark on this exciting Perler bead adventure. You’ll be amazed at how quickly these beautiful and sturdy frames come to life, ready to showcase your special instant prints!
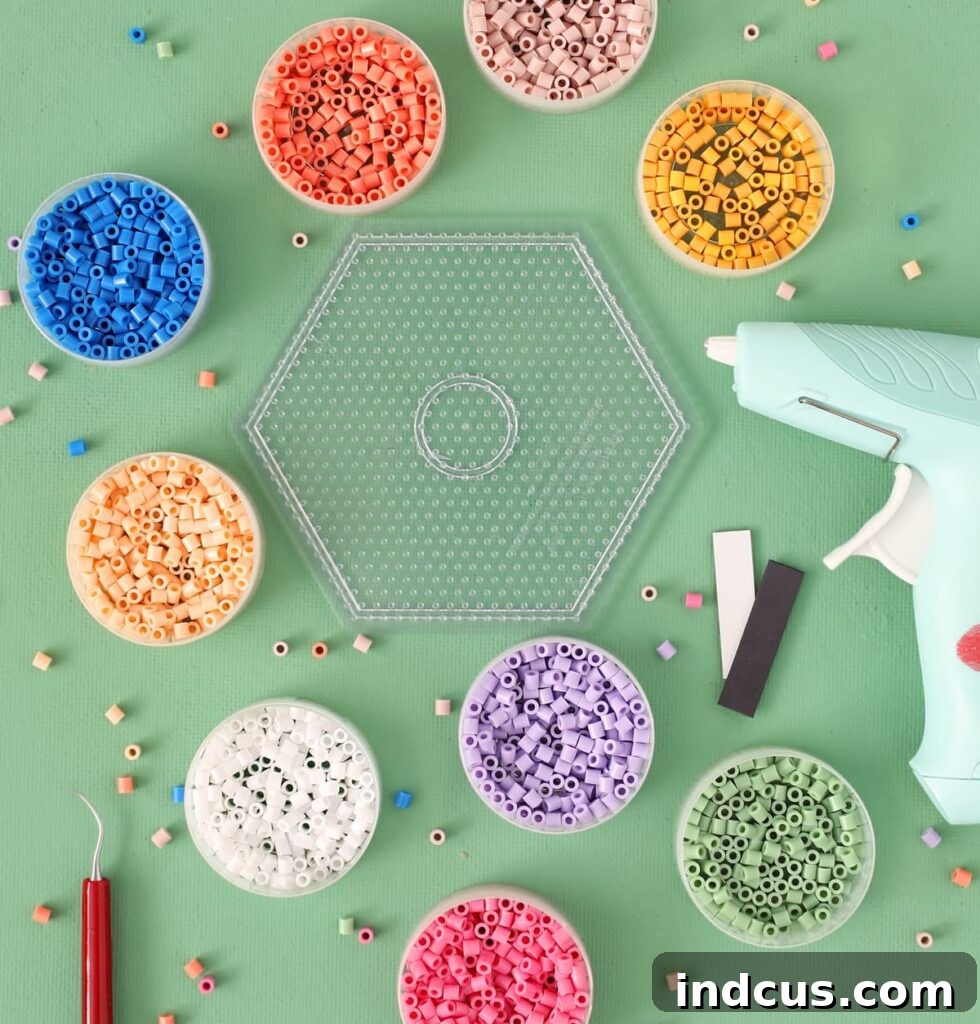
Essential Materials for Your Perler Bead Frames
Before we embark on our creative journey, let’s ensure we have all the necessary tools and materials ready and organized. Having everything at your fingertips will make the crafting process smooth, efficient, and thoroughly enjoyable.
- Perler Beads (Fuse Beads): You’ll need a selection of colors. Assorted color kits are available, but purchasing individual colors provides more control over your design and often yields better results.
- Hexagon Perler Bead Pegboard: This specific shape is crucial for easily forming our charming flower patterns.
- Clothing Iron or EasyPress: A standard household iron or a craft heat press will be used to permanently fuse the beads together.
- Ironing Paper: This essential paper creates a protective barrier between your iron and the melting beads. (Often conveniently included with pegboards)
- Strong Mini Magnets: These tiny yet powerful magnets are key to giving your frames their magnetic functionality and ensuring they stay put.
- Hot Glue Gun + Hot Glue Sticks: For securely and quickly attaching the magnets to the back of your finished frames.
A Note About Perler Beads: While it might initially seem more economical to purchase a large, bulk bucket of mixed Perler beads, the reality of sorting through hundreds of beads to locate the exact colors you desire can be quite a time-consuming and frustrating task. For a more streamlined and enjoyable crafting experience, we strongly recommend investing in individual colors. Keeping each color neatly organized in its own container or small baggie will significantly reduce prep time and allow you to focus more on the creative design process. Many crafters find excellent deals on individual colors at local craft stores like Hobby Lobby, where prices can often be more competitive than online retailers, especially when utilizing sales or coupons.
A Note About Magnets: The quality of your magnets will profoundly impact the functionality and longevity of your finished frames. It’s wise to resist the temptation to use those flimsy, often self-adhesive, sheet magnets that frequently come in generic craft kits. In our extensive crafting experience, these simply do not offer the necessary strength to reliably hold your frames and photos securely. They are prone to peeling, sliding, and ultimately failing to perform as expected. We emphatically advise splurging a little on robust, small yet powerful magnets. The specific magnets we’ve linked are tiny but incredibly strong, ensuring your beautiful Perler bead frames remain firmly anchored to any magnetic surface. Trust us on this small but significant investment; it will save you a lot of frustration and guarantee a professional, long-lasting finish for your charming Perler bead art.
These adorable flower frames are thoughtfully designed to perfectly fit Instax or Sprocket instant photos, which typically measure around 2 inches by 3 inches. This creates a snug and aesthetically pleasing display for your mini prints. Should your creative vision extend to crafting frames for larger photographs, fear not! The fundamental flower pattern we’re using is easily adaptable. You can simply increase the number of flowers along each side of the frame to accommodate the desired photo size. However, it’s crucial to note that for significantly larger photos, such as standard 4-inch by 6-inch prints, you would need a considerably larger pegboard than the hexagon one we’ve linked. The provided pegboard, while perfectly sized for mini photos, isn’t quite expansive enough for bigger projects – a valuable lesson learned from personal experience when trying to scale up!
Step-by-Step Guide: Crafting Your Perler Bead Photo Frames
Now that we have all our supplies meticulously gathered and organized, let’s begin the exciting and rewarding process of bringing these vibrant flower frames to life. Follow these detailed steps carefully, and soon you’ll have a beautiful collection of handmade photo displays ready to showcase your favorite moments.
Step 1: Laying the Foundation – The First Daisy Chain Segment
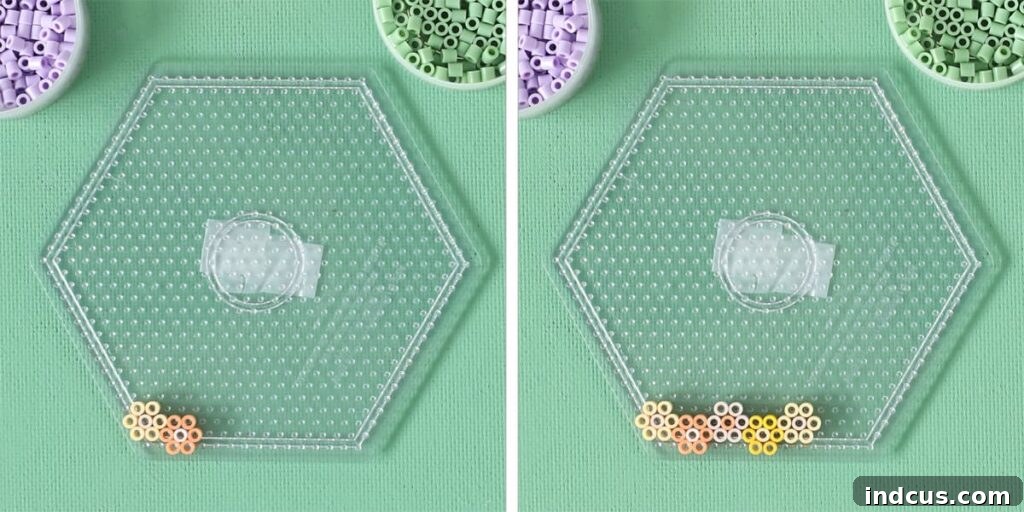
Begin by positioning your hexagon pegboard squarely in front of you, ensuring one of its straight edges faces directly downwards. This consistent orientation is vital for maintaining uniformity and ease throughout your entire design. Now, let’s form the first segment of our delightful floral pattern. Along the left edge of the pegboard, meticulously create a six-petal flower. As you place the beads for this first flower, make sure to intentionally leave the very bottom two pegs on the left edge open – these specific pegs are crucial for establishing the proper zig-zag alignment of subsequent flowers. Once the six petals are meticulously placed, add a contrasting colored bead to the center of the flower to make it visually pop. Next, create a second six-petal flower immediately to the right of your first flower. The clever design element here is that the center petal of this second flower will align perfectly with the bottom petals of the first flower. This interlocking connection creates a charming and continuous “zig-zag” effect as the flowers connect. If you’ve aligned them correctly, you should observe two empty pegs remaining in the bottom left corner of the pegboard, forming a neat, offset start to your frame. This initial setup is paramount to establishing the correct overall structure and pattern flow for your entire Perler bead frame.
Step 2: Extending the Base – Completing the Bottom Edge
With your first two interlocked flowers confidently in place, continue building horizontally across the pegboard. Replicate the same interlocking, zig-zag pattern, adding more six-petal flowers to the right, one after the other. Your objective for the entire bottom edge of the frame is to create a seamless line consisting of five beautifully connected flowers. As you proceed, take your time to ensure each flower is properly interlocked and evenly spaced. This meticulous placement will form the sturdy and aesthetically pleasing base of your photo frame, giving you a clear indicator of its final width and providing a solid foundation from which to build the subsequent vertical sides. Precision in this step will ensure your frame maintains its intended shape.
Step 3: Building Up the Sides – Forming the Right Edge
Now, let’s turn our attention to constructing the vertical sides of the frame. To accurately build up the right edge, strategically position the next flower directly above but slightly offset from the far-right corner of your completed bottom row. This precise placement, as clearly depicted in the accompanying photograph, is essential for ensuring a seamless and graceful transition from the horizontal base to the vertical side. Continue adding flowers upwards, meticulously maintaining the same six-petal design and the signature interlocking zig-zag pattern. You will extend this vertical line of flowers until you have a total of seven flowers running along the right-hand side. This meticulous construction will provide your frame with the necessary height and an elegant, continuous floral border. Remember to keep checking your alignment as you go to avoid any discrepancies.
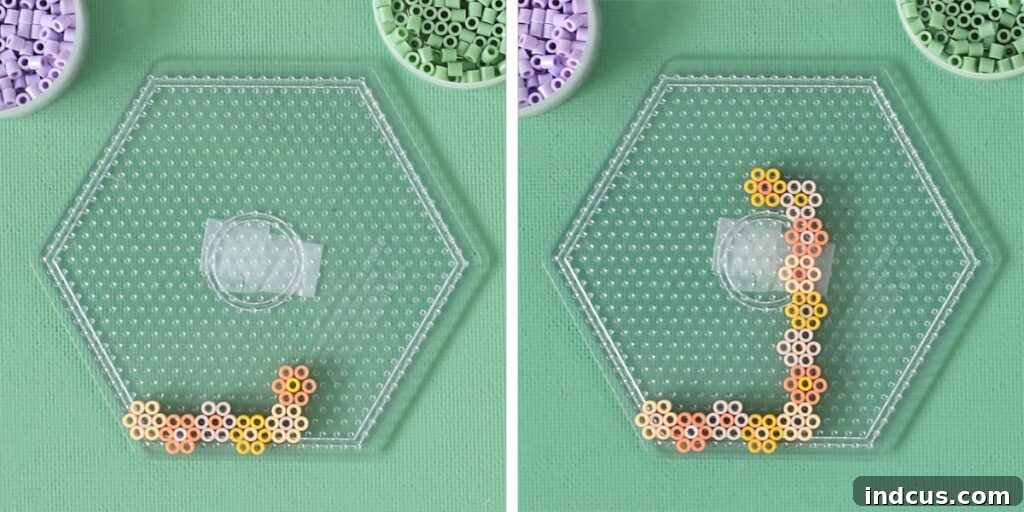
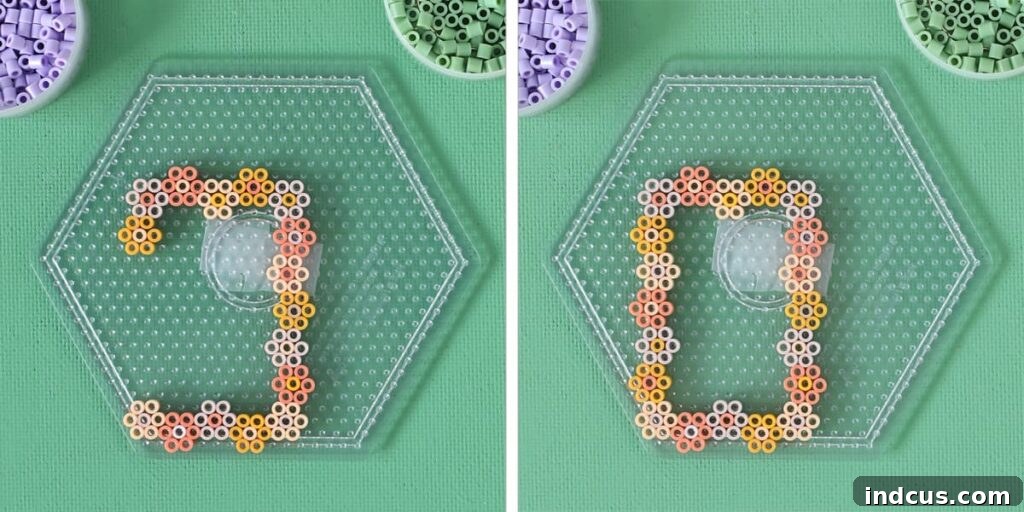
Once the right side is complete, repeat the process for the remaining sides – the top and the left – ensuring perfect symmetry and a continuous border. The ultimate goal is to form a complete rectangular frame, leaving an open space in the very center for your beloved photo. Before moving on, double-check all alignments, making sure every flower is precisely where it should be.
Step 4: Fusing the Beads – The Melting and Setting Process
Once you are absolutely satisfied with your intricate floral design and all the Perler beads are perfectly and securely in place on the pegboard, it’s time for the magical transformation: fusing the beads together. This crucial step requires careful attention and a steady hand to ensure an even melt and a durable, aesthetically pleasing finished product. You can achieve this using either a standard household clothing iron or a specialized craft heat press like an EasyPress.
- Prepare for Fusing: Very carefully cover your entire Perler bead design with a sheet of ironing paper. This crucial barrier serves to protect both your iron from melting plastic and your delicate beads from direct, uneven heat.
- Set Your Heat: If you are using a traditional clothing iron, set it to a medium heat setting, ensuring that any steam function is turned off and the iron’s water reservoir is empty. For those utilizing a heat press like an EasyPress, a temperature of approximately 320 degrees Fahrenheit (which is about 160 degrees Celsius) is generally considered ideal. Always allow your chosen heat tool sufficient time to reach the correct temperature before proceeding.
- Apply Heat Evenly: Gently place your heated iron or EasyPress onto the ironing paper that covers your design. When using a clothing iron, apply light, even pressure and move it in slow, continuous circular motions across the entire design. The key here is to keep the iron perfectly flat against the paper to ensure all beads melt uniformly. If you’re using an EasyPress, simply rest it flat on the design without applying any additional downward pressure, allowing its consistent, even heat to do the work.
- Observe and Fuse: Continue to heat the design for approximately 20 seconds, or until you clearly see the beads beginning to soften, fuse, and securely stick together. You’ll notice the small holes in the center of the beads start to close slightly, which is a clear indicator that they are melting. It’s important not to over-iron, as this can flatten the beads excessively and potentially distort the delicate design. Many experienced crafters, myself included, prefer the unique textured look of the un-ironed side, leaving one side less melted to preserve the distinct bead shape. If you share this preference, you can stop once the beads are securely fused on one side. However, if you desire a fully melted, smooth appearance on both sides, carefully flip your design over (after it cools slightly to prevent warping) and repeat the ironing process on the reverse side.
Cooling and Flattening: After the fusing process is complete, gently and carefully peel off the ironing paper. While your Perler bead creation is still warm and pliable, immediately place a heavy, flat object – such as a large textbook, a cutting board, or a heavy tile – evenly on top of it. Allow the design to cool completely under this substantial weight. This vital step helps to prevent any warping or curling, ensuring your finished photo frame remains perfectly flat, sturdy, and ready for proudly displaying your cherished photos for years to come.
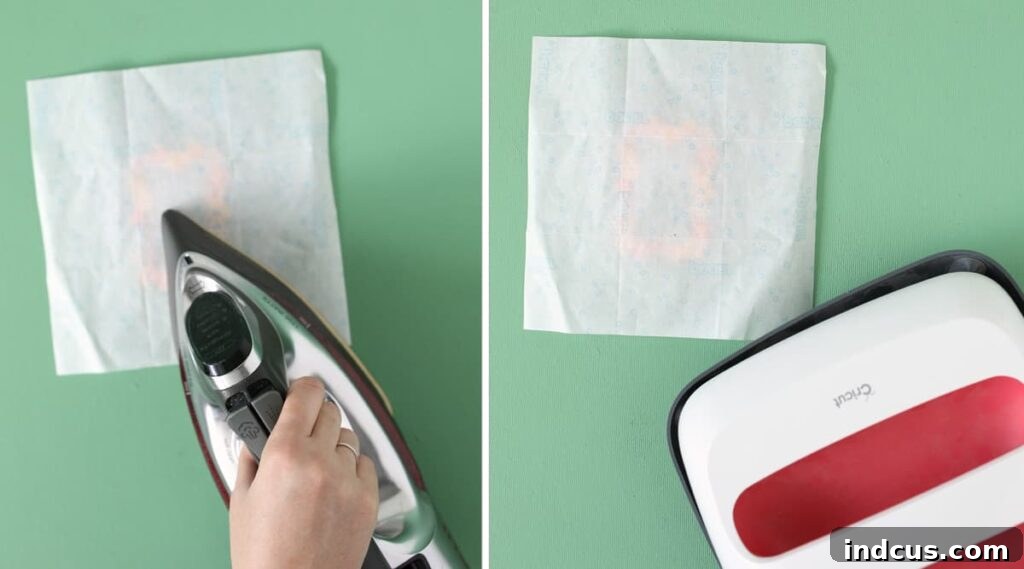
Once completely cooled, carefully remove the heavy object and marvel at your beautifully fused Perler bead creation! Observe how wonderfully cute these frames are, now durable and ready to hold your precious memories with an undeniable touch of handmade charm!
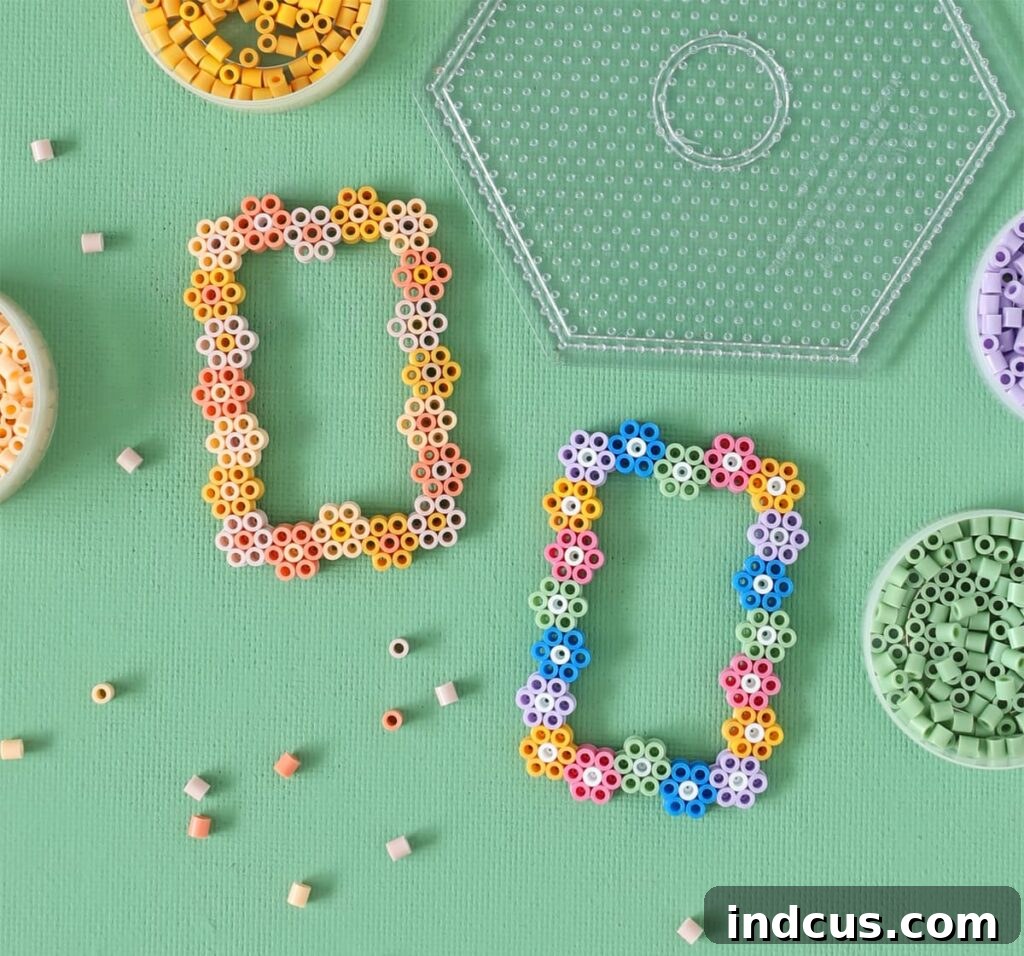
Step 5: Attaching the Magnets – Making Your Frame Functional
The final, exciting step in completing your functional and stylish photo frame is the attachment of the magnets. This is where your trusty hot glue gun comes into play. Carefully flip your fully fused Perler bead frame over to its back side. Apply a small, controlled dab of hot glue to the back of the frame, ideally on a sturdy, well-fused section of beads that will not interfere with the photo opening or be visible from the front. Quickly but carefully press one of your strong mini magnets onto the hot glue, holding it firmly in place for a few seconds until the glue begins to cool and set. For optimal hold and enhanced stability, especially for frames that might be frequently moved or those displaying slightly heavier photos, consider attaching two magnets – one strategically placed near the top and another near the bottom. This dual placement ensures your frame remains securely anchored to any magnetic surface, preventing it from sliding, tilting, or potentially falling. Once the hot glue has completely cooled and fully cured (which happens very quickly), your custom Perler bead flower photo frame is ready to adorn your refrigerator, personalize your locker, or brighten your whiteboard, beautifully displaying your favorite Instax or Sprocket mini photos in delightful, handmade style!
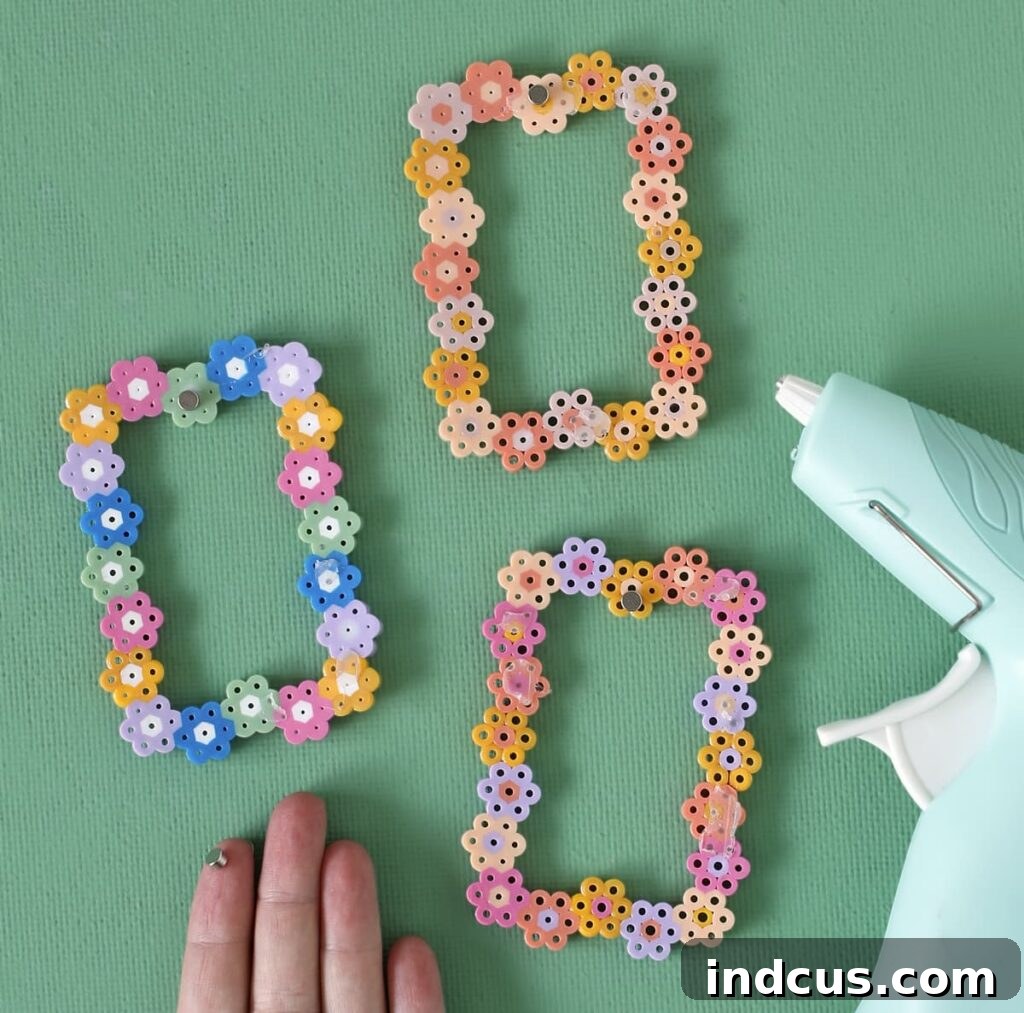
Need a Helping Hand? Grab Our Printable Perler Bead Pattern!
Creating intricate patterns with Perler beads can sometimes be a little tricky, particularly when you’re aiming for perfect alignment across multiple rows and corners. Even experienced crafters can occasionally misplace a single bead or get a row slightly off, which can lead to frustrating misalignments later in the design! To ensure your charming flower photo frames come out flawlessly on your very first attempt, we’ve thoughtfully developed a helpful printable pattern. While the comprehensive photos above provide excellent visual guidance, this pattern offers an additional layer of precision, allowing you to easily line up each flower and section correctly. It’s an invaluable tool for both beginners seeking extra support and seasoned crafters who appreciate having a detailed reference. Furthermore, if younger crafters are using this tutorial, having a printed guide means they won’t need to constantly borrow your phone or device to follow along, making the crafting process smoother, more independent, and more enjoyable for everyone involved. Click the pink button below to conveniently access and print your pattern, and enjoy a stress-free crafting experience, confident in achieving a perfect result!
Visual Guide: Perler Bead Flower Photo Frames (Video)
For those who benefit most from visual learning, a video tutorial complementing these written instructions can often clarify nuances and precise techniques that might be harder to grasp from text alone. While the specific video player is not directly embedded within this HTML content, a quick search for “Perler Bead Flower Photo Frame Tutorial” on popular video platforms will likely yield excellent visual guides. Watching the beads being meticulously placed, the interlocking pattern formed, and the fusing process demonstrated can be incredibly beneficial for understanding the alignment and the critical melting technique, making the entire crafting process even easier to follow and master.
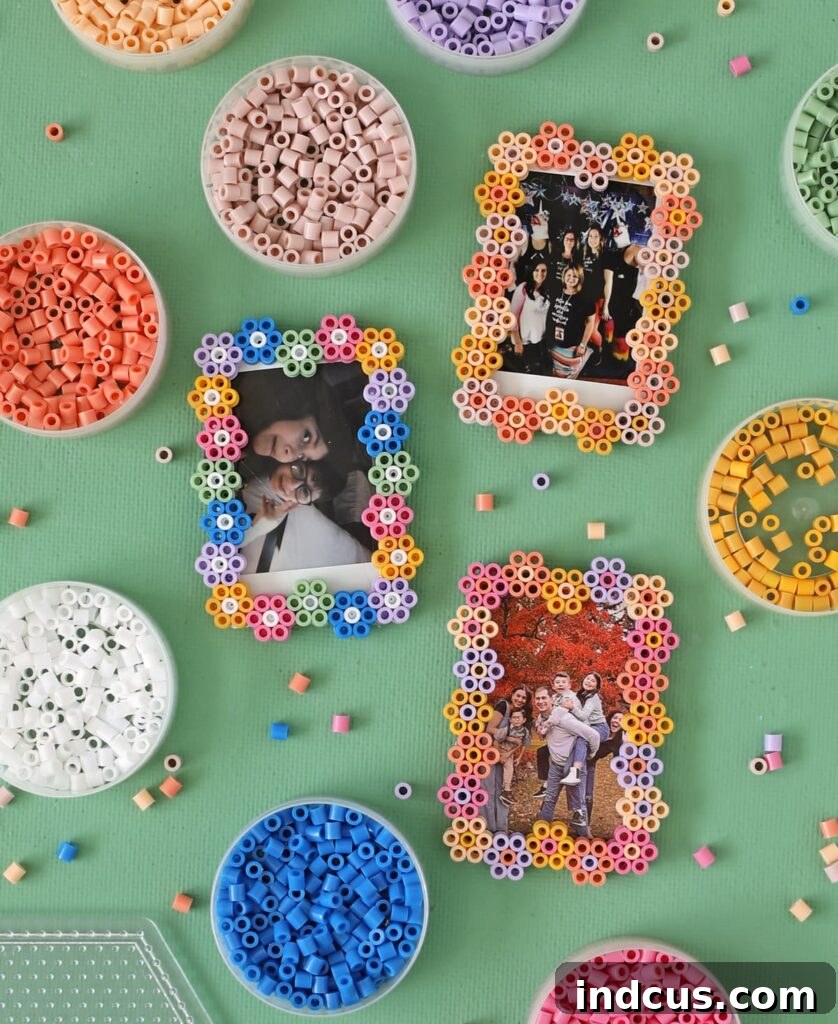
Unleash Your Creativity with Personalized Perler Bead Frames!
And there you have it – a wonderfully engaging and creatively satisfying project that yields truly charming and functional results! These DIY Perler bead flower photo frames are far more than just simple crafts; they are personalized tokens of cherished memories, perfect for you, your older children, or teens to complete during a relaxed and enjoyable afternoon. What truly makes this project stand out is the incredible freedom it offers for customization. With an expansive and endless palette of Perler bead colors at your disposal, you can design frames that perfectly match your home decor, reflect seasonal themes, or capture the unique personality of the person you’re crafting for. Experiment boldly with vibrant, contrasting color combinations for a playful and energetic look, or choose softer, harmonious pastels for a more serene and elegant aesthetic. The wavy daisy flower pattern itself is undeniably cute and brings a cheerful, nostalgic, and welcoming vibe to any displayed instant photo, instantly brightening its surroundings.
Beyond the Refrigerator: Creative Uses for Your Handmade Frames
These versatile Perler bead frames aren’t just limited to your kitchen! Explore a multitude of creative ways to incorporate them into your life or share them with others:
- Thoughtful Personalized Gifts: Fill a frame with a cherished photo of a shared memory and present it to a loved one for birthdays, holidays, anniversaries, or simply as a heartfelt “just because” gesture.
- Locker Decor Extraordinaire: Help students brighten up their often-drab school lockers with a vibrant pop of color and a beloved memory, making their space more personal and inviting.
- Magnetic Whiteboard & Command Centers: Keep important notes, inspiring quotes, or a weekly schedule displayed prominently alongside a beloved photo on any magnetic whiteboard or home command center.
- Unique Party Favors: Host a craft-themed party and let guests create their own mini frames to take home, providing a fun activity and a memorable keepsake.
- Engaging Classroom Decorations: Teachers can utilize these frames to display student work, inspiring classroom rules, or educational visuals in a fun, colorful, and interactive way.
- Charming Holiday Ornaments: Before the final fusing step, carefully add a small loop of string or ribbon to the top of the design. Once fused, these can be transformed into unique, handmade ornaments for your Christmas tree or other festive decorations.
Tips for Ensuring Long-Lasting Perler Bead Art
To ensure your beautiful Perler bead frames remain vibrant, intact, and a source of joy for many years to come, consider incorporating these simple yet effective care tips:
- Gentle Cleaning: If your frames accumulate dust over time, gently wipe them with a soft, dry cloth. For slightly more stubborn marks, a very lightly damp cloth can be used, but ensure the frame is completely dry afterward to prevent any residue.
- Avoid Extreme Heat: To preserve the integrity and color of your fused beads, keep your frames away from direct sunlight for prolonged periods and other intense heat sources (like near a hot stove or radiator), as this could potentially cause warping, fading, or discoloration over time.
- Secure Magnet Placement: Periodically check that the magnets on the back are still firmly attached. If you notice any loosening, a quick and simple reapplication of hot glue will secure them back in place, ensuring your frame remains steadfast.
We genuinely hope you have immense fun and find great satisfaction in bringing these adorable magnetic Perler bead photo frames to life. It’s a craft that is simple to learn, incredibly satisfying to complete, and ultimately results in a truly charming and personalized display for your most treasured moments. Don’t forget to inspire and share this fantastic idea with other crafters by pinning it for later – spread the joy of handmade creativity and instant memory display!
Happy crafting, and enjoy showcasing your memories in vibrant, handmade style!







