
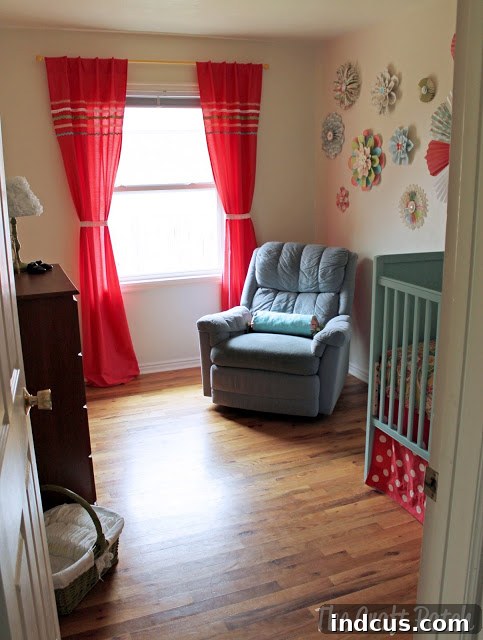
The anticipation is palpable, the nesting instinct undeniable, and finally, the moment has arrived! We are absolutely thrilled to announce that our nursery is officially complete, a lovingly crafted haven awaiting its newest, tiniest resident. After weeks of planning, painting, and plenty of DIY magic, this cozy space is now perfectly primed for snuggles, sleepy feeds, and countless cherished memories. We simply can’t wait to share every detail of this budget-friendly, yet utterly charming, baby room. Are you ready to take the grand tour?
Crafting a Dream Nursery on a Budget: Our DIY Journey
Creating a beautiful and functional nursery doesn’t have to break the bank, nor does it require sacrificing style. Our philosophy for this project centered around maximizing comfort, practicality, and personal touches, all while adhering to a strict budget. We leveraged DIY projects, thrift store finds, and a bit of creative ingenuity to transform a small space into a vibrant and welcoming retreat. This detailed guide will walk you through each element, sharing tips and tricks for how you can achieve a similar look and feel in your own home.
The Art of Resourceful Window Treatments
One of the first projects to tackle was the window treatments, a crucial element for light control and adding a soft touch to the room. If you recall our previous post, we revealed how effortlessly we created super cheap and easy curtains and an equally affordable curtain rod. The secret? Clearance flat sheets and a simple, ingenious rod solution! This approach allowed us to select fabric that perfectly matched our desired aesthetic without the hefty price tag of custom drapery. The result is a light, airy, and private space, essential for daytime naps and peaceful nights. For a full breakdown of this simple yet effective DIY, you can read all about them HERE.
Designing for Comfort and Functionality in a Small Space
The nursery’s compact footprint presented an exciting challenge, demanding thoughtful planning to ensure every inch was utilized effectively. Our design priority was clear: create a functional and comfortable environment, even if it meant making some unconventional choices. The layout involved swapping out a larger dresser for a more petite one from our own room, strategically tucking the crib into a corner against the wall, and most importantly, dedicating ample space for what we affectionately call the “world’s most comfortable nursing chair.”
The Indispensable Nursing Nook: Prioritizing Comfort Above All
This particular nursing chair holds a special place in our hearts. While it might be a bit older and perhaps not the most aesthetically “perfect” piece of furniture, its unparalleled comfort for those demanding 2 AM feedings cannot be overstated. It rocks gently, a feature I adore for soothing little ones, and even reclines for those moments when returning to bed feels like an impossible feat. This is precisely why we allocated so much generous space around it; when you’re navigating the early days of parenthood, comfort truly is a non-negotiable priority. It’s a lifesaver, providing a serene spot for both baby and parent to connect and rest.
Practical Diaper Changing Solutions
Through experience with our other children, we discovered that a traditional changing table often goes unused in our home. We found that changing diapers on the floor is a more practical and convenient solution for us. To maintain efficiency and organization, we simply keep a soft changing pad neatly tucked into a diaper basket, always within arm’s reach. This simple system works wonderfully, saving space and making diaper changes quick and easy, wherever we are in the room.
The Crib: A Centerpiece of Comfort and DIY Charm
The crib stands as the heart of any nursery, and ours is no exception. We focused on both aesthetics and practicality, ensuring it was a safe, comfortable, and beautiful place for our baby to rest.
Simple, Washable Crib Bedding
For the crib bedding, we opted for a design that prioritizes ease of cleaning, knowing full well how many washes it will endure. Our bedding consists of just two layers of fabric sewn together, without any bulky batting or tying. This streamlined approach means it fits easily into the washing machine and dries quickly, a major win for busy parents. To add a touch of flair, we incorporated a cheerful blue band on one end, which looks lovely when the bedding is folded over, adding a pop of color to the crib.
The Amazing Crib Makeover: From Drab to Delightful
One of the most transformative projects in the nursery was undoubtedly the crib makeover. We took an old, worn crib and gave it a new lease on life with a fresh coat of paint. The color chosen, Benjamin Moore Waterfall, is simply stunning – a soft, serene aqua that instantly brightens the room and perfectly complements our coral and yellow accents. To truly appreciate the dramatic improvement, let’s take a quick look at its “before” state:
Eek! It was quite a sight, wasn’t it? The dated bear appliqué definitely had to go. What you couldn’t fully appreciate in the “before” picture were the significant spots along the rails where our older “rabbit children” (as we lovingly call them) had left their unmistakable teeth marks. Why do little ones have such a penchant for chewing on crib rails? It’s a mystery! Addressing these chew marks required considerable sanding and elbow grease, but the effort was well worth it. We are absolutely thrilled with the new and improved crib. It’s now so wonderfully bright, cheerful, and perfectly safe for our new arrival, radiating warmth and happiness into the room.
Adding Charm with a DIY Crib Skirt
To complete the crib’s look, we fashioned a delightful crib skirt from the same type of flat sheet used for the curtains, ensuring a cohesive design throughout the room. We elevated its simple beauty by painting playful white polka dots and adding a cute peek-a-boo slit adorned with a small bow. Our “super secret lazy trick” for installing it makes it not only adjustable but also incredibly easy to position: we simply laid the flat sheet between the mattress and the crib bottom. This method allows for easy height adjustments as the crib mattress is lowered, a detail we explained further HERE.
Enchanting Wall Decor: Handmade Paper Flowers
Above the crib, a captivating display of handmade paper flowers adds a whimsical and artistic touch to the nursery walls. These vibrant blooms bring a burst of color and a soft, three-dimensional element to the space, creating a focal point that is both charming and unique. We previously shared a step-by-step guide on how to create these beautiful paper flowers in THIS post, demonstrating just how simple it is to achieve such an impactful decorative feature with minimal expense.
Dresser and Decorative Accents: Curated Finds and Creative DIYs
The dresser serves as a practical storage solution and a canvas for showcasing some of our favorite decorative pieces. Each item on it has a story, reflecting our commitment to creating a personalized and budget-friendly space.
Vintage Charm and Sentimental Touches
A beautiful vintage-inspired poster proudly sits atop the dresser, its classic design adding a touch of timeless elegance. Alongside it, a practical lamp provides soft lighting for nighttime feeds and diaper changes, while a charming, old-fashioned bicycle figurine adds a playful, nostalgic element. This miniature bicycle was a fantastic score from a thrift store, discovered on the very same day we found the canvas for the poster – truly a day of exceptional finds! And those tiny shoes… well, they are simply too precious to be hidden away. Displaying them allows us to enjoy their sweet charm every single day, serving as a constant reminder of the little feet that will soon fill them.
The Thrifty Lamp Makeover
This lamp is a testament to the power of a good makeover. The entire lamp and shade cost us a mere $1.50 at the thrift store! We transformed its base with a fresh coat of Ivy Leaf colored spray paint, matching the hue we used on our wicker basket for a cohesive look. The lampshade received an even more unique treatment: it’s lovingly adorned with delicate crepe paper flowers, turning a plain shade into a whimsical piece of art. The intricate detail of these handmade flowers adds an incredible softness and character to the lamp, making it a true statement piece in the room.
Aren’t the crepe paper flowers just exquisite? They add such a charming, handcrafted feel to the lamp. We’ll be sure to post a detailed tutorial on how to make them sometime soon, so you can recreate this lovely accent for your own space!
A Whimsical Thrift Store Bicycle Find
This adorable little bicycle quickly became one of our favorite thrift store treasures. The moment I spotted it, I practically darted across the store to snatch it up! Priced at just a single dollar, it was an absolute steal. Originally black, a quick burst of cheerful yellow spray paint completely revitalized it, transforming it into a bright and playful decorative element that perfectly suits the nursery’s joyful theme. It truly highlights how a little paint can completely change the character of an item.
Smart Storage Solutions: The Basket Makeover
Tucked neatly into a corner of the room is a basket that received its own special makeover. You can see the full transformation process HERE. Now, this once plain basket is brimming with diapers, wipes, and all the essential changing supplies, ready to be put to constant use. It’s a prime example of how repurposing and a little creative effort can yield stylish and functional storage solutions that fit seamlessly into the nursery’s design, keeping necessities organized and accessible without cluttering the space.
The Finishing Touch: A Practical Bolster Pillow
The last delightful detail that ties the room together is the bolster pillow, resting comfortably on our beloved nursing chair. We followed an excellent tutorial found HERE, and the pillow came together remarkably quickly and easily. What we particularly love about this design is the ability to effortlessly remove the pillow form for washing. We imagine it will inevitably encounter milk spills or spit-up, so this practical feature ensures it can always be kept fresh and clean, contributing to the overall comfort and hygiene of the nursing space.
Achieving the Dream Nursery on a Shoestring Budget
We are incredibly proud of what we accomplished in this nursery, especially considering the tight budget and the limitations of living in a rental home where painting walls isn’t an option. Our approach proves that creativity, resourcefulness, and a willingness to embrace DIY projects can result in a personalized, beautiful, and highly functional space without breaking the bank. Every dollar was stretched, and every item was chosen with purpose and charm in mind.
Cost Breakdown: The Proof is in the Pennies!
Here’s a transparent look at how we managed to create such a charming nursery for an incredibly modest sum. Our strategy involved scouring clearance racks, embracing thrift store finds, and tackling many projects ourselves, proving that a beautiful space doesn’t require a lavish budget.
- Curtain and Bed Skirt Fabric: $6 (Two flat sheets, $3 each on clearance – an absolute steal for so much fabric!)
- Curtain Rod/Hardware: $4 (Simple yet effective, demonstrating that functionality doesn’t have to be expensive)
- Bedding and Bolster Pillow Fabric: $9 (1 yard floral fabric at $6/yd, and 1 yard aqua fabric at $3/yd – carefully chosen remnants)
- Paper Flowers: $2 worth of scrapbook paper (on sale), with the rest ingeniously sourced from our existing craft stash.
- Paint/Supplies for Crib: $10 (Includes a spray primer, and incredibly, the vibrant aqua paint was free with a promotional flyer!)
- Art (Vintage Poster): $1 (A lucky thrift store find that added character)
- Lamp (for dresser): $1.50 (A remarkable transformation for minimal cost)
- Bicycle Decoration: $1 (Another charming thrift store discovery, revitalized with paint)
- Basket (for diapers): $1 (An inexpensive base for a functional makeover)
- Spray Paint: $11.25 (Two cans of green for the basket and one can of yellow for the bicycle – a small investment for big impact)
GRAND TOTAL FOR A COMPLETE NURSERY: $46.75
This total speaks volumes about the power of DIY and savvy shopping. We hope this breakdown inspires you to embark on your own budget-friendly nursery projects!
Now that every last nursery project is meticulously completed, and the space is brimming with love and readiness, there’s only one thing left to do. We sincerely hope our sweet baby knows she is absolutely free to arrive any time now. Please, the sooner the better! We are beyond excited to welcome her into this specially prepared, cozy little world we’ve created just for her.







