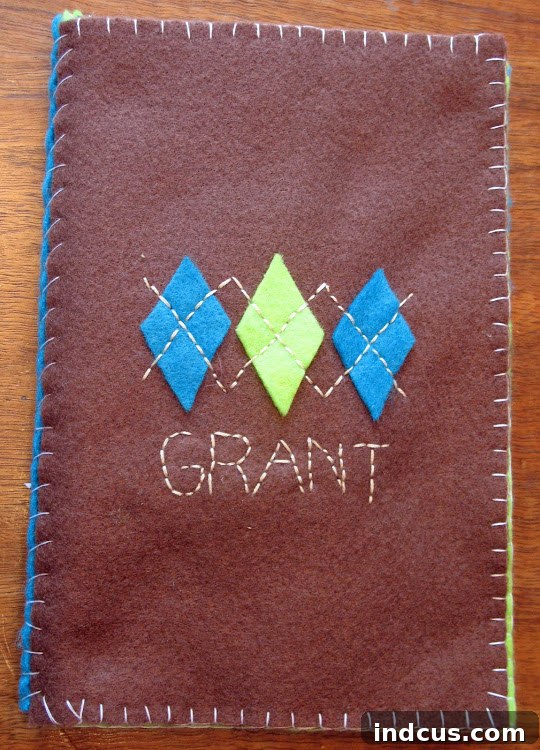
Crafting Joy: Create a Personalized Felt Name Book for Your Little One
As the holiday season draws near, the quest for truly meaningful and unique gifts begins. While store shelves overflow with options, there’s an undeniable magic in a handmade present. It speaks volumes of the love, time, and thoughtfulness poured into its creation. For those of us who cherish the art of crafting, there’s no better feeling than gifting something truly personal. Today, we’re thrilled to share a delightful project that has been a labor of love for my own child: a bespoke felt name book, designed to engage, educate, and inspire quiet play.
This isn’t just any book; it’s a vibrant, tactile learning adventure tailored specifically for a child, featuring each letter of their name paired with a corresponding picture. Imagine the joy in their eyes as they recognize their own name, letter by letter, brought to life through soft felt and intricate stitching. This personalized felt name book serves as an exceptional educational toy and a treasured keepsake, perfect for Christmas or any special occasion. Let’s delve into the charm of this project and discover how you can create one too, transforming simple felt sheets into a captivating learning tool.
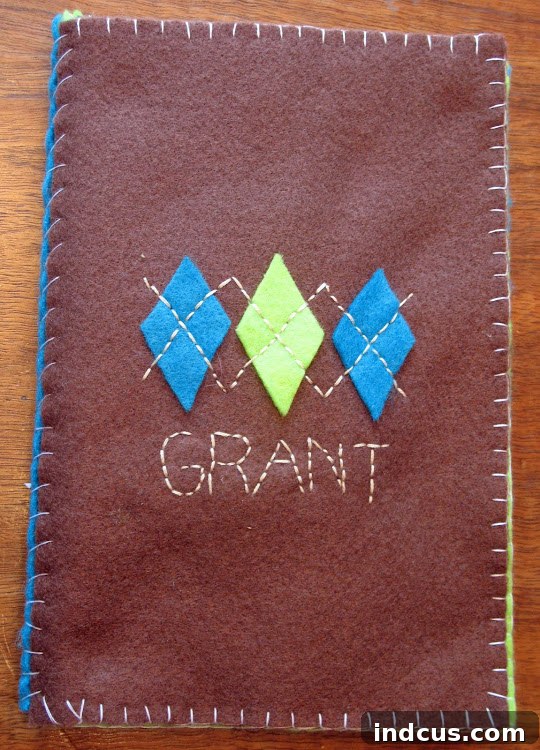
Ready to peek inside this heartwarming creation and explore the wonderful world of felt craftsmanship? Each page is a miniature masterpiece, carefully stitched to ignite curiosity and foster early literacy skills. From vibrant fruits to friendly robots, every element is designed to make learning the alphabet an interactive and enjoyable experience for toddlers and preschoolers alike.
A Glimpse Inside: Exploring Each Personalized Page of Our DIY Quiet Book
The beauty of a felt name book lies in its interactive and educational design. Each spread is an opportunity for discovery, linking letters to familiar objects and sounds. Through bright colors and varied textures, these pages offer a rich sensory experience that makes learning engaging and memorable. Let’s explore some of the vibrant pages we’ve crafted, showcasing how simple felt shapes can transform into captivating learning tools for young minds.
G is for Grapes: A Sweet Start to Tactile Learning
Our alphabet adventure begins with the letter ‘G’, beautifully represented by a cluster of luscious grapes. Crafted from varying shades of purple and green felt, these grapes offer a wonderful tactile experience. Children can trace the curves of the ‘G’ with their fingers and feel the individual felt “berries,” helping them to connect the visual letter with a concrete image and its corresponding sound. This page encourages discussions about colors, healthy snacks, and where grapes grow, making it much more than just a letter page – it’s a tiny lesson in nutrition and nature!
R is for Robot: Engaging Mechanical Fun for Early Learners
Next, we encounter ‘R’ for Robot! This charming felt robot, pieced together with different colored felt scraps, is an instant favorite. The geometric shapes of the robot provide a great opportunity to talk about basic forms, while the intricate stitching gives it personality and depth. Children can imagine the robot moving and making sounds, stimulating their creativity and narrative skills. It’s a fantastic way to introduce the letter ‘R’ with a fun, relatable character, encouraging imaginative play and vocabulary expansion related to technology and machinery.
A is for Alligator: An Adventure with Alphabet Animals
The letter ‘A’ comes alive with a grinning alligator! This green felt creature, with its distinct teeth and scales, provides a fascinating subject for young learners. Crafting animal figures from felt is particularly rewarding as the material lends itself well to soft, rounded shapes and expressive details. This page not only teaches the letter ‘A’ but also sparks conversations about animals, their habitats, and even the sounds they make, making learning an immersive and engaging experience. It’s a fantastic way to explore the animal kingdom through craft.
N is for Net: Catching Knowledge and Fun
The page for ‘N’ features a simple yet effective net. This image allows for versatility in storytelling – perhaps it’s a fishing net for catching imaginary fish, a butterfly net for exploring nature, or even a soccer goal net for sports enthusiasts. The subtle stitching to create the mesh effect demonstrates how even basic shapes can be made visually interesting and engaging. This page is excellent for teaching the letter ‘N’ and expanding vocabulary related to various uses of a net, from scientific exploration to everyday activities.
T is for Teepee: A Glimpse into Cultural Stories
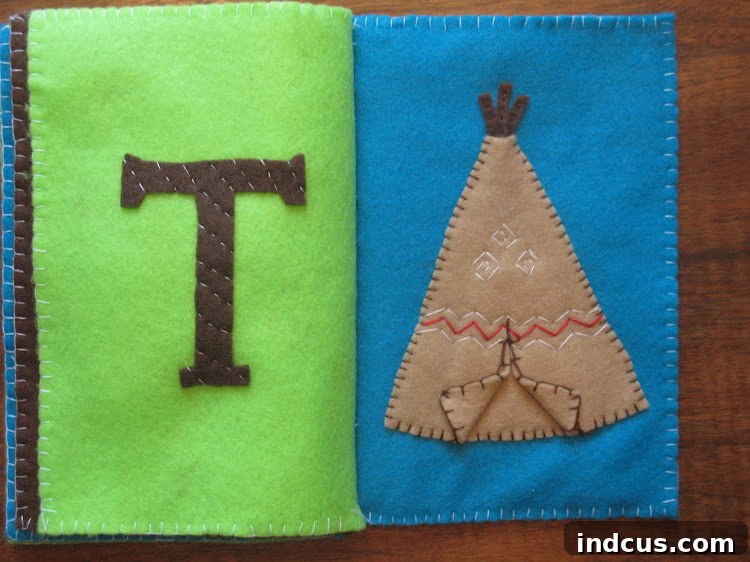
Concluding our letter showcase, ‘T’ is for Teepee. This page offers a unique opportunity to introduce children to different cultures and historical dwelling structures. The vibrant colors and distinct triangular shape of the teepee make it visually appealing and intriguing. Discussing the teepee can open doors to conversations about history, diverse communities, and architectural ingenuity, making the learning experience both broad and deep. It’s a wonderful way to foster cultural awareness through a simple, handmade craft.
The Finishing Touches: Back Cover and Overall Craftsmanship of Your Felt Book
Every great book deserves a thoughtful conclusion, and our felt name book is no exception. The back cover carries a small, personalized signature – a subtle yet significant detail that underscores the handmade nature and unique origin of the gift. This special touch elevates the book from a mere toy to a cherished family heirloom.
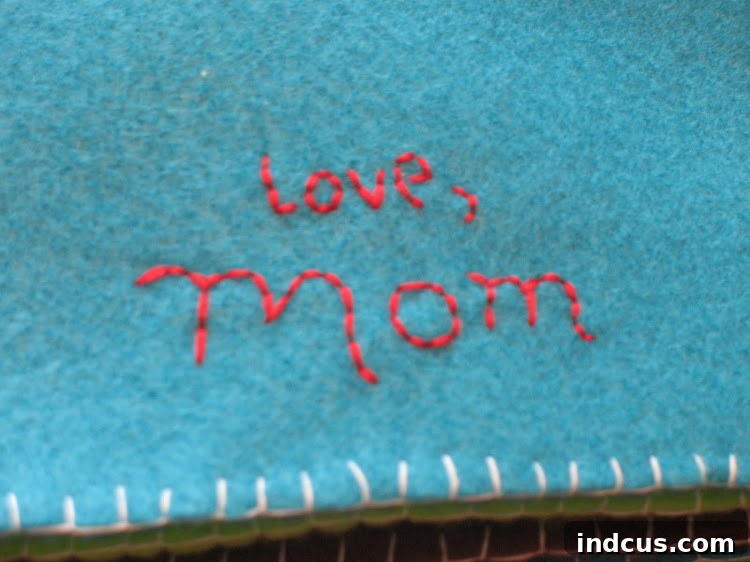
This signature isn’t just a label; it’s a mark of authenticity and love, adding an extra layer of sentimentality to an already cherished item. It’s a gentle reminder that this book was crafted with care, specifically for its little owner, distinguishing it from mass-produced toys and highlighting the value of personal effort in gift-giving.
And for those curious about the physical presence of the book, here’s a view from the side, revealing its delightful thickness and the robust binding that holds all these precious pages together. This view emphasizes the durability and substantial feel of a well-made felt quiet book.
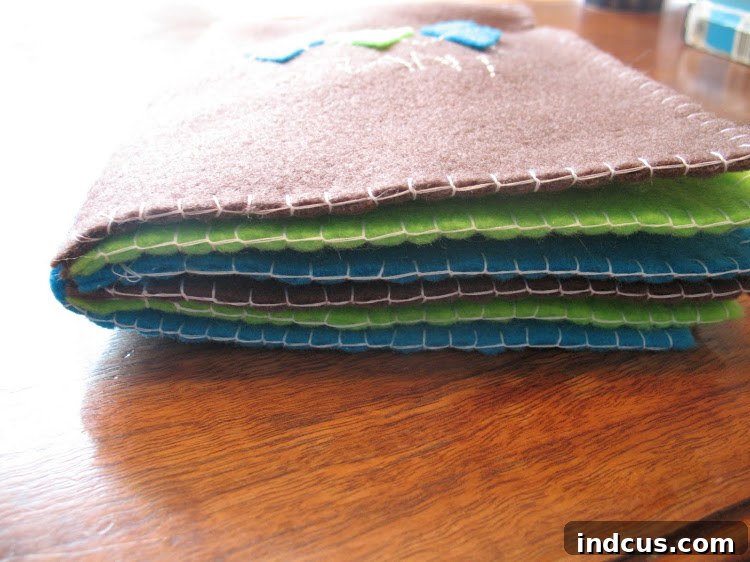
The side view emphasizes the book’s substantial feel and durability. The carefully stitched binding ensures that this quiet book can withstand countless hours of eager little hands exploring its pages. Its soft, rounded edges make it safe for even the youngest children, while the array of textures provides a rich sensory experience. This tactile quality is paramount, as children learn best through touch and interaction. The thickness also suggests a significant number of pages, ensuring plenty of content for extended play and learning sessions.
Your Guide to Crafting a Felt Name Book: A Step-by-Step DIY Journey
While I may not have a detailed tutorial for every single picture, the general idea behind creating this charming felt book is surprisingly straightforward and incredibly rewarding. If you’re inspired to embark on your own crafting adventure and create a personalized name book, here’s a comprehensive outline of how to bring your vision to life. This DIY felt craft project is perfect for crafters of all skill levels, offering immense satisfaction.
Essential Materials You’ll Need:
- Felt Sheets: A vibrant assortment of colors for the pages, letters, and picture elements. Opt for good quality craft felt that is both durable and easy to work with.
- Embroidery Thread: A selection of assorted colors to match your felt pieces and for decorative stitching.
- Embroidery Needle: A sharp-pointed needle suitable for piercing felt and handling embroidery thread.
- Fabric Scissors: Sharp scissors are crucial for precise cutting of felt shapes.
- Fabric Marker or Chalk: Useful for tracing letters and picture outlines onto felt sheets.
- Patterns/Stencils (Optional): For achieving consistent letter and picture shapes, especially if you prefer uniformity.
- Fabric Glue (Optional): Can be used to temporarily secure small felt pieces before stitching, though stitching alone provides the most secure and child-safe finish.
- Ruler or Measuring Tape: For accurately cutting uniform page rectangles, ensuring a neat and professional-looking book.
The Crafting Process: Transforming Felt into a Fantastic Book
Step 1: Planning and Design – Laying the Creative Foundation
The first and most enjoyable step is thorough planning! Begin by deciding on the child’s name you wish to feature. Then, brainstorm a simple, recognizable image or object for each letter of that name. Think about items that are visually appealing, easily represented in felt, and relatable to a child (e.g., ‘B’ for bear, ‘C’ for cat, ‘D’ for dinosaur). Sketch out your ideas for each page, carefully considering color combinations and how the letter will be integrated with its corresponding image. This meticulous planning phase allows for maximum creativity and ensures a cohesive and visually harmonious look for your entire book.
Step 2: Cutting the Felt – Precision and Preparation for Assembly
Once your designs are finalized and you have a clear vision for each page, it’s time to move on to cutting the felt. Start by cutting equal-sized rectangles that will form the individual pages of your book. Remember, each finished page will consist of two felt rectangles stitched together (a front and a back). Next, carefully cut out your chosen letters and all the small components for each picture. For letters, you can freehand them for a charming, rustic look or use stencils for a cleaner, more consistent appearance. For pictures, cut out individual shapes (for example, for a flower, cut petals, a stem, and a center separately) which you will then layer and stitch.
Step 3: Assembling Each Page – Bringing Pictures and Letters to Life
Now for the truly fun and artistic part: bringing your designs to life! Take one felt rectangle that will serve as the front of a page. Carefully arrange your cut-out letter and all the components of its corresponding picture onto this felt rectangle. Once you’re completely happy with the placement and composition, hand-stitch each piece securely using your chosen embroidery thread. Don’t be afraid to experiment with different stitching patterns – a simple running stitch works wonderfully for outlines, but a backstitch or a decorative blanket stitch can add more definition, texture, and visual interest. The stitching itself adds immense character and charm to each shape, making your felt book truly unique. Ensure all small pieces are firmly attached to prevent them from coming loose with enthusiastic play.
Step 4: Creating the Individual Pages – Joining Fronts and Backs with Care
After all your pictures and letters are meticulously stitched onto the front of each page, it’s time to create the individual, sturdy book pages. Take a decorated felt rectangle (the finished front of a page) and place it directly on top of another plain felt rectangle (which will serve as the back of that page). Using a neat blanket stitch, carefully sew around three of the outside edges, making sure to leave one side completely open. This essential technique creates a sturdy, finished edge for each page and gives them a soft, slightly padded feel, enhancing the sensory experience. Leaving one side open is crucial for the final binding step of the book.
Step 5: Binding the Book – The Grand Finale of Your Crafting Project
Once all your individual pages are complete, decorated, and their three sides neatly stitched, it’s time to assemble the entire book. Stack all your finished pages neatly, ensuring that the unstitched edges are perfectly aligned. Using a long, sturdy needle and strong embroidery thread (or even dental floss for exceptional durability!), stitch through all thicknesses along the open, aligned edge. These “long stitches” will form the binding, holding the entire book together securely and creating a robust spine. Make sure your stitches are tight, evenly spaced, and reinforced to create a durable book that can withstand years of love and play. And just like that, with a flourish, your personalized felt name book is complete! Wha-la! Done!
I have never made a book entirely from felt before this specific project, although I have immensely enjoyed creating a fabric name book in the past. Felt is an absolute joy to work with, primarily because it’s wonderfully forgiving, doesn’t fray when cut, and holds its shape beautifully, making it ideal for beginners and intricate cutouts alike. Best of all, it’s incredibly affordable! You can often find high-quality craft felt sheets for as little as 20 cents each, making it a budget-friendly material for even the most elaborate projects. Sometimes, you can even discover felt sheets with delightful patterns or textures, adding an extra layer of visual interest to your creations. I thoroughly enjoyed experimenting with different stitching patterns for each element, discovering how simple stitches can dramatically enhance the shapes and bring them to life. Remember, the stitching adds immense character, so embrace the opportunity to play with it and let your creativity shine!
Why Choose a Handmade Felt Book? Benefits for Learning and Play
Beyond being a charming handmade gift, a personalized felt name book offers a plethora of invaluable benefits for children, making it a truly valuable addition to their learning and play resources. This DIY quiet book serves multiple developmental purposes, making it a thoughtful investment in a child’s growth.
- Early Literacy Development: By associating each letter of their name with a familiar, tangible object, children begin to develop crucial letter recognition skills and phonological awareness in a fun, tactile way. This personalized approach makes learning more engaging, memorable, and deeply relevant to the child.
- Fine Motor Skill Enhancement: The act of turning soft pages, tracing felt shapes with their fingers, and pointing to objects helps children develop crucial fine motor skills, refine hand-eye coordination, and enhance dexterity, which are foundational for tasks like writing and drawing.
- Sensory Engagement: The soft, varied textures of felt provide a rich and stimulating sensory experience. Children can touch, feel, and explore the different elements on each page, stimulating their tactile senses and enhancing their overall engagement with the book’s content.
- Quiet Play and Concentration: Felt books are inherently “quiet books.” They offer a wonderful opportunity for independent, focused play without the overstimulation of electronic devices. This encourages concentration, imaginative thought, and self-directed learning, fostering calm moments.
- Vocabulary Expansion: Each image and letter pairing provides a natural chance to introduce new words, discuss concepts, and tell stories, thereby expanding a child’s vocabulary and general knowledge about the world around them in an organic way.
- Emotional Connection and Personalization: A book crafted specifically for a child’s name carries immense sentimental value. It’s a tangible expression of love and effort, fostering a deeper emotional connection to reading, learning, and the gift itself.
- Durability and Safety: Felt is a remarkably resilient material that stands up exceptionally well to enthusiastic play. When properly stitched and constructed, felt books are very durable, and the soft, non-toxic material makes them a safe and comforting toy for young children.
- Budget-Friendly Crafting: As previously mentioned, felt is an inexpensive material, allowing crafters to create a high-quality, personalized, and deeply meaningful gift without incurring significant costs.
Explore More Handmade Quiet Book Inspiration
If this project has sparked your interest in the wonderful world of quiet books and felt crafting, you’re in luck! There’s a vast community of crafters who share amazing ideas for DIY quiet books. Here are a few more delightful quiet book projects that you might enjoy exploring, offering different themes, complexities, and creative challenges:
- The Original Fabric Quiet Book: A classic starter project, perfect for those new to the quiet book crafting scene.
- Personalized Fabric Name Book: Another excellent take on customizing a book with a child’s name, offering alternative design ideas.
- “Favorite Things” Book: Create a charming book centered around a child’s preferred objects, animals, and activities, making it even more personal.
- Fabric Quiet Book For Boys: Tailored themes and interactive activities specifically designed to appeal to boys’ interests.
- Boy Felt Name Book 2: More inspiration and creative ideas for boy-themed personalized felt books, expanding on previous concepts.
- Girl Felt Name Book: Sweet and charming design ideas for girl-themed personalized felt books, perfect for little princesses.
Embark on Your Crafting Journey!
Creating a personalized felt name book is more than just a craft project; it’s an act of love that results in a truly cherished keepsake. It’s a wonderful opportunity to slow down, engage your creativity, and make something profoundly special for the little ones in your life. Whether you’re preparing for Christmas, a birthday, or simply want to create a unique educational toy that stands the test of time, this DIY felt book project offers endless possibilities for customization and heartfelt expression.
We hope this detailed guide inspires you to pick up some felt and embroidery thread and start stitching your own story. The joy of seeing a child interact with a gift made especially for them is unparalleled. Share your unique creations with us – we’d absolutely love to see the imaginative name books you bring to life! Happy crafting, and may your needlework be filled with love and inspiration!