
Delicious & Easy No-Bake Rice Krispie Ice Cream Cone Treats: The Ultimate Kid-Friendly Dessert
Finding the perfect treat that is both delightful for children and surprisingly simple for adults can often feel like a quest. Whether it’s for a birthday party, a classroom celebration, or just a special afternoon snack, the ideal dessert strikes a balance between fun, flavor, and ease of preparation. We recently stumbled upon (or rather, were inspired by) a creation that perfectly embodies these qualities: the ingenious Rice Krispie Ice Cream Cone Treat. This isn’t just any dessert; it’s a delightful illusion, a clever twist that brings joy without the fuss, and it’s become an instant favorite.
The inspiration for these charming treats came from a truly special place – my mom’s Sunday school class. She dedicates immense thought and care to teaching eight-year-olds at church, making every session engaging and memorable. Her students absolutely adore her, and it’s easy to see why. Each week, she goes above and beyond, and one particular week, she unveiled these unbelievably cute treats. The moment I saw them, I knew I had to share this brilliant idea with everyone seeking a dose of sweet inspiration.
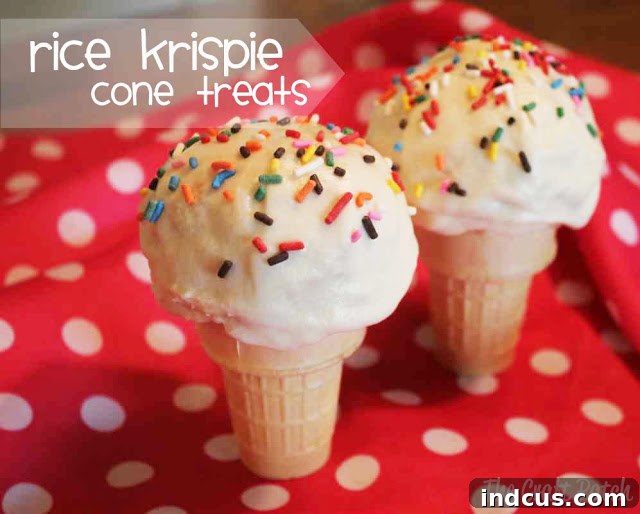
Imagine this: a classic ice cream cone, but instead of cold, melting scoops, it’s filled with chewy, gooey Rice Krispie treats. Crowned with a swirl of velvety buttercream frosting and a generous scattering of colorful sprinkles, it perfectly mimics the look of a freshly scooped ice cream cone. The magic, however, lies in its stability – it’s an ice cream cone that defies melting, making it an absolute game-changer for any occasion.
Why These Rice Krispie Cone Treats Are an Absolute Must-Try
Beyond their undeniable cuteness, these Rice Krispie cone treats boast a multitude of advantages that make them stand out in the world of desserts. They address many common challenges faced by parents and party planners, offering practical solutions wrapped in a deliciously fun package.
1. The Unbeatable Cuteness Factor
Let’s be honest, presentation counts for a lot, especially when it comes to tempting young palates. These treats are inherently adorable. The illusion of an ice cream cone is instantly captivating, drawing smiles and sparking curiosity. When you present a plate of these, expect gasps of delight. They elevate any dessert table, making them perfect for themed parties, holiday gatherings, or simply making an ordinary day feel extraordinary. The visual appeal alone makes them a winner, proving that sometimes, the simplest ideas are the most impactful.
2. Quick, Easy, and No-Bake Convenience
One of the most significant benefits of these treats is their incredible ease and speed of preparation. Unlike traditional baked goods such as cupcakes or cookies, Rice Krispie treats require no oven time, meaning you won’t be heating up your kitchen, a huge plus during warmer months. The entire process, from mixing to assembling, is significantly faster than baking and decorating a batch of cupcakes. This no-bake aspect not only saves time but also reduces stress, allowing you to whip up a large batch for a crowd without breaking a sweat. It’s the ultimate hassle-free dessert solution for busy schedules.
3. Mess-Free Enjoyment
Traditional ice cream cones can be notoriously messy, leading to sticky fingers, stained clothes, and the constant search for napkins. These Rice Krispie cones, however, offer a delightfully clean eating experience. Since they don’t melt, there’s no sticky drip or race against the clock. Children can enjoy them at their own pace without the need for plates, forks, or excessive cleanup. This makes them ideal for outdoor events, picnics, car rides, or any situation where minimizing mess is a priority. Parents everywhere will appreciate the simplicity and the lack of sticky aftermath.
4. The Delightful “Doesn’t Melt” Novelty
Perhaps the most charming aspect for children is the playful trickery of these treats. The idea of an “ice cream cone that doesn’t melt” is pure magic to an eight-year-old. It sparks their imagination and adds an element of fun and surprise. This unique characteristic makes them a memorable addition to any event, generating giggles and conversation. It’s a treat that not only satisfies a sweet tooth but also offers a mini-experience of wonder.
Crafting Your Own Rice Krispie Ice Cream Cone Treats: A Step-by-Step Guide
Ready to embark on this deliciously easy culinary adventure? Here’s everything you need to know to create your own batch of these irresistible no-bake delights. You’ll find that with a few simple ingredients and a little creativity, you can bring these charming treats to life.
Essential Ingredients & Tools:
- Crispy rice cereal (like Rice Krispies)
- Marshmallows
- Butter
- Ice cream cones (sugar cones or waffle cones work best for stability)
- Powdered sugar (confectioners’ sugar)
- More butter (for frosting)
- Milk or cream
- Vanilla extract
- Sprinkles (your favorite colors and shapes!)
- Large saucepan
- Mixing bowl
- Spatula or wooden spoon
- Measuring cups and spoons
Step-by-Step Instructions:
-
Whip Up a Batch of Perfect Rice Krispie Treats:
Start by preparing your classic Rice Krispie treats. While you can find the original recipe HERE, the basic method involves melting 3 tablespoons of butter in a large saucepan over low heat. Add 1 package (10 oz., about 40) of regular marshmallows and stir until completely melted and smooth. Remove from heat and promptly stir in 6 cups of crispy rice cereal until well coated. For best results, work quickly while the mixture is still warm and pliable. This forms the delicious core of your cone treats.
Pro Tip: To prevent the mixture from sticking to your hands, lightly grease them with butter or cooking spray before handling the warm cereal mixture. This will make the next step much easier!
-
Craft Your Creamy Buttercream Frosting:
Next, prepare a batch of delectable buttercream frosting. A fantastic starting point for a classic buttercream recipe can be found HERE. The key for these cone treats is to achieve a slightly thinner, more “drippy” consistency than normal frosting, which will help it naturally “slouch” and mimic melting ice cream. To do this, add a little extra milk (or heavy cream) to your frosting, a teaspoon at a time, until it reaches a soft, spreadable, almost pourable consistency. You want it to hold its shape for a moment but then relax slightly. This subtle adjustment is crucial for achieving that authentic ice cream look.
Coloring Option: Feel free to add a few drops of food coloring to your buttercream to create vibrant “strawberry,” “mint,” or “blueberry” ice cream effects!
-
Fill the Cones and Shape the “Scoop”:
While your Rice Krispie mixture is still warm and manageable, it’s time to fill your ice cream cones. Gently take a handful of the mixture and carefully press it into the cone, ensuring it’s packed firmly enough to be stable but not so tight that it breaks the cone. Once the cone is filled, shape the remaining mixture on top into a rounded ball, resembling a scoop of ice cream. This step requires a gentle touch to achieve a pleasing, realistic shape. You can use lightly buttered hands or the back of a spoon to smooth and shape the tops.
Cone Choice: Sugar cones or waffle cones tend to be sturdier than plain cake cones and provide a more authentic ice cream look and feel. They also offer a delightful crunch against the chewy Krispies.
-
Frost with Artistic Flair:
Now for the fun part – frosting! Using a knife, small spatula, or even a spoon, generously frost the shaped Rice Krispie “scoop” with your slightly thinner buttercream. As you apply it, allow it to gently “slouch” or drip slightly down the sides, just like real soft-serve or a melting scoop of ice cream would. Don’t aim for perfection; a little imperfection here enhances the authentic melted ice cream appearance. The slightly wetter consistency of your buttercream will naturally facilitate this effect, creating a beautifully realistic texture.
-
Adorn with Sprinkles:
The final touch! While the buttercream frosting is still wet and tacky, generously sprinkle your chosen toppings over the “ice cream.” This is where you can truly customize each treat. Colorful jimmies, sparkling sanding sugar, rainbow nonpareils, or even mini chocolate chips will adhere perfectly to the fresh frosting, adding that quintessential ice cream parlor finish. Work quickly from treat to treat to ensure all your sprinkles stick.
Why These Treats Are Perfect for Any Occasion
These Rice Krispie ice cream cone treats aren’t just easy and cute; they are incredibly versatile and suitable for a wide array of events and celebrations:
- Birthday Parties: A fantastic alternative to birthday cake, offering individual, mess-free portions.
- Classroom Celebrations: Easy to transport and distribute, and allergy-friendly if you adjust ingredients.
- Summer Gatherings & BBQs: No melting worries mean they hold up perfectly outdoors.
- Playdates & Picnics: Convenient for kids to grab and go.
- Bake Sales & Fundraisers: Their unique appeal and charming look make them excellent sellers.
- Just Because: A simple way to bring a smile to anyone’s face on an ordinary day.
Creative Variations & Customization Ideas
The beauty of these treats lies in their adaptability. Don’t be afraid to experiment and personalize them to suit different tastes or themes:
- Cereal Swaps: Try using Cocoa Krispies for a chocolatey base, Fruity Pebbles for a burst of color and flavor, or even Cinnamon Toast Crunch for a spicy twist.
- Mix-Ins: Fold mini chocolate chips, sprinkles, chopped nuts (ensure no allergies!), or even dried fruit into the Rice Krispie mixture before filling the cones for added texture and flavor.
- Flavored Frostings: Infuse your buttercream with different extracts like mint, almond, lemon, or add cocoa powder for a rich chocolate frosting.
- Dipped Cones: For an extra layer of decadence, dip the empty ice cream cones into melted chocolate (white, milk, or dark) and allow them to set before filling with the Rice Krispie mixture. You can even roll the chocolate-dipped rims in more sprinkles!
- Themed Sprinkles: Use holiday-specific sprinkles for Christmas, Halloween, or Valentine’s Day to match any occasion.
- Edible Decorations: Add small edible candy eyes, mini chocolate candies, or gummy worms to make them even more whimsical.
Storage Tips
Once assembled, these Rice Krispie cone treats can be stored at room temperature in an airtight container for up to 2-3 days. For longer freshness, especially if using a dairy-based buttercream, they can be refrigerated. Just be sure to bring them back to room temperature for about 15-20 minutes before serving for the best texture and flavor of the frosting.
So, does it get any easier or cuter than this? We think not! These Rice Krispie Ice Cream Cone Treats are a testament to how simple ingredients can create something truly special and memorable. They are a delightful reminder that sometimes, the most ingenious ideas are the ones that blend familiarity with a touch of playful innovation. Go ahead, gather your ingredients, and prepare to delight everyone with these charming, no-bake masterpieces!







