
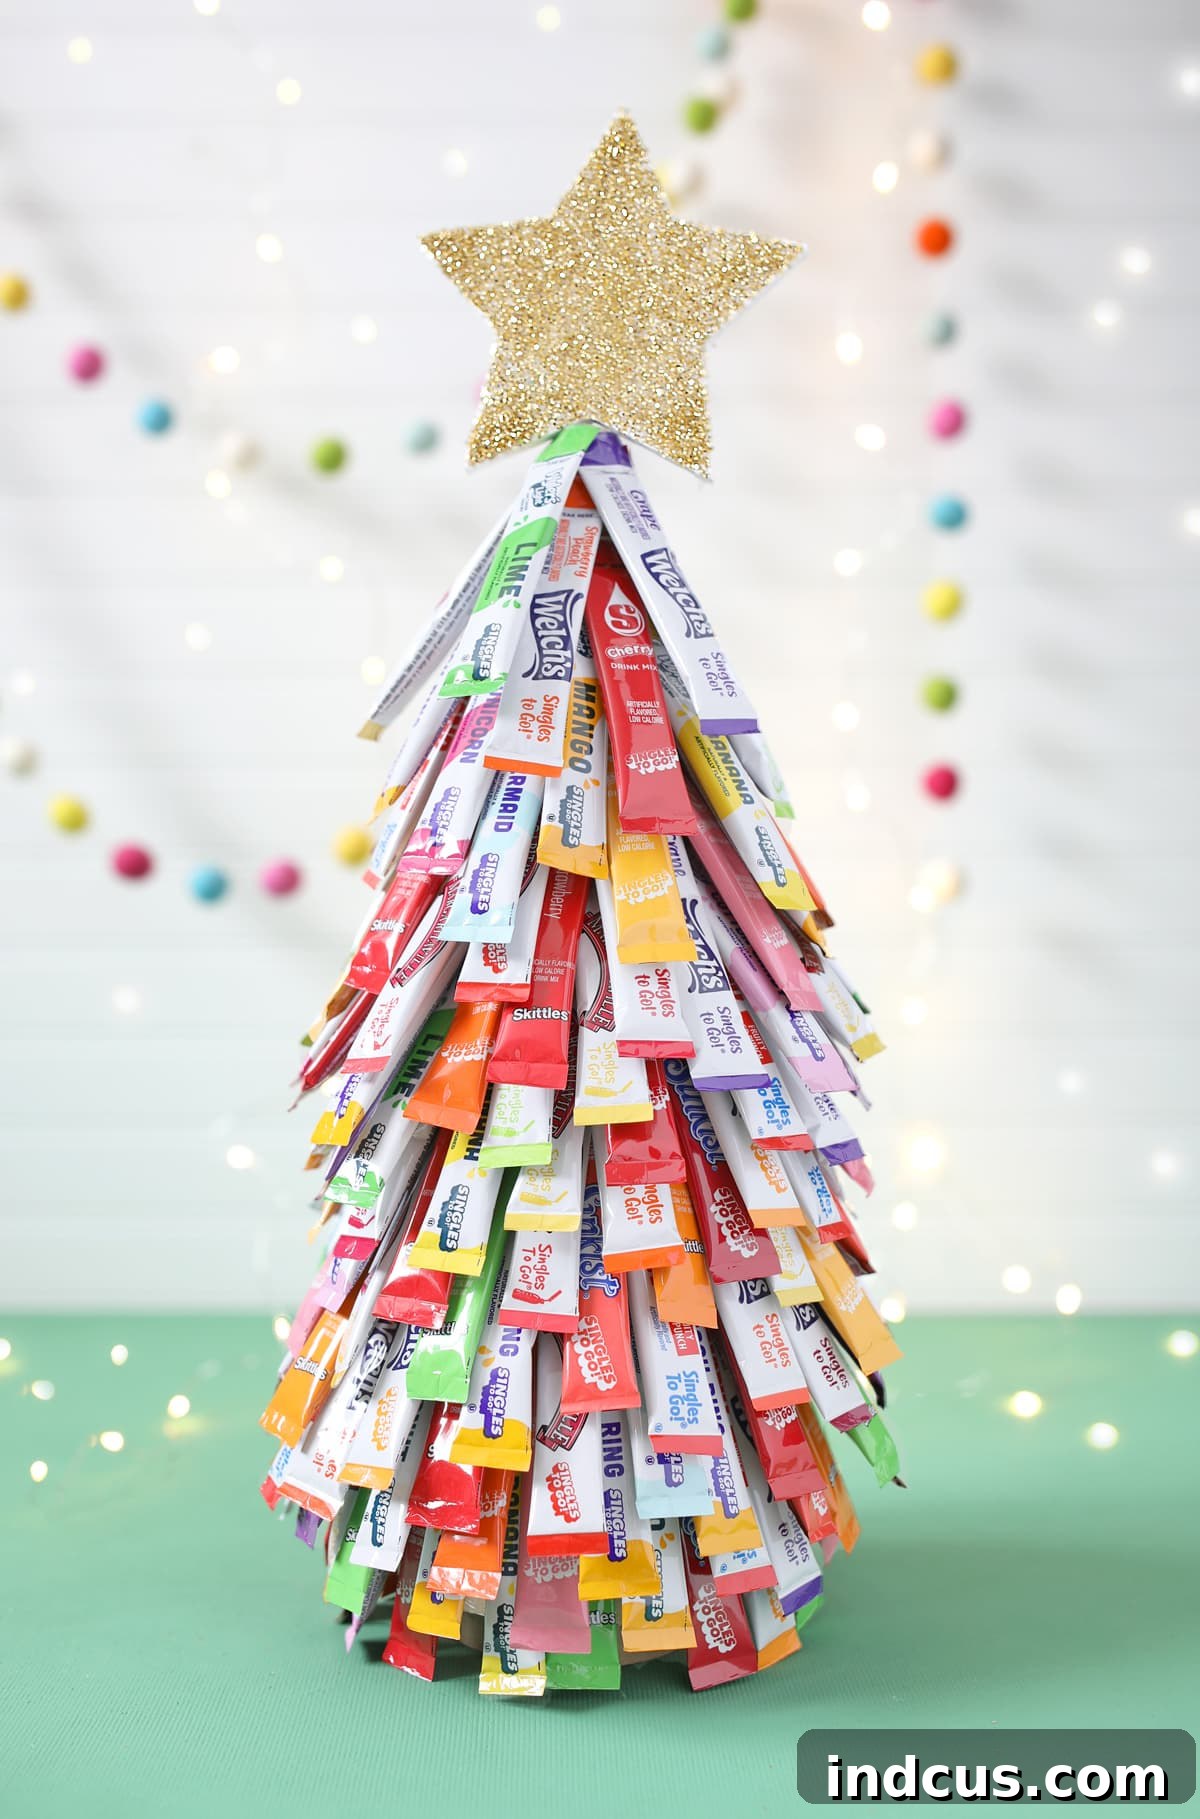
Craft a Stunning & Hydrating Holiday Drink Station: Your DIY Drink Flavor Packet Christmas Tree
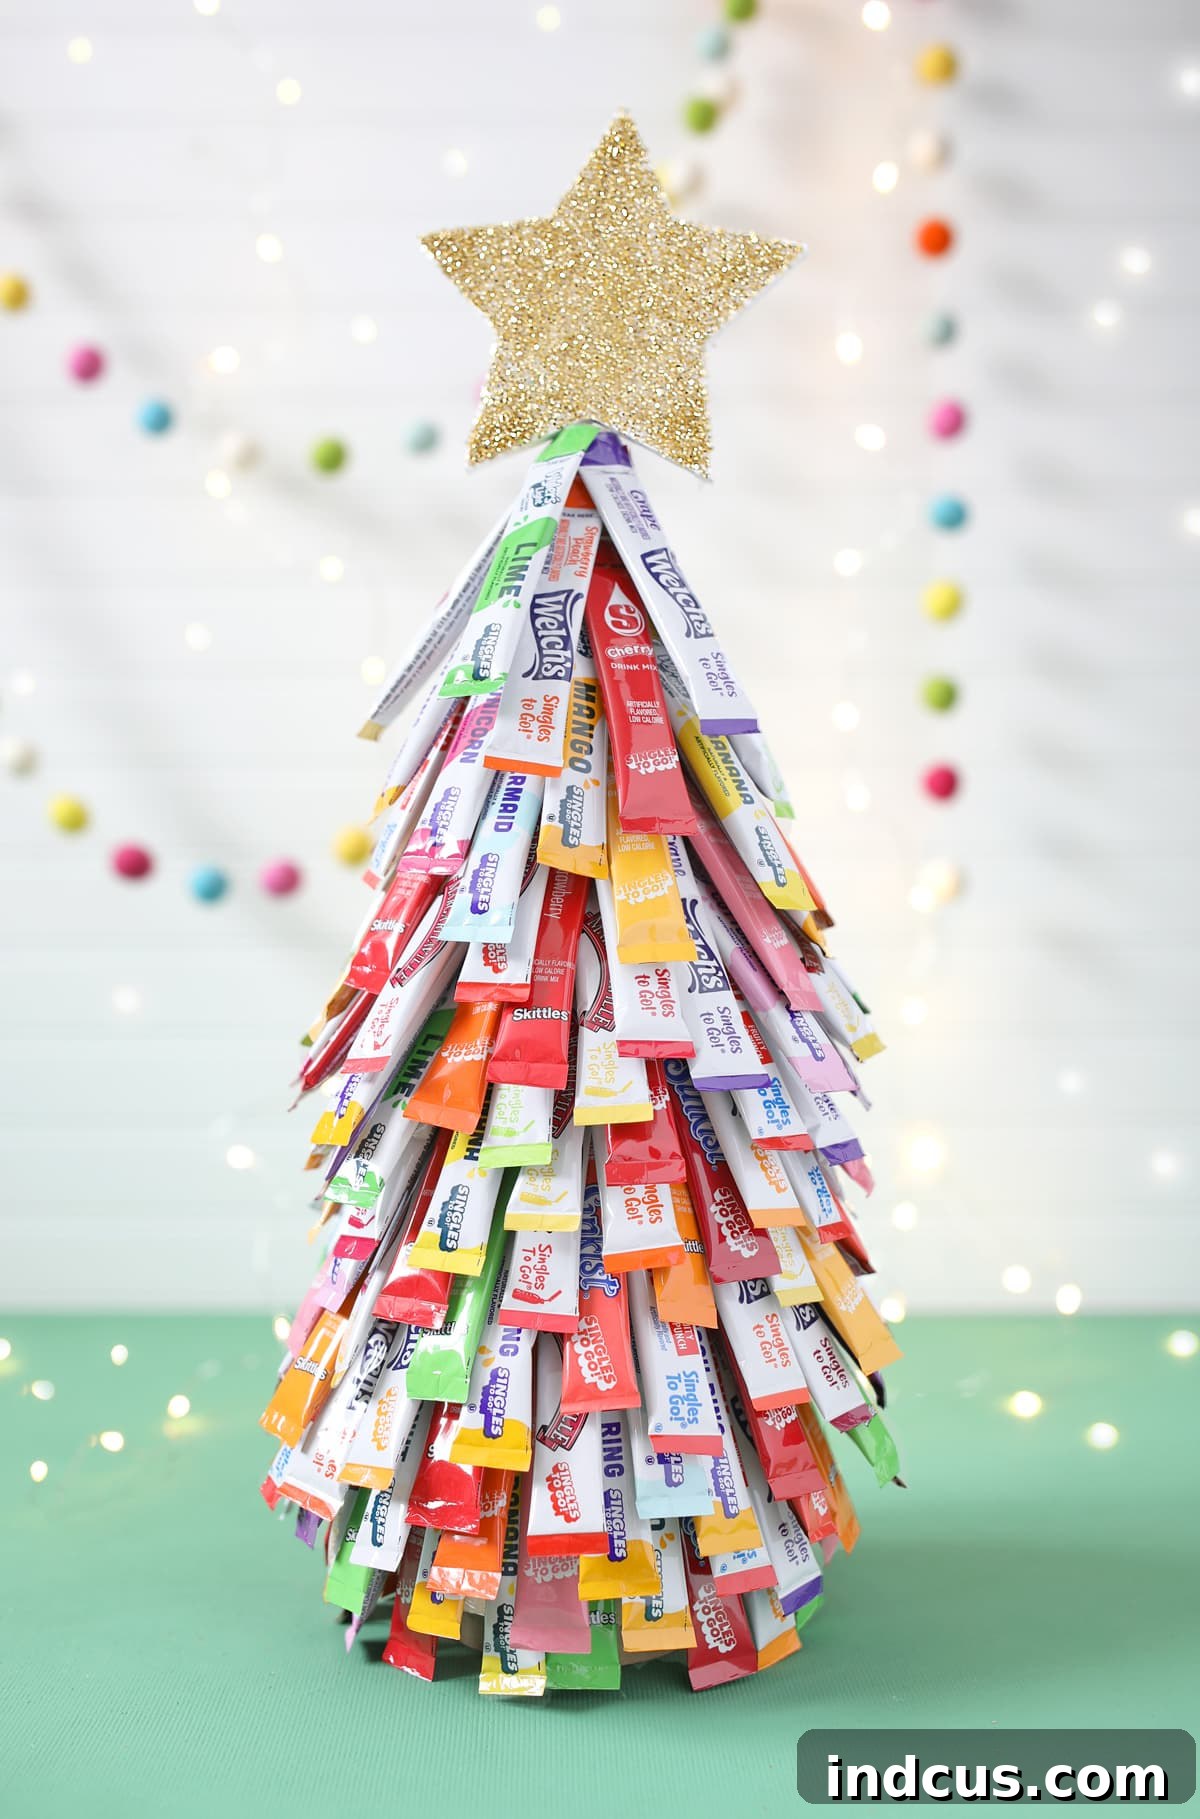
Transform your holiday party into a truly unforgettable event with a creative and highly functional centerpiece: a DIY Drink Flavor Packet Christmas Tree! This ingenious project not only serves as a vibrant and eye-catching decoration but also offers your guests a delightful and healthier beverage option. Imagine your party-goers’ delight as they pluck a flavor packet directly from a festive tree, ready to infuse their cold water with a burst of delicious taste, all without the guilt of added sugars typically found in traditional holiday drinks. It’s an interactive, customizable, and remarkably charming addition that promises to be the talk of the season, ensuring your holiday drink station is both festive and refreshingly practical.
For many, myself included, flavored water packets are an absolute game-changer. They’re that perfect, guilt-free indulgence that adds a little zest to an otherwise ordinary glass of water. So, when the opportunity arose to curate the drink station for this year’s highly anticipated holiday party, my mind immediately gravitated towards these unassuming little wonders. I envisioned something festive, unique, and utterly charming – a Christmas tree, but not just any tree. A magnificent, edible (or rather, drinkable) Christmas tree crafted entirely from an assortment of vibrant drink flavor packets. And let me tell you, the final creation was beyond adorable; it was a showstopper!
This isn’t just a craft; it’s an experience waiting to happen. It’s an opportunity to inject a generous dose of personality and thoughtfulness into your holiday gathering. The process is surprisingly straightforward, yielding results that are undeniably impressive. I’m so thrilled with how it turned out that I simply must share the step-by-step guide with you. You absolutely have to bring one of these to your next holiday celebration. It’s too much fun to keep to yourself; you simply must give it a try!
Why a Drink Packet Christmas Tree is Your Holiday Party Secret Weapon
Beyond its undeniable charm, this DIY drink station offers a plethora of benefits that make it an essential addition to any festive gathering. Firstly, it stands out as a unique conversation starter. Guests will be intrigued and delighted by this innovative display, sparking joyful interactions and compliments. Secondly, it champions healthier choices. In a season often brimming with sugary indulgences, offering a variety of sugar-free or low-sugar drink options allows guests to stay hydrated and refreshed without the caloric overload. It caters to those with dietary preferences or health goals, making everyone feel considered and cared for.
Furthermore, this project is incredibly versatile and customizable. You can select packets that match your party’s color scheme, feature a wide array of flavors to suit diverse palates, or even choose specific brands. It empowers guests to personalize their beverages, turning a simple drink into a delightful, interactive experience. The ease of preparation and the relatively low cost of materials also make it an attractive option for budget-conscious hosts who still want to make a big impact. It’s a craft that pays dividends in both aesthetic appeal and guest satisfaction, solidifying its place as a must-try holiday hack.
Essential Materials for Your Flavorful Creation
Gathering your supplies is the first exciting step towards building your very own drink packet Christmas tree. While the list is concise, the quality and variety of your chosen items can truly elevate the final display. Here’s what you’ll need, along with a few tips to ensure you have everything for a smooth crafting experience:
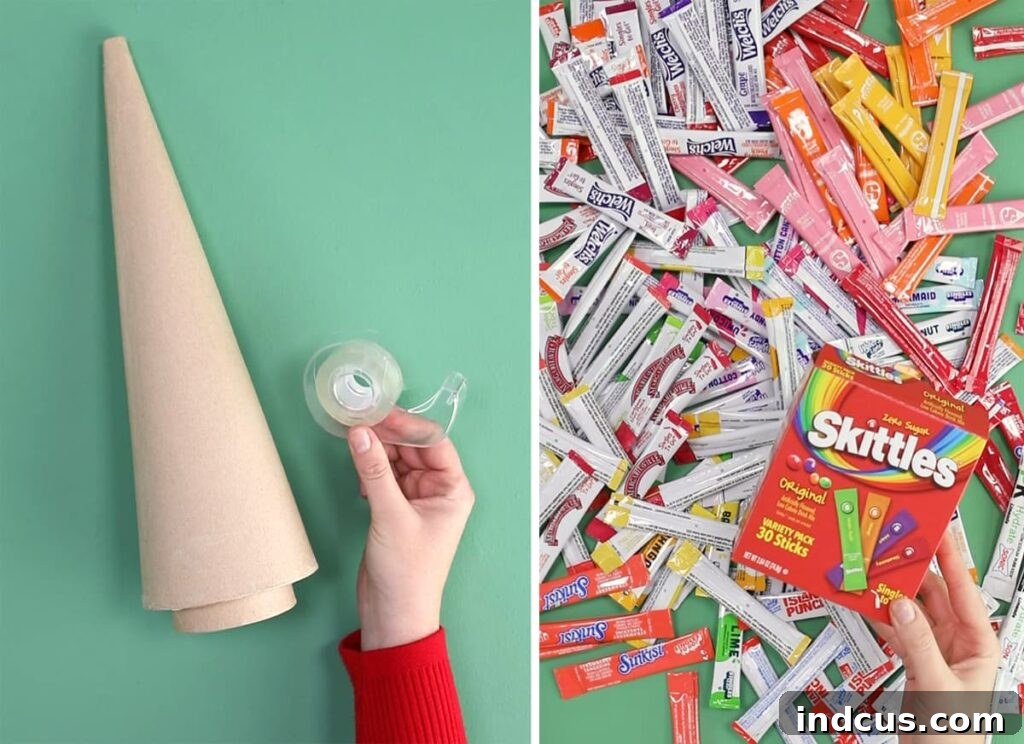
- Drink Flavor Packets: This is the star of your show! You’ll need a significant quantity, depending on the size of your cone. Aim for at least 50-100 packets for a 17-inch tree. Consider a variety of flavors and colors to create a visually appealing and diverse selection for your guests. Look for sugar-free or low-sugar options for a healthier twist, and perhaps even some festive, holiday-themed flavors like cranberry or spiced apple cider. Buying in bulk or during sales can be very cost-effective.
- Cone Christmas Tree: A 17-inch tall paper mache or foam cone provides the perfect base for your tree. The size is ideal for a tabletop display without being overly cumbersome. You can find these at craft stores, especially around the holiday season. If you can’t find paper mache, a sturdy foam cone will work just as well. Consider the overall height you desire for your display when choosing your cone size; smaller cones are great for mini versions!
- Clear Tape: Standard clear Scotch tape works perfectly. You’ll want a reliable tape that holds firmly but is also relatively easy to peel off by guests. Avoid heavy-duty tapes that might damage the packets when removed. Having a few rolls on hand is always a good idea, as you’ll be using quite a bit.
- Wooden Star or Bow for the Top: Every Christmas tree needs a crowning glory! A small wooden star that can be painted or glittered, or a beautiful festive bow, will complete the look of your drink packet tree. Choose something lightweight that won’t make your cone top-heavy and can be easily secured.
Step-by-Step Guide to Crafting Your Drink Packet Tree
With your materials ready, let’s dive into the fun part: assembling your unique holiday centerpiece. This process is enjoyable, and the gradual transformation of a simple cone into a dazzling display is incredibly satisfying. Take your time, enjoy the creative journey, and watch your vision come to life.
Step 1: Unpack and Prepare Your Flavor Packets
Begin by carefully unboxing all your drink packets. This might seem like a simple step, but it’s crucial for streamlining the assembly process. As you empty those boxes, you might be surprised by the sheer volume you’ve accumulated – it certainly brought a smile to my face, seeing so many vibrant options! Once unpacked, consider sorting them by color or flavor if you have a specific design in mind, or simply keep them mixed for a more eclectic look. Lay them out on a clean, flat surface, ensuring they are easily accessible. This preparation makes the subsequent steps much smoother and helps you visualize the abundance of choices available for your tree.
Step 2: Constructing the Foundation – The First Row
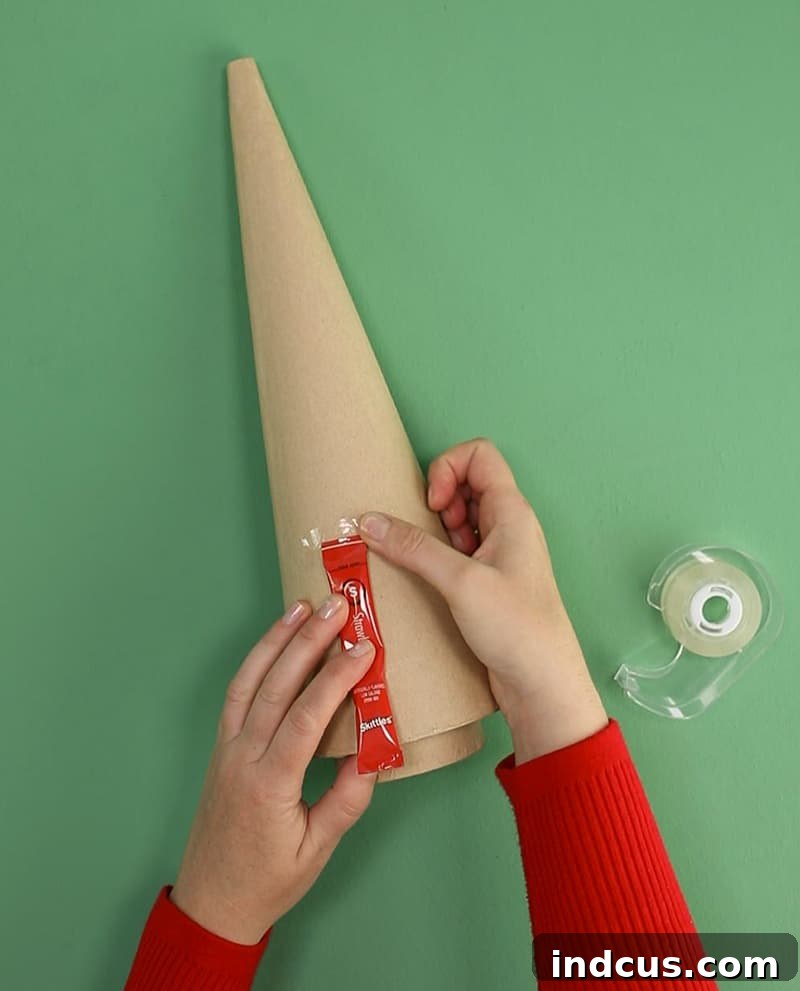
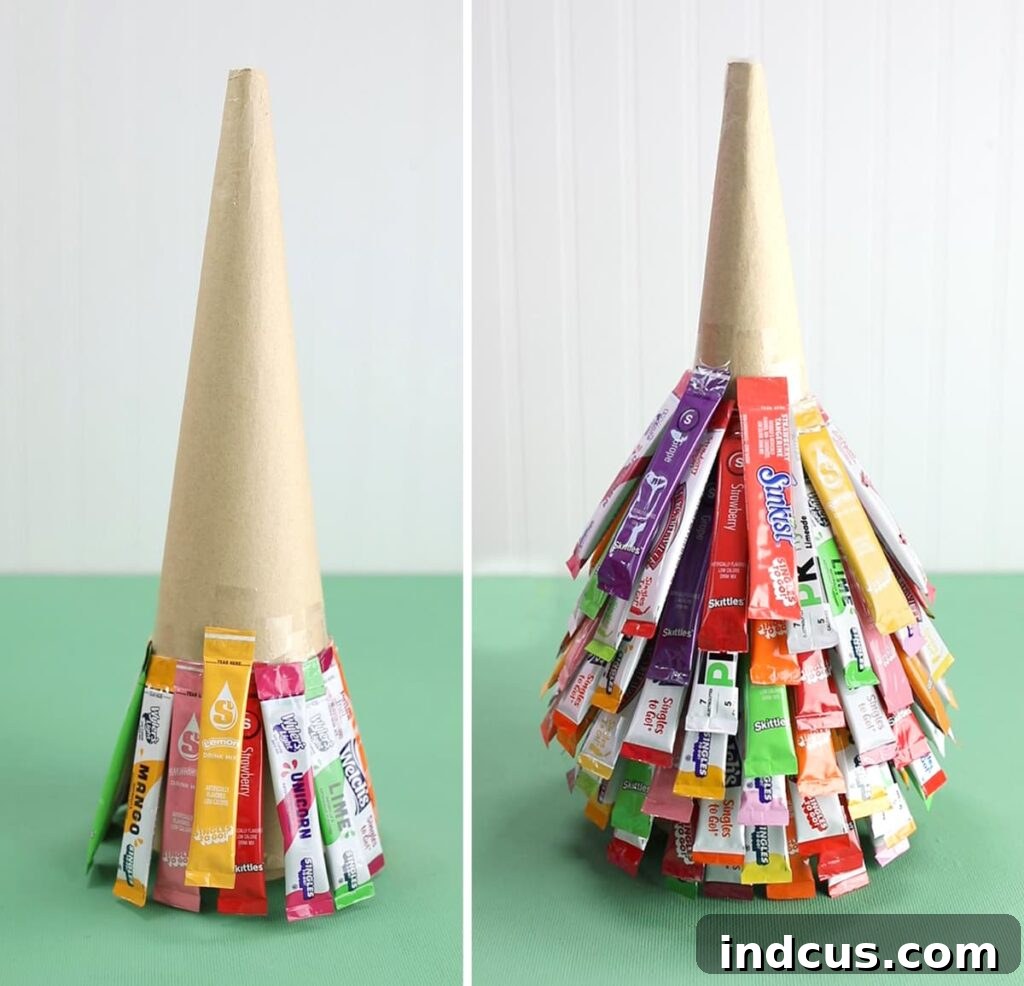
Now, let’s establish the base of your drink packet tree. Take your first drink packet and locate its smaller top end. Apply a small, discreet piece of clear tape to this end. Carefully position the packet against the base of your cone tree, ensuring that its bottom edge just grazes the tabletop. This placement is key for creating a full, attractive base. Once the first packet is securely taped, select the next packet. Place it as close to the first as possible, without allowing any overlap. You want the packets to nestle snugly side-by-side, forming a continuous, even ring around the entire circumference of the cone. Maintain this careful spacing and alignment as you continue to tape packets all the way around the base, completing your first foundational row. This precision sets the stage for the rest of your tree.
Step 3: Building Upwards – Layering the Rows
With your first row complete, it’s time to begin building upwards, creating the lush, full appearance of a classic Christmas tree. For the second row, start positioning packets approximately 1 inch higher than the top of the first row. The trick here is to stagger your packets, so each one in the new row sits just above the space between two packets in the row below. This creates a beautiful, seamless, and natural-looking coverage that hides the cone base effectively. As you progress further up the cone, the shape begins to narrow, and you might find yourself worrying less about perfectly straight, horizontal rows and more about ensuring each packet effectively covers the gaps below it. The goal is a dense, attractive arrangement where the packets create a rich, layered texture, making your tree truly spectacular as you work your way towards the apex.
Step 4: The Finishing Touch – Adorning the Top
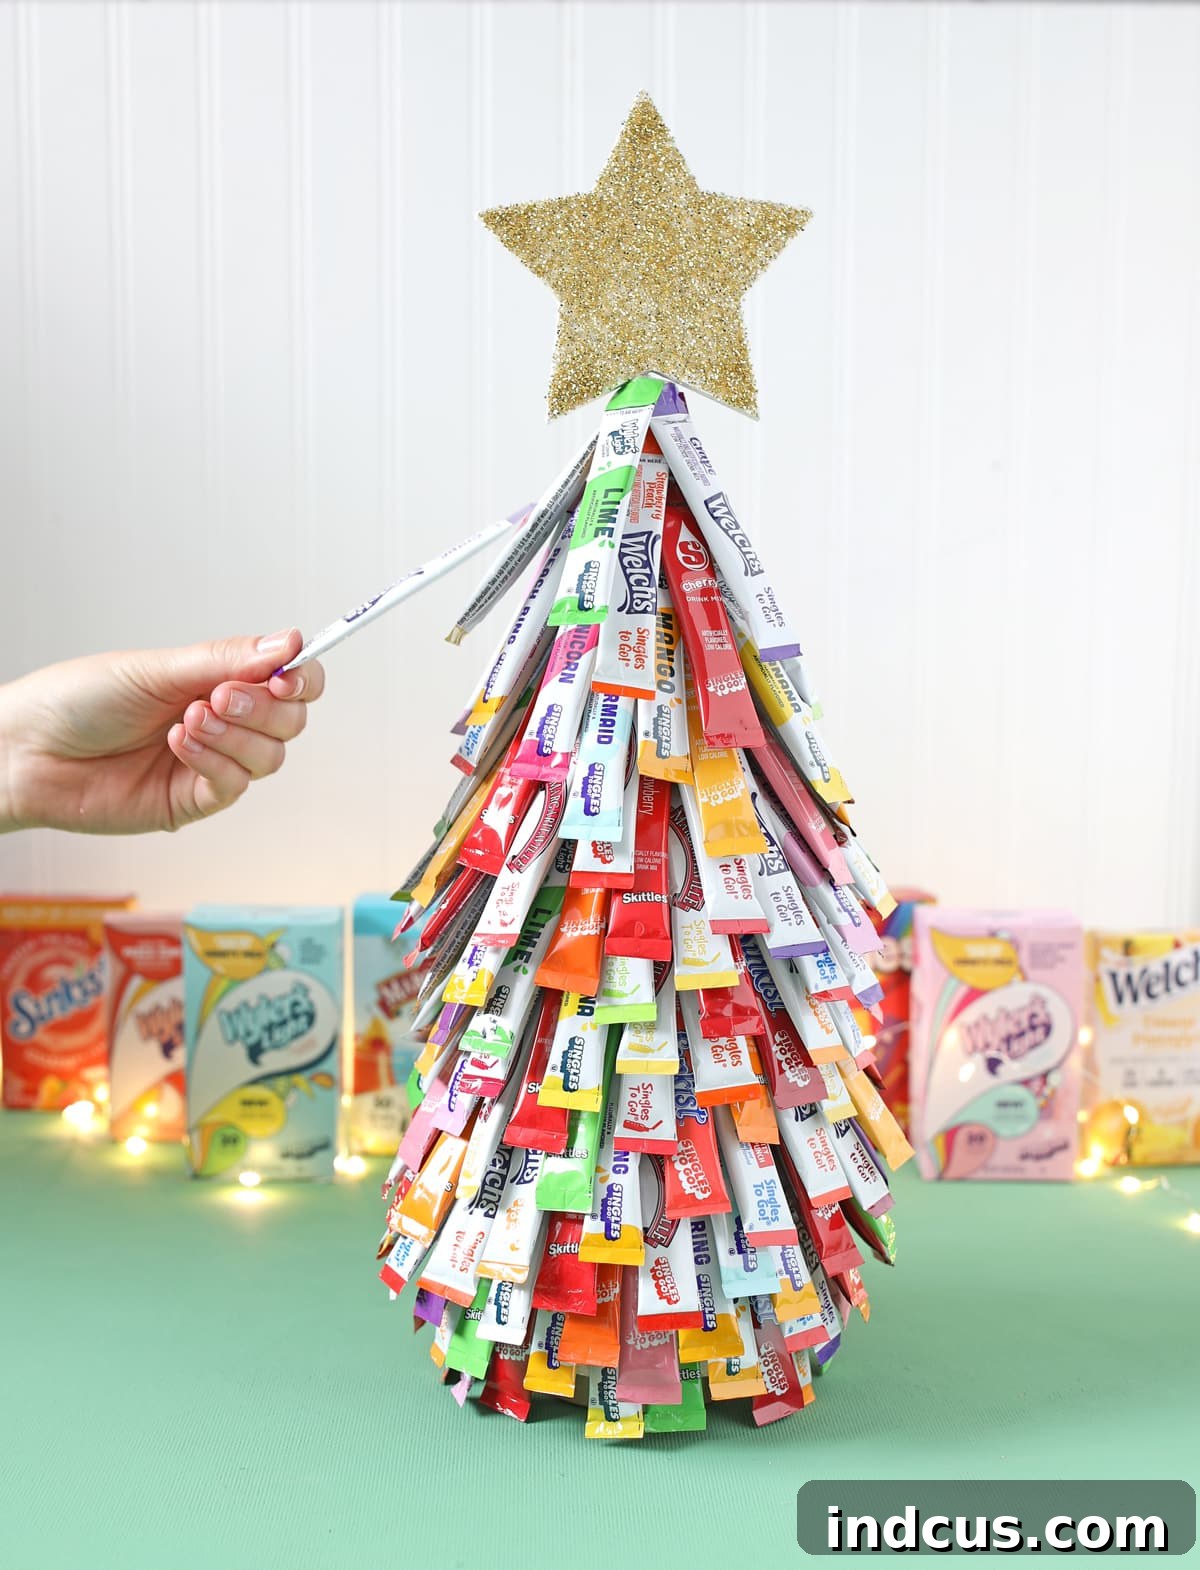
You’re almost there! Once you’ve meticulously covered the entire cone with your colorful assortment of drink packets, it’s time to add the crowning glory. Just like any magnificent Christmas tree, yours deserves a beautiful topper. Carefully affix a star or a large, elegant bow to the very top of your drink packet tree. Ensure it’s secured firmly so it stands proudly throughout your party. This final embellishment not only completes the festive aesthetic but also adds that extra sparkle and holiday spirit. With your topper in place, your incredible DIY drink packet Christmas tree is officially complete and ready to dazzle your guests!
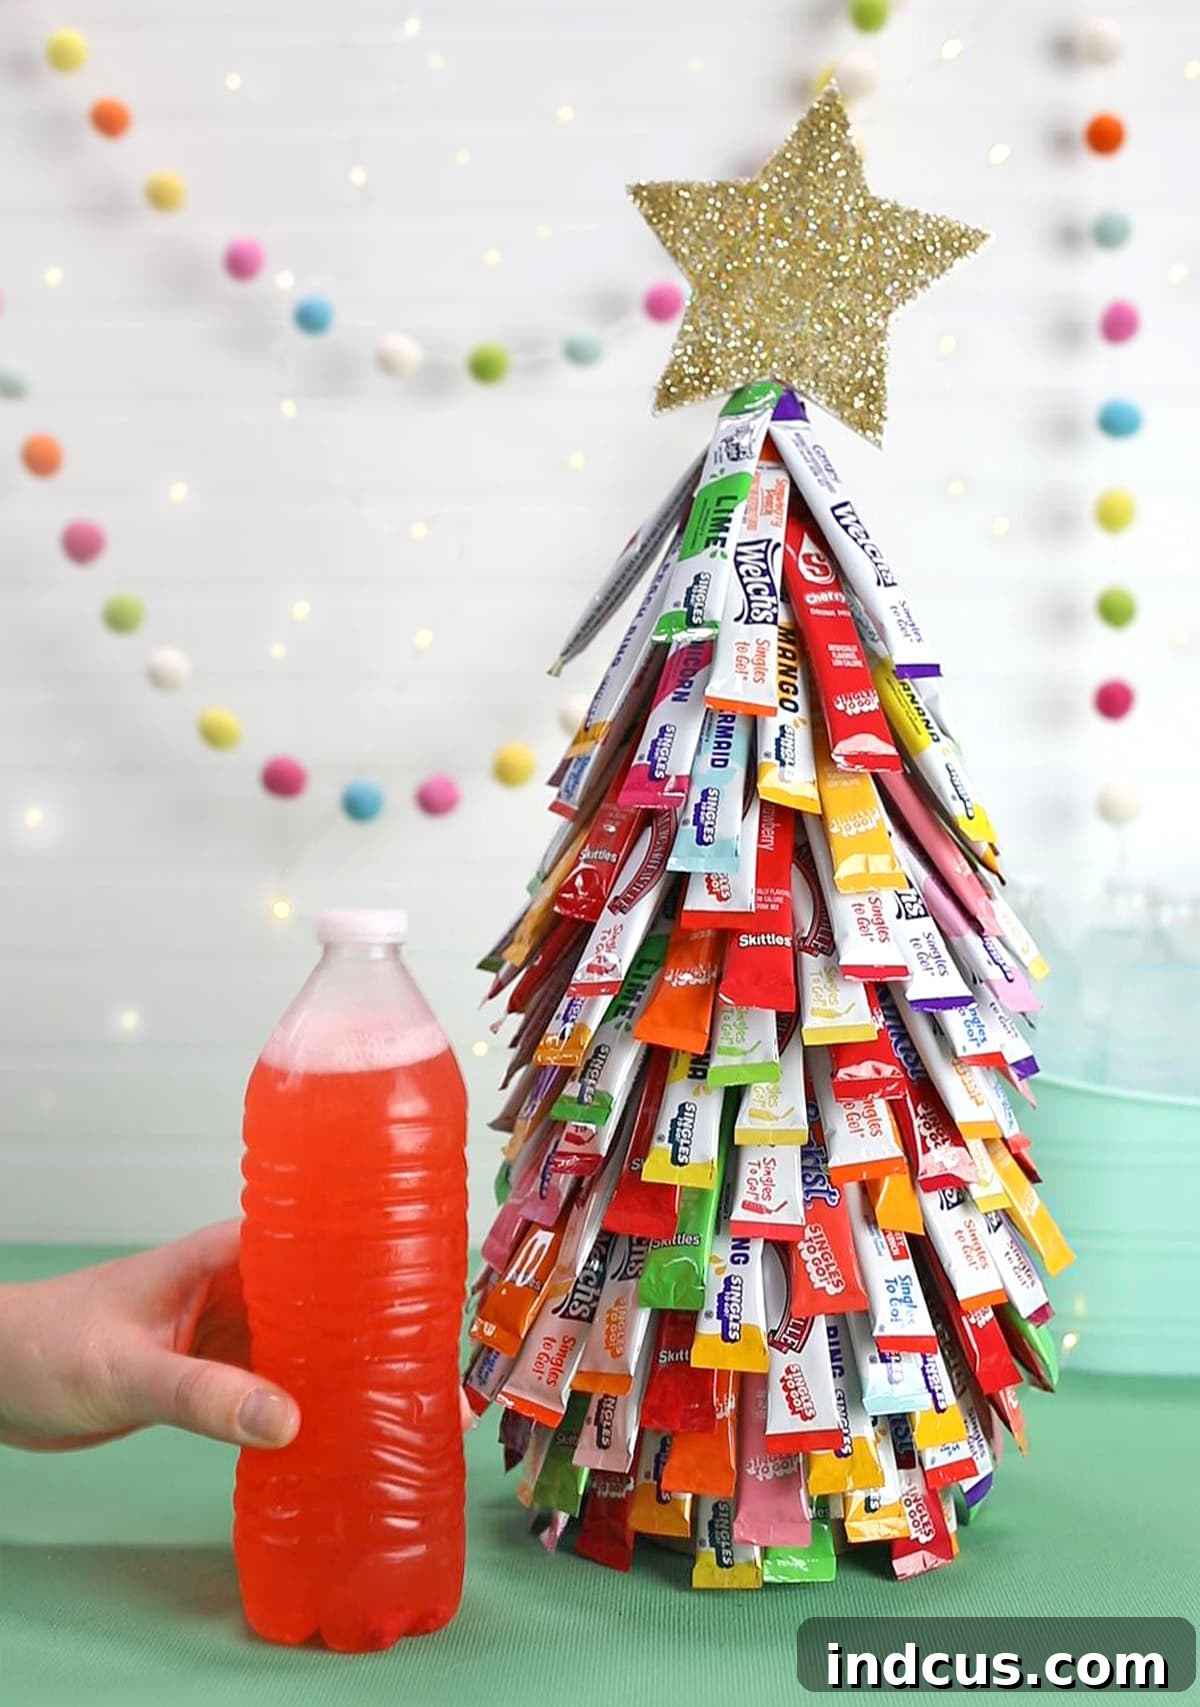
When the festive day arrives and your guests begin to gather, your drink packet tree will be ready to serve its delightful purpose. Create a welcoming “hydration station” by filling a large cooler with an abundance of chilled bottled water. Position it conveniently next to your beautiful, handmade tree. Then, watch the magic unfold as party guests are drawn to the unique display, naturally gravitating towards it to grab a drink packet of their choosing.
They can then easily mix their chosen flavor into their cold bottle of water, creating a personalized and refreshing beverage to sip on throughout the entire party. It’s an effortless way to keep everyone hydrated and happy, offering a fun, interactive, and health-conscious alternative to more traditional, sugary holiday drinks. This innovative setup is bound to be a huge hit, offering both utility and a generous dose of holiday cheer!
Tips for Success & Customization
To ensure your drink packet tree is an absolute triumph, consider these helpful tips and creative customization ideas:
- Variety is Key: Offer a wide range of flavors and brands. Include popular choices like lemonade, fruit punch, and peach, but also add some unique or seasonal options. This ensures there’s something for everyone.
- Color Coordination: While a random assortment looks festive, you can elevate the design by arranging packets in a color gradient or pattern. For a sophisticated look, choose packets in a specific holiday palette (red, green, gold).
- Secure Taping: Use good quality clear tape. Apply enough tape to each packet to hold it firmly, but not so much that it becomes difficult for guests to remove. Test a few placements first.
- Staggering is Essential: As mentioned in Step 3, always stagger the packets in subsequent rows. This technique ensures the underlying cone is completely hidden and creates that beautiful, full Christmas tree effect.
- Lighting it Up: For an extra magical touch, consider weaving a string of small, battery-operated LED fairy lights through the packets before adding the top layers. The gentle glow will make your tree truly sparkle.
- Personalized Topper: Instead of a generic star or bow, consider crafting a custom topper. This could be a small initial, a miniature holiday character, or a small sign with your family name.
- Different Sizes: Don’t limit yourself to one size. Create a trio of trees in varying heights for a dynamic display. Smaller trees can also be charming individual gifts or party favors.
- Kid-Friendly Options: If children will be at the party, ensure you have some kid-friendly flavors available. Perhaps even create a smaller “kids’ tree” with their favorite characters or colors.
- Displaying with Flair: Place your finished tree on a festive platter, a cake stand, or surrounded by holiday greenery, pinecones, or decorative ornaments to further enhance its presentation.
Making Your Holiday Party Truly Memorable
This drink packet Christmas tree isn’t just a craft; it’s a thoughtful gesture that elevates your holiday hosting game. It solves the perennial party dilemma of offering diverse, appealing beverages without endless preparation or high costs. Guests, particularly those seeking healthier alternatives to sugary sodas or alcoholic beverages, will deeply appreciate the effort and the option to customize their drink. It encourages hydration in a fun, engaging way, which is often overlooked amidst the excitement of holiday festivities.
Imagine the joyful buzz around your drink station as guests chat, choose their favorite flavors, and mix their custom beverages. This interactive element transforms a simple drink offering into a memorable experience, sparking conversation and smiles. It integrates seamlessly into your holiday decor, adding a touch of whimsical charm that is both practical and picturesque. In essence, by crafting this unique centerpiece, you’re not just providing drinks; you’re creating a moment, fostering connection, and ensuring your holiday gathering is remembered for its creativity, consideration, and cheer. It’s truly a way to “win Christmas” in the eyes of your delighted guests!
I absolutely adore this concept, and I have a strong feeling it’s going to be a monumental hit at any holiday gathering. The blend of creativity, utility, and health-consciousness is simply perfect for the festive season. Is this a brilliant, fun-filled project that you’re eager to try for your next celebration?
Merry Christmas and happy crafting to all!







