
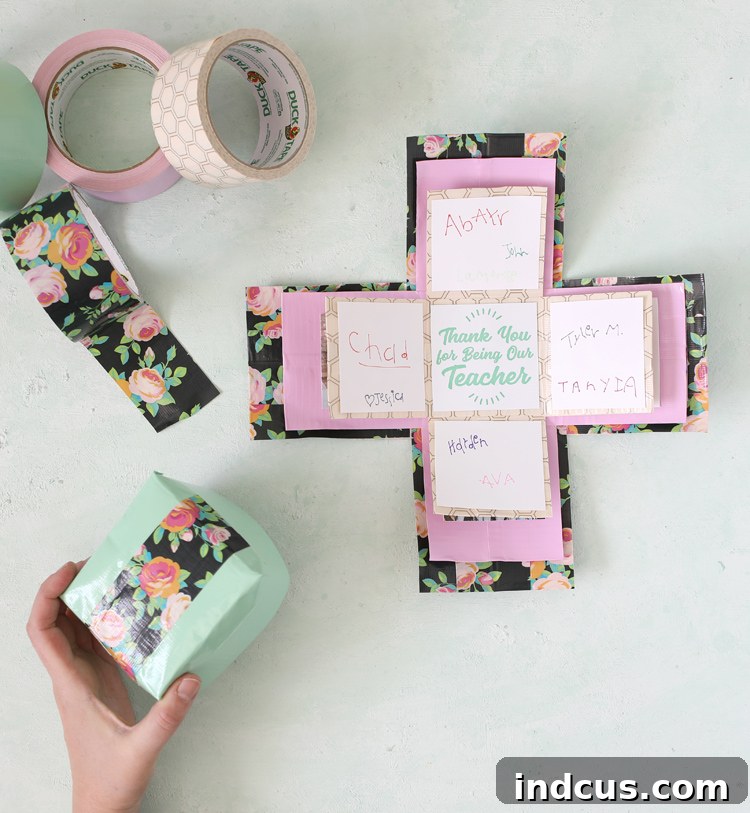
Unleash Creativity: Crafting a Personalized Duck Tape Pop-Out Surprise Box
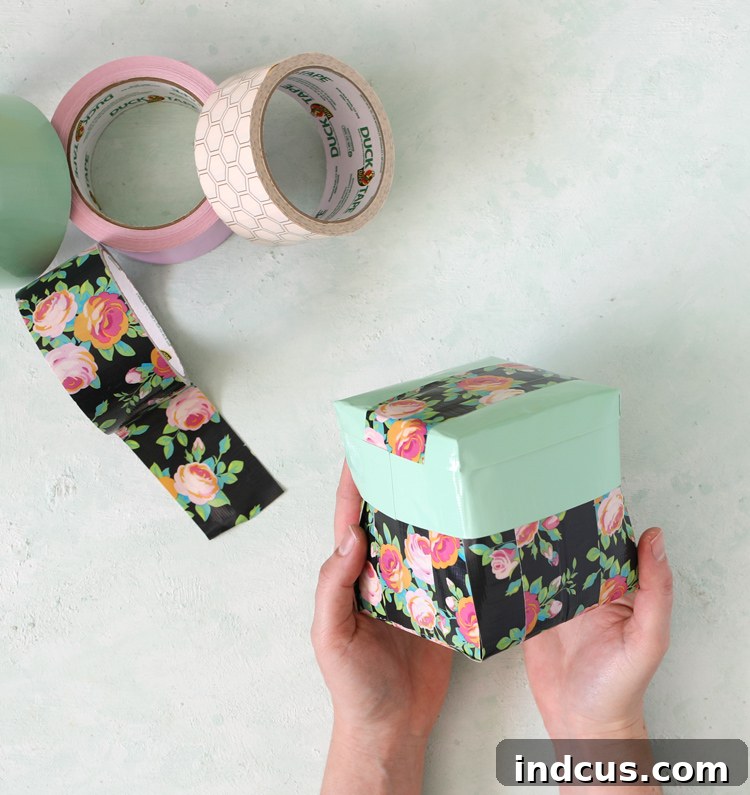
There’s an undeniable charm in handmade gifts, and nothing says “thoughtful” quite like a custom-crafted surprise. With Teacher Appreciation Week just around the corner, and Mother’s Day not far behind, it’s the perfect time to dive into a creative project that’s both fun to make and incredibly impactful to receive. Today, we’re thrilled to guide you through creating a truly unique Duck Tape pop-out surprise box – an intermediate-level craft that promises an exciting reveal!
Imagine the delight on a loved one’s face as they lift the lid to reveal layers of personalized messages, cherished photos, or even small gifts, all cascading outwards in a vibrant display. This “explosion box” design, ingeniously constructed with versatile Duck Tape, is more than just a container; it’s an experience, a memory encapsulated. While the technique requires a bit of precision and patience, the step-by-step instructions ensure that even those new to Duck Tape crafting can achieve a stunning result.
This post is sponsored by Duck Tape®. All ideas and opinions expressed are authentically my own.
To embark on this exciting project, the fundamental tools you’ll need are Duck Tape and a good pair of scissors. However, for a truly professional finish and to significantly ease the crafting process, we highly recommend utilizing a rotary cutter paired with a self-healing cutting mat and a clear ruler. This combination allows for impeccably straight, crisp lines and ensures every piece remains perfectly square, which is crucial for the box’s structural integrity and aesthetic appeal. While scissors certainly get the job done, a rotary cutter transforms the experience, making precision cuts almost effortless.
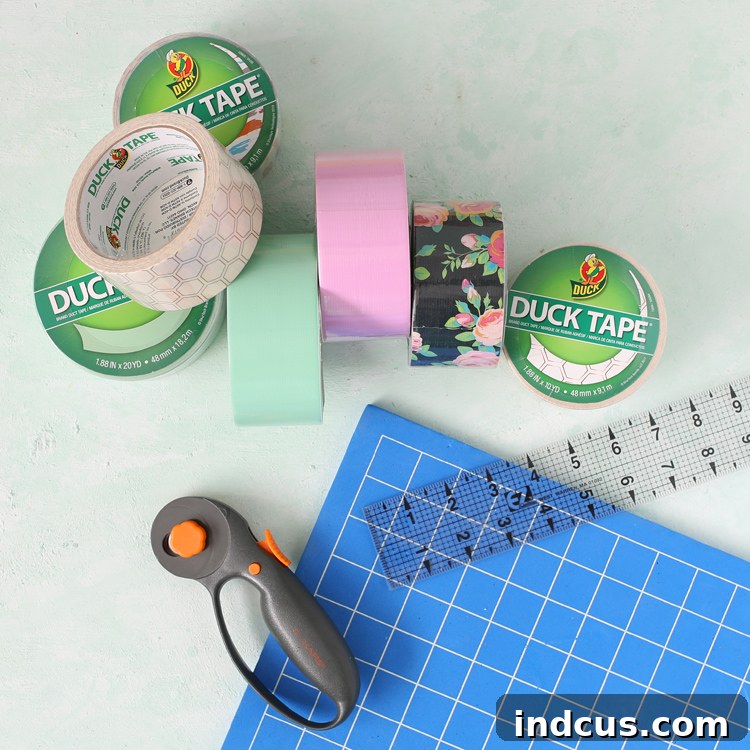
One of the most exciting aspects of crafting with Duck Tape today is the incredible array of patterns, colors, and textures available. Gone are the days of plain silver tape; now you can choose from metallics, neons, intricate prints, and even glitter finishes. This vast selection empowers you to customize your surprise box to perfectly match the recipient’s personality or the theme of the occasion. You can explore and view all of the different colors and patterns here, allowing your imagination to run wild with design possibilities. For this tutorial, our example box features three distinct internal layers, creating a beautiful depth effect. However, the beauty of this design is its adaptability; you can easily add or remove layers by simply adjusting the measurements provided, allowing for endless customization.
Step 1: Precision Cutting for the Foundation Layers
Achieving clean, precise cuts is paramount when working with Duck Tape, especially for a structured project like this surprise box. As mentioned, while standard scissors will suffice, a rotary cutter with a self-healing mat and a clear ruler is a game-changer for speed and accuracy. This method drastically simplifies the process of creating perfectly straight edges and consistent dimensions, which are vital for a well-fitting box.
To use this technique, simply adhere your chosen Duck Tape strip directly onto your self-healing cutting mat. Use your ruler to measure out the desired length and width, then guide the rotary blade along the ruler’s edge for a flawless cut. Once cut, the tape peels off the mat effortlessly, leaving you with a perfectly shaped piece. This method eliminates the frustration of sticky scissor blades and uneven lines, making your crafting experience far more enjoyable and efficient.
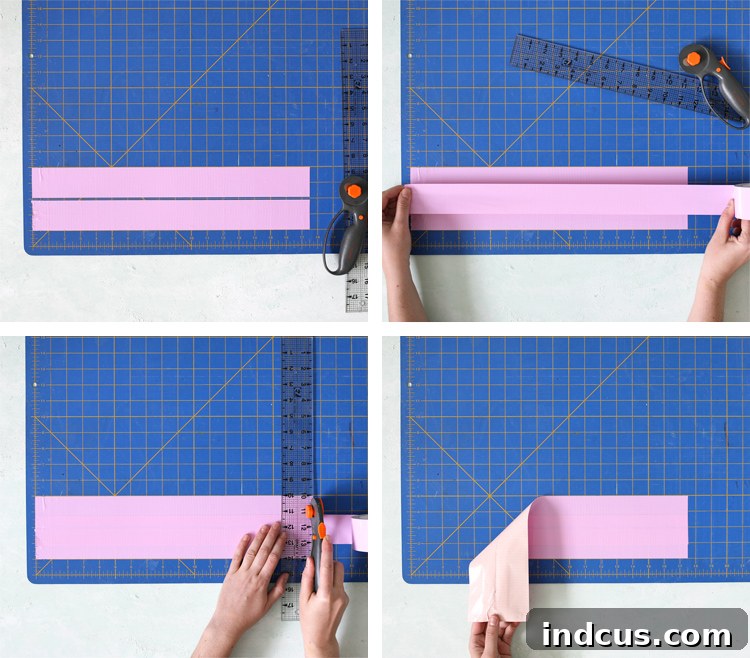
For the core structure of our three-layered surprise box, you will need to cut two pieces for each of the three different sizes. These varying dimensions are key to creating the distinct, tiered effect when the box “explodes” open. Here are the precise measurements you’ll need:
- Outer Layer: Two pieces, each measuring 4 inches wide by a specific length (which you will determine by layering the strips).
- Middle Layer: Two pieces, each measuring 3.75 inches wide by a specific length.
- Inner Layer: Two pieces, each measuring 3 inches wide by a specific length.
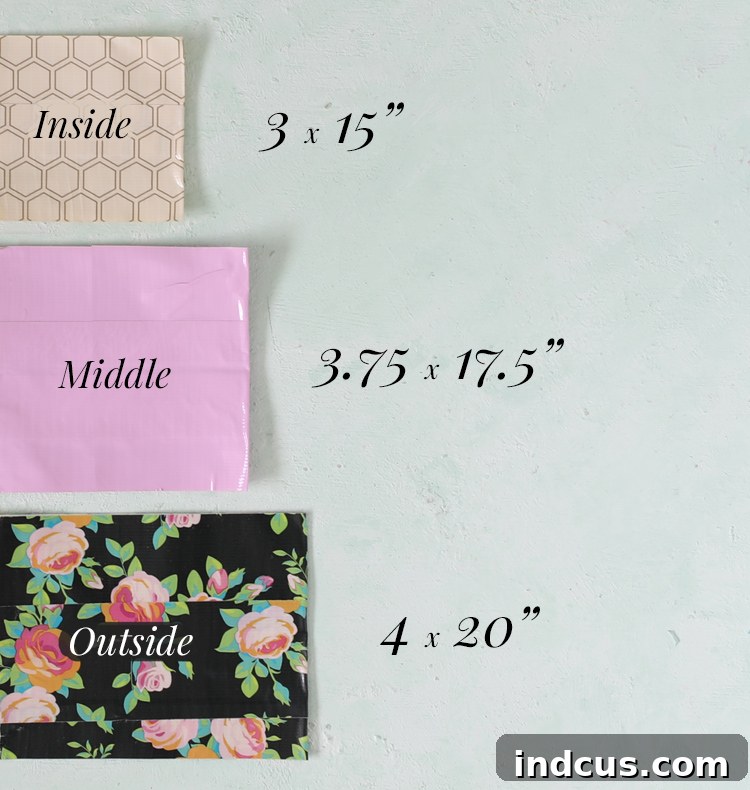
To achieve the required width for each piece, you’ll need to layer strips of Duck Tape. Start by cutting individual strips to your desired length. Then, carefully layer these strips together, slightly overlapping, until you reach the correct overall width (e.g., 4 inches for the outer layer). Once you have the full-width strip, flip it over so the sticky side faces up. This is where we create the clean, non-sticky edges that will form the sides of your box layers. Measure in from each end of the strip and fold the excess sticky tape inward towards the center. For the 4-inch wide outer piece, you’ll mark 4 inches in from each end and fold there, effectively creating a 4×4 inch square with non-sticky edges. Similarly, for the 3.75-inch middle piece, you’ll fold 3.75 inches in, and for the 3-inch inner piece, you’d fold 3 inches in. This clever folding technique creates perfectly sized, square-shaped panels with clean, non-adhesive perimeters, ready for assembly. If this step feels a little abstract, the detailed video tutorial at the bottom of this post offers a clear visual guide that can be incredibly helpful.
After carefully executing these cuts and folds, you will have a set of neatly prepared Duck Tape pieces, each with clean, non-sticky edges, resembling the image below. These perfectly square panels are the building blocks for your impressive pop-out box.
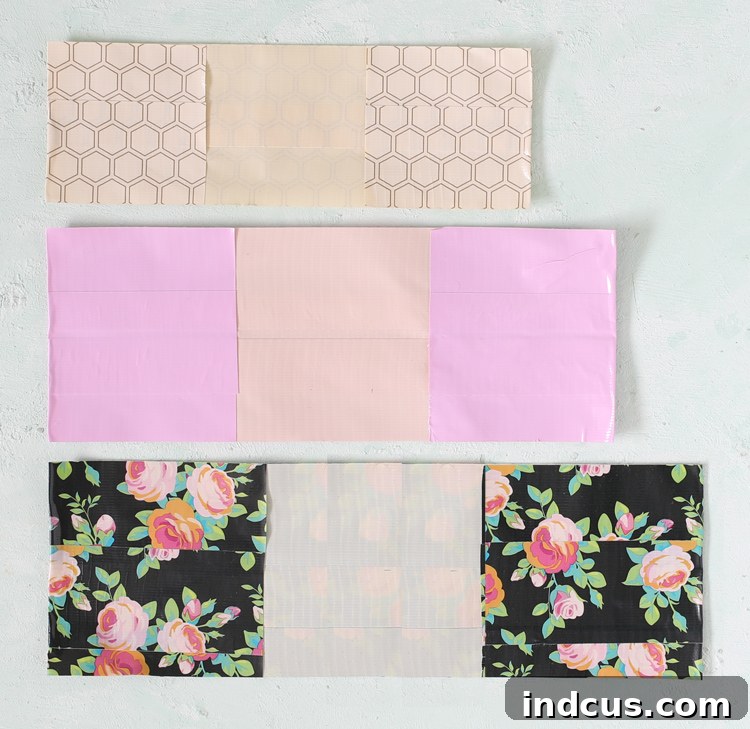
Step 2: Expert Assembly of the Exploding Base
Now that your perfectly cut and folded Duck Tape pieces are ready, it’s time to bring them together to form the dynamic exploding base of your surprise box. Precision in this step ensures that your layers will pop open smoothly and dramatically.
Begin with the largest pieces, which form the outside layer of your box. Take two of the prepared strips for this layer. You will stick them together to form a “T” shape. The crucial detail here is to join them with their sticky centers together. This means you’ll align the central sticky portion of one strip directly onto the central sticky portion of the other, forming a cross where the middle section is sealed. The folded, non-sticky edges will extend outwards, defining the perimeter of your first, largest square.
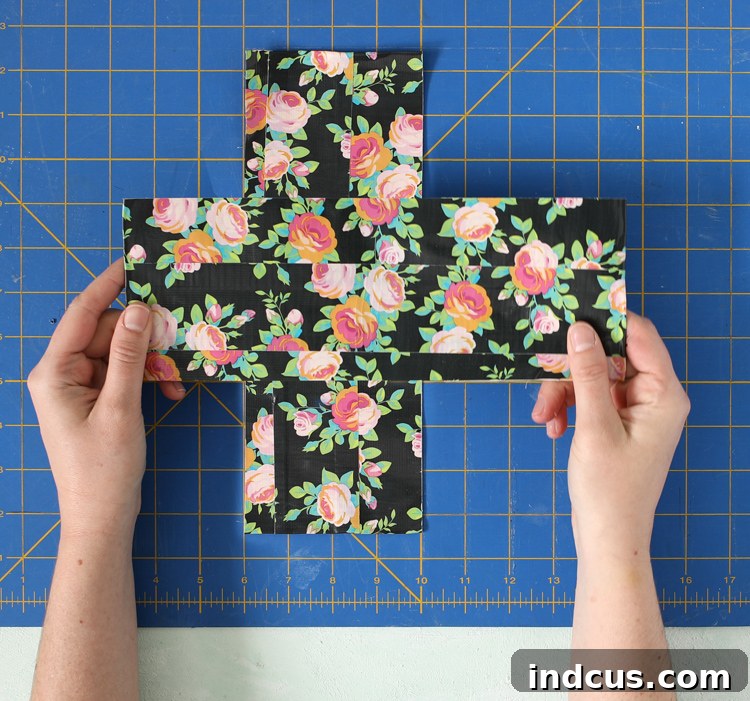
Next, move on to the middle and inside layers. For these layers, you will also form “T” shapes using their respective two strips. However, this time, you will join them with the sticky centers both facing up. This creates a “T” where the entire upper surface remains sticky, which is essential for attaching them to the layers below and above. This difference in sticky-side orientation is critical for the nested, exploding effect.
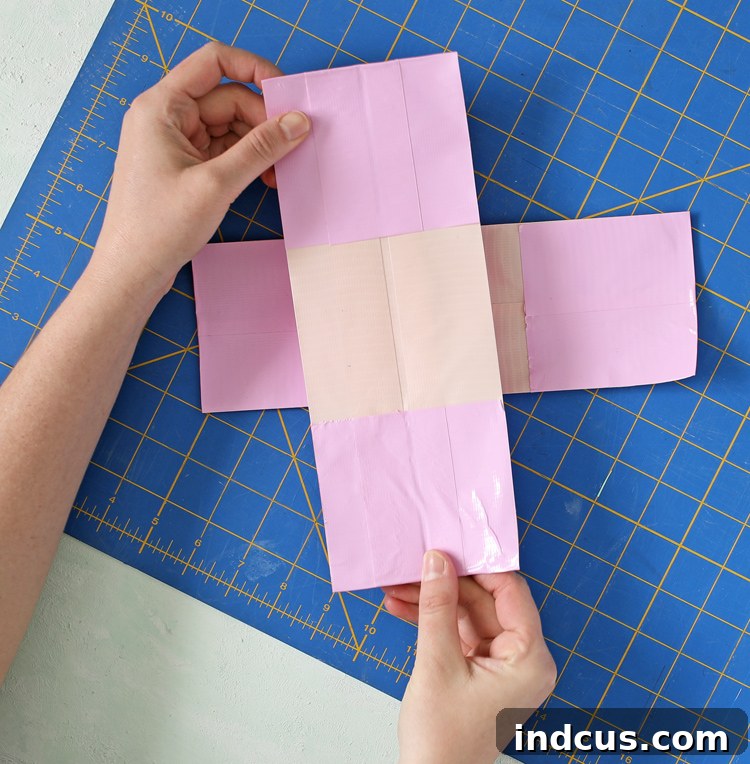
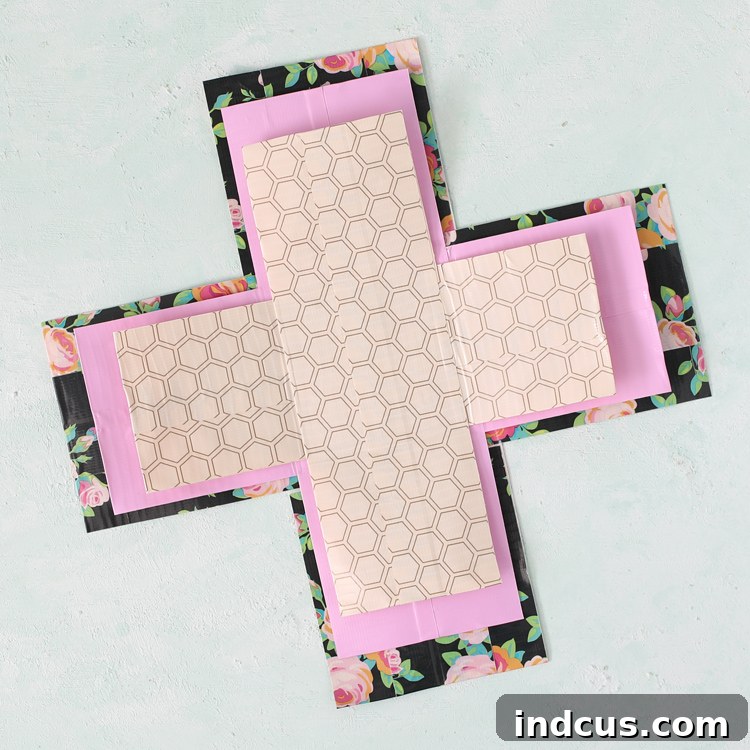
At this point, you should have three distinct “T” shaped components, each corresponding to an outer, middle, and inner layer of your box. Visually, they will appear as varying sizes of crosses, with some having exposed sticky surfaces and others with a sealed, non-sticky center.
The final step in assembling the base is to nest these layers. Take the middle layer and carefully place it sticky-side-down onto the exact center of the outside layer. The exposed sticky surface of the middle layer will adhere firmly to the non-sticky center of the outside layer. Ensure precise alignment for a symmetrical box. Once the middle layer is secured, repeat the process with the inside layer, placing it sticky-side-down onto the center of the middle layer. Press firmly on each layer as you attach it to ensure maximum adhesion and to smooth out any air bubbles. With all layers securely stacked, you’ll now have the completed bottom part of your spectacular exploding box, ready to hold your chosen surprises!
Step 3: Crafting a Secure and Stylish Lid
A surprise box wouldn’t be complete without a perfectly fitting lid to hold all the excitement contained within. Crafting the lid for your Duck Tape pop-out box is a straightforward process that requires two main components: the top square and the side strip.
To begin, you will need to cut two 5-inch squares of your chosen Duck Tape. These will form the sturdy top of your lid. Additionally, cut two 17-inch strips of Duck Tape; these will become the sidewalls that hold the lid together and allow it to sit snugly on your box base.
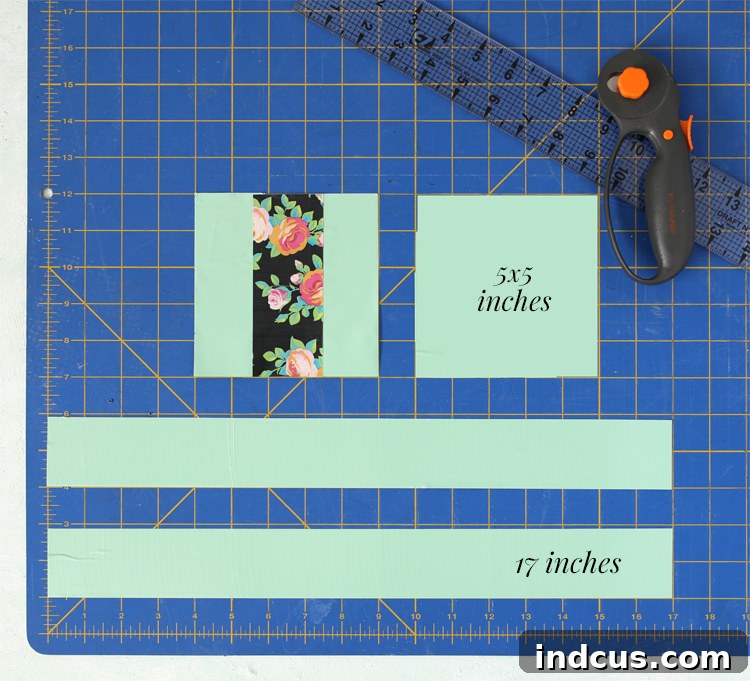
Start by placing one of your 5-inch squares sticky-side-up on your clean work surface. Carefully align the second 5-inch square directly on top of the first, pressing down firmly to ensure a strong, bubble-free bond. This creates a double-layered, non-sticky, and robust square that will serve as the top of your lid.
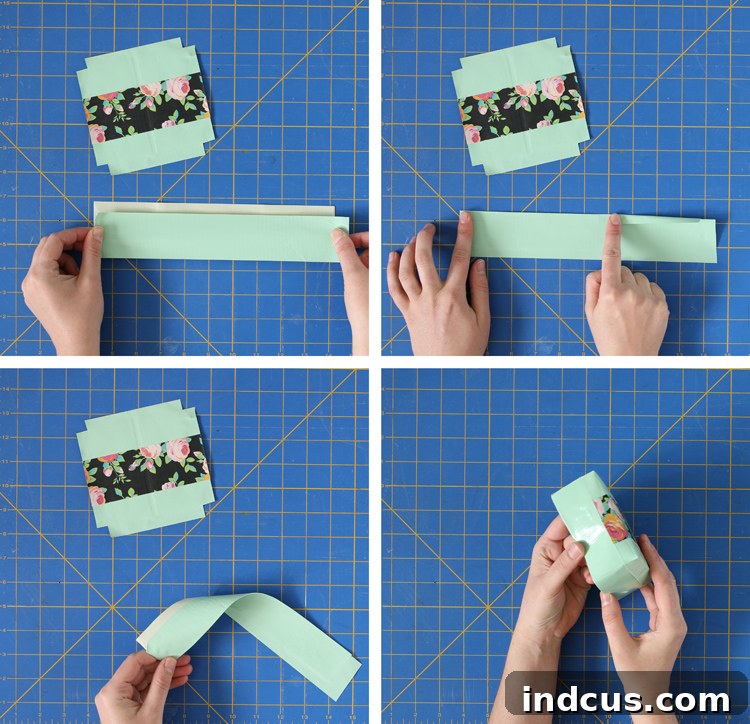
Next, take one of your 17-inch strips of Duck Tape and place it sticky-side-up on your work surface. Take the second 17-inch strip and carefully place it on top of the first, but with a deliberate 1/2-inch offset. This offset is crucial for creating the perfect edge. Once aligned, fold over one of the sticky edges of the offset strips onto itself, effectively creating a clean, non-sticky edge on one side of your long strip. Leave the other sticky edge exposed for now.
Now, it’s time to assemble the lid. Carefully wrap this prepared strip around the edge of your double-layered square. The exposed sticky edge of the strip will adhere to the sides of the square. As you wrap, you’ll notice the pre-cut notches (created by the offset) will naturally come together to form crisp, clean corners for your lid. The 1/2-inch offset piece will perfectly line up with the edge of the square, creating a seamless and sturdy side wall. Take your time, smoothing the tape as you go to avoid wrinkles or air pockets. This intricate step is often best understood visually, so again, referring to the video tutorial at the bottom of the post will provide invaluable guidance in seeing how this is done with precision.
Step 4: Personalize and Fill with Heartfelt Surprises
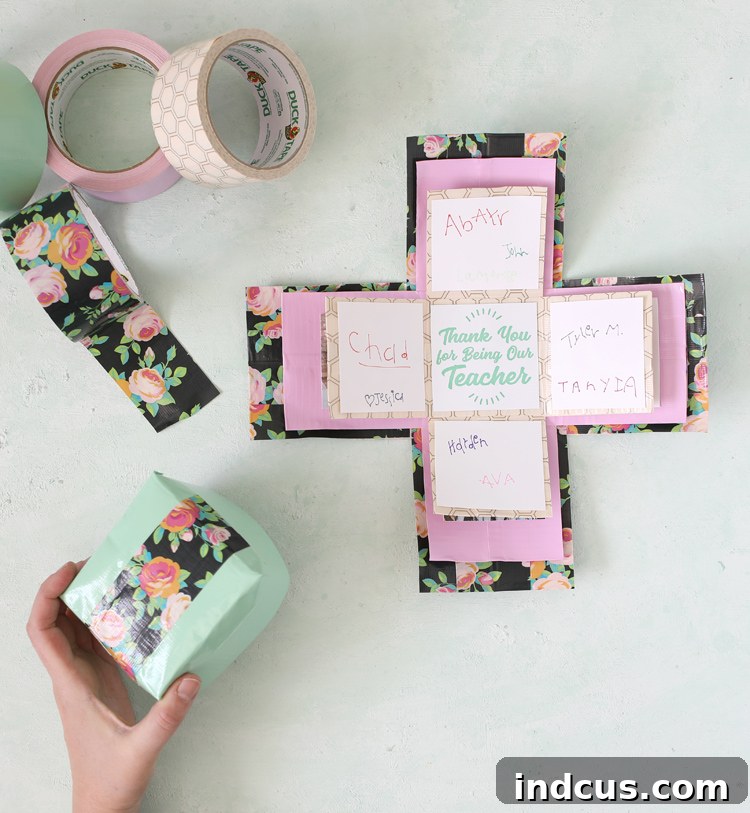
The true magic of the Duck Tape surprise box lies in its ability to be deeply personalized, transforming it from a simple craft into a cherished keepsake. While our example was designed as a thoughtful teacher gift, featuring signatures from each child and memorable photos from the year, the possibilities for customization are virtually limitless. This is where your creativity truly shines!
Imagine gifting this delightful box for Mother’s Day, filled with handwritten notes of appreciation, small tokens of affection, or even a collection of favorite family recipes. For a birthday, you could tuck in a series of gift cards to their favorite shops, creating a truly substantial and exciting present that keeps on giving. Consider a graduation gift, where each layer reveals encouraging words from friends and family, small mementos of their academic journey, or even a ‘seed fund’ for their future adventures.
Beyond the contents, think about the box’s aesthetic. You could choose Duck Tape patterns and colors that reflect the recipient’s favorite hobbies, colors, or even a special occasion theme. Add small embellishments like Duck Tape bows, cut-out shapes, or even glitter (if your tape allows for it) to enhance the visual appeal. For an anniversary, fill it with ‘reasons why I love you’ written on small cards, photos from special dates, or a tiny charm. For a new parent, it could hold miniature baby items, well wishes, or gift certificates for a meal delivery service.
Each layer of the box offers a new opportunity for a surprise. You could dedicate each tier to a different theme: one for photos, one for written messages, and the innermost for a small gift. The act of uncovering each layer makes the gift-opening experience interactive and memorable. Don’t be afraid to experiment with different types of fillers – from confetti that bursts out when the lid is removed, to small candies, inspiring quotes, or even a collection of tiny trinkets that hold sentimental value. The key is to infuse it with personal touches that resonate deeply with the recipient, making this handmade gift truly unforgettable. Anything goes when it comes to expressing your love and appreciation with this unique creation!
Why Choose Duck Tape for Your Crafts?
Duck Tape isn’t just for household repairs anymore; it’s a revolutionary crafting material that offers unparalleled versatility and durability. Its strong adhesive and robust construction make it ideal for projects that need to withstand handling, like this surprise box. Moreover, its water-resistant properties ensure your creations remain pristine, even if they encounter a little moisture. The vast array of colors, patterns, and even textured options means you’re never limited in your design choices, allowing for truly unique and personalized outcomes. It’s also incredibly easy to work with once you get the hang of it, providing a clean finish without the mess of glue or paint.
Tips for a Flawless Duck Tape Surprise Box
- Work on a Clean Surface: Ensure your workspace is free of dust and debris to prevent unwanted particles from sticking to your tape. A self-healing mat is also excellent for protecting your table.
- Sharp Tools are Key: Always use a sharp rotary cutter or scissors. Dull blades will tug at the tape, creating uneven and messy edges.
- Measure Twice, Cut Once: Precision is paramount for this project. Double-check all your measurements before making any cuts to ensure your layers fit together perfectly.
- Smooth Out Bubbles: As you adhere tape, use a credit card or a craft squeegee to smooth out any air bubbles or wrinkles for a professional finish.
- Don’t Rush: Take your time with each step, especially when aligning layers and forming the lid. Patience will yield a much neater and more robust end product.
- Experiment with Designs: Don’t limit yourself to one color! Mix and match different patterns and solid colors for each layer to create a visually dynamic and exciting box.
Beyond the Basics: Creative Variations
Once you’ve mastered the basic pop-out surprise box, you can explore endless creative variations:
- More Layers: Add additional layers by simply calculating smaller dimensions, creating an even grander “explosion.”
- Central Gift Well: Instead of flat layers, modify the innermost layer to create a small, central compartment or “well” to hold a tiny, special gift like a ring, a charm, or a small piece of jewelry.
- Pockets and Envelopes: Attach small Duck Tape pockets or envelopes to the inside panels of each layer, perfect for holding gift cards, tiny notes, or even seeds.
- Themed Boxes: Dedicate an entire box to a specific theme – a travel box filled with pictures from a trip, a “reasons why I love you” box, or a “bucket list” box for a friend.
- Embellished Edges: Use decorative edge scissors on certain strips or add thin strips of contrasting Duck Tape along the edges for an extra touch of flair.
Duck Tape Surprise Box Video Tutorial
For those who prefer a visual learning experience or need extra guidance on the trickier steps, this comprehensive video tutorial provides a step-by-step walkthrough of the entire process. It’s an invaluable resource for ensuring your Duck Tape surprise box comes out perfectly!
Crafting a Duck Tape surprise box is more than just a project; it’s an opportunity to create something truly meaningful and memorable. Whether it’s for a beloved teacher, a cherished mother, or anyone who deserves a unique token of appreciation, the effort you put into this handmade gift will undoubtedly be felt. So gather your favorite Duck Tape rolls, unleash your creativity, and get ready to surprise and delight with a personalized pop-out masterpiece!







