
Exterior Light Makeover: Transforming Dated Fixtures with the Power of Paint
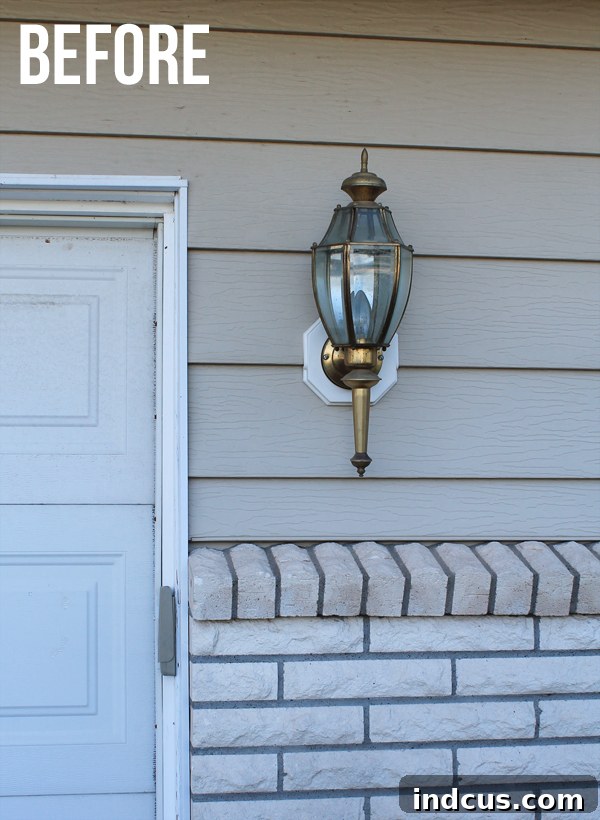
The transformative power of paint never ceases to amaze me! It’s incredible how a simple coat of paint can breathe new life into old, tired elements around the house, dramatically enhancing curb appeal without breaking the bank. Our home’s exterior was burdened by a set of brass light fixtures that, while once stylish, had succumbed to years of weather and age, appearing significantly weathered and undeniably dated.
These fixtures were not only showing their age but also clashing with our evolving aesthetic. They contributed to an outdated look that we were eager to modernize. Instead of investing in costly new lighting, we decided to embark on a DIY journey, armed with nothing but a can of spray paint and a vision for a refreshed exterior.
The Removal Process and Initial Assessment
The first crucial step in this exciting transformation was safely removing the old brass lights from their perches. My husband, ever the helpful partner in our DIY adventures, carefully detached each fixture from the exterior wall. This step is vital not just for accessibility during painting but also for ensuring a thorough and even finish.
Before proceeding, always remember safety first: ensure the power supply to the lights is completely turned off at the breaker box before attempting any removal. This simple precaution prevents electrical accidents and ensures a smooth process. Once the power was off, he meticulously disconnected the wiring and unmounted the fixtures, preparing them for their impending makeover.
The Disassembly Challenge and the Promise of a Perfect Finish
With the fixtures off the wall, it was my turn to tackle the next phase: complete disassembly. Now, a word of caution for the faint of heart: taking these fixtures completely apart can be an intimidating task. Many components, small screws, and delicate glass pieces need to be carefully handled. I won’t lie, there was a moment (or several) where I found myself praying I’d be able to piece them back together correctly!
However, disassembling the lights is arguably the most critical step for achieving a professional, flawless finish. By separating each component – from the frame and decorative elements to the base and mounting plates – you ensure that every surface can be thoroughly cleaned, primed, and painted without missed spots or uneven coverage. This meticulous approach prevents any glimpses of the old, dated brass from peeking through, guaranteeing a truly comprehensive transformation.
To aid in reassembly, I highly recommend taking detailed photos at each stage of disassembly. This visual guide can be a lifesaver when you’re faced with a pile of seemingly identical screws and parts later on. You might also consider labeling small baggies for different sets of screws or components. These small organizational steps can turn a potential headache into a manageable puzzle.
The Magic of Spray Paint: Choosing the Right Finish
Once all the little parts were meticulously separated and cleaned, it was time for the real magic to happen. I chose Rustoleum spray paint in an oil rubbed bronze metallic finish, and it was the perfect choice. This particular finish is renowned for its durability and its ability to mimic the sophisticated look of high-end fixtures. Oil-rubbed bronze offers a rich, dark brown tone with subtle metallic highlights, instantly elevating the aesthetic from dated brass to a contemporary, elegant style.
When spray painting, preparation is key. Work in a well-ventilated area, preferably outdoors on a non-windy day. Lay down drop cloths or old newspapers to protect your surroundings. For the best results, apply several light, even coats rather than one thick coat. This technique prevents drips and ensures a smooth, professional-looking surface. Allow adequate drying time between each coat as per the manufacturer’s instructions, typically 15-30 minutes, before applying the next. Patience during this phase is paramount for a long-lasting and beautiful finish.
After applying several coats and ensuring everything was perfectly dry, the daunting task of reassembly began. It truly felt like a crazy 3D puzzle, testing my spatial reasoning and memory. There were moments of frustration, I’m not going to lie, but the vision of the finished product kept me going. Carefully, piece by piece, screw by screw, the fixtures started to take shape once more, but this time, with an entirely new personality.
The Stunning Transformation: Before and After
And then, the moment of truth arrived. They did go back together, eventually! And the difference was absolutely astounding. The drab, aged brass was replaced by the sophisticated, modern sheen of oil-rubbed bronze. The once-overlooked light fixtures were now elegant accents, contributing positively to our home’s exterior appeal.
The impact of this simple DIY project was far greater than we had anticipated. What felt like a small undertaking yielded a dramatic visual upgrade. The fixtures now complement our home’s exterior colors and architectural style, adding a touch of modern elegance that was previously lacking. It’s a testament to how even minor changes can lead to significant improvements in your home’s overall aesthetic.
Yay! “New” lights! The satisfaction of seeing the finished product, knowing we achieved this transformation ourselves, is truly rewarding. (Though, upon closer inspection, it looks like this project highlighted another task: washing the house! Where did all that dirt come from?)
The Alternative Approach: Painting In Situ
Not all fixtures are created equal, and some present unique challenges. The light on our back porch, for instance, proved to be a different beast. Unlike the front fixtures, this one was welded together, making complete disassembly an impossibility. Rather than giving up, we adapted our strategy.
I decided to paint this fixture while it remained mounted. This required careful masking and protection. I meticulously taped off all the glass panes to ensure no paint splattered onto them, preserving their clarity. Additionally, I used newspaper and painter’s tape to create a barrier, protecting the adjacent siding of the house from any overspray. This is a critical step; paint mist can travel surprisingly far and adhere to unintended surfaces.
Painting a fixture in place is certainly easier in terms of setup, as it bypasses the disassembly and reassembly headache. However, it’s not without its drawbacks. The primary limitation is that you can’t access some of the internal parts or hidden angles as effectively as when the fixture is completely taken apart. This means the finish might not be as perfectly comprehensive in every nook and cranny.
Despite these limitations, the finished product still looked incredibly great. The visible parts were uniformly coated in the rich oil-rubbed bronze, and the overall effect was a significant improvement. From a normal viewing distance, the transformation was undeniable, proving that even a partial painting effort can yield impressive results and drastically enhance the visual appeal.
The Cumulative Impact on Curb Appeal
Stepping back and observing the front of the house, the upgraded lights make a cohesive statement. Here’s a view of the front lights, beautifully transformed and shining with their new, modern finish. It’s truly amazing how such a small, relatively easy change can have such a big and positive impact on the overall curb appeal of our home.
This project underscores a valuable lesson in home improvement: you don’t always need to spend a fortune to achieve significant aesthetic upgrades. With a little effort, a keen eye, and the right tools (in this case, just a can of quality spray paint), you can revitalize existing elements and bring your home’s exterior into the modern era. Not only is this a budget-friendly alternative to purchasing new fixtures, but it’s also an environmentally conscious choice, giving old items a second life.
The success of this outdoor lighting makeover has fueled our enthusiasm for future projects. Next on the list are the storm door and the front door, both of which are desperately in need of repainting. We’re confident that with the right paint and a bit of elbow grease, we can achieve similar dramatic transformations, continuing to enhance our home’s exterior, one painted surface at a time. Stay tuned for more DIY adventures and the incredible power of paint!







