
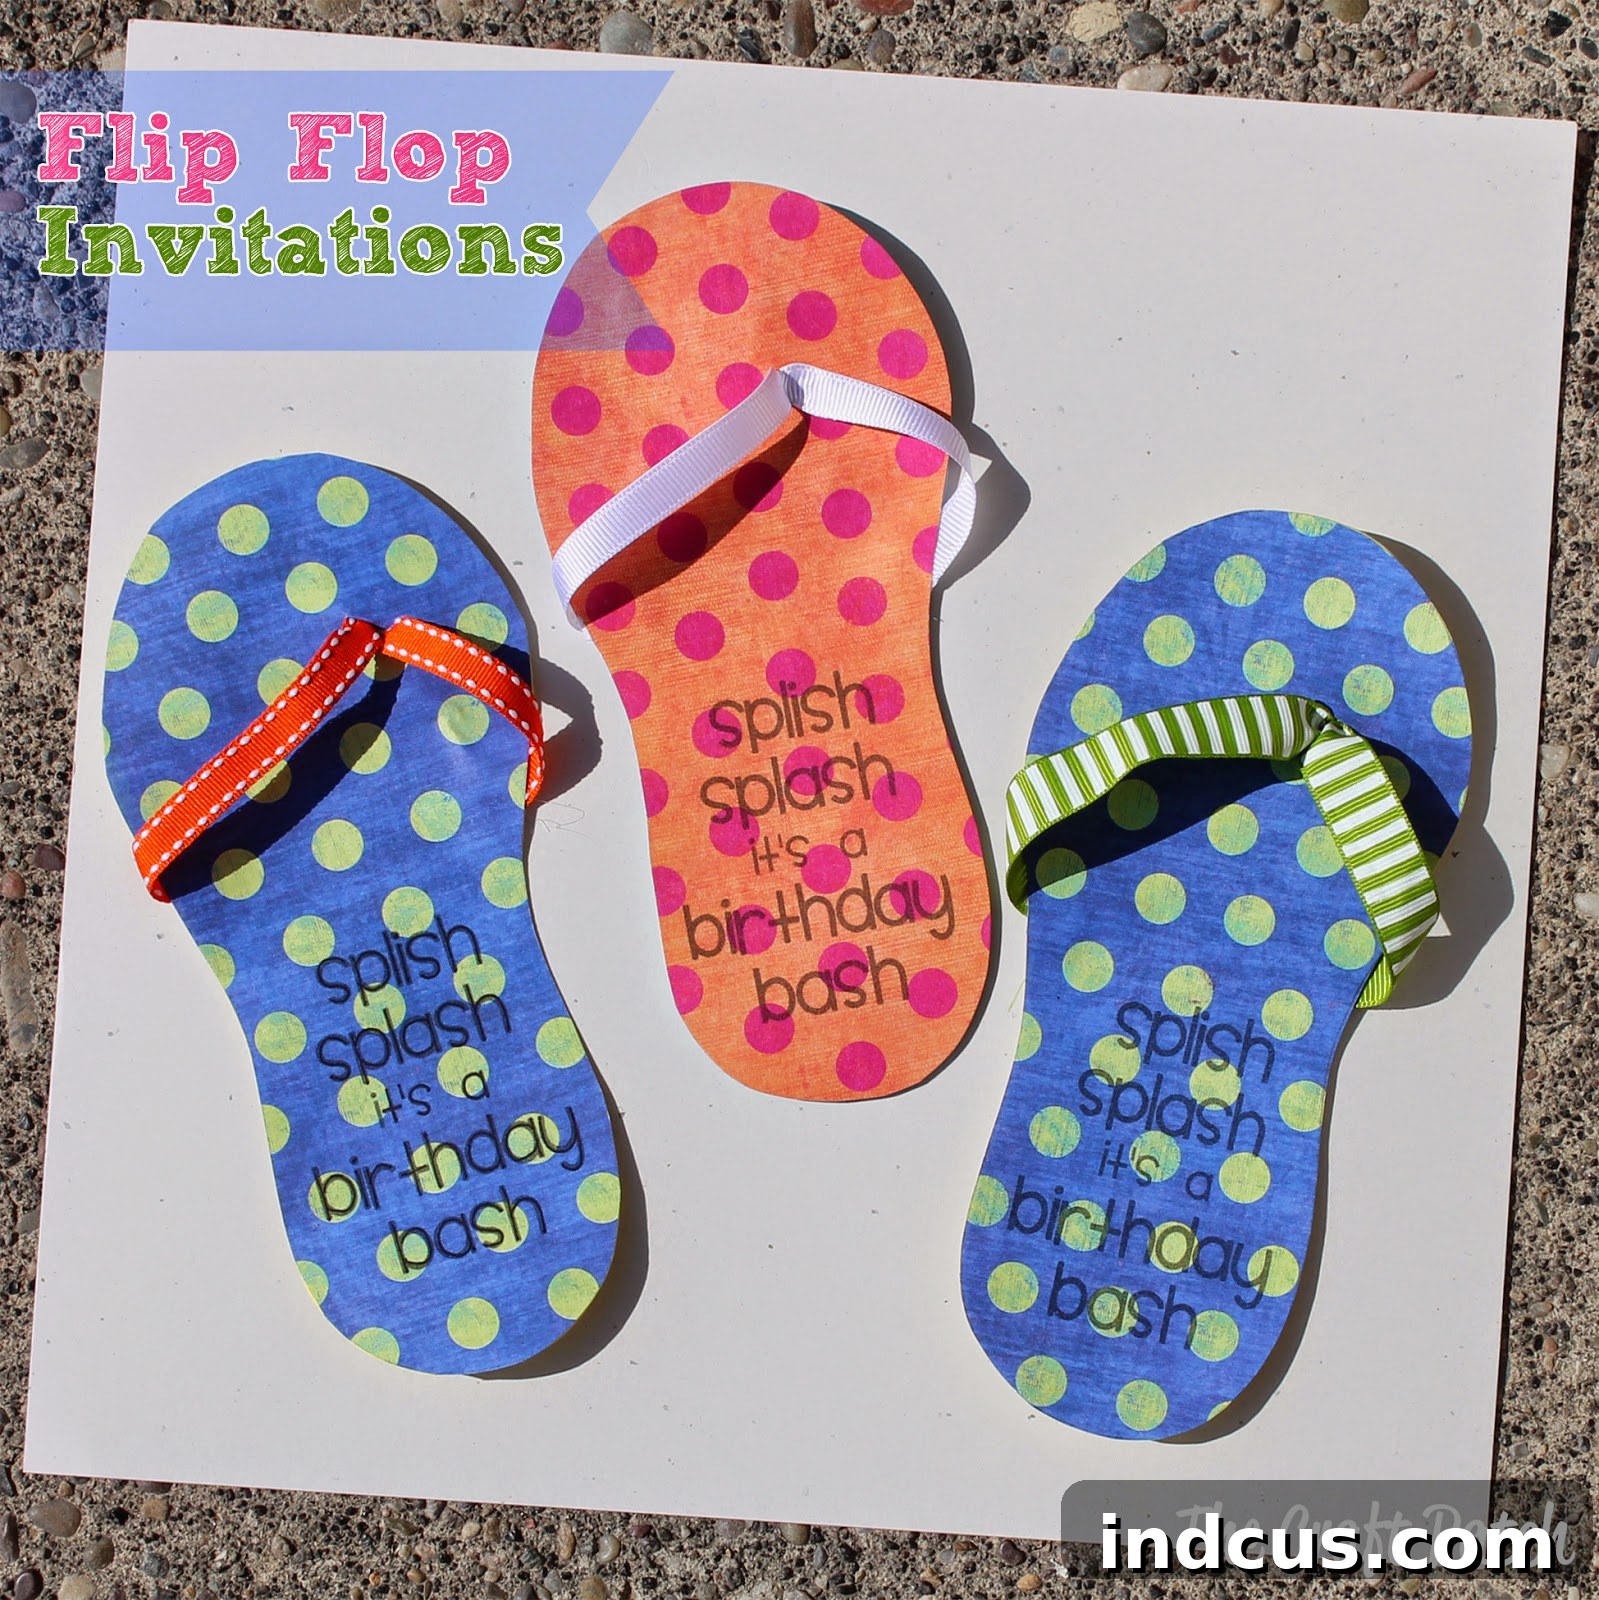
DIY Flip Flop Invitations: The Ultimate Guide for Splish Splash Bashes & Summer Celebrations
There’s something truly special about receiving a handmade invitation. It sets the tone for your event, showing guests the care and excitement you’ve poured into planning a memorable gathering. If you’re envisioning a vibrant, fun-filled summer party, a refreshing pool bash, or a delightful “Splish Splash” birthday, then these DIY flip-flop shaped invitations are the perfect way to get your guests excited!
Last week, we crafted these adorable flip-flop invitations for my daughter’s Splish Splash Birthday Bash, and they were an absolute hit. They’re unique, surprisingly simple to make, and add that personal touch that store-bought invitations often lack. Forget generic cards; let’s dive into making an invitation that truly stands out and perfectly captures the spirit of your celebration!
Why Choose DIY Flip Flop Invitations?
Beyond their undeniable cuteness, there are several compelling reasons to choose handmade flip-flop invitations for your next event:
- Unforgettable First Impression: A unique, themed invitation immediately sparks curiosity and excitement, making your event feel special from the start.
- Personal Touch: Custom-made invitations reflect your creativity and the care you put into every detail of your party. Guests will appreciate the effort!
- Cost-Effective: Crafting your own invitations can often be more budget-friendly than purchasing custom-designed or specialty cards, especially when you need a large quantity.
- Fully Customizable: From paper patterns and colors to ribbon textures and embellishments, you have complete control over the design to perfectly match your party’s theme and color scheme.
- Fun and Rewarding Craft: The process of creating these invitations is a delightful craft project in itself, offering a creative outlet and a sense of accomplishment.
- Theme Reinforcement: A flip-flop invitation instantly communicates a summer, pool, or beach theme, setting clear expectations for your guests about the type of fun awaiting them.
Materials You’ll Need
Gathering your supplies before you begin will make the crafting process smooth and enjoyable. Most of these items can be found at your local craft store or even around your house.
- Cardstock: Choose a sturdy, plain cardstock (e.g., 65-80 lb) in white or a light color. This will form the back of your invitation where the text is printed and needs to hold up well.
- Patterned Scrapbook Paper: This is where you can truly let your creativity shine! Select a medium to thick weight scrapbook paper (e.g., 65-100 lb) with fun, vibrant patterns that match your party theme. Think stripes, polka dots, floral designs, or even playful beach-themed prints. The thicker paper provides better structure for the front of the flip-flop.
- Ribbon: You’ll need two pieces of thin ribbon per invitation. Satin, grosgrain, or even thin organza ribbons work wonderfully. Choose colors that complement your patterned paper. Approximately 6-8 inches per invitation (two pieces) should be sufficient, but it’s always good to have extra.
- Scissors: A good pair of sharp craft scissors will ensure clean cuts, especially when dealing with intricate shoe shapes.
- Pencil: For tracing your shoe shape onto the cardstock and patterned paper.
- Hole Punch: A standard single-hole punch is ideal for creating the holes for your ribbon straps. If you don’t have one, the tip of a sharp pencil can be used in a pinch, though a punch will provide cleaner, more consistent holes.
- Hot Glue Gun and Glue Sticks: Essential for securely attaching the ribbon straps and providing a strong bond for the final assembly.
- Glue Stick or Craft Glue: A good quality glue stick or liquid craft glue (like Elmer’s or Mod Podge) will be used to adhere the front and back pieces of the flip-flop together.
- Printer: To print your invitation wording onto the cardstock.
Step-by-Step Guide: Crafting Your Flip Flop Invitations
Now, let’s get crafting! Follow these detailed steps to create your charming flip-flop invitations.
Step 1: Preparing the Invitation Back (Wording and Shape)
This is where your guests will find all the essential party details. Start by designing your invitation wording on your computer. Choose a fun, legible font and include all necessary information: date, time, location, RSVP details, and any special instructions (e.g., “bring your swimsuit!”). Print this wording onto your chosen cardstock. Make sure the text is positioned appropriately, leaving enough blank space around it to trace and cut out a flip-flop shape.
Once printed, it’s time to create the flip-flop shape. You can freehand a shoe shape, use a cookie cutter as a template, or find a simple flip-flop outline online to print and cut out as a guide. Trace this shape onto the cardstock, ensuring the wording is centered and clearly visible within the traced area. Carefully cut out each flip-flop shape using sharp scissors, aiming for smooth, clean edges.
Step 2: Crafting the Decorative Front
Now for the fun part – selecting your patterned paper! Take your chosen patterned scrapbook paper. This piece will be the decorative front of your flip-flop. Here’s a crucial tip: when you trace the flip-flop shape onto the patterned paper, make sure to flip the cardstock back piece over before tracing. If your cardstock piece has a distinct left or right foot shape, you need to ensure the patterned piece is the *mirror image* of the back. This ensures that when you glue them together, the patterned front perfectly aligns with the printed back, creating a complete flip-flop. If you cut them both facing the same direction without flipping, they won’t fit together correctly!
Carefully cut out the patterned flip-flop shapes. Aim for precision here, as this piece will be the visible top layer of your invitation.
Step 3: Attaching the Ribbon Straps (Part 1 – Back)
With both pieces cut, it’s time to add the iconic flip-flop straps. On the cardstock back piece (the one with the wording), identify the two points where the straps would typically connect on a flip-flop – usually one near the “toe” area and one on each side closer to the “heel.” Use your hole punch (or the tip of a pencil, carefully) to create two small holes at these points. These holes should be large enough for your ribbon to pass through.
Cut two pieces of ribbon, each about 3-4 inches long, for each flip-flop. Thread one end of each ribbon piece through the two holes from the front side of the invitation back. Pull the ends through to the back of the cardstock. Secure these ends to the back of the paper using a small dab of hot glue. Press firmly and allow the glue to cool completely. This secures the initial attachment of the straps and hides the messy ends on the inside of the flip-flop.
Step 4: Shaping the Straps (Part 2 – Front)
Now, flip the cardstock back over so the ribbon pieces are coming out the front. These are your emerging flip-flop straps. You’ll want them to create a natural “V” or “Y” shape, just like real flip-flops. Take the loose ends of the ribbon and bring them around to the sides of the cardstock piece. Position them so they curve gracefully upwards from the toe area and then come down to meet the sides of the “sole” closer to the arch of the foot.
Crucially, leave a little bit of slack in the ribbon to give it that realistic “strap” look – don’t pull it taut. Once you’re happy with the placement and curvature of the straps, use small dots of hot glue to secure the ends of the ribbon onto the sides of the cardstock back piece. Ensure the glue is applied neatly and holds the ribbon firmly in place. This step is about forming the visual appearance of the straps.
Step 5: Assembling the Flip-Flop
With your ribbon straps securely in place and beautifully shaped, it’s time for the final assembly. Take your patterned scrapbook paper front piece and align it perfectly with the cardstock back piece. This will hide all the glue and ribbon ends, giving your invitation a clean, professional finish.
Apply a generous, even layer of glue stick or craft glue to the entire back surface of the patterned paper. Alternatively, you can apply it to the front surface of the cardstock piece, avoiding the areas where the ribbon is particularly bulky. Carefully place the patterned front piece directly on top of the cardstock back piece, aligning all edges. Press down firmly across the entire surface to ensure good adhesion.
Where the ribbon straps are attached, you might find that the glue stick isn’t quite strong enough to create a completely flat and secure bond due to the slight thickness of the ribbon. In these specific spots, you may need to lift the patterned paper slightly and apply a tiny dab of hot glue to firmly secure it over the ribbon ends. Press down again and hold until the glue sets. This extra step ensures your flip-flop invitations are durable and beautifully finished.
Tips for Success and Creative Variations
Here are some additional tips to make your DIY flip-flop invitations even better, along with ideas for different party themes:
General Crafting Tips:
- Create a Template: If you’re making many invitations, it’s highly recommended to create a sturdy flip-flop template from cardboard or thick plastic. This ensures consistency in shape and size for all your invites.
- Experiment with Paper: Don’t be afraid to mix and match patterns or textures. Glitter cardstock for the front or metallic cardstock for the back can add extra sparkle.
- Ribbon Alternatives: Instead of traditional ribbon, consider using thin strips of fabric, colorful twine, or even embroidery floss for a different look.
- Embellishments: Elevate your flip-flops with small self-adhesive rhinestones, tiny paper flowers, glitter glue, or even mini buttons glued to the “straps” to mimic a buckle.
- Batch Production: To save time, complete one step for all your invitations before moving to the next. For example, print all wording, then cut all backs, then all fronts, and so on.
- Proofread: Always proofread your invitation wording multiple times before printing. Have someone else read it too!
Creative Party Themes for Your Flip Flop Invitations:
These invitations are incredibly versatile and can be adapted for a variety of fun events:
- Splish Splash Birthday Bash / Pool Party: This is the classic use! Think blues, greens, and vibrant aquatic patterns. The flip-flop theme immediately signals fun in the sun and water activities.
- Beach Party / Luau: Use tropical-themed papers with hibiscus flowers, palm trees, or ocean waves. Consider natural twine instead of ribbon for an authentic beachy vibe.
- Summer BBQ / Picnic: Choose gingham patterns, red and white checks, or papers with fruit designs. The flip-flop hints at a relaxed, outdoor gathering.
- Spa Day / Pedicure Party: This is a super cute idea! Think pastel colors, soft florals, or even shimmering papers. The flip-flop is the perfect icon for pampering. “Oooo… I think I need to throw a pedicure party. That sounds fun!”
- Girls’ Night In / Brunch: For a casual get-together, design your flip-flops with chic, trendy patterns or elegant florals.
- Bridal Shower / Bachelorette Party (Tropical Theme): If the bride loves the beach, these can be a playful and memorable invitation for a tropical-themed celebration.
Conclusion: Step into Creativity with DIY Invitations!
And that’s it! You’ve successfully crafted unique, charming, and personalized flip-flop invitations that are sure to make a splash. Easy, affordable, and incredibly unique, these invitations are more than just a piece of paper – they’re a tiny preview of the fun and excitement your guests can expect at your party.
Whether you’re planning a lively “Splish Splash” birthday, a relaxing pedicure party, or any summer celebration, these DIY flip-flop invites are a fantastic way to add a personal touch and get everyone in the festive spirit. So grab your supplies, get creative, and enjoy the process of bringing your party vision to life, one adorable flip-flop at a time!
Don’t forget to share your creations and tag us if you post them online. Happy crafting!







