
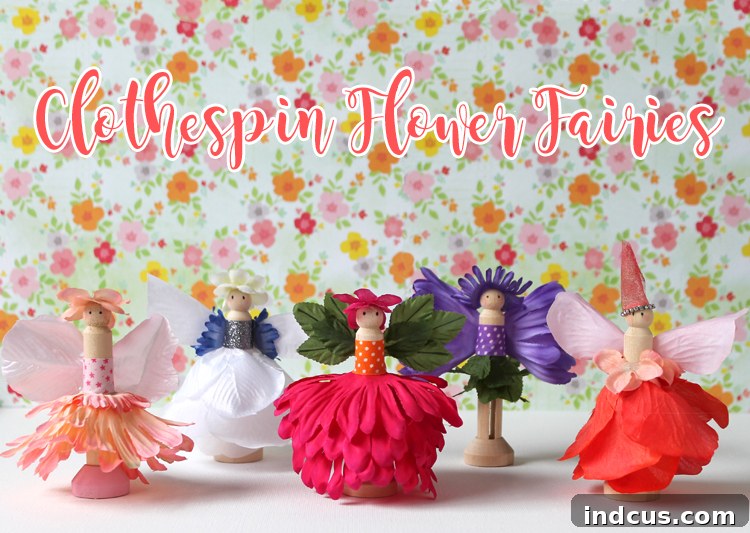
Craft Your Own Magic: Enchanting DIY Clothespin Fairies for Whimsical Fun
Welcome, fellow craft enthusiasts, to a world where imagination takes flight and everyday items transform into something truly magical! Today, we’re diving into an enchanting project that promises to spark joy and unleash creativity: crafting your very own whimsical clothespin fairies. This delightful DIY endeavor is perfect for all ages, offering a charming way to add a touch of handmade magic to your home, give personalized gifts, or simply enjoy a relaxing afternoon of creative expression.
The inspiration for this adorable craft comes directly from the heart of our vibrant crafting community. I was incredibly touched when a wonderful reader, Twila W., shared photographs of the most delightful fairies she lovingly created for her daughters. Their charm and imaginative detail instantly captivated me, making it impossible not to embark on this crafting adventure myself. Today, I’m thrilled to share a comprehensive guide, walking you through each step so you can bring these cute, whimsical characters to life in your own unique style. Prepare to discover one of the most fulfilling and fun DIY projects you’ll ever undertake!
Why Embark on a Clothespin Fairy Crafting Journey?
Beyond the sheer cuteness, there are numerous compelling reasons to try your hand at making clothespin fairies. This craft is more than just an activity; it’s an experience that offers a wealth of benefits for crafters of all skill levels.
Unleash Boundless Creativity and Imagination
Clothespin fairies are a blank canvas for your imagination. From choosing vibrant colors for their dresses to designing unique hairstyles and adding intricate embellishments, every decision is an opportunity to express your personal flair. This project encourages imaginative play, especially for children, as they can create entire stories and worlds for their new fairy friends. It’s a fantastic way to develop storytelling skills and enhance creative thinking.
An Accessible and Affordable Craft for Everyone
One of the greatest appeals of this DIY project is its accessibility. The core materials are incredibly inexpensive and often found around the house or at any craft store. This makes it an ideal activity for families on a budget, classrooms, or anyone looking for a creative outlet that doesn’t break the bank. You don’t need specialized tools or advanced techniques, making it perfect for beginners and seasoned crafters alike.
Perfect for All Ages: A Fun Family Activity
Whether you’re a grandparent looking for a project to share with grandchildren, a parent seeking a fun activity for a rainy afternoon, or an individual wanting a relaxing solo craft, clothespin fairies fit the bill. Children can handle many of the steps with a little guidance, fostering fine motor skills and patience, while adults can enjoy the therapeutic process of bringing a miniature character to life. It’s a wonderful opportunity for intergenerational bonding and shared creativity.
Charming Decor and Thoughtful, Personalized Gifts
Once completed, these little fairies aren’t just toys; they are charming pieces of art. They can instantly brighten up any space, whether perched on a bookshelf, strung into a whimsical garland, or nestled among houseplants. Furthermore, a handmade clothespin fairy makes an incredibly thoughtful and personal gift. Imagine the delight of a friend or loved one receiving a unique fairy crafted especially for them, reflecting their personality or favorite colors. They are ideal for baby shower gifts, birthday presents, or simply as a token of appreciation.
Mindfulness and Relaxation Through Crafting
In our fast-paced world, finding moments of calm and focus is invaluable. Crafting, especially projects like these adorable fairies, offers a meditative escape. The repetitive actions of wrapping yarn, cutting fabric, and gluing tiny details can be incredibly soothing and help reduce stress. It allows you to slow down, focus on the present moment, and enjoy the satisfaction of creating something beautiful with your own hands.
Gather Your Magical Supplies: Essential Materials
Before we embark on our crafting journey, let’s ensure we have all the necessary components to create our enchanting clothespin fairies. Most of these items are readily available, making preparation a breeze.
Core Fairy Components:
- Wooden Clothespins: The classic wooden spring-style clothespins are perfect for forming the fairy’s body. Choose standard sizes.
- Craft Glue: A good quality liquid craft glue that dries clear is essential. For more secure attachments (especially small embellishments or if working with adults), a low-temperature hot glue gun can be beneficial (with proper supervision).
- Scissors: Sharp scissors for cutting fabric, paper, and yarn.
For the Fairy’s Body, Hair, and Arms:
- Yarn or Embroidery Floss: Various colors for hair and to wrap around the clothespin body.
- Pipe Cleaners (Chenille Stems): Great for creating poseable arms or adding extra structural elements.
- Felt or Fabric Scraps: Small pieces can be used for clothing details or hair accessories.
For Dresses, Wings, and Accessories:
- Fabric Scraps: Lightweight fabrics like cotton, tulle, lace, or silk scraps work wonderfully for dresses and skirts.
- Felt: Excellent for creating structured dresses, hats, or wing bases.
- Tissue Paper or Coffee Filters: Fantastic for delicate, translucent wings that can be layered and shaped.
- Ribbon: Thin ribbons can be used for sashes, hairbands, or decorative accents.
- Artificial Flower Petals: A beautiful and often free source of colorful “fabric” for skirts.
- Sequins, Glitter, Small Beads: For adding sparkle and enchanting details.
- Fine-Tip Markers or Acrylic Paint Pens: To draw delicate facial features.
Optional but Recommended:
- Small Wooden Beads: If you prefer a round head for your fairy instead of the flat top of the clothespin.
- Floral Wire: For creating more intricate, poseable wings or antennae.
- Small Bells or Charms: To add a jingling sound or extra magical touch.
- Wire Cutters/Pliers: If using floral wire.
Step-by-Step Guide: Crafting Your Whimsical Clothespin Fairies
Now that you have all your supplies, let’s begin the exciting process of bringing your fairies to life! Follow these simple steps to create a charming masterpiece.
Step 1: Preparing the Fairy Body and Hair
- The Foundation: Start with a plain wooden clothespin. This will form the core of your fairy.
- Creating Hair: Cut several strands of yarn (about 6-8 inches long, depending on desired hair length). Fold the yarn in half and glue the folded middle point to the “head” end of the clothespin. Once dry, you can trim and style the hair. You can use different colors for highlights or braids.
- Forming Arms (Optional): If you want poseable arms, take a pipe cleaner, wrap it around the clothespin just below the “neck” area, and twist it to secure. Shape the ends into small loops for hands or keep them straight.
Step 2: Designing the Dress or Skirt
This is where your fairy’s personality truly starts to shine! There are many ways to create a dress:
- Fabric Scraps: Cut a rectangle of fabric, gather one long edge, and glue it around the clothespin, just below the “neck” area, to form a skirt. You can layer multiple pieces for a fuller look.
- Felt Dress: Cut a simple dress shape from felt. You can make it an A-line or a more structured bodice and skirt. Glue it directly onto the clothespin.
- Flower Petals: Glue artificial flower petals in layers around the clothespin, overlapping them to create a beautiful, natural-looking skirt.
Step 3: Crafting and Attaching the Wings
No fairy is complete without a beautiful set of wings!
- Paper/Coffee Filter Wings: Fold a coffee filter or a piece of tissue paper in half, then half again. Cut a wing shape from the folded corner. Unfold to reveal a symmetrical set of wings. You can decorate them with markers or glitter.
- Felt Wings: Cut two identical wing shapes from felt. These will be more durable.
- Attaching Wings: Apply a dab of glue to the center back of the fairy’s body and press the wings firmly into place. Hold until dry.
Step 4: Adding Delicate Facial Features
Give your fairy a friendly face!
- Simple Expression: Use a fine-tip black marker to draw two small dots for eyes and a tiny curve for a mouth.
- More Detail: For more expressive faces, you can add small dots for rosy cheeks with a pink marker or even use tiny beads for eyes. Keep it simple for a whimsical look.
Step 5: Embellishments and Magical Details
This is the fun part where you add all the magical touches!
- Sparkle: Apply a thin layer of glue to the wings or dress and sprinkle with fine glitter.
- Shine: Glue tiny sequins, beads, or rhinestones onto the dress or hair for extra bling.
- Natural Elements: Add small pressed flowers, tiny leaves, or even dried moss for a woodland fairy feel.
- Headwear: Create a small flower crown from tiny artificial flowers or a simple ribbon headband.
- Accessories: Give your fairy a tiny wand made from a toothpick and a bead, or a little satchel from felt.
Step 6: Bringing Your Fairy to Life and Display
Once your fairy is complete and all the glue has dried, she’s ready to fly!
- Display: The clothespin bottom allows your fairy to stand upright or clip onto things. You can clip them to curtains, plants, garlands, or even a mobile.
- Play: Encourage imaginative play! These fairies make wonderful characters for storytelling and small world play.
Tips for Success and Creative Variations
To ensure your crafting experience is smooth and enjoyable, and to inspire even more creativity, here are some helpful tips and exciting variations to explore.
Making It Child-Friendly: Simplifications for Young Crafters
- Pre-Cut Materials: Have fabric scraps, wing shapes, and yarn pre-cut to minimize frustration.
- Safe Glue: Opt for school glue or glue sticks for younger children instead of hot glue.
- Guidance: Provide ample supervision and assistance, especially with cutting and intricate gluing.
- Focus on Fun: Emphasize the process and creativity over perfection. Let them experiment!
Seasonal and Themed Fairies
- Spring Fairies: Use pastel colors, floral patterns, and artificial flower petals.
- Summer Fairies: Bright, vibrant colors, shell embellishments, and light, airy fabrics.
- Autumn Fairies: Earthy tones, tiny leaves, acorns, and warm fabrics.
- Winter/Christmas Fairies: Whites, silvers, golds, glitter, tiny pinecones, and snowflake embellishments.
- Woodland Fairies: Incorporate natural elements like twigs, moss, small stones, and earthy fabric tones.
- Mermaid Fairies: Use iridescent fabrics, sequins shaped like scales, and sea-inspired colors.
Beyond Display: Different Uses for Your Fairies
- Fairy Garland: String multiple fairies together with beads and ribbons to create a magical garland for a child’s room or party decor.
- Mobile: Attach fairies to a hanger or cross-shaped frame to create a whimsical mobile for a nursery.
- Party Favors: Craft personalized fairies as unique and memorable party favors for birthdays or celebrations.
- Storytelling Props: Use them as characters in imaginative puppet shows or bedtime stories.
- Dollhouse Residents: Their small size makes them perfect inhabitants for dollhouses or miniature scenes.
Advanced Techniques for Experienced Crafters
- Wire Armatures: For more poseable fairies, use floral wire to create a more intricate armature for arms and legs before wrapping with yarn.
- Sculpted Features: Use tiny bits of polymer clay or air-dry clay to sculpt more detailed faces or accessories.
- Painted Details: Instead of markers, use fine brushes and acrylic paints for more nuanced facial expressions and clothing patterns.
The Joy of Giving and Displaying Your Handmade Creations
Once your magical clothespin fairies are complete, the joy doesn’t end there. Sharing your creations, whether as thoughtful gifts or delightful home decor, extends the magic.
Imagine the smile on a child’s face receiving a fairy made just for them, perhaps even resembling them or incorporating their favorite colors. These personalized touches elevate a simple craft into a cherished keepsake. For adults, a handmade fairy can be a charming token of friendship, a unique wedding favor, or a whimsical addition to a gift basket.
Displaying your fairies around your home can infuse every corner with personality and charm. Clip them to lampshades, hang them from plants, or create a magical display on a mantelpiece. Their small size makes them versatile decor elements, capable of bringing a subtle touch of fantasy wherever they go. Consider placing them in a child’s bedroom to inspire dreams and imaginative play, or in a crafting nook as a reminder of your creative spirit.
Embrace the Whimsy: Your Fairy Tale Awaits!
Crafting these adorable clothespin fairies is more than just a project; it’s an invitation to embrace creativity, connect with your inner child, and add a sprinkle of magic to your life. From the initial spark of inspiration from our wonderful reader, Twila W., to the final delicate touches of glitter, every step is a journey of discovery and satisfaction. So gather your materials, clear your workspace, and prepare to be enchanted by the process. Don’t miss out on this cute, whimsical craft – it truly is one of the most fun and rewarding DIY projects you’ll ever experience. We encourage you to try it, experiment with your own unique ideas, and share your delightful fairy creations with the world!







