
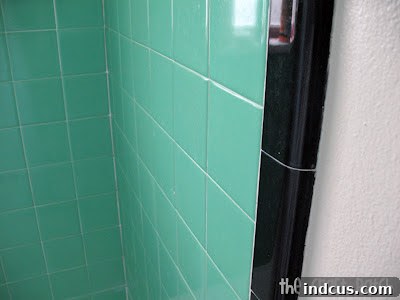
Moving into a new home is a thrilling experience, filled with the promise of new memories and the exciting challenge of personalizing every corner. For me, one of the first areas I wanted to tackle was the bathroom. Specifically, I had my sights set on replacing the existing shower curtain. It simply didn’t align with the charming, vintage aesthetic of our new space, particularly clashing with the beautiful mint green tiles that defined the room’s character.
The quest for the perfect shower curtain began, but I soon realized that finding a ready-made option that perfectly complemented the unique vintage mint green and black tile was harder than I anticipated. Most off-the-shelf curtains felt generic or failed to capture the subtle elegance I envisioned. I longed for something that felt custom, something with a delicate texture and a touch of sophistication.
The Inspiration: A West Elm Duvet Cover Transforms a Vision
As fate would have it, a West Elm catalog arrived in my mailbox, and a particular item caught my eye: a stunning pintuck duvet cover. Its delicate, dimensional texture and understated elegance were exactly what I had been searching for. The way the fabric was gathered into neat, parallel folds created a sophisticated pattern that was both classic and contemporary. Immediately, a lightbulb went off – why couldn’t I recreate that same beautiful texture for a shower curtain?
This West Elm duvet cover wasn’t just a product; it was a revelation. It provided the exact visual inspiration needed to solve my bathroom decor dilemma. The idea of a textured, white, pintuck shower curtain, one that would softly complement the vintage tiles without competing with them, began to take shape.
Why DIY? The Unbeatable Advantages of a Homemade Shower Curtain
Opting for a DIY shower curtain, especially one as detailed as a pintuck design, offers numerous advantages over purchasing a mass-produced item. It’s more than just a creative project; it’s a strategic choice for personalized home decor:
Customization at Its Finest
The primary benefit of a homemade shower curtain is unparalleled customization. You dictate the fabric, the color, the texture, and most importantly, the exact dimensions. This is especially crucial when dealing with unique bathroom layouts or specific aesthetic requirements, like needing a curtain to harmonize with vintage mint green tiles. A DIY approach ensures your shower curtain is truly one-of-a-kind, reflecting your personal style and fitting your space perfectly.
Budget-Friendly Decor Solutions
Achieving a high-end look doesn’t have to come with a hefty price tag. Inspired by the West Elm aesthetic, I knew a store-bought pintuck shower curtain would likely be quite expensive. However, by choosing to create one myself, I dramatically reduced the cost. My main material? A simple flat sheet from Wal-Mart, acquired for a mere $4.47. This incredible savings allows you to allocate your budget to other areas of your home renovation or simply enjoy the satisfaction of an inexpensive, yet luxurious, update.
Adding a Unique Personal Touch
There’s an undeniable charm that comes with handmade items. A DIY pintuck shower curtain adds a deeply personal touch to your bathroom. It tells a story – your story – of creativity, resourcefulness, and attention to detail. This element of uniqueness can’t be replicated by mass-produced items and makes your home feel truly yours.
A Sustainable Choice: Upcycling and Repurposing
In an age where sustainability is increasingly important, upcycling an old or inexpensive flat sheet into a beautiful shower curtain is an eco-conscious choice. It gives new life to existing materials, reducing waste and promoting a more sustainable approach to home decorating. This project is a perfect example of how repurposing can lead to stunning results.
The Joy of Creation and Skill Development
Beyond the tangible benefits, undertaking a sewing project like this is incredibly rewarding. It provides a creative outlet, allows you to develop or hone your sewing skills, and offers a profound sense of accomplishment. Turning a flat piece of fabric into a textured, elegant home accessory is a satisfying journey from start to finish.
Gathering Your Materials: What You’ll Need for Your Pintuck Project
Before diving into the sewing, it’s essential to gather all your tools and materials. Having everything ready will make the process smoother and more enjoyable:
- A Flat Sheet: This is your primary material. For a standard shower curtain (approximately 70-72 inches wide), I learned that a full-sized sheet is ideal, or even a queen-sized sheet if you desire extra fullness and need to account for significant fabric shrinkage from the tucks. A twin sheet, while budget-friendly, might result in a slightly “skimpy” width, as I discovered. Choose a color that complements your bathroom – white or an off-white is classic and versatile.
- Sewing Machine: Any basic sewing machine capable of straight stitches will work perfectly.
- Matching Thread: Select a high-quality thread that matches the color of your sheet for a seamless finish.
- Measuring Tape or Long Ruler: Absolutely crucial for precise measurements of your tucks and hems.
- Fabric Chalk or Washable Fabric Marker: To accurately mark your tuck lines on the fabric.
- Fabric Shears: Sharp scissors specifically designed for fabric will ensure clean cuts.
- Iron and Ironing Board: Essential for pressing and setting your tucks for crisp, professional-looking folds.
- Pins: To hold fabric folds in place before stitching.
- Shower Curtain Rings/Hooks: To hang your finished curtain.
- Shower Curtain Liner (Optional but Recommended): While your fabric curtain adds style, a waterproof liner is necessary to protect your bathroom from water splashes.
- Optional: Grommet Kit or Buttonhole Attachment: If you prefer grommets over traditional buttonholes for hanging.
Step-by-Step Guide: Crafting Your Elegant Pintuck Shower Curtain
Creating your pintuck shower curtain is a meticulous yet highly rewarding process. Follow these steps for the best results:
1. Prepare Your Fabric
Start by washing and thoroughly ironing your flat sheet. Pre-washing helps prevent future shrinkage and ensures the fabric is clean and smooth for marking and sewing. A well-pressed sheet is key to crisp tucks.
2. Determine Your Dimensions and Plan Your Tucks
This is arguably the most critical step. A standard shower curtain is about 72 inches wide by 72 inches long. However, each pintuck you create will consume fabric. For example, if you make a 1/2-inch wide tuck (meaning you stitch 1/4 inch from the fold), you are essentially folding over 1 inch of fabric to create that tuck. If you plan for 30 such tucks across your curtain, you will lose 30 inches of width! This is why starting with a wider sheet (full or queen) is essential.
Decide on:
- Desired Finished Width: For example, 70 inches.
- Number of Tucks: More tucks create a denser texture.
- Tuck Width: How wide each finished tuck will be (e.g., 1/4 inch, 1/2 inch).
- Spacing Between Tucks: How much flat fabric you want visible between each tuck.
Calculate your starting fabric width needed: Desired Finished Width + (Number of Tucks x Amount of Fabric Consumed Per Tuck). For the length, you’ll need the desired finished length plus allowances for the top and bottom hems.
3. Mark Your Fabric for Tucks
Lay your ironed sheet flat. Using your measuring tape and fabric chalk, mark parallel lines for each tuck. These lines represent the fold lines for your tucks. Ensure they are evenly spaced and perfectly straight across the entire width of the fabric.
4. Create the Pintucks
- Fold and Press: Take your first marked line. Fold the fabric precisely along this line, ensuring the raw edges or previous tucks align neatly. Press this fold sharply with your iron.
- Pin: Pin along the folded edge to keep it secure.
- Stitch: Using your sewing machine, stitch a straight line parallel to the pressed fold. The distance from the fold determines the width of your tuck (e.g., stitch 1/4 inch from the fold for a 1/2-inch wide tuck).
- Repeat: Continue this process for every marked line. As you complete each tuck, press it flat in the direction you want it to lay (usually towards one side, consistent across the curtain). This step is labor-intensive but crucial for the final aesthetic.
5. Finish the Side and Bottom Hems
Once all your tucks are complete, trim any excess fabric from the sides to achieve your desired finished width. Then, create neat double-fold hems along both vertical sides and the bottom edge of the curtain. Press, fold twice (e.g., 1/2 inch then another 1/2 inch), and stitch in place.
6. Create the Top Hem and Eyelets/Grommets
For the top, fold down a generous hem, typically 2 to 3 inches, to create a sturdy channel for your shower curtain rings. Press this fold well, then fold it under again to conceal the raw edge. Stitch it securely in place. Once the top hem is sewn, you need to create openings for your shower curtain hooks or rings.
- Buttonholes: Mark evenly spaced points (usually 6-8 inches apart) along the top hem. Use your sewing machine’s buttonhole function to create neat buttonholes.
- Grommets: Alternatively, purchase a grommet kit. Mark the placement for your grommets, cut small holes, and follow the kit’s instructions to install the metal grommets. This provides a more modern and robust finish.
7. Final Inspection
Give your newly sewn curtain a final press to ensure all tucks lie flat and crisp. Trim any loose threads. You are now ready to hang your beautiful, custom creation!
The Big Reveal: Hanging Your Custom Creation and Lessons Learned
With the last stitch sewn and the final press complete, the moment arrived to hang my new pintuck shower curtain. The anticipation was high, and as it unfurled in the bathroom, I was absolutely enamored. The delicate texture, the clean white fabric, and the subtle dimension of the tucks perfectly complemented the vintage mint green tiles. It was exactly the “feminine” touch I had envisioned, bringing a fresh, custom feel to the space.
However, as with many DIY projects, there was a small but significant learning curve. I realized that all those beautiful tucks, while adding incredible texture, had consumed more fabric width than I had initially accounted for. My curtain ended up being a little “skimpy” in width – still beautiful, but perhaps not as full as I would have liked. This was an invaluable lesson:
Next time, I’d definitely use a full-sized sheet (or even a queen!) for a standard shower curtain. The extra width provides more allowance for the fabric lost in the tucks, ensuring a luxuriously full appearance. Despite this minor setback, I still absolutely adore the curtain. It’s pretty, it’s custom, and it makes me smile every time I see it. I’m confidently calling it “good enough” and celebrating the achievement.
The success of this project, even with its small imperfection, has ignited a new spark of creativity. I’m already envisioning my next pintuck creation: a matching duvet cover for my bed. The elegance and simplicity of the design are so captivating that I can’t wait to incorporate it into other areas of my home.
Beyond the Shower: Other Pintuck Project Ideas
The beauty of the pintuck technique extends far beyond shower curtains. Once you’ve mastered this skill, a world of textured home decor opens up:
- Duvet Covers and Pillow Shams: As my next planned project, a pintuck duvet cover brings hotel-level luxury and texture to your bedroom. Matching pillow shams complete the sophisticated look.
- Decorative Pillows: Small pintuck throw pillows can add a touch of elegance to a sofa or armchair.
- Table Runners and Placemats: Elevate your dining experience with custom pintuck table linens, perfect for special occasions or everyday chic.
- Window Curtains or Valances: Pintuck curtains can add soft texture and privacy to any room, offering a subtle alternative to more elaborate drapery.
- Garment Details: For those who sew clothing, pintucks can be incorporated into blouses, dresses, or skirts for a tailored, designer touch.
- Wall Art: Consider creating a textured fabric panel with pintucks, framed or stretched over a canvas, for a unique piece of art.
Tips for Your Next DIY Sewing Project
Embarking on any sewing project, big or small, comes with its own set of challenges and triumphs. Here are a few tips to ensure your next DIY endeavor is a success:
- Always Pre-Wash Your Fabric: This prevents shrinkage after your project is complete and removes any factory finishes that might interfere with sewing.
- Measure Twice, Cut (and Sew) Once: Precision is key, especially with projects that require even spacing like pintucks. Double-check all your measurements before marking and stitching.
- Test a Small Sample: If you’re trying a new technique or uncertain about fabric behavior, practice on a small scrap of fabric first. This allows you to adjust stitch length, tension, or spacing without risking your main project.
- Don’t Be Afraid to Experiment: Sewing is a journey of discovery. If something doesn’t look quite right, don’t be afraid to unpick and try again. Each mistake is a learning opportunity.
- Embrace Imperfections: Handmade items inherently carry a unique character that mass-produced items lack. Embrace the slight variations; they tell the story of your craftsmanship.
- Invest in Good Basic Tools: Sharp scissors, a reliable sewing machine, quality thread, and a good iron are fundamental tools that will make your sewing experience much more enjoyable and produce better results.
Conclusion: Embrace the Joy of Personalized Home Decor
Creating this pintuck shower curtain from a simple flat sheet was more than just a home decor project; it was a testament to the power of inspiration, the satisfaction of hands-on creation, and the joy of infusing personal style into every corner of a home. From a modest $4.47 sheet, I crafted a beautiful, textured, and truly unique shower curtain that now perfectly complements our vintage bathroom tiles.
While I learned a valuable lesson about fabric consumption and will opt for a larger sheet next time, the outcome is undeniably charming and completely my own. This experience has deepened my appreciation for DIY and ignited a desire to bring more custom, handmade touches into our living space. If you’re looking for a budget-friendly yet elegant way to refresh your bathroom or any room, I wholeheartedly encourage you to try your hand at a pintuck project. The feeling of stepping back and admiring something you’ve created is truly incomparable.







