
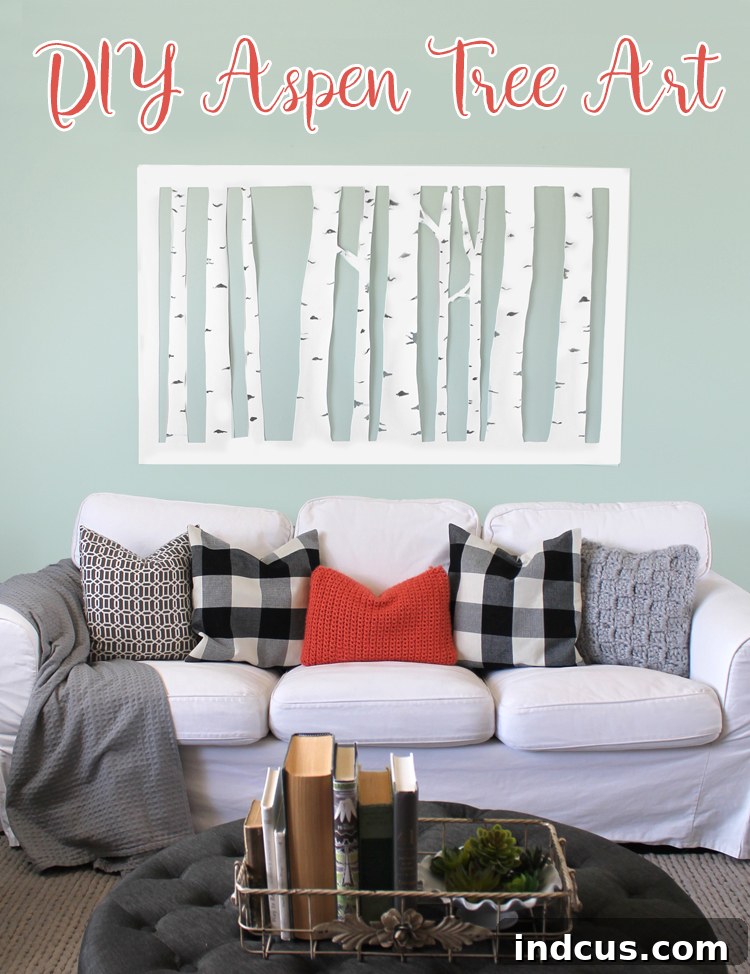
Transform Your Space: Craft Stunning DIY Large Aspen Tree Wall Art for Under $10
Finding the perfect piece of large wall art to complement your home decor can be a significant challenge, especially when you’re working with a budget. High-quality, substantial artwork often comes with an exorbitant price tag, leaving many searching for creative and affordable alternatives. If you’ve been on the hunt for something impactful to adorn that prominent wall above your couch or in your living area, but have been deterred by steep prices, you’re in the right place. We believe that beautiful home decor doesn’t have to break the bank, and with a little creativity, you can craft truly impressive pieces.
This guide will walk you through creating your very own breathtaking aspen tree scene – a majestic, large-scale piece of wall art that brings a touch of natural elegance into any room. Not only is this project incredibly satisfying to complete, but it’s also astonishingly inexpensive, costing less than $10 for all materials. Imagine having a custom-sized, visually striking artwork that perfectly fits your space and reflects your personal style, all while keeping your wallet happy. That’s precisely what this DIY project offers!
The Allure of Aspen Tree Art: Why This Project Shines
Aspen trees, with their distinctive white bark and unique “eye” patterns, are iconic symbols of nature’s beauty, particularly resonant with a serene, minimalist, or wintery aesthetic. Their tall, slender forms create an elegant, almost ethereal presence, making them an ideal subject for large-scale art. This DIY aspen tree wall art project capitalizes on these qualities, offering a design that is both sophisticated and versatile, capable of enhancing various interior styles from modern and Scandinavian to rustic or contemporary farmhouse.
The finished piece measures an impressive 3 feet by 5 feet, demonstrating that “big art” doesn’t equate to “big spending.” This substantial size allows it to serve as a powerful focal point in any room, anchoring your decor and drawing the eye without overwhelming the space. The beauty of crafting your own art is the freedom to choose the exact dimensions that suit your wall, ensuring a perfect fit that store-bought options rarely provide. The joy of creating something so impactful and tailored to your home for such a minimal investment is truly unparalleled.
Ready to Get Creative? Your Step-by-Step Guide Awaits!
If you’re eager to transform your blank wall into a gallery-worthy display, you’re in luck! We’ve meticulously detailed every step of the process, ensuring that even novice crafters can achieve professional-looking results. Gather your materials, prepare your workspace, and get ready to embark on a fun and rewarding DIY journey. Here’s exactly how you can craft your very own big, beautiful, and budget-friendly DIY aspen tree wall art:
Materials You’ll Need: Crafting on a Shoestring Budget
The beauty of this project lies not just in its stunning outcome but also in the simplicity and affordability of its required materials. Each item is chosen for its ease of use, accessibility, and ability to contribute to a high-quality finished product without breaking your budget. Here’s a detailed list of what you’ll need to bring your aspen forest to life:
- Foamies Big Roll Craft Foam in White: This is the star of our show. The large roll of craft foam provides an expansive, lightweight, and incredibly easy-to-cut surface that mimics the clean, flat look of a canvas. Its white color is perfect for representing the iconic bark of aspen trees. Look for a roll that’s at least 36 inches wide to accommodate the 3×5 foot dimensions. (Affiliate Link: Find it here)
- Black or Charcoal Craft Paint: A small bottle of acrylic craft paint in black or charcoal gray is all you need. This will be used to add the intricate details of the aspen bark, giving your trees depth and realism. Charcoal often provides a softer, more natural look than stark black.
- Small Paint Brush: Opt for a small, fine-tipped brush, perfect for detailing. This will allow you to create the characteristic horizontal lines and “eyes” that make aspen trees so recognizable. Precision is key for these final touches.
- Sharp Scissors: A good pair of sharp, comfortable scissors is essential for clean cuts. You’ll be cutting through foam, so a pair that can handle thicker materials will make the process much smoother and prevent jagged edges.
- Yardstick or Long Straight Edge: Accuracy is important when establishing your border. A yardstick or any other long, sturdy straight edge will ensure your lines are crisp and even, providing a professional finish to your artwork.
- Optional: Masking Tape or Painter’s Tape: Useful for securing the foam while you work and, as a temporary hanging solution (though not recommended for long-term display, as discussed later).
- Recommended for Hanging: Command Strips (Velcro Picture Hanging Strips): For a secure, damage-free, and long-lasting display, these strips are highly recommended.
With these basic supplies in hand, you’re well on your way to crafting a spectacular piece of DIY wall art that will be the envy of all your guests!
Creating Your Aspen Forest: Step-by-Step Instructions
Step 1: Prepare Your Canvas and Outline Your Vision
The initial setup is crucial for ensuring a smooth crafting process. Begin by unrolling your large sheet of white craft foam. Foam tends to curl, so it’s important to flatten it out. Tape all four edges securely to a hard, flat surface – a large table, the floor, or even a sheet of plywood works perfectly. This will prevent the foam from shifting or curling back up while you’re working, ensuring precise cuts and drawings.
Once the foam is flat and secure, grab your yardstick or straight edge. Carefully draw a 3-inch border around the entire outside edge of the foam sheet. This border serves two vital purposes: it provides a clean, framed look for your finished art, and more importantly, it offers structural integrity, preventing the inner design from becoming flimsy once cut. Use a pencil with a light touch, as these lines are primarily guides.
Next comes the exciting part: drawing your aspen trees! For inspiration, I highly recommend looking up pictures of aspen tree groves online. Pay attention to the natural variations in trunk thickness, height, and spacing. Avoid making your trees perfectly straight or evenly spaced; nature is imperfect, and incorporating this organic feel will make your art more authentic. Sketch your trees freehand within the bordered area, ensuring they reach from the bottom border to the top. Don’t worry about perfection in your initial sketches – you can always erase and refine. A useful tip I discovered was to lightly color in the areas that *will be* the trees. This makes it much easier to distinguish between the positive space (the trees you’ll keep) and the negative space (the background you’ll cut out), preventing accidental cuts and making the design clearer.
Step 2: Precision Cutting – Revealing Your Forest
Now that your design is laid out, it’s time to bring your trees to life by cutting out the negative space. This means you will be removing the foam that represents the “background” between and around your trees, leaving the tree shapes intact and connected by your 3-inch outer border. Carefully, using your sharp scissors, begin cutting along your drawn lines. Start from an inner section and work your way outwards.
The key here is precision and patience. Take your time, especially around the curves and narrow sections of the trees. Remember, you are cutting *around* the tree shapes, not through them. It’s crucial not to cut through the outside 3-inch border you established earlier, as this border holds the entire artwork together. If your scissors are struggling with tight angles, consider using the tip of the blade for finer details. The goal is to create clean, smooth edges that define each tree trunk.
Step 3: Adding Realistic Bark Details
With all the negative space removed, your aspen tree outlines are now clearly defined. It’s time to add the subtle yet crucial details that give aspen trees their unique character. Grab your small paint brush and your black or charcoal craft paint. Dip your brush lightly into the paint, removing any excess to prevent drips. Aspen trees are known for their distinctive horizontal markings and dark “eyes” or scars on their otherwise smooth white bark.
Using a light hand, paint small, irregular horizontal lines and dots along the tree trunks. Vary the length and thickness of these marks to mimic natural bark patterns. Don’t strive for uniformity; imperfection adds to the realism. You can also create small, oval-shaped “eyes” in a few spots. Remember, a little goes a long way. The goal is to suggest texture and detail, not to cover the white foam completely. Step back periodically to assess your work and ensure you’re happy with the overall effect. Once you’re satisfied, allow the paint to dry completely. This usually takes only a short time for craft paint.
Step 4: Hanging Your Masterpiece
As soon as your paint is thoroughly dry, your beautiful, custom-made aspen tree art is ready to be displayed! Choosing the right hanging method is important to ensure your artwork stays securely on the wall without causing damage. While masking tape might seem like an easy option, my experience showed that it started peeling off after just a few days, leading to potential frustration and rework.
For a reliable and wall-friendly solution, I highly recommend using Velcro Command Strips. These innovative strips are designed to hold securely and remove cleanly without leaving sticky residue or damaging paint. For a piece this large (3×5 feet), you’ll want to use several strips strategically placed along the top, sides, and bottom of the art to ensure even distribution of weight and prevent sagging. Follow the instructions on the Command Strips packaging for best results, paying close attention to the recommended weight limits. Their strong grip combined with easy removal makes them perfect for renters, dorm rooms, or anyone who wants to avoid putting holes in their walls.
The Incredible Value: Big Art, Tiny Price Tag
Considering the impressive size and custom design of this DIY wall art, the fact that it costs less than $10 to make is truly remarkable. Compare this to the hundreds, if not thousands, of dollars you might spend on a similar-sized piece from a gallery or home decor store. This project offers an unbeatable combination of affordability, personalization, and artistic impact. It’s a testament to the power of DIY – creating something genuinely special without the hefty price.
I absolutely adore the subtle, wintery feel this artwork brings to my space. It evokes a sense of calm and natural beauty, perfectly complementing my seasonal decor. I’m so pleased with its aesthetic that I plan to keep it proudly displayed well into the spring, enjoying its serene presence day after day.
Beyond its aesthetic appeal and budget-friendly nature, this DIY wall art offers practical advantages. Being super lightweight, it’s an ideal decorative solution for a dorm room, rental apartment, or any space where you need to avoid permanent wall damage. The ability to hang it easily and securely with Command Strips means you can enjoy stunning decor without worrying about patching holes or losing your security deposit. It’s truly hassle-free home improvement!
Now that my beautiful aspen tree art has been gracing my wall for some time, my creative wheels are already turning for its next evolution. I’m envisioning building a rustic barn wood frame for it. Imagine the juxtaposition of the minimalist white trees with the weathered charm of reclaimed wood – it would add another layer of texture and character, elevating the piece even further. This project proves that DIY home decor is not just about saving money; it’s about endless possibilities for customization and evolving your personal style.
Embrace DIY Decor: Personalize Your Space Without the Price Tag
This large DIY aspen tree wall art project is more than just a craft; it’s an invitation to explore your creativity and personalize your living space in a meaningful way. It demonstrates that with simple materials and a few hours of your time, you can create high-impact decor that rivals expensive store-bought pieces. From defining your borders to adding delicate bark details and choosing the perfect hanging method, every step is designed to be enjoyable and rewarding.
Whether you’re decorating a new apartment, refreshing a tired room, or simply looking for a fun and affordable project, this aspen tree art is a fantastic choice. It offers a unique blend of natural elegance, custom sizing, and incredible cost savings. So, why wait? Gather your supplies, unleash your inner artist, and transform your walls with a piece of art that’s uniquely yours. You’ll be amazed at what you can achieve!







