
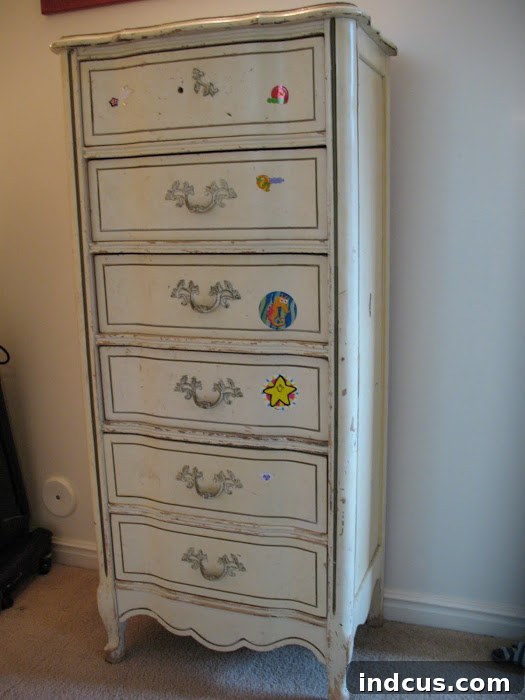
From Forgotten Find to Fabulous Feature: A $5 Dresser’s Remarkable Makeover
Every now and then, you stumble upon a true hidden gem. Two years ago, I had one such serendipitous moment at a bustling neighborhood yard sale. Tucked away amongst forgotten toys and dusty knick-knacks, a forlorn dresser caught my eye. It was, to put it mildly, a sad sight. Covered in a chaotic mosaic of peeling stickers, adorned with countless dings and scratches, and boasting a curious small hole on one side, its appearance screamed neglect. And truth be told, a faint, inexplicable odor emanated from its wooden frame, hinting at years of storage in an forgotten corner. Yet, despite these glaring imperfections, something within me saw beyond the immediate shabbiness. I envisioned potential, a blank canvas awaiting a vibrant new life, and for a mere five dollars, it seemed like a gamble worth taking. This wasn’t just a dresser; it was an opportunity for transformation, a chance to prove that beauty can be found in the most unexpected places, even for the smallest investment.
The Diamond in the Rough: Unearthing Potential at a Yard Sale
The acquisition of this distressed dresser marked the beginning of an exciting journey. While its initial state might have deterred many, I’ve always been drawn to the challenge of breathing new life into forgotten furniture. This particular piece wasn’t just cosmetically damaged; it had a distinct character that hinted at decades of use. The myriad of stickers, likely collected over years by a child, told silent stories. The dents and dings were badges of honor from countless moves or everyday bumps. The curious hole on the side was a puzzle to solve. The peculiar smell was perhaps the most daunting challenge, suggesting dampness or years of confinement. But at $5, the risk was minimal, and the potential reward, a beautifully restored piece, seemed immeasurable. This dresser represented the essence of budget-friendly home decor and the satisfaction of a successful DIY project.
Decoding the Dresser: Understanding Its Unique Construction
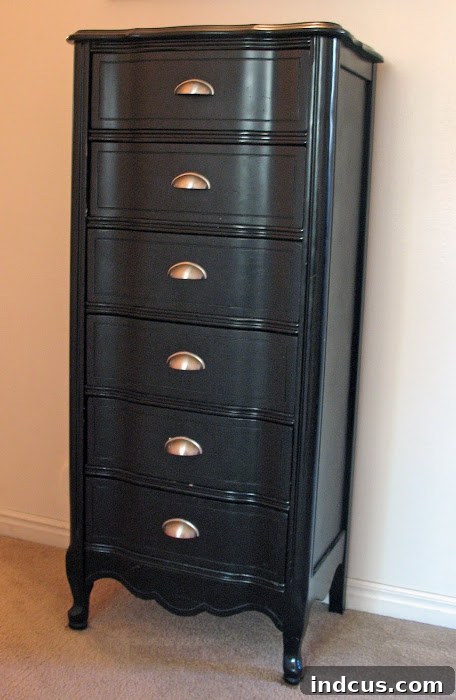 Sleek black paint and new modern handles give this baby a whole new vibe!
Crafting a Vision: From Drab to Dreamy
The moment I brought the dresser home, the planning began. What color would best complement its lines and my existing decor? How could I address the challenging veneer? My goal was to achieve a modern aesthetic without sacrificing the dresser’s inherent charm. After much deliberation, I settled on a bold, classic black. Black paint has an incredible ability to instantly elevate furniture, giving it a contemporary edge and sophisticated appeal. It also offers versatility, allowing the piece to blend seamlessly into various design schemes. The choice of hardware was equally crucial. The original knobs were likely dated and impractical, so I began searching for sleek, minimalist handles that would provide a striking contrast against the dark finish. This vision for a completely reimagined dresser fueled my excitement and commitment to the project, turning a simple yard sale purchase into a passionate DIY furniture restoration.
The Budget Breakdown: High Impact, Low Cost
One of the most satisfying aspects of this project was the incredibly low total cost, especially when compared to purchasing a new piece of furniture. The transformation was achieved on a shoestring budget, proving that stunning home decor doesn’t require a hefty investment. Here’s a transparent look at the total expenditure for this impressive dresser makeover:
$20-knobs from Target (A fantastic deal on modern, high-quality hardware that truly elevated the dresser’s look and feel.)
$5-10-spray paint/clear coat (I don’t remember exactly how many cans I used, but the total for both the sleek black spray paint and the protective clear coat fell well within this modest range. Choosing spray paint was a strategic decision for its ease of application and smooth finish, especially for a piece with a challenging veneer.)
The total investment for this stunning piece of furniture was approximately $30-$35. This incredibly modest sum yielded a sophisticated, modern dresser that rivals pieces costing hundreds, if not thousands, of dollars. It’s a testament to the power of upcycling and the value of a little elbow grease, demonstrating that budget home decor can be both stylish and sustainable.
The DIY Journey: Step-by-Step Revitalization
The actual process of transforming the dresser was an engaging and rewarding experience, full of learning moments. Each step, from initial cleaning to the final coat, brought me closer to realizing my vision for a stunning black dresser.
Initial Cleaning and Repair: Addressing the Scars of Time
The very first step involved a thorough cleaning. Removing the countless stickers was a painstaking process, often requiring a putty knife, a gentle cleaner, and a good deal of patience. Once the stickers were gone, I tackled the unpleasant odor. A good scrub with a mixture of white vinegar and water, followed by prolonged airing out in the sun, worked wonders in neutralizing the smell. Next came the repairs. The small hole on the side was filled with wood filler, carefully sanded smooth once dry. I also addressed various nicks and dings across the dresser’s surface, ensuring a uniform and smooth canvas for the paint.
Prepping for Perfection: Sanding and Priming
Preparing the surface was crucial, especially given the plastic-like veneer on the top. Light sanding was performed on all surfaces – not just to create a better grip for the paint, but also to further smooth out any minor imperfections. For the veneer specifically, extra care was taken to scuff it gently without damaging it. Following the sanding, a high-quality primer designed for tricky surfaces was applied. Primer is a non-negotiable step when painting over old finishes or unusual materials like veneer, as it creates a uniform base and ensures the topcoat adheres properly and lasts for years to come.
The Magic of Paint: Choosing Black for Boldness
With the surface perfectly prepped, it was time for the fun part: painting! I opted for several thin coats of a satin black spray paint. Spray paint offers an incredibly smooth, streak-free finish that is difficult to achieve with a brush, especially for larger pieces. Working in a well-ventilated area, I applied multiple light coats, allowing adequate drying time between each. This layered approach prevents drips and ensures a durable, even color saturation. The transformation with each coat was remarkable; the piece steadily shed its tired, worn appearance and began to take on a sophisticated, unified look. The choice of black was deliberate, aiming for a dramatic impact and a timeless appeal that would suit various interior design styles.
The Finishing Touches: New Hardware, New Life
After the final coats of black paint had cured, a clear protective topcoat was applied. This step is essential for durability, protecting the paint from scratches, scuffs, and daily wear and tear. Once the clear coat was dry, the final, most impactful step was installing the new hardware. The modern, sleek knobs from Target were not just functional; they acted as the jewelry for the dresser, providing a contemporary contrast against the classic black finish. The simple act of replacing the old, dated hardware with these stylish new pieces completed the furniture flip, cementing its new identity as a modern, elegant storage solution.
Your Own Furniture Flip: Tips for Success
Inspired by this transformation? Here are a few tips for embarking on your own furniture restoration adventure:
- See Beyond the Surface: Don’t be deterred by superficial damage. Most scratches, dings, and even holes can be repaired.
- Research Materials: Understand the type of wood or veneer you’re working with. This will guide your choice of sandpaper, primer, and paint.
- Preparation is Key: Cleaning, sanding, and priming are the most crucial steps. A well-prepped surface ensures a lasting, professional finish.
- Ventilation Matters: Always work in a well-ventilated area, especially when using spray paints or strong cleaners.
- Patience Pays Off: Allow adequate drying time between coats of primer, paint, and clear coat. Rushing the process can lead to imperfections.
- Invest in Hardware: New knobs or pulls can drastically change the look of a piece and are often an affordable upgrade.
- Embrace Imperfections: Sometimes, minor flaws add character to a vintage piece. Don’t strive for factory perfection, but for charming revitalization.
The Enduring Joy of Upcycling
This dresser makeover is more than just a successful DIY project; it’s a testament to the power of upcycling and the joy of creating something beautiful from the overlooked. It’s a reminder that with a little imagination, some inexpensive materials, and a willingness to get your hands dirty, you can transform a neglected item into a beloved centerpiece. The satisfaction of looking at this sleek black dresser, knowing it cost me only a fraction of what a similar new piece would, is immense. It’s not just furniture; it’s a story of transformation, sustainability, and personal accomplishment. This $5 yard sale find now stands as a proud, modern statement in my home, a true embodiment of budget-friendly home decor and the enduring appeal of a well-executed furniture flip. What forgotten treasures might you uncover and transform next?







