
DIY Faux Mercury Glass Mirror: A Comprehensive Guide to Antiquing Your Own Reflection
Every homeowner knows the joy of finding that perfect piece to complete a room. For me, the quest began with a large, empty frame in my living room, yearning for a statement piece. While a traditional mirror seemed like an obvious choice, the thought of constantly catching my reflection as I walked past or settled down to play the piano didn’t quite appeal. I envisioned something with character, depth, and a touch of vintage elegance – something that echoed the enchanting allure of mercury glass.
Have you ever encountered mercury glass? Its unique, mottled appearance, often referred to as “silvered glass,” possesses an almost mystical quality. It doesn’t offer a crisp reflection but rather a soft, diffused shimmer, creating an instant antique charm. This distinctive aesthetic became my inspiration, propelling me on a DIY journey to transform a forgotten mirror into a focal point.
Armed with an unused, large mirror and a burning desire for a creative challenge, I decided to embark on a project to antique it myself, aiming to replicate that coveted bubbly, divinely textured mercury glass finish. Little did I know, this endeavor would involve a blend of research, trial-and-error, and a healthy dose of improvisation.
The Allure of Mercury Glass: A Brief History and Modern Appeal
Before diving into the DIY process, it’s worth understanding what makes mercury glass so special. Originating in Germany in the 1840s, true mercury glass isn’t actually made with mercury at all. Instead, it involves a double-walled glass vessel with a silvering solution (typically a silver nitrate solution) injected between the layers and then sealed. This technique created a captivating, reflective surface with inherent imperfections and an aged look that couldn’t be achieved with solid silver. The name “mercury glass” likely stemmed from its quicksilver-like appearance.
In modern decor, mercury glass pieces are highly sought after for their ability to infuse a space with vintage charm, sophistication, and a touch of industrial elegance. From vases and candle holders to lamps and decorative balls, their muted reflectivity and antique patina add warmth and texture without being overly flashy. Recreating this effect on a large mirror allows for a stunning, custom piece that tells a story, making it a perfect addition for those who appreciate unique, handcrafted elements in their homes.
Why DIY Your Own Antique Mirror?
Opting for a DIY approach to creating an antique-effect mirror offers numerous advantages. Firstly, it’s incredibly cost-effective. Purchasing a genuine antique mercury glass mirror, especially a large one, can be an expensive undertaking. By transforming an old, unused mirror, you’re essentially upcycling, giving new life to an item that might otherwise be discarded. Secondly, it provides unparalleled customization. You have complete control over the level of antiquing, the intensity of the metallic finish, and the overall look, ensuring the final piece perfectly complements your existing decor. Finally, there’s immense personal satisfaction in creating something beautiful and functional with your own hands. It’s a rewarding project that allows you to infuse your personality into your living space, making it truly one-of-a-kind.
Gathering Your Essential Supplies for a Successful Transformation
Every great DIY project begins with the right tools and materials. For this antique mirror transformation, careful selection is key. Here’s what you’ll need:
- An Old Mirror: The larger, the better for a statement piece. Ensure the glass is intact and free from deep scratches.
- Spray-On Paint Remover: This is crucial for stripping the mirror’s backing. Be warned: this product is potent, so choose one specifically designed for paint stripping from glass or metal.
- Metallic Silver Spray Paint: Look for a high-quality, mirror-effect or highly reflective silver spray paint. The brand ‘Rust-Oleum Mirror Effect’ or similar products are often recommended.
- Water in a Spray Bottle: Essential for creating the distinctive mottled effect. A fine mist sprayer works best.
- Old Rags or Paper Towels: For blotting and creating texture. Have plenty on hand.
- Protective Gear: Absolutely non-negotiable! This includes heavy-duty rubber gloves (not thin dishwashing gloves), safety glasses or goggles, and a high-quality respirator mask.
- Drop Cloths or Cardboard: To protect your work surface from paint remover and overspray.
- Scraper: A plastic scraper is ideal to avoid scratching the glass, but a metal one can be used carefully on the backing.
- Fine Steel Wool (Optional): For very light, subtle distressing if desired, though the water-blotting method often suffices.
- Garden Hose or Water Source: Crucial for immediate washing in case of skin contact with paint remover.
Preparation is Paramount: Setting Up Your Workspace Safely
Given the nature of some of the materials, especially the paint remover, setting up a safe and appropriate workspace is critical. Choose a well-ventilated outdoor area or a garage with open doors and fans. Lay down drop cloths or old newspapers generously to protect the ground and surrounding areas. Ensure you have easy access to a water source, like a garden hose, for emergency washing. Read all product labels thoroughly before you begin, paying close attention to safety instructions and disposal guidelines. This meticulous preparation will not only ensure your safety but also contribute to a smoother, more successful project.
The Journey Begins: De-Silvering Your Mirror Safely
The first and arguably most critical step in transforming your mirror is to remove its existing backing. This process exposes the underlying silver layer, which we will then manipulate. Many tutorials often bypass the intensity of this step, but it’s vital to understand the precautions.
Safety First: Handling Toxic Paint Remover
Let me reiterate: this stuff is majorly toxic. My personal experience involved the remover eating through standard rubber gloves and starting to burn my skin – a harrowing moment that fortunately led me to a nearby garden hose, where I washed my hands frantically, recalling scenes of characters being “dipped” in solvent from “Who Framed Roger Rabbit.” This vivid memory serves as a potent reminder of the chemical’s potency. You absolutely must wear heavy-duty chemical-resistant gloves (butyl rubber or nitrile, not latex or thin household gloves), eye protection (goggles, not just safety glasses), and a respirator mask to protect against fumes. Ensure your work area is extremely well-ventilated. Have a bucket of water or a garden hose running nearby for immediate flushing in case of skin or eye contact.
Applying and Removing the Paint Remover
With your protective gear firmly in place, carefully apply the spray-on paint remover to the entire painted back surface of the mirror. Follow the manufacturer’s instructions for application and dwell time, which usually ranges from 15 to 30 minutes. You’ll observe the paint bubbling and loosening. Once it has sufficiently softened, use a plastic scraper to gently scrape away the grey paint and copper layers. Work in sections, applying more remover if needed. The goal is to expose the reflective silver layer underneath. Be patient; this step can be messy and time-consuming. Avoid aggressive scraping that could damage the underlying glass.
Cleaning After Layer Removal
After stripping the layers, clean the back of the mirror thoroughly to remove any residue from the paint remover and detached paint. A damp cloth, followed by a dry one, works well. Ensure the surface is completely dry before proceeding to the next stage.
Exploring Different Antiquing Techniques: A Path of Discovery
With the mirror’s backing stripped, you’re left with a thin, reflective silver layer. My initial attempts to antique this layer directly involved a series of experiments, some of which proved less successful than anticipated, but ultimately paved the way to the winning method.
Initial Experiments and Their Pitfalls
- Sanding the Silver Layer: My first thought was to gently sand the silver finish to create natural-looking imperfections. However, the outcome was disappointing. Every minute scratch became glaringly visible, and the finish looked more damaged than antique. It lacked the organic, diffuse quality I desired.
- Bleaching the Silver Layer: Next, I tried spraying the silver layer with bleach, hoping for a chemical reaction that would create interesting patterns. The result was an immediate blackening of the silver, which was precisely *not* the elegant, aged look I was aiming for.
- Direct Steel Wool Application: Attempting to create natural-looking holes or wear patterns in the silver finish using fine steel wool proved incredibly difficult. It was hard to control, and the resulting patches looked artificial and forced, failing to achieve that authentic, time-worn appearance.
The “Aha!” Moment: The Water-Blotting Method
After these less-than-ideal attempts, I pivoted my strategy. Instead of attacking the delicate silver backing, I decided to work on the *glass side* of the mirror – the front surface that would typically face the room. This shift in perspective proved to be the breakthrough.
Here’s the refined technique that finally delivered the desired faux mercury glass effect:
- Prepare the Glass Surface: Ensure the front (glass) side of the mirror is meticulously clean and free of dust or fingerprints.
- Light Water Mist: Using your spray bottle, apply a very fine, even mist of water across the entire glass surface. The key is “mist” – you don’t want large droplets or puddles, just a delicate film of moisture.
- Finest Layer of Metallic Silver Spray Paint: Immediately after misting, apply the absolute finest layer of metallic silver spray paint possible. Hold the can further back than usual and use quick, sweeping motions. The goal is barely-there coverage, almost a ghost of silver.
- Immediate Blotting: Without delay, take an old, clean rag or paper towel and begin to gently blot the painted surface. The water prevents the paint from adhering perfectly to the glass, allowing the blotting action to remove much of the paint in irregular, organic patterns. This is where the magic happens – the interaction between the water and the quick-drying paint, coupled with the blotting, creates those beautiful, splotchy, uneven textures reminiscent of true mercury glass.
- Repeat for Depth (Optional): For a more intense or layered effect, you can allow the first layer to dry slightly (a minute or two), then repeat the misting, spraying, and blotting process. This builds depth and complexity. Remember, less is often more, and you can always add another layer, but removing one is much harder.
The beauty of this method lies in its organic nature. The water acts as a resist, creating truly unique patterns that are impossible to replicate precisely, ensuring your antique mirror is genuinely one-of-a-kind. The goal isn’t perfect coverage, but rather an imperfect, aged appearance that subtly obscures the reflection while still catching the light beautifully.
Assembling and Displaying Your Masterpiece
Once you are satisfied with the antique finish and the paint is completely dry to the touch (allow several hours, or even overnight, for full curing), it’s time to carefully place your newly transformed mirror back into its frame. This is often the moment of truth, where the raw potential of the glass truly comes to life.
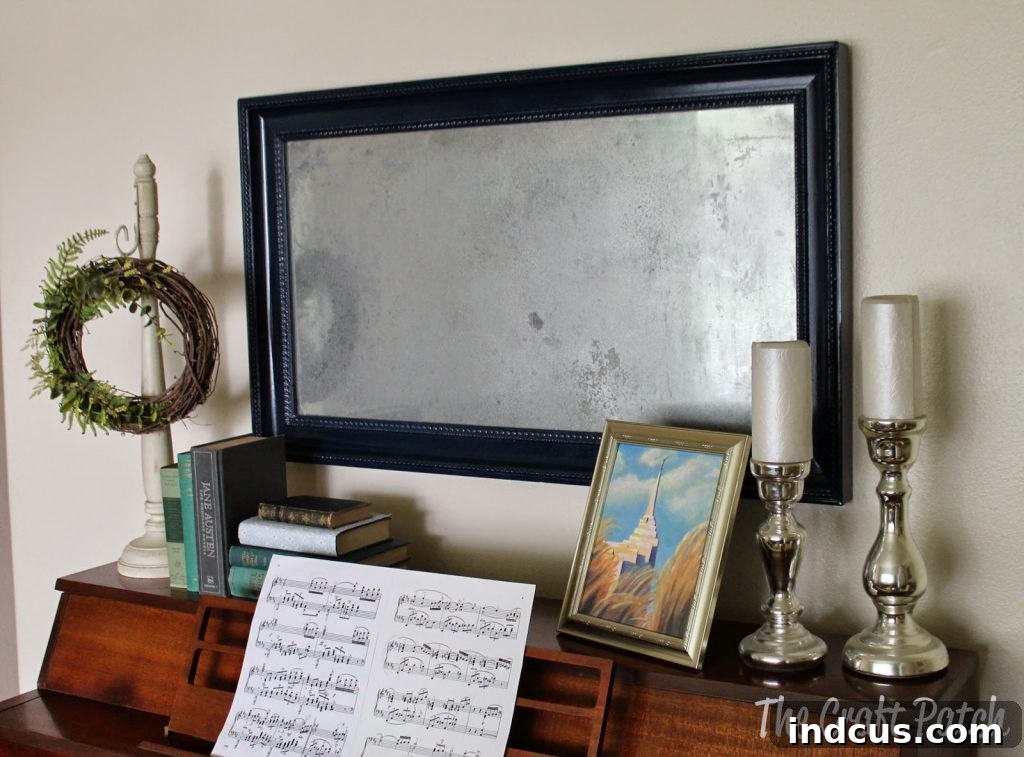
I distinctly remember feeling uncertain about my project’s outcome until I nestled the mirror into its elegant navy blue frame and finally hung it above my piano. The frame itself played a crucial role, providing a sophisticated border that enhanced the aged character of the glass. The deep blue contrasted beautifully with the metallic sheen, making the subtle antiquing pop.
The final effect was exactly what I had hoped for: splotchy, beautifully aged, incredibly interesting, and artfully image-obscuring while still retaining a degree of reflectivity. It was pretty close to my vision of faux mercury glass, adding a vintage focal point without the starkness of a plain mirror.
The Unveiling: Embracing Imperfection and Unique Charm
There’s a deep satisfaction that comes from filling a long-empty space with something you’ve created. I am immensely glad to finally have a piece that complements my living room, replacing the blank canvas that once was. While the project is notoriously difficult to photograph accurately – the subtle interplay of light and shadow, the varying reflectivity, and the depth of the finish are challenging to capture in a static image – the close-up truly gives a better idea of its unique appearance.
While it may not be chemically identical to historical mercury glass, the finished product delivers the aesthetic perfectly. It’s a testament to the power of DIY – transforming an ordinary object into an extraordinary piece of personalized home decor. The aged look adds character, warmth, and a touch of vintage elegance that a new, pristine mirror simply cannot replicate.
Tips for Success and Troubleshooting Your DIY Antique Mirror
To ensure your own antique mirror project is as successful and enjoyable as possible, here are some invaluable tips and troubleshooting advice:
- Always Test First: If you have a small scrap piece of glass, practice your water misting and spray paint technique there first. This allows you to get a feel for the spray distance, paint amount, and blotting pressure without risking your main mirror.
- Ventilation is Non-Negotiable: We cannot stress enough the importance of a well-ventilated area, especially when working with paint remover and spray paint. Outdoors is always best.
- Patience with Paint Remover: Don’t rush the de-silvering step. Allow the paint remover adequate time to work. Rushing can lead to uneven stripping or unnecessary effort.
- Light Coats are Key for Spray Paint: When applying the metallic silver spray paint, err on the side of caution. It’s much easier to add another light layer if you want more coverage or depth than it is to remove excess paint. Heavy coats will obscure the desired mottled effect.
- Experiment with Blotting Materials: While old rags work well, try different textures like crumpled newspaper, crinkled paper towels, or even a natural sponge for varied patterns and effects.
- Work in Sections for Large Mirrors: If your mirror is very large, consider working on smaller sections at a time for the water-blotting and spray painting steps. This prevents the water from drying out or the paint from setting before you can blot it.
- Consider a Protective Sealant: If the back of your mirror (where the original silvering and new metallic paint are) will be exposed or handled frequently, you might consider applying a clear, non-yellowing protective sealant to prevent further scratching or degradation of your faux antique finish. However, if it’s framed and against a wall, this might not be necessary.
- Embrace Imperfection: The beauty of faux mercury glass and antique mirrors lies in their imperfections. Don’t strive for pristine uniformity; instead, celebrate the unique, organic patterns that emerge.
Conclusion: Crafting Your Own Timeless Statement Piece
Embarking on this DIY antique mirror project was an exploration of creativity, a testament to the power of repurposing, and ultimately, a triumph in personalizing my living space. What started as an empty frame and an unused mirror transformed into a captivating piece of decor that draws the eye without reflecting it too sharply. It’s more than just a mirror; it’s a piece of art, a conversation starter, and a source of pride.
If you’ve been looking for a way to add character, vintage charm, or a unique touch to your home, I wholeheartedly encourage you to try your hand at creating a faux mercury glass mirror. With the right materials, a focus on safety, and a willingness to experiment, you too can craft a timeless statement piece that perfectly reflects your personal style – or in this case, beautifully diffuses it.







