
Transform Your Under-Sink Cabinet: A Comprehensive Guide to Organization and Waterproofing
The cabinet beneath the kitchen sink often becomes a notorious black hole in our homes. It’s a space where cleaning supplies mysteriously multiply, where essential items get lost, and where past plumbing mishaps can leave behind a less-than-desirable legacy. For many, myself included, this hidden compartment under the sink had become a source of quiet frustration, a place I’d rather not look at. It was a repository for forgotten items, an accidental storage unit for things destined for the trash, and a stark reminder of plumbing issues that had once plagued our home.
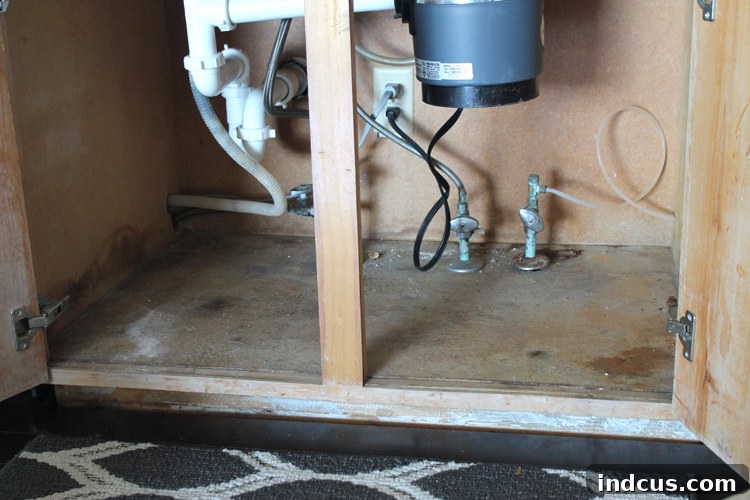
Before its transformation, my under-sink cabinet was a disaster zone. Incorrectly installed pipes when we first moved in had led to significant water leaks and subsequent damage, leaving the area looking unsightly and feeling unhygienic. The dampness and disarray were not only visually unappealing but also a potential hazard for our new wood floors. Despite its dire state, I often found myself just squinting past the clutter, quickly grabbing the dishwasher soap, and pretending the mess didn’t exist. This familiar avoidance strategy, however, could only last so long before a complete overhaul became absolutely necessary.
This isn’t just about aesthetics; it’s about functionality and preventing future problems. A messy under-sink cabinet isn’t just an eyesore; it can harbor mold, attract pests, and make finding anything a frustrating ordeal. It was high time to reclaim this essential storage area and turn it into an efficient, clean, and well-organized space.
Step 1: The Crucial Foundation – Waterproofing and Protection
The first and most critical step in this under-sink cabinet renovation was addressing the lingering threat of water damage. Given our recent experience with leaks and the installation of beautiful new wood floors, protecting the integrity of the cabinet and preventing any future water from seeping out was paramount. This involved a dual-action approach: sealing cracks with caulk and creating a protective barrier with paint.
To begin, I thoroughly cleaned and dried the entire cabinet interior, paying close attention to any residual moisture or debris from previous leaks. Once clean, I applied a generous bead of waterproof caulk along all the edges and seams of the cabinet floor, extending it slightly up the walls. This creates a watertight seal, effectively blocking any small gaps where water could otherwise escape and damage the surrounding structures or, worse, our new flooring. It’s a simple step, but incredibly effective in safeguarding against the unexpected drips and spills that are inevitable in a kitchen environment.
After the caulk had fully cured, I applied two layers of high-quality latex paint to the cabinet floor and approximately six inches up the interior walls. Latex paint, especially a semi-gloss or gloss finish, provides an excellent protective barrier. It’s durable, easy to clean, and resistant to moisture, adding another robust layer of waterproofing. This painted surface not only seals the wood, preventing water absorption, but also brightens the interior, making it feel cleaner and more inviting. This proactive measure ensures that any future minor leaks or spills will be contained and easily wiped up, offering peace of mind and preserving both the cabinet and our valuable new floors.
A quick note on the overall condition of our existing cabinets: these close-up shots really highlight the wear and tear they’ve endured over the years. This under-sink project was actually a precursor to a larger plan to refinish all our kitchen cabinets, making their dated appearance more noticeable than ever. This focused renovation provided a perfect opportunity to test out some techniques and get a head start on improving the overall kitchen aesthetic.
Step 2: Enhancing Functionality and Aesthetics with Shelf Liner
With the waterproofing complete, the next step was to add a touch of practicality and charm. Shelf liner is an unsung hero in cabinet organization, offering both aesthetic appeal and crucial protection. I chose a durable, easy-to-clean shelf liner, not just for its “cute factor” but more importantly because it makes spills incredibly simple to manage. Instead of having liquids seep into the cabinet wood or sit on a painted surface, the liner provides a non-porous barrier that can be quickly wiped clean.
Applying shelf paper can sometimes feel like a wrestling match with sticky, crinkled plastic, but with the right technique, it’s a breeze. Here are my tried-and-true tips for achieving a smooth, bubble-free application:
- Measure and Cut Precisely: Always measure the area you want to cover with the backing paper still on the liner. Use a ruler and a utility knife or sharp scissors to get a clean, straight cut. It’s often helpful to cut it slightly larger than needed and trim the excess later for a perfect fit.
- Start Small, Stick Steadily: Peel back only a small section of the backing paper, about 1-2 inches, along one edge. Carefully align this exposed adhesive edge with the corresponding edge of your cabinet or shelf.
- Smooth as You Go: Once the initial edge is stuck down, slowly and gradually peel away the rest of the backing paper with one hand. As you peel, use a clean towel, a smoothing tool, or even a credit card to firmly rub and smooth the liner onto the surface with your other hand. Work from the adhered edge outwards, pushing out any air bubbles as you go.
- Address Bubbles and Creases: If you encounter a stubborn bubble, gently lift the liner back to that point and reapply, smoothing carefully. For small, trapped bubbles, you can often pierce them with a tiny pin and then smooth the air out.
This methodical approach ensures a seamless finish, transforming a dull cabinet base into a bright, easy-to-maintain surface that feels both clean and organized. It truly makes a significant difference in the overall appeal and hygiene of the under-sink area.
Step 3: Ingenious Storage Solutions – The DIY Garbage Bag Dispenser
One of the most frustrating aspects of an unorganized under-sink cabinet is the constant hunt for necessities. Finding a fresh garbage bag often involved rummaging through a pile of rolls, inevitably pulling out several at once, and fumbling to unroll a single bag. This everyday annoyance sparked an idea for a simple, yet incredibly effective DIY project: a wall-mounted garbage bag dispenser.
This brilliant hack eliminates the chaos and makes grabbing a new bag effortless. To create it, I used just a few inexpensive items:
- Two curtain brackets (the simple, open-ended kind work best)
- A wooden dowel (ensure it’s long enough to span the distance between the brackets and can fit through the center of a garbage bag roll)
- Screws (to mount the brackets)
The installation was straightforward. First, I strategically screwed the two curtain brackets into the side wall of the cabinet, ensuring they were level and spaced appropriately for the length of my wooden dowel. The height was chosen for easy access. Next, I simply threaded the wooden dowel through the center of a roll of garbage bags. Finally, I placed the dowel, with the bag roll on it, into the waiting curtain brackets. That’s it! The bags now dispense smoothly, one at a time, just like a paper towel roll. This simple addition has been a game-changer, making a small but frequent chore so much more convenient. I honestly regret not doing this sooner, as it significantly enhances the functionality of the space.
Step 4: Streamlined Storage – Baskets for Clutter Control
With the waterproofing and the clever garbage bag dispenser in place, the final piece of the organizational puzzle was managing the myriad of cleaning products. My goal was to create a system where everything had a designated home, making it easy to find what I needed and, more importantly, to put things back. I considered installing a pull-out tray on the left-hand side of the cabinet, which offers fantastic accessibility. However, after careful consideration, I opted for a simpler and more cost-effective solution: a sturdy basket.
The decision came down to balancing budget with functionality. While pull-out trays are undoubtedly efficient, they can be more expensive and require precise installation. A well-chosen basket, on the other hand, provides immediate containment for various items at a fraction of the cost. It serves the same fundamental purpose of corralling items, preventing them from sprawling across the cabinet floor. I selected a durable plastic basket that could withstand potential moisture and was easy to wipe clean, perfect for storing bottles of cleaners, sponges, and brushes.
Having all my cleaners neatly contained within one basket has proven to be incredibly convenient. No more knocking over bottles or searching for a specific spray. Everything is now easily accessible and visible. This organized approach significantly reduces the time and frustration associated with cleaning tasks. Who knows, perhaps a pull-out tray might make its way into the cabinet down the road, but for now, this simple basket solution has truly revolutionized the functionality of this once chaotic space.
The Transformation: Before and After
The cumulative effect of these simple yet powerful updates is truly remarkable. The difference between the “before” and “after” state of the under-sink cabinet is night and day. What was once a daunting, grimy, and disorganized void has been transformed into a bright, clean, and highly functional storage area.
While these changes might not be “earth-shattering” in the grand scheme of home renovations, the impact on daily life is profound. The “ick factor” is completely gone, replaced by a sense of order and cleanliness. Every item now has its place, making the act of grabbing a cleaning product or a new garbage bag a seamless, frustration-free experience. The improved functionality means less wasted time, less stress, and a much more hygienic environment in the heart of our home.
This project proves that you don’t need a huge budget or extensive DIY skills to make a significant positive change in your living space. Sometimes, focusing on those hidden, often-neglected areas can yield the most satisfying results. So, take a peek under your sink – if it’s looking a bit scary, perhaps it’s time for its own incredible transformation. And speaking of transformations, now that this space is perfect, who wants to come over and help me paint the rest of the kitchen cabinets?! Share your own under-sink organization tips in the comments below!







