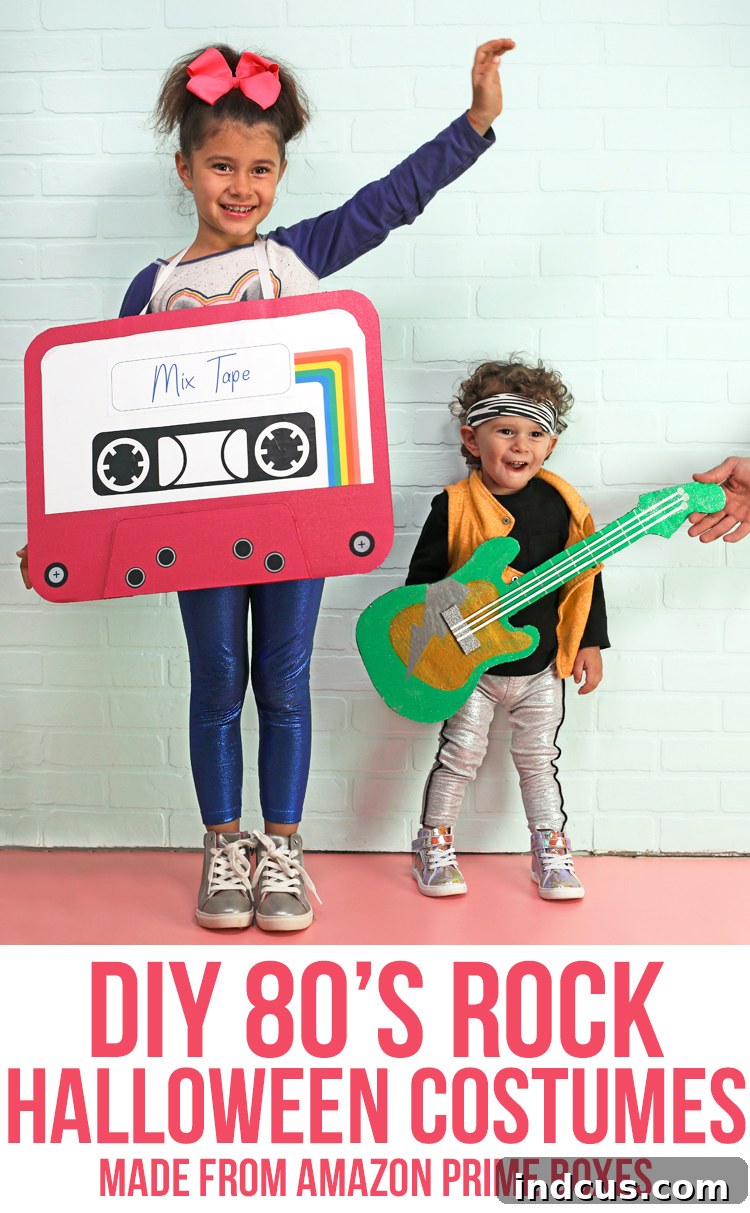
Rock ‘n’ Roll & Rewind: Crafting Iconic 80s Halloween Costumes from Amazon Prime Boxes!

Halloween is a magical time for imagination and creativity, and what could be more thrilling than crafting unique costumes that transport us back to a legendary era? This year, we’re taking a vibrant trip down memory lane to the totally awesome 80s! I’m absolutely delighted to share these do-it-yourself Halloween costumes – affectionately known as “Boxtumes” – with you. Forget store-bought ensembles; we’re embracing sustainability and originality by transforming humble Amazon Prime boxes into show-stopping outfits for my two youngest kids: a retro cassette tape and a fierce 80s rocker. There’s something undeniably hilarious and heartwarming about toddlers in elaborate costumes, and my little guy truly rocked his look. Get it? Rocked?
This post is sponsored by Amazon and Forward Influence Network. All ideas and opinions expressed are entirely my own, born from a love of crafting and all things 80s.
Why DIY “Boxtumes” are the Ultimate Halloween Choice
If your online shopping habits mirror mine over the past few months, you’ve likely accumulated quite a collection of cardboard boxes. Instead of tossing them, why not transform them into something spectacular? This is where the concept of “Boxtumes” shines! Upcycling these readily available materials not only makes for awesome, handmade Halloween costumes but also offers numerous benefits:
- Uniqueness Guaranteed: Stand out from the crowd with a one-of-a-kind costume that can’t be found on any store shelf.
- Budget-Friendly Fun: By utilizing materials you already have, you drastically cut down on costume expenses, leaving more room in your budget for important Halloween essentials… like candy!
- Eco-Conscious Crafting: Give new life to cardboard boxes, reducing waste and teaching kids the value of recycling and repurposing.
- Creative Expression: From choosing colors to adding intricate details, the DIY process allows for boundless creativity and personalization.
- Family Bonding: Crafting costumes together creates lasting memories and provides a wonderful opportunity for family collaboration.
So, gather your boxes and your crafting supplies – you’re about to embark on a thrilling journey of Halloween costume creation! Let me guide you through the exciting process of making each of these radical “boxtumes.”
The Allure of the 80s: A Theme That Never Fades
The 1980s was an era defined by bold fashion, iconic music, and a vibrant pop culture that continues to influence trends today. From neon colors and big hair to legendary rock anthems and classic movie soundtracks, the 80s offer an endless wellspring of inspiration for Halloween. Our chosen themes – the humble cassette tape and the flamboyant rock star – perfectly capture the essence of this decade, making them instantly recognizable and incredibly fun. Get ready to inject some serious retro flair into your Halloween festivities!
Essential Supplies for Your Cardboard Costume Adventure
Before we dive into the creation process, let’s ensure you have all the necessary tools and materials on hand. The beauty of these “boxtumes” lies in their simplicity and reliance on common craft supplies:
- Cardboard Boxes: Specifically, medium to large Amazon Prime boxes work wonderfully due to their sturdy yet manageable thickness.
- Cutting Tools: A sharp utility knife (with adult supervision, always!), sturdy scissors, and a cutting mat to protect your surfaces.
- Adhesives: A hot glue gun with plenty of glue sticks for strong, fast bonds, and possibly some craft glue for finer details.
- Measuring & Marking Tools: A ruler, pencil, and a round object (like a plate or bowl) for tracing curves.
- Decorative Elements:
- Spray Paint: Choose vibrant colors! Glittery spray paint adds that quintessential 80s sparkle.
- Acrylic Paints & Brushes: For smaller details and hand-painted touches.
- Vinyl Sheets: Great for cutting out crisp logos, labels, or geometric shapes.
- Printed Graphics: Images, labels, or album art printed from your computer.
- Glitter: Because you can never have too much sparkle!
- Metallic Cardstock or Paper: For shiny accents like lightning bolts or guitar hardware.
- Ribbon or Fabric Strips: For comfortable neck and guitar straps.
- Markers: For outlines, signatures, and fine detailing.
Having these supplies ready will make your crafting process smooth and enjoyable!
DIY Cassette Tape Costume: Press Play on Retro Fun!
The cassette tape, once a staple of every music lover’s collection, is a perfect symbol of the 80s. This costume is surprisingly simple to make, yet its visual impact is enormous, especially when paired with some vibrant 80s apparel.
Step 1: Preparing the Cardboard Base
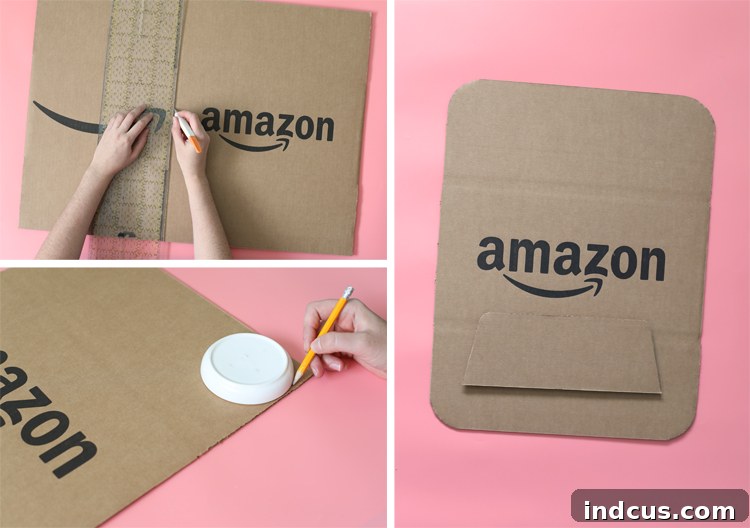
Begin by selecting a flat piece of cardboard from one of your Amazon boxes. You’ll want to cut a large rectangle that will form the body of your cassette tape. A good starting size is approximately 16 inches by 21 inches. This dimension allows for a noticeable costume without being too cumbersome for a child to wear. Once you have your rectangle, find a round object (a dinner plate or a large bowl works perfectly) and trace its curve onto each of the four corners of your cardboard rectangle. Carefully cut along these traced lines to give your cassette tape its characteristic rounded corners. This small detail is crucial for authentic shaping.
Step 2: Crafting the Trapezoid Detail
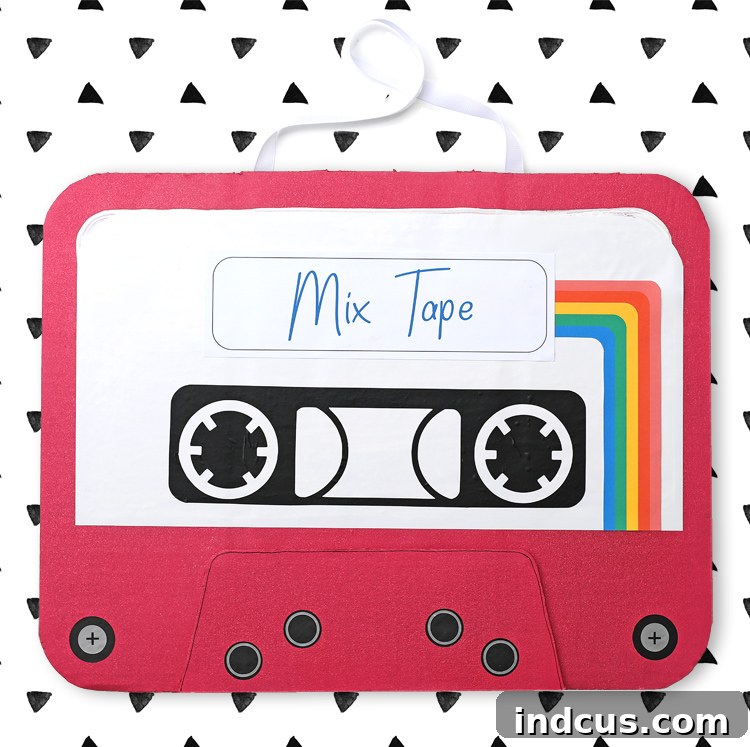
Next, you’ll create the distinctive trapezoid shape that typically sits along the bottom edge of a cassette tape. Cut a second piece of cardboard into an 11.5-inch by 4.25-inch rectangle. To transform this into a trapezoid, measure 1 inch in from each side along one of the longer edges. Then, cut at an angle from these 1-inch marks down to the bottom corners of that same side. This creates the slightly angled, inset look of a cassette’s label area. This piece will be attached later.
Step 3: Bringing the Cassette to Life with Decoration
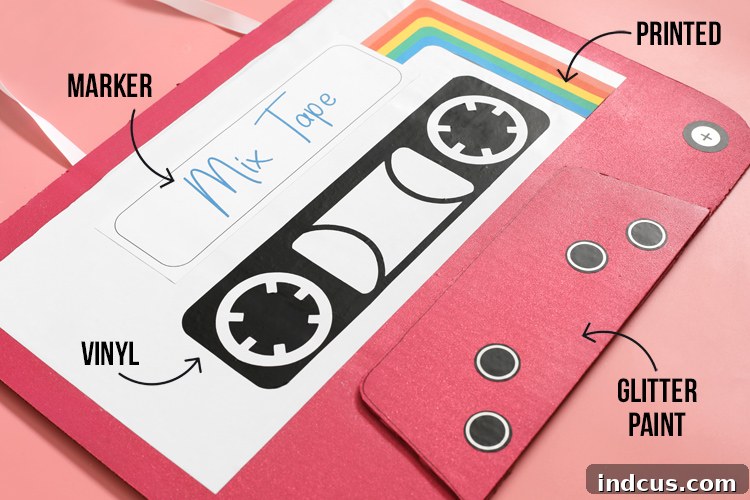
This is where the true magic of the 80s comes to life! The decoration phase is essential for transforming a plain cardboard cutout into a vibrant cassette tape. First, I generously sprayed the entire main piece of cardboard with a fabulous pink glittery spray paint. This instantly gives it that signature 80s sparkle and a fun, playful base color. While that dries, prepare your details. I cut out various designs from vinyl, including the iconic circular “spools” and a rectangular window. I also printed classic cassette tape details, like “MIX TAPE” titles, band names, or song lists, directly from my computer. Once everything is cut and ready, carefully glue all these elements onto the front of your main cassette piece. The trapezoid shape you cut earlier goes along the bottom edge, resembling the tape’s label area, and can be easily attached with a few dabs of hot glue.
Step 4: Securing the Costume: The Neck Strap
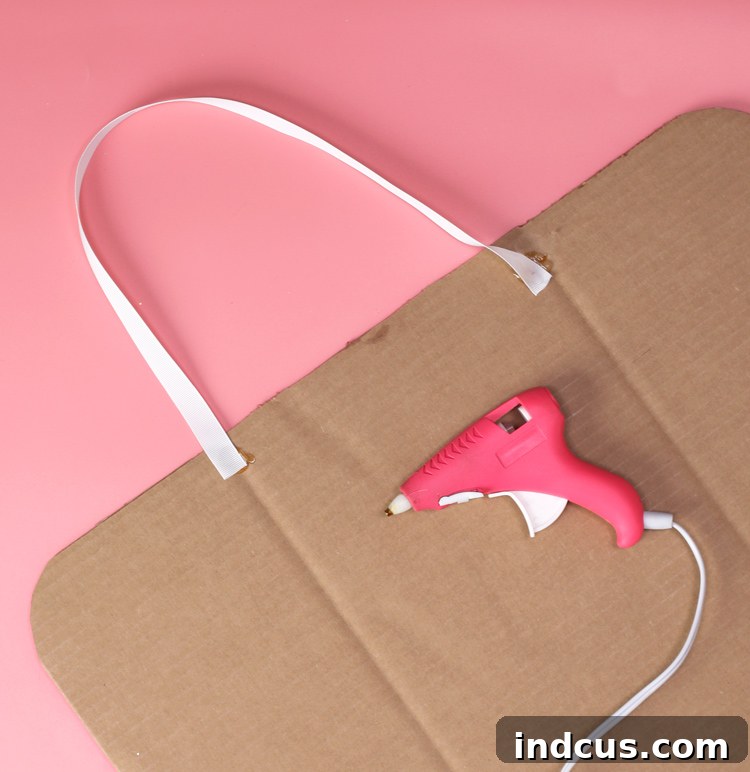
The final step for comfort and wearability is adding a neck strap. Have the person who will be wearing the costume stand in front of you. Hold the decorated cardboard cassette up to their chest and determine a comfortable height – typically around the mid-chest area. Measure a length of sturdy ribbon or fabric long enough to go over their head easily and allow the cassette to rest at the desired height. It’s better to cut it a little longer and trim if necessary. Once you have the correct length, attach the ends of the ribbon securely to the back of the cardboard with strong hot glue. You might want to reinforce these points with an extra piece of cardboard glued over the ribbon ends for added durability, especially for energetic little trick-or-treaters.
And just like that, you have a super simple yet incredibly eye-catching ‘boxtume’! The vibrant colors and personalized details make it SO. MUCH. FUN.
Styling Your Cassette Kid: Completing the 80s Vibe
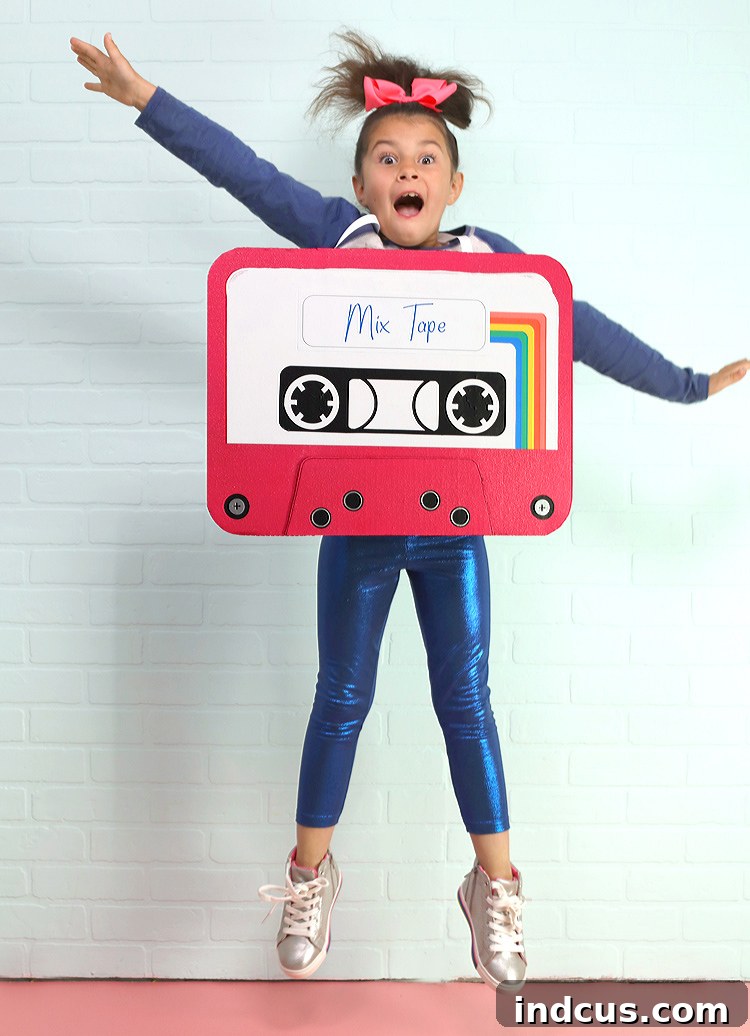
To truly embrace the 80s spirit, encourage your little one to don their most colorful, retro garb. Think neon leggings, bright patterned shirts, leg warmers, and maybe even a scrunchie or a side ponytail. My daughter absolutely radiated excitement in her completed costume, proving that these handmade creations bring an extra level of joy to Halloween!
Easy 80s Rocker Costume with a Cardboard Guitar: Shredding into Halloween!
Every 80s rock star needs a killer guitar, and this “boxtume” delivers just that! It’s another incredibly straightforward project that yields spectacular results, perfect for inspiring some mini-rocker moves.
Step 1: Creating the Cardboard Guitar Body
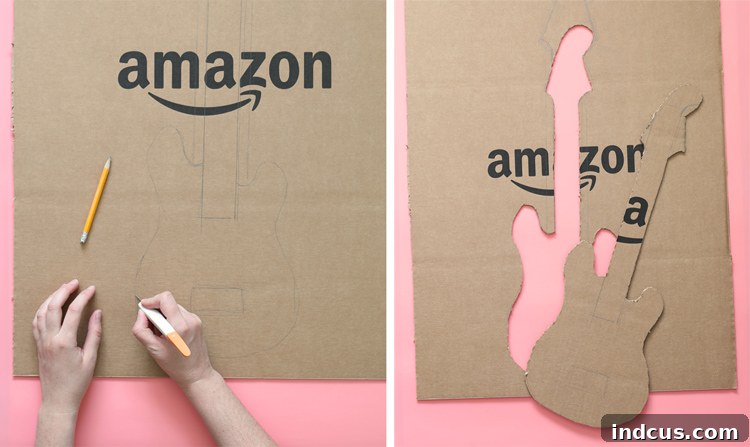
For the rock star costume, the centerpiece is a magnificent cardboard electric guitar. Start by tracing the outline of an electric guitar onto a large, flat Amazon Prime box. If you’re not confident in your freehand drawing skills, a fantastic trick is to print out a large picture of an electric guitar (you might need to tape a few pieces of paper together to get it big enough). Then, simply trace this printed image onto your cardboard. Once traced, carefully cut out the guitar shape using a sharp utility knife. Safety is paramount here: always use a cutting mat underneath and exercise extreme caution. I found that the best technique for a clean cut is to first score through just the top layer of cardboard, and then follow back along those scored lines to cut completely through the full thickness of the box. This method helps prevent jagged edges and gives you a much smoother finish.
Step 2: Decorating Your Rockstar Guitar
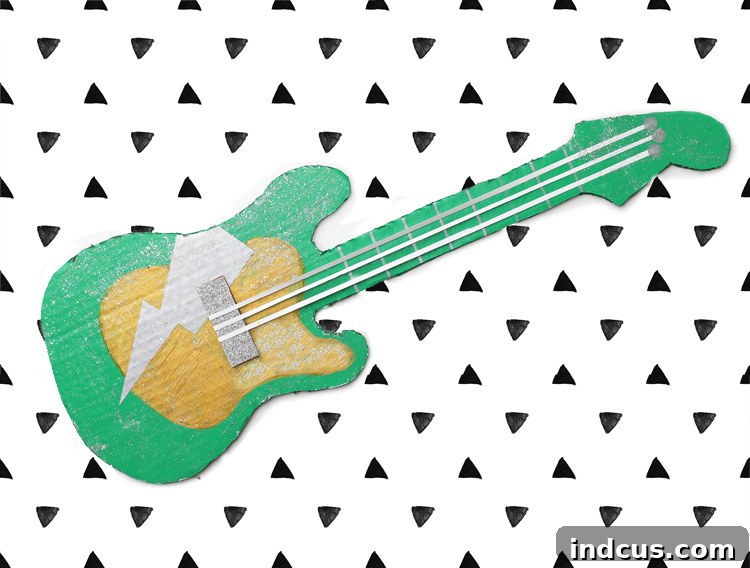
Now for the fun part: transforming that plain cardboard into a rock ‘n’ roll masterpiece! I opted for a vibrant green spray paint as the base, giving it a bold, energetic look. To truly capture the 80s rock aesthetic, I added a metallic silver lightning bolt – a classic motif – and intricate metallic gold details to mimic tuning pegs, bridges, and other guitar hardware. Don’t forget the glitter paint for that extra stage sparkle! For the guitar strings, simple strips of oversized paper glued securely at both ends work perfectly, creating the illusion of real strings without the fuss. You can even draw on fret markers with a black marker for added realism.
Step 3: The Essential Guitar Strap (and Sturdiness Tips!)
While my toddler just held his guitar for photos, for actual trick-or-treating or sustained wear, a guitar strap is crucial. I would highly recommend adding one. A sturdy piece of webbing, thick ribbon, or even an old fabric belt can be repurposed for this. Attach the strap securely to the “body” of the guitar with hot glue, reinforcing with extra cardboard pieces if necessary. For added durability, especially for enthusiastic young rockers, you might consider doubling up the cardboard when creating the guitar. Glue two identical cutouts together to make the instrument much sturdier; toddlers, in their playful exuberance, can often “mangle that thing in two seconds flat” as I learned!
Step 4: Rocker Style: Completing the Look
But I digress… Are you ready for a chuckle? Dressing up my baby as an 80s rocker was absolutely hilarious, especially with his adorable expressions. To complete the ultimate 80s rock star look, think bold! Ripped jeans, a band t-shirt (or one adorned with neon graphics), a faux leather jacket, and fishnet gloves are all fantastic choices. Accessorize with a bandana, a headband, high-top sneakers, and even some cool sunglasses. The combination of the DIY guitar and these iconic fashion elements creates an unforgettable and incredibly funny costume. That headband! Those high tops! The sparkly rocker pants! It’s just so much fun!

Tips for a Successful Boxtume Project
To ensure your DIY costume adventure is a roaring success, keep these additional tips in mind:
- Safety First: When using a utility knife or hot glue gun, adult supervision is essential, especially if children are helping with the project. Teach proper handling and always prioritize safety.
- Involve the Kids: Depending on their age, kids can help with choosing colors, decorating, gluing smaller details, or even tracing. This fosters their creativity and makes them feel invested in their costume.
- Test Fit Frequently: As you construct, have your child try on the costume components to ensure a comfortable and secure fit. Adjust straps and openings as needed.
- Reinforce Key Areas: For costumes that will endure active wear (like trick-or-treating!), reinforce attachment points for straps and any areas that might experience stress. Extra layers of cardboard or duct tape on the inside can work wonders.
- Consider Weather: If trick-or-treating in an area with unpredictable weather, a light coat of clear sealant spray can offer a small degree of moisture resistance to your cardboard creations.
Beyond Halloween: Repurposing Your Awesome Boxtumes
The fun doesn’t have to end once Halloween is over! These durable cardboard costumes can easily transition into other roles:
- Playtime Props: Your little rock star can continue to shred imaginary riffs, and the cassette tape can inspire endless musical adventures.
- Room Decor: Hang them on a wall for a quirky, personalized touch to a child’s bedroom or play area.
- Party Decorations: Use them as props for an 80s-themed birthday party or other fun gatherings.
Get Ready to Rock This Halloween!
So there you have it… two incredibly fun, creative, and inexpensive Halloween costumes made almost entirely from upcycled Amazon Prime boxes! These “boxtumes” are not just costumes; they’re a testament to imagination, sustainability, and the joy of creating something unique with your own hands. I honestly could stare at these photos all day long, reliving the cuteness and the fun of making them. I can’t wait for Halloween to finally arrive so I can show these little cuties off to the neighborhood!
I hope this guide inspires you to unleash your inner crafter and create some unforgettable memories this spooky season. Happy crafting, and Happy Halloween!
Love these rad ideas? Pin them now so you don’t forget them!