Unleash Your Inner Dinosaur: The Ultimate Easy No-Sew Costume with Duck Tape®
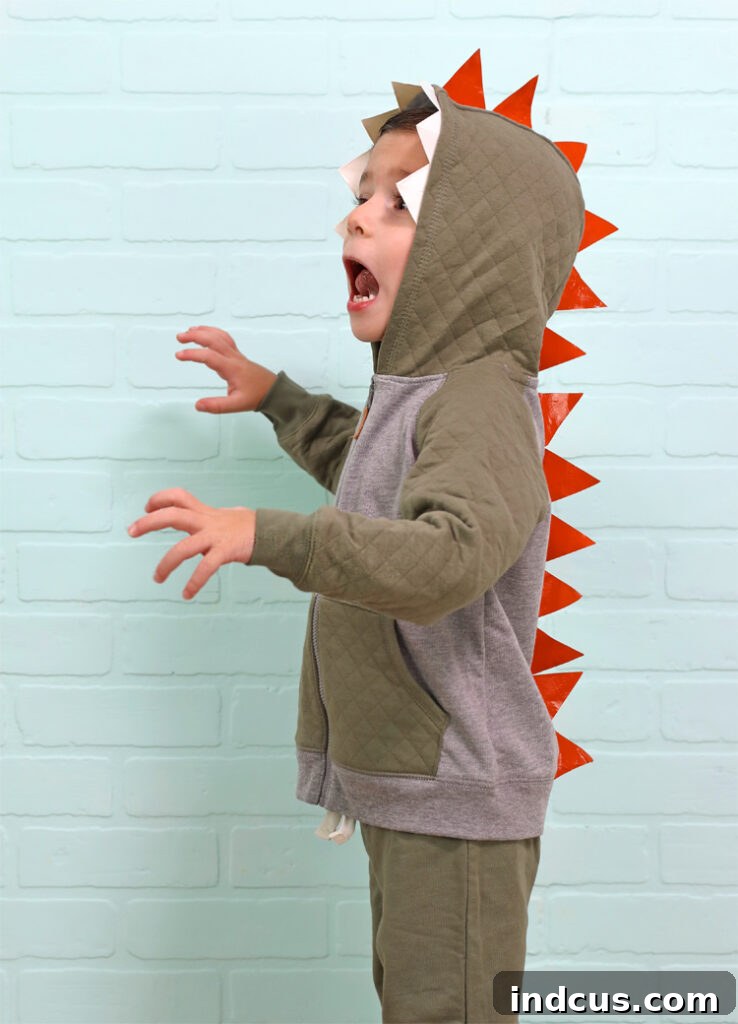
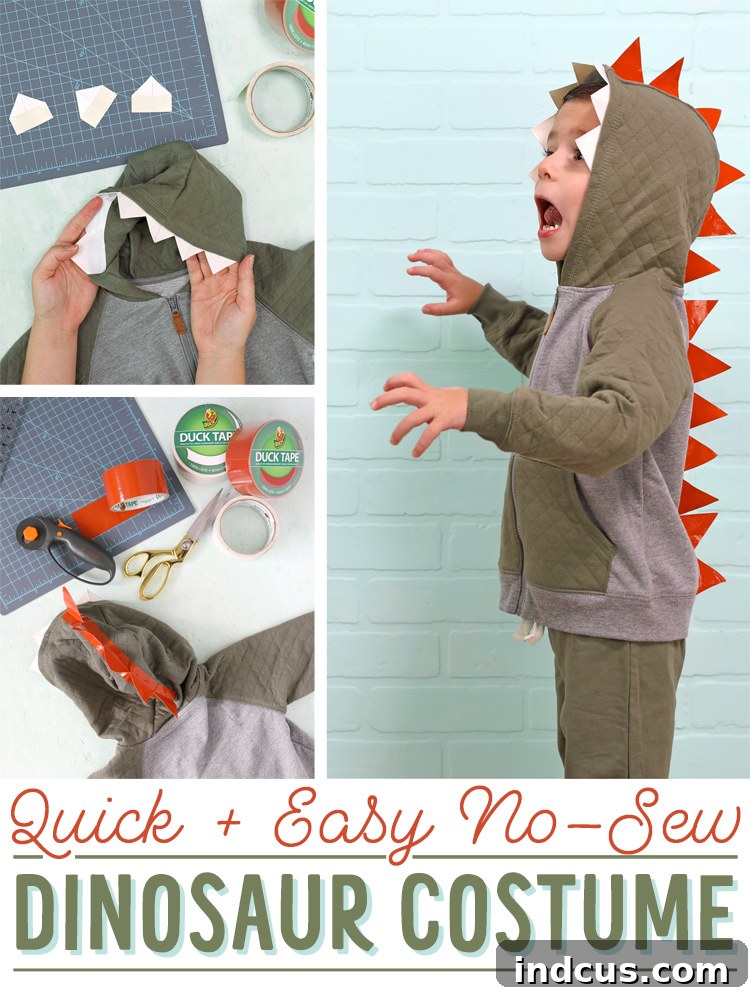
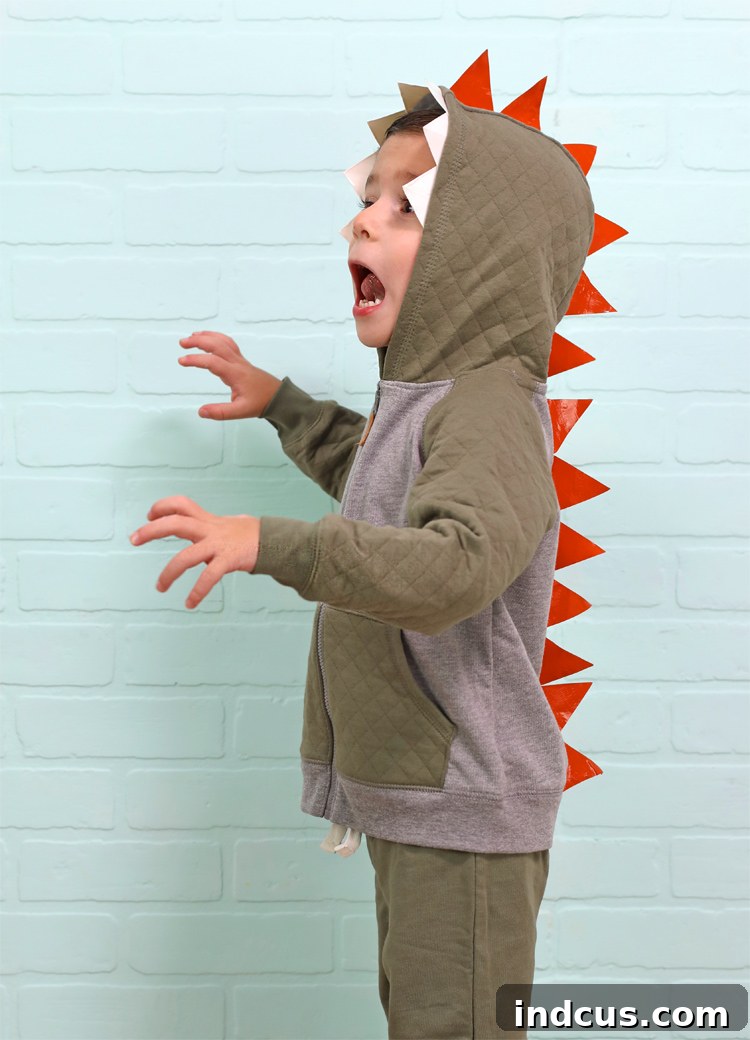
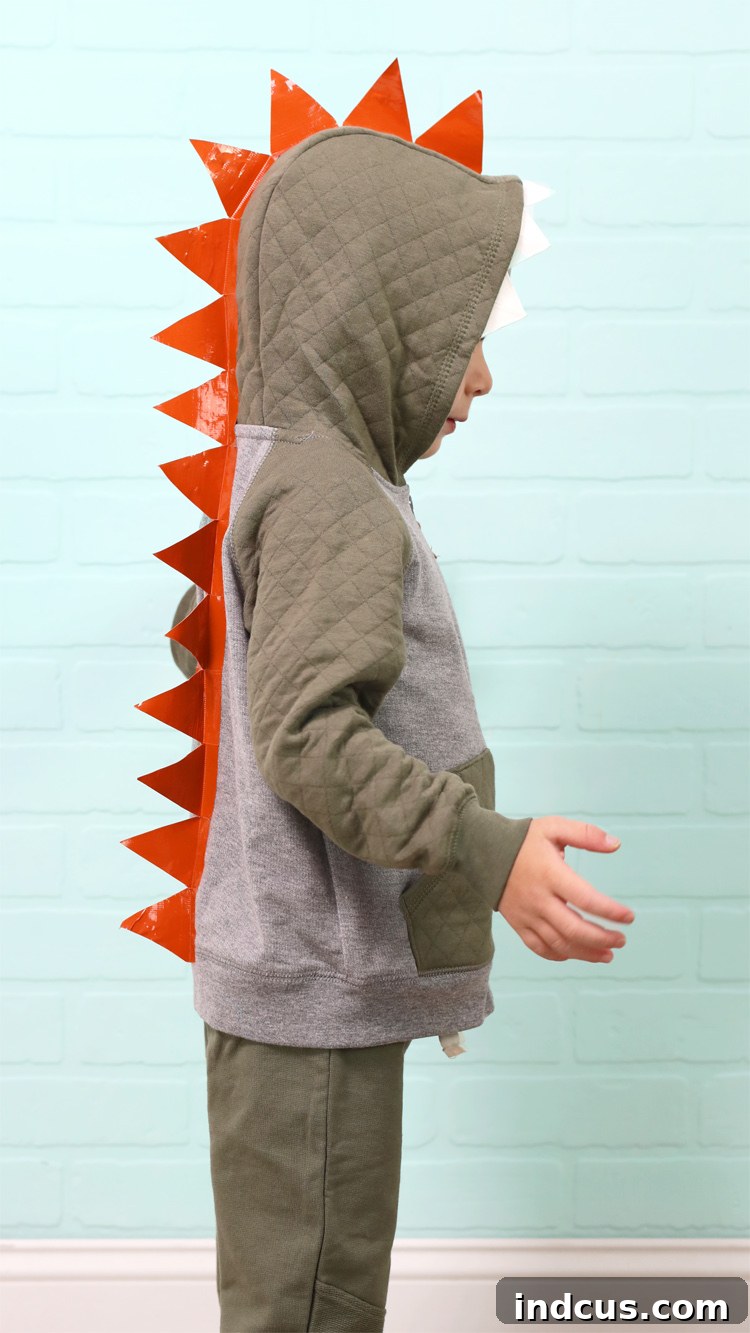
Are you scrambling for a captivating yet effortless Halloween costume? Look no further! This ingenious no-sew dinosaur costume is your perfect last-minute solution, transforming a simple hooded sweatshirt and vibrant Duck Tape into a prehistoric masterpiece. Forget the sewing machine; with just an hour or two of creative fun, you can craft a unique costume that will make your little one roar with delight.
One of the most remarkable features of this DIY project is its impermanence. After the Halloween festivities conclude, you can simply peel off the Duck Tape without leaving any sticky residue or damage to the sweatshirt. This means the cozy garment can return to its original state, ready for everyday wear. The possibilities for customization are endless – imagine a fierce green T-Rex, a whimsical pink and purple Stegosaurus, or a sleek blue Velociraptor! The choice of colors allows for incredible personalization, turning a simple craft into a cherished memory.
This post is sponsored by Duck Brand.
Why Choose This DIY Dinosaur Costume?
Crafting a Halloween costume should be an exciting and stress-free experience, and this no-sew dinosaur project truly delivers. It’s an ideal choice for parents seeking an affordable, quick, and highly customizable outfit without the hassle of intricate sewing patterns or expensive materials. Whether you’re a seasoned crafter or a complete beginner, the simplicity of working with Duck Tape makes this an achievable goal for everyone.
The beauty of the “no-sew” approach cannot be overstated. It eliminates the need for specialized equipment, intricate stitching, and hours hunched over a sewing machine. This project relies on the incredible adhesive power and versatility of Duck Tape, allowing for clean lines, strong attachments, and vibrant color combinations. It’s a fantastic way to engage kids in the costume-making process, fostering creativity and a sense of accomplishment.
Beyond its ease and speed, the removable nature of the Duck Tape ensures that your investment in a good quality hooded sweatshirt isn’t wasted on a single night. This sustainable aspect is a huge win for both your wallet and the environment. You get a fantastic costume for Halloween, and your child gets to keep their favorite hoodie for the rest of the season. It’s a win-win situation that combines fun, practicality, and creativity into one amazing project.
Gathering Your Crafting Arsenal: Materials Needed
Before you embark on your prehistoric crafting adventure, ensure you have all the necessary supplies readily available. The beauty of this project lies in its minimal material requirements, making it accessible and budget-friendly. Feel free to experiment with Duck Tape colors – a contrasting color for the spikes against the sweatshirt’s base color often creates a visually striking effect. Think about the type of dinosaur you want to create and choose your palette accordingly!
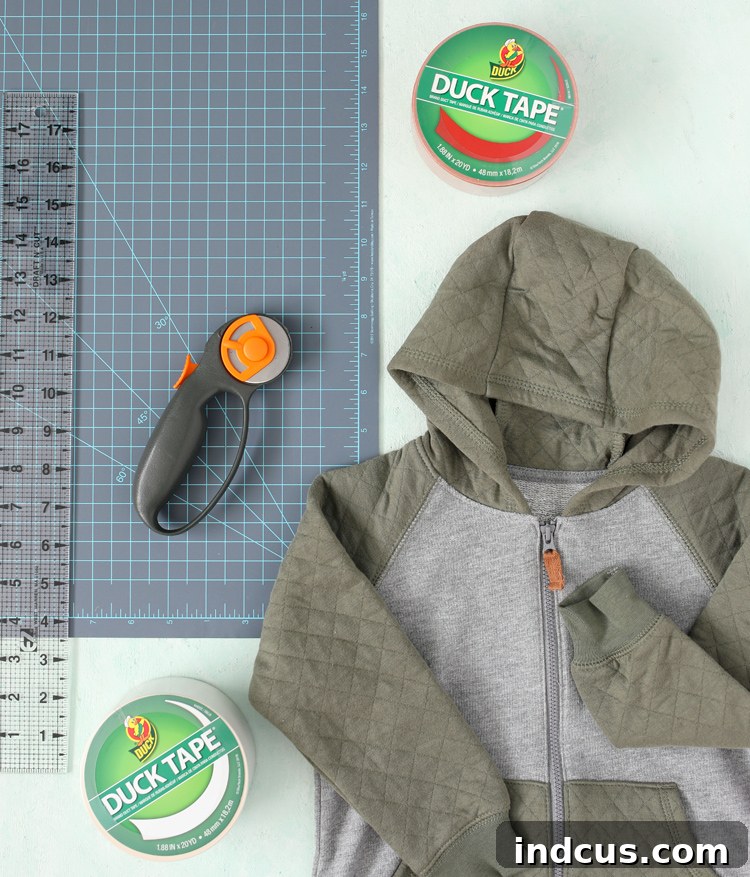
- White Duck Tape: Essential for crafting the sharp, iconic teeth. A standard roll will suffice.
- Colored Duck Tape: This will form the striking spikes of your dinosaur. I personally used Terra Cotta for a classic dinosaur look, but feel free to let your imagination run wild with greens, blues, purples, or even patterned tapes!
- Hooded Sweatshirt: The foundation of your costume. Choose a color that complements your chosen Duck Tape. A plain, unadorned sweatshirt works best. Ensure it’s the correct size for the wearer.
- Rotary Cutter + Cutting Mat: While scissors can work, a rotary cutter provides incredibly precise, straight edges, which is particularly helpful when cutting multiple strips of Duck Tape. A self-healing cutting mat protects your surfaces.
- Ruler: Crucial for accurate measurements, ensuring uniformity in your teeth and spikes.
- Scissors: Useful for smaller cuts, trimming, and shaping.
Step-by-Step Guide: Crafting Your Dino Masterpiece
This section will walk you through each step of creating your no-sew dinosaur costume. Pay close attention to the details for the best results, and remember that precision in cutting and folding will lead to a more polished final product. Take your time, and enjoy the creative process!
Step 1: Crafting the Fearsome Dinosaur Teeth
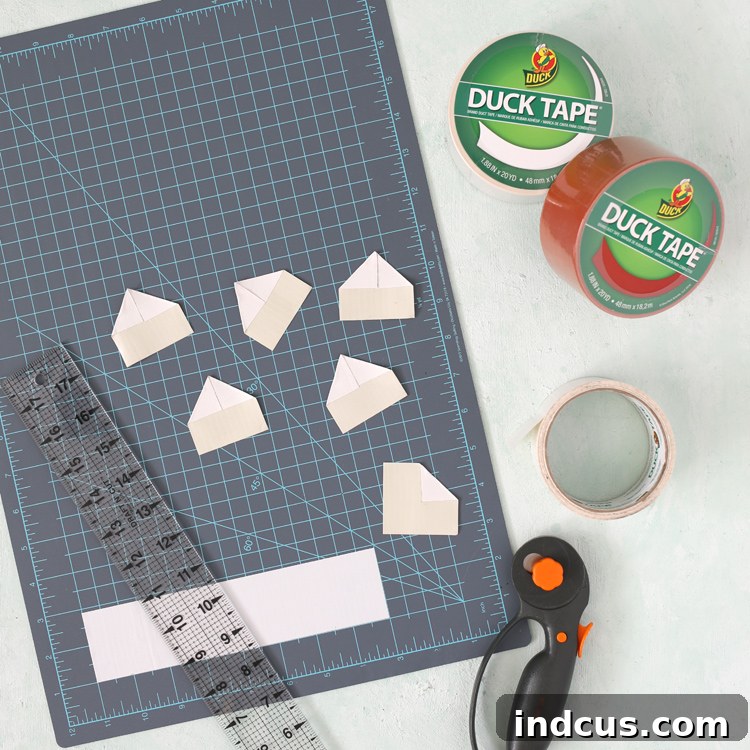
Step 1 Detail: To give your dinosaur a truly formidable grin, begin by cutting a two-inch piece of White Duck Tape. Lay this piece flat, sticky side up, on your cutting mat or a clean, non-stick surface. Carefully take the top-left corner and fold it down towards the center of the tape strip. Repeat this action with the top-right corner, folding it down to meet the first fold in the center. This will form a triangle shape at the top, leaving a horizontal strip of exposed sticky tape along the bottom edge. This exposed strip is what you’ll use to adhere the teeth to the hood.
The number of teeth you’ll need will depend on the size of your hooded sweatshirt and how closely spaced you want them to be. For a toddler-sized costume, approximately seven teeth usually provide ample coverage across the front edge of the hood. For larger sizes, you may need more. It’s always better to make a few extra than to run out mid-way through attachment. Ensure each tooth is roughly the same size for a consistent look.
Step 2: Attaching the Gnashers to Your Hood
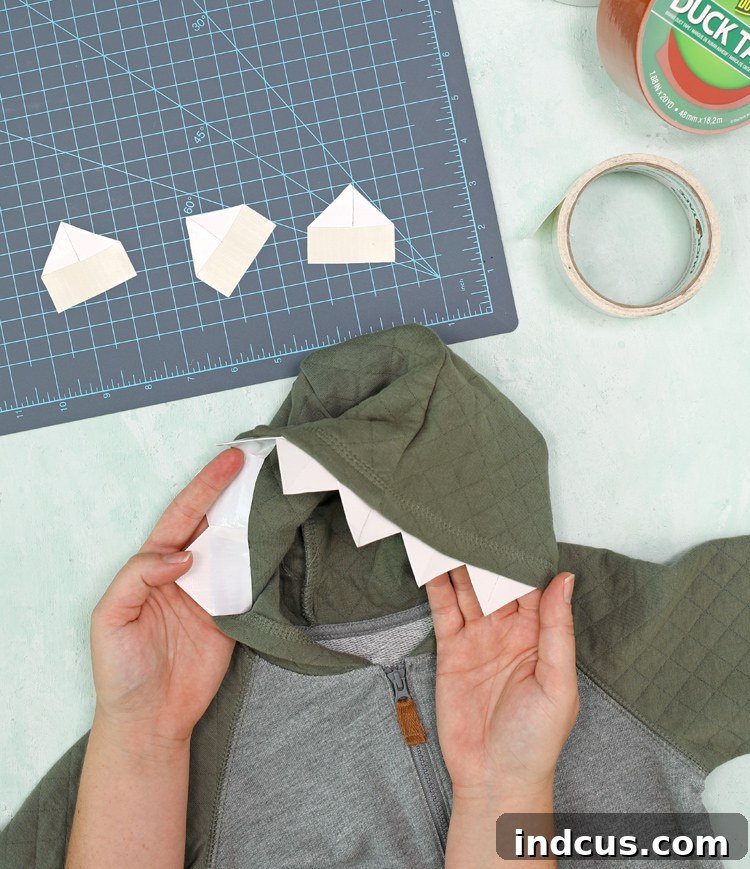
Step 2 Detail: With your dinosaur teeth prepared, it’s time to bring your creature to life. Take each folded tooth and press the exposed sticky strip firmly to the inside edge of the hood. For optimal symmetry and aesthetic appeal, I recommend starting with one tooth placed directly at the top center of the hood’s opening. Once this central tooth is secure, work your way outwards, attaching the remaining teeth evenly down each side of the hood. This method helps ensure that your dinosaur’s grin is perfectly balanced. Apply firm pressure to each tooth to ensure strong adhesion, especially around the edges, to prevent them from peeling off during enthusiastic play or trick-or-treating.
Step 3: Folding the Iconic Dinosaur Spikes
Step 3 Detail: The spikes are perhaps the most defining feature of your dinosaur, so creating them with care is key. This step involves a clever folding technique to create durable, double-sided spikes with sticky tabs for attachment. Follow these detailed steps, referring to the illustration below for a visual guide to each fold and cut:
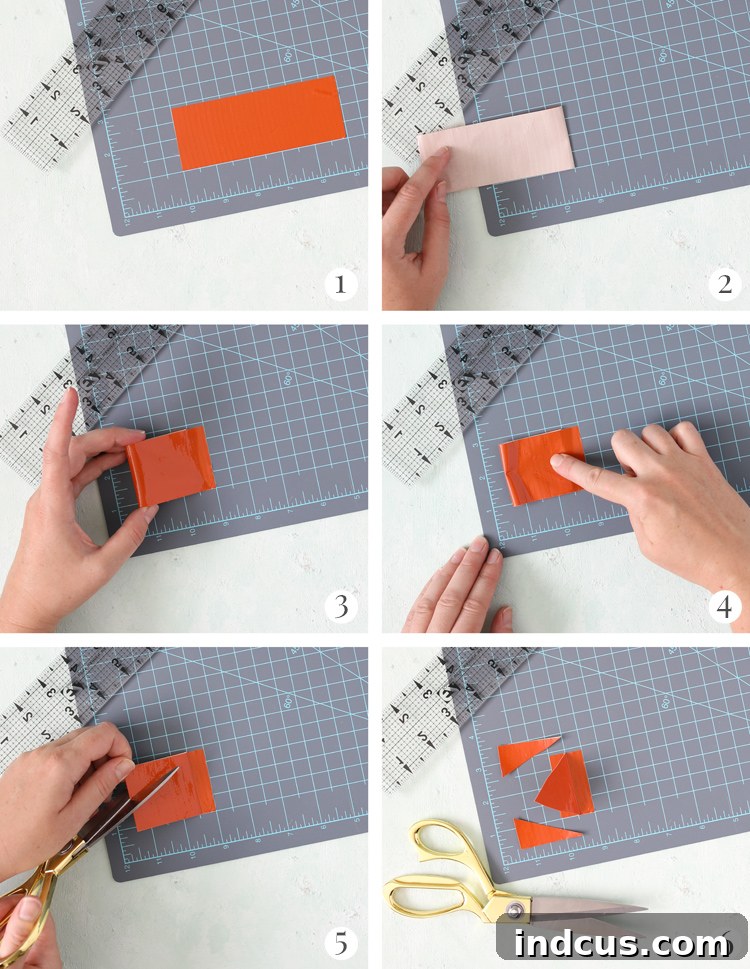
- Prepare Your Strip: Start by cutting a five-inch strip of your chosen colored Duck Tape. Lay this strip sticky side down on your cutting mat.
- Partial Peel: Carefully peel all but the last 1/2 inch of the tape strip back from the cutting mat. The very end of the strip should remain attached, preventing the tape from sticking to itself prematurely. This creates tension for the next fold.
- Form the Loop: Take the loose end of the tape and gently loop it back over itself. The crucial part here is to ensure the sticky sides do NOT touch each other yet. Align the edge of this looped tape so that it overlaps the original part (the section still attached to the mat) by exactly 1/2 inch. This overlap is critical for creating the double-sided flap.
- Secure the Fold: Once perfectly aligned, press the tape firmly together where the two sticky sides meet. You will now have a double-sided flap of Duck Tape, meaning both sides are colored and non-sticky, with two distinct 1/2 inch sections at the very ends that are still sticky and exposed. These sticky ends are what will anchor your spike.
- Shape the Spike: With a sharp pair of scissors or your rotary cutter, carefully cut a triangular shape into the non-sticky, double-sided tab. Make sure you cut only the folded part of the tape and avoid cutting into the two sticky strips that are still exposed at the bottom. This triangle forms the main body of your dinosaur spike.
- Final Form: You should now have a distinct triangular shape for your spike, with two separate, rectangular sticky tabs extending from its base. These tabs are essential for securely attaching the spike to the sweatshirt. Repeat this process to create as many spikes as you need to run down the length of the hood and the back of the sweatshirt, ensuring they are uniform in size for a cohesive look.
If any part of these instructions seems complex, remember that visual aids can be incredibly helpful. Seek out a video tutorial that demonstrates this specific Duck Tape folding technique; seeing it in action often clarifies the process much more effectively than written instructions alone.
Step 4: Lining Up Your Dino’s Spine: Attaching the Spikes
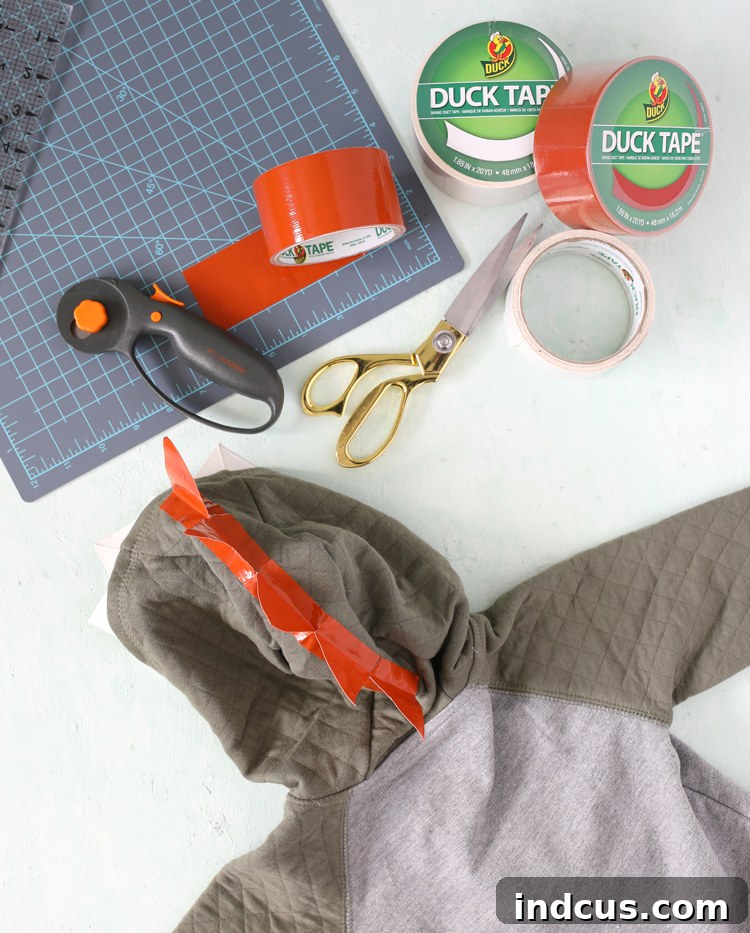
Step 4 Detail: Now comes the exciting part – bringing your dinosaur’s silhouette to life! Take your prepared triangular spikes, each with its two sticky tabs. Starting from the very front center of the hood, carefully align the first spike. Press each of its two sticky tabs separately and firmly onto the sweatshirt fabric. The goal is to create a straight, prominent line of spikes running all the way down the center of the hood and continuing down the back of the sweatshirt. Ensure that each spike is evenly spaced and that their sticky tabs are neatly aligned with each other, creating a clean, professional finish. Work slowly and meticulously to maintain a consistent line, making minor adjustments as you go. The key is to apply enough pressure to each sticky tab to ensure maximum adhesion, so your dinosaur can withstand a day of roaring and running.
Unleash Your Inner Paleontologist: Customization & Enhancements
You’ve successfully created the basic structure of an amazing no-sew dinosaur costume! But why stop there? This project offers endless opportunities for customization, allowing you to personalize your dinosaur and make it truly unique. Think about the specific type of dinosaur you want to emulate or simply let your imagination guide you in adding extra details.
For an even more authentic look, consider extending the spikes down the sides of matching sweatpants. This creates a more immersive full-body dinosaur effect. You could also craft fake “claws” out of contrasting Duck Tape and attach them around the sleeve cuffs of the sweatshirt or even to a pair of gloves. These small details can significantly enhance the overall impact of the costume. For texture and visual interest, cut out spots or stripes from another color of Duck Tape and strategically place them on the belly or sides of the sweatshirt, mimicking various dinosaur patterns.
Don’t be afraid to experiment with different color combinations. A classic green and brown look is always popular, but imagine a vibrant blue dinosaur with yellow spikes, or a prehistoric creature adorned in shades of pink and purple! You could even use metallic Duck Tape for a futuristic or fantastical dinosaur. The beauty of Duck Tape is its versatility and the ease with which you can apply and even remove it, giving you the freedom to try out various designs without permanent commitment. This is your chance to truly have fun with the project and bring your unique vision of a dinosaur to life!
Your Roaring Success: The Finished No-Sew Dinosaur Costume
And there you have it! A truly impressive, quick, and easy dinosaur costume that you can craft in a single afternoon. This project not only delivers an adorable and unique Halloween outfit but also boasts the practical advantage of being completely reversible. The ability to simply peel off the Duck Tape after Halloween means you can easily restore the hooded sweatshirt to its original condition, ready for everyday wear. It’s a testament to the versatility and convenience of Duck Tape as a crafting material.
This no-sew design makes costume creation accessible to everyone, regardless of their sewing skills. It’s a fantastic way to spend a creative afternoon, resulting in a costume that is both fun to make and exciting to wear. Watch your child’s face light up as they transform into their favorite prehistoric creature, ready for adventures and trick-or-treating. Enjoy the simplicity and ingenuity of this project, and revel in the joy of a handmade Halloween costume!
Visual Learning: No-Sew Dinosaur Costume Video Tutorial
For those who prefer a visual guide or need extra clarification on any of the steps, a comprehensive video tutorial is often the best resource. Many crafting channels and the Duck Brand website offer step-by-step videos demonstrating how to create this easy no-sew dinosaur costume. Such a video would walk you through each cut, fold, and attachment process, providing real-time visual examples and tips to ensure your project is a roaring success. Look for tutorials titled “Easy Dinosaur Costume” or “No-Sew Duck Tape Dinosaur” on popular video platforms to follow along visually and bring your prehistoric creation to life with confidence.
Like this idea? Pin it so you can find it later!