
There’s a unique satisfaction that comes from tackling a small, achievable project. While grand, complex endeavors can be rewarding, they often come with their share of stress and time commitment. Sometimes, the most delightful experiences are found in those quick, low-frustration DIYs that yield immediate, tangible results. It’s a chance to hit pause, rejuvenate your creative spirit, and bring a touch of order or beauty into your home without a significant investment of time or money.
Revitalize Your Bookshelf: An Ingenious Upcycled Cookie Tin Book Organizer
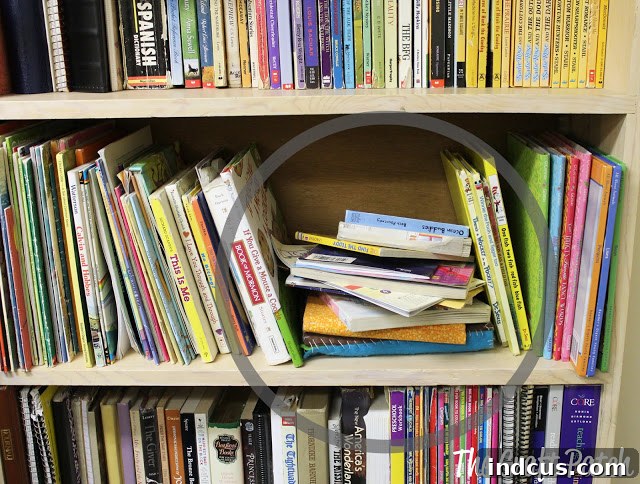
Every home enthusiast or parent knows the struggle of a perpetually messy bookshelf, especially when it comes to the smaller, more ‘misfit’ books that children adore. These charming, often colorful paperbacks and board books, despite their endearing qualities, can be a nightmare to keep tidy. They rarely stand neatly, are prone to tumbling over, and quickly transform an otherwise organized shelf into a chaotic eyesore. This particular section of my bookcase had long been a source of minor vexation:
It was the designated spot for all those diminutive, oddly-sized children’s books that just never seemed to fit anywhere else. Their precarious stacks were a constant visual reminder of disarray, and honestly, it really bothered me. I longed for a simple, yet effective, solution that would bring order without breaking the bank or requiring extensive crafting skills.
The Simple Solution: A Thrift Store Treasure Transformed
The universe, it seems, often conspires to provide answers in the most unexpected places. During a routine visit to Goodwill, amidst an array of forgotten household items, I stumbled upon an unassuming, yet perfectly sized, old cookie tin. Priced at a mere 95 cents, its potential immediately clicked into place. This wasn’t just a tin; it was the elegant, budget-friendly solution I had been searching for to tame the unruly stacks of children’s books.
The beauty of upcycling is transforming something old and overlooked into something new and functional, often with a unique character that mass-produced items lack. A simple metal tin, once home to festive cookies, was about to embark on a new life as a charming book organizer. The initial vision was clear: to decorate it to blend seamlessly with my home decor, turning a practical necessity into a decorative asset.
Step-by-Step DIY: Crafting Your Custom Book Bin
This project is a testament to how little time and effort are needed to make a significant impact on your home’s organization and aesthetic. The entire process, from finding the tin to its final placement on the shelf, took me roughly an hour. The result? A remarkably tidier and more appealing bookshelf, proving that small changes can indeed lead to big improvements.
Phase 1: Embellishing Your Tin with Mod Podge and Scrapbook Paper
The first step in this transformation involved personalizing the tin. I opted for scrapbook paper, which offers an incredible variety of patterns and colors, allowing for complete customization to match any room’s decor. Paired with Mod Podge, a crafter’s best friend, the process is straightforward and fun.
Materials You’ll Need:
- An old cookie tin (or any suitable metal tin with a lid)
- Scrapbook paper (enough to cover your tin, consider coordinating patterns)
- Mod Podge (matte or glossy, depending on your desired finish)
- A foam brush or soft bristle brush
- Scissors or a craft knife
- A ruler and pencil
- Clean cloth for wiping
Detailed Decoration Process:
- Preparation is Key: Begin by thoroughly cleaning your cookie tin. A quick wipe-down with a damp cloth and then drying it completely will ensure optimal adhesion for the Mod Podge. Remove the lid for easier handling.
- Measure and Cut Your Paper: Carefully measure the dimensions of your tin’s sides and lid. Cut your chosen scrapbook paper to fit these measurements, adding a slight overlap if desired for a seamless finish. For curved edges, you might need to make small relief cuts in the paper.
- Applying the Mod Podge (Layer 1): Using your foam brush, apply an even, thin layer of Mod Podge directly onto a section of the tin you wish to cover first (e.g., one side).
- Positioning the Paper: Carefully place your cut scrapbook paper onto the Mod Podge-coated section of the tin. Smooth out any air bubbles or wrinkles using your fingers, a credit card, or a brayer, working from the center outwards.
- Seal and Protect (Layer 2): Once the paper is smoothly applied, apply another thin, even coat of Mod Podge over the top of the scrapbook paper. This acts as a sealant, protecting the paper and giving it a durable finish.
- Repeat and Dry: Continue this process for all sides of the tin and the lid, working systematically. Allow each section to dry completely before handling extensively or moving to the next. Mod Podge typically dries clear, but allow ample time (usually 15-20 minutes between coats, and several hours for a full cure).
- Finishing Touches: Once completely dry, inspect your tin. You can add a second topcoat of Mod Podge for extra durability, especially if the tin will be handled frequently.
With its fresh new look, the cookie tin instantly brought a sense of order to the chaotic shelf. All those small, ‘misfit’ books now had a designated, stylish home, neatly contained and easily accessible. The visual improvement was immediate and immensely satisfying.
Phase 2: Enhancing Functionality with a Custom Knob
However, a minor practical hurdle quickly presented itself. While the tin looked fantastic and effectively organized the books, its lid, being tightly fitted, proved a bit challenging for small fingers to pry open. This called for a further enhancement, turning a decorative piece into a truly child-friendly storage solution.
Once again, the treasure hunt led me to another fantastic resource: The Restore (Habitat for Humanity ReStore), a haven for reclaimed building materials and hardware. There, I found a charming knob for a mere 50 cents. Its wooden center offered the perfect opportunity for further customization, allowing me to cover it to match the scrapbook paper on the tin. This small detail ensures a cohesive and polished look, elevating the entire project.
Materials for Adding a Knob:
- A decorative knob (with its accompanying screw)
- A small piece of scrapbook paper matching your tin (or paint)
- Mod Podge (if using paper)
- Drill with a metal-specific drill bit (the size should match your screw’s diameter)
- Measuring tape or ruler
- Pencil or marker
- Safety glasses
- Small piece of wood or scrap material (to protect your work surface)
The Power Tool Adventure: Attaching the Knob
This step might seem intimidating if you’re not accustomed to power tools, but I assure you, it’s simpler than it sounds and incredibly empowering! Using a drill to add a functional element is a fantastic way to customize and truly finish a project.
- Customizing the Knob (Optional): If your knob has a flat wooden center, you can trace and cut a small circle of your scrapbook paper to fit, attaching it with Mod Podge. Seal with another coat of Mod Podge. Allow to dry.
- Marking the Drill Points: Place the lid of your tin on a flat, stable surface. Using a measuring tape or ruler, find the exact center of the lid. Mark this spot with a pencil or marker. For two-hole knobs, measure and mark the two points accurately.
- Safety First: Before drilling, always put on safety glasses. Ensure your lid is securely placed on a sturdy surface, perhaps on top of a scrap piece of wood to prevent it from slipping and to protect your table.
- Drilling the Holes: Select a metal drill bit that is slightly smaller than the diameter of your knob’s screw. This ensures a snug fit. Carefully, and with steady pressure, drill through the marked spot(s) on the metal lid. It might take a moment to break through, so be patient and let the drill do the work.
- Attaching the Knob: Once the hole(s) are drilled, align the knob with the hole(s) from the top of the lid. Insert the screw from the underside of the lid and thread it into the knob. Tighten it securely with a screwdriver until the knob is firm and doesn’t wobble. “Tah dah!” – A perfectly functional handle is now in place!
The addition of the knob was a game-changer. It not only made the tin significantly easier for little fingers to open and close, but it also added an extra touch of design sophistication. The carefully selected and customized knob truly completes the piece, blending seamlessly with the overall aesthetic.
The End Result: Function, Style, and Satisfaction
I absolutely adore how this project turned out! It’s a perfect marriage of function and style, achieved on an incredibly modest budget. This approach to home decor and organization – finding creative solutions that are both inexpensive and visually pleasing – is truly how we like to operate. It embodies the spirit of smart living, sustainability, and personal expression.
Beyond Books: Versatile Storage Solutions
While this upcycled cookie tin shines as a book organizer, its potential extends far beyond the bookshelf. Imagine using similar decorated tins for:
- Craft Supplies: Keeping crayons, markers, small beads, or yarn neat and accessible.
- Toy Storage: Perfect for small LEGOs, toy cars, or doll accessories.
- Desk Organization: Storing pens, paperclips, or notepads.
- Kitchen Pantry: Holding tea bags, spice packets, or other small pantry items.
- Keepsakes: A beautiful place to store mementos or photos.
- Pet Treats: A stylish and airtight container for your furry friend’s snacks.
The adaptability of this DIY means you can create custom storage solutions for virtually any room in your home, adding personality and order wherever it’s needed.
Why This Project is a Win-Win
This cookie tin makeover isn’t just about organizing books; it’s about embracing a lifestyle that values creativity, sustainability, and mindful consumption. Here’s why projects like this are so rewarding:
- Cost-Effective: Utilizing thrift store finds and common craft supplies makes this an incredibly budget-friendly endeavor. You achieve high-end style without the high-end price tag.
- Sustainable Living: By repurposing an old item, you’re contributing to a more sustainable lifestyle, reducing waste, and giving new life to forgotten objects.
- Personalized Style: The ability to choose your own papers, paints, and knobs means each project is uniquely yours, reflecting your personal taste and complementing your existing decor.
- Sense of Accomplishment: There’s immense pride in creating something beautiful and functional with your own hands. Even a simple project can boost confidence and inspire further creativity.
- Practicality Meets Aesthetics: This DIY perfectly balances the need for practical organization with the desire for a visually pleasing home environment. No more choosing between neatness and style – you get both!
So, the next time you encounter a persistent little organizational problem in your home, consider the power of a simple, upcycled solution. A quick trip to a thrift store, a dash of creativity, and a willingness to get a little crafty can transform an ordinary object into an extraordinary piece of home decor and organization. It’s a reminder that sometimes, the best projects are the small ones that bring both joy and tangible improvement to your living space. Happy crafting!







