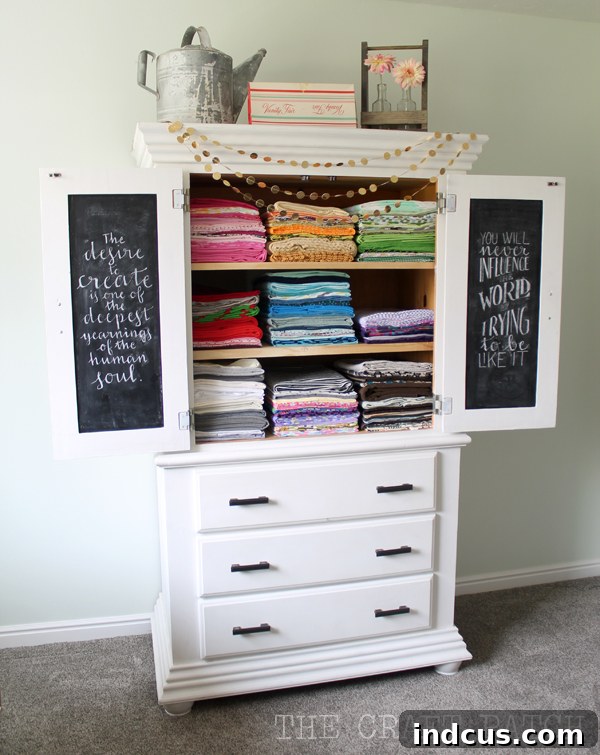
Transforming a cluttered craft space into a haven of order and inspiration can feel like a daunting task, especially when it comes to managing an ever-growing fabric collection. Yet, a beautifully organized fabric stash isn’t just a dream; it’s an achievable reality that can significantly enhance your creative process and overall enjoyment of your hobby. If you’ve ever admired the pristine appearance of a neatly stocked fabric store or a perfectly folded display in a boutique, you know the satisfaction that comes from visual order. Today, we’re diving deep into the art of professional fabric folding, drawing inspiration from retail techniques to create a system that will make your fabric armoire, or any fabric storage solution, a true masterpiece of organization. You might have already caught a glimpse of my fabric armoire – a cherished piece that sparked this entire organizational journey – and today I’m thrilled to share the detailed method behind achieving its impeccably neat rows of fabric.
The Vision: A Glorious Fabric Armoire and the Challenge of Fabric Storage
Every crafter dreams of a dedicated, functional, and aesthetically pleasing space where creativity can flourish without the distraction of disorder. My fabric armoire, with its elegant design and ample storage capacity, represents this ideal. It’s more than just a piece of furniture; it’s a sanctuary for my creative materials. However, even the most magnificent armoire can quickly become a chaotic jumble if its contents aren’t meticulously organized. Fabric, with its varied textures, weights, and widths, presents unique challenges when it comes to storage. Without a consistent folding method, rolls can unravel, wrinkles can set in, and finding that perfect print or essential solid can turn into a frustrating treasure hunt.
Common fabric storage woes include:
- Wrinkling and Creasing: Improper folding leads to deep, stubborn creases that require extra ironing time before use.
- Lost Fabric: Smaller scraps or specific yardages can easily get buried beneath larger pieces, making them hard to locate.
- Space Inefficiency: Inconsistent folds create wasted space, reducing the overall storage capacity of shelves or drawers.
- Visual Clutter: A messy stash can be overwhelming and detract from the enjoyment of your creative space.
- Damage: Fabric can be snagged or pulled if not stored securely, especially delicate materials.
These challenges often deter crafters from fully enjoying their collections, making it essential to implement an effective and sustainable organization system. The goal is not just to tidy up, but to create a system that enhances accessibility, preserves your fabric, and inspires your next project.
Drawing Inspiration from Retail Excellence: The Secret to Perfect Folds
My journey to perfect fabric folding began not in a craft studio, but in the fast-paced environment of a mall clothing store during my teenage years. There, precision was paramount. We were taught the art of folding giant stacks of t-shirts with an almost robotic consistency. The secret weapon? A simple clipboard. We would meticulously wrap each shirt around the clipboard, fold it precisely, and then carefully slide the clipboard out, leaving behind a stack of perfectly identical, crisp t-shirts. This method ensured not only a beautiful display but also maximized shelf space and made it easy for customers to browse without disturbing the stack.
Beyond folding, we also practiced “finger-spacing” for hanging clothes. Each hanger had to be precisely two fingers’ width apart from its neighbors, creating an illusion of abundance and order. This strict adherence to consistency, whether in folding or spacing, taught me a valuable lesson: uniformity is the key to both visual appeal and practical efficiency in storage. It was this foundational experience that sparked the idea of applying similar principles to my fabric stash. If it worked for t-shirts, why not for fabric?
Crafting Your Custom Fabric Folding Template: The DIY Clipboard Method for Fabric
The core of this fabric organization system lies in creating a custom folding template. This isn’t just any piece of cardboard; it’s a tool tailored to the specific dimensions of your storage space, ensuring every piece of fabric folds to a consistent size. This consistency is what elevates your fabric stash from a mere collection to an artfully arranged display.
Materials You’ll Need:
- Sturdy Cardboard: Repurpose old moving boxes, appliance boxes, or even poster board for a lighter template. The thicker the cardboard, the more durable your template will be.
- Ruler or Measuring Tape: For accurate measurements.
- Pencil or Marker: To mark your cutting lines.
- Utility Knife or Sharp Scissors: A utility knife with a cutting mat is ideal for straight, clean cuts. If using scissors, ensure they are sharp enough for cardboard.
Determining the Perfect Dimensions for Your Template:
This is where the customization comes in. The ideal size of your template depends entirely on your storage solution – be it an armoire, shelves, drawers, or bins. The goal is for your folded fabric to fit snugly and consistently within your chosen space.
- Measure Your Storage Space: First, measure the internal width and depth of your shelves or drawers. For example, if your armoire shelf is 12 inches deep and 24 inches wide, these numbers will guide your template size.
- Determine Template Width: The width of your template will directly correspond to the width of your folded fabric. This is the dimension that will be visible from the front of your shelves. Choose a width that looks good and fits well within your shelf width, allowing for multiple stacks. A common width for shelves might be 8-10 inches, allowing for two or three stacks across a standard shelf. For smaller items like fat quarters, a narrower template might be better. Consistency here is paramount for visual appeal.
- Determine Template Depth: The depth of your template determines how far back your fabric will go on the shelf when folded. I found that the precise depth didn’t matter as much as the front width, as long as all my fabric pieces were folded to the same depth. This helps prevent fabric from jutting out unevenly or getting pushed too far back. For a 12-inch deep shelf, a template depth of 10-11 inches might be appropriate, leaving a small gap at the back for easy retrieval.
Once you have your desired width and depth measurements, carefully mark them onto your cardboard using a ruler and pencil. Double-check your measurements before cutting.
Cutting Your Template:
With your measurements marked, it’s time to cut your template. If using a utility knife, place the cardboard on a cutting mat to protect your work surface. Use a ruler as a guide for straight cuts. Apply firm, even pressure. If using scissors, take your time to ensure straight edges. A clean, precisely cut template will yield the best folding results.
The Fabric Folding Process: From Mess to Masterpiece
Now that your custom fabric folding tool is ready, it’s time for the main event: transforming your fabric stash. This process, while requiring a bit of time and patience initially, yields immensely satisfying and long-lasting results.
Step-by-Step Folding Guide:
- Prepare Your Fabric: Lay your fabric flat on a large, clean surface – a table, a clean floor, or even a large ironing board. Smooth out any major wrinkles. If the fabric is very wrinkled, a quick press with an iron beforehand can make the folding process much easier and yield crisper results.
- Initial Folds – Achieving the Right Depth: Most fabrics are sold in widths of 44/45 inches or 54/60 inches. To get your fabric to the depth of your template, you’ll likely need to fold it lengthwise into thirds or quarters.
- For a standard 44/45-inch wide fabric: Fold one selvage edge towards the center, then fold the other selvage edge over, creating a long, narrow strip that is roughly 10-12 inches wide (or whatever matches your template’s depth). Ensure the selvage edges are tucked inside to create clean edges.
- For wider fabrics (e.g., upholstery, home decor): You might need to fold it into quarters or more sections lengthwise to achieve your desired template depth. The key is to create a strip of fabric that is slightly narrower than your template’s depth.
The goal here is to make the fabric “long and skinny” so it can be neatly wrapped around your template.
- Wrap Around the Template: Place one end of your fabric strip (the cut end or a folded edge, whichever looks neater) flush against one short edge of your cardboard template. Begin wrapping the fabric snugly around the template, working your way down the length of the fabric.
- Maintain Tension: Keep the fabric taut but not stretched, ensuring a smooth and even wrap.
- Align Edges: As you wrap, continuously check that the long edges of your fabric remain aligned with the edges of your template. This creates a uniform look.
- Neatness: Pay attention to any loose threads or selvages, tucking them in to maintain a clean appearance.
- The Final Fold: Once you reach the end of your fabric, you should have a neatly wrapped bundle. If there’s a small excess, fold it over the last wrapped layer.
- Carefully Slide Off the Template: This is the crucial step. Hold the wrapped fabric firmly with one hand while gently sliding the cardboard template out with the other. The key is to keep the folded fabric tight as you remove the template, so it retains its shape. Once the template is removed, you’re left with a perfectly folded, self-supporting fabric rectangle.
I won’t lie – meticulously folding an entire fabric stash can take hours, especially if you have a substantial collection. However, the transformation is truly remarkable. The effort is absolutely worth it for the stunning visual impact and the sheer joy of a perfectly organized creative space. Doesn’t it look incredibly satisfying?
Tips for Success and Maintaining Your Organized Fabric Stash
Implementing this folding method is a significant first step, but ongoing maintenance and smart organizational habits are key to long-term success. Here are some additional tips to keep your fabric armoire looking glorious:
- Batch Processing: Don’t try to fold every piece of fabric in one sitting. Break it down into manageable batches. Focus on one shelf or one type of fabric at a time to avoid burnout.
- Labeling for Easy Identification: While the neat folds make fabric more visible, adding labels can be incredibly helpful. Use small tags or stickers to note fabric content, yardage, designer, or intended project. This is especially useful for similar-looking fabrics or when you need a specific type of material.
- Inventory Management: For larger stashes, consider keeping a simple digital or physical inventory. Note down fabric types, quantities, and their location. This prevents accidental repurchases and helps you plan projects more efficiently.
- Strategic Arrangement: Arrange your folded fabric by color, type (e.g., quilting cottons, knits, home decor), designer, or even by project. This creates a visually appealing display and makes it easier to locate specific fabrics for your next creative endeavor. Stacking vertically, like books, can also make individual pieces easier to access without disturbing the stack.
- Immediate Integration of New Fabric: Make it a habit to fold new fabric purchases using your template as soon as they enter your craft space. This prevents new items from creating immediate clutter and keeps your system consistent.
- Versatility of the Method: This cardboard template method isn’t just for yardage! It works wonderfully for fat quarters, fabric scraps, clothing items (like t-shirts or scarves), and even linens. Adjust the template size as needed for different items.
Beyond Aesthetics: The Tangible Benefits of a Well-Organized Fabric Collection
The immediate satisfaction of seeing a beautifully organized fabric armoire is undeniable, but the benefits extend far beyond mere aesthetics:
- Time-Saving Efficiency: No more rummaging! When every piece of fabric is visible and neatly categorized, you spend less time searching and more time creating. This increased efficiency can transform your crafting experience.
- Maximized Space: Uniformly folded fabric takes up less space than haphazardly stored pieces. This method allows you to utilize every inch of your storage unit, potentially fitting more fabric than you thought possible.
- Preservation of Fabric: Proper folding minimizes deep creases, pulls, and snags, helping to maintain the integrity and quality of your fabric over time. This is especially important for delicate or expensive materials.
- Sparking Creativity: A tidy, inspiring craft space can significantly boost your creativity. When your materials are beautifully displayed and easily accessible, you’re more likely to feel inspired to start new projects and experiment with combinations.
- Stress Reduction: Clutter can be a major source of stress. An organized fabric stash contributes to a more peaceful and enjoyable crafting environment, allowing you to relax and fully immerse yourself in your passion.
- Financial Savings: By knowing exactly what fabric you own, you’re less likely to buy duplicates, saving you money in the long run. You can also make better use of your existing stash, reducing the need for new purchases.
Embrace the Joy of Organized Creativity
The journey to an impeccably organized fabric armoire, or any fabric storage system, might require an initial investment of time and effort. However, the rewards—a beautiful, functional, and inspiring creative space—are immeasurable. By adopting this simple yet highly effective retail-inspired fabric folding technique, you’re not just tidying up; you’re cultivating an environment where your passion for crafting can truly flourish. So, grab some cardboard, take those measurements, and embark on your own fabric organization adventure. You’ll be amazed at the transformation and the renewed joy it brings to your creative endeavors. Share your own organization tips and tricks – together, we can inspire a world of beautifully ordered craft spaces!