DIY Glamorous Two-Toned Metallic Pumpkins: A Simple Guide to Stunning Fall Decor
As the leaves begin to change and a crispness fills the air, our thoughts turn to cozy fall decorating. While traditional carved pumpkins are a Halloween staple, painted pumpkins offer a sophisticated, long-lasting, and incredibly versatile alternative. They provide an artistic touch to your autumnal displays, transitioning seamlessly from spooky Halloween charm to elegant Thanksgiving gratitude.
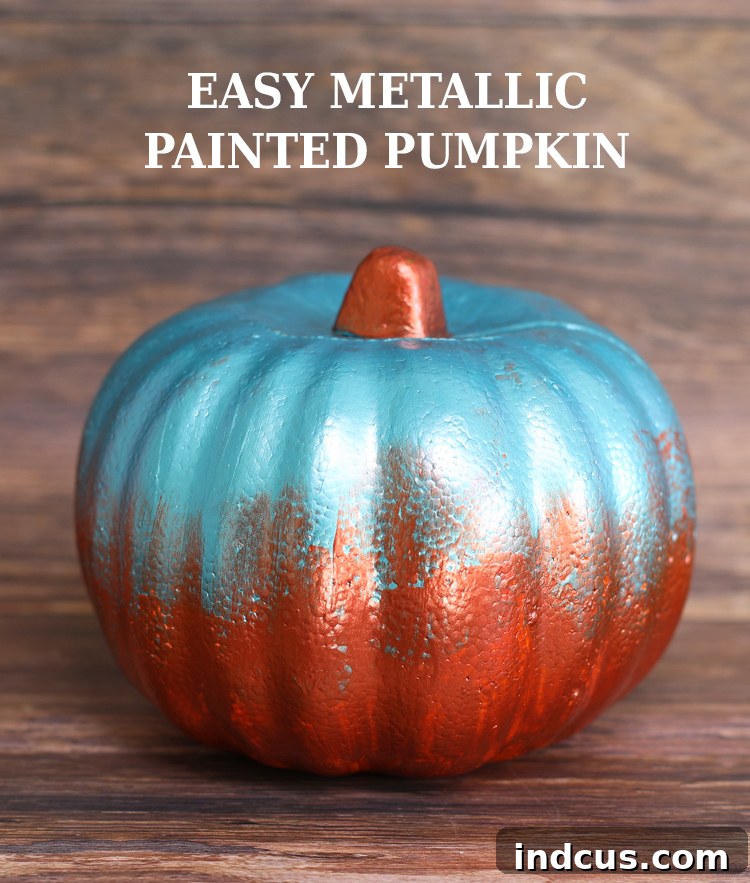
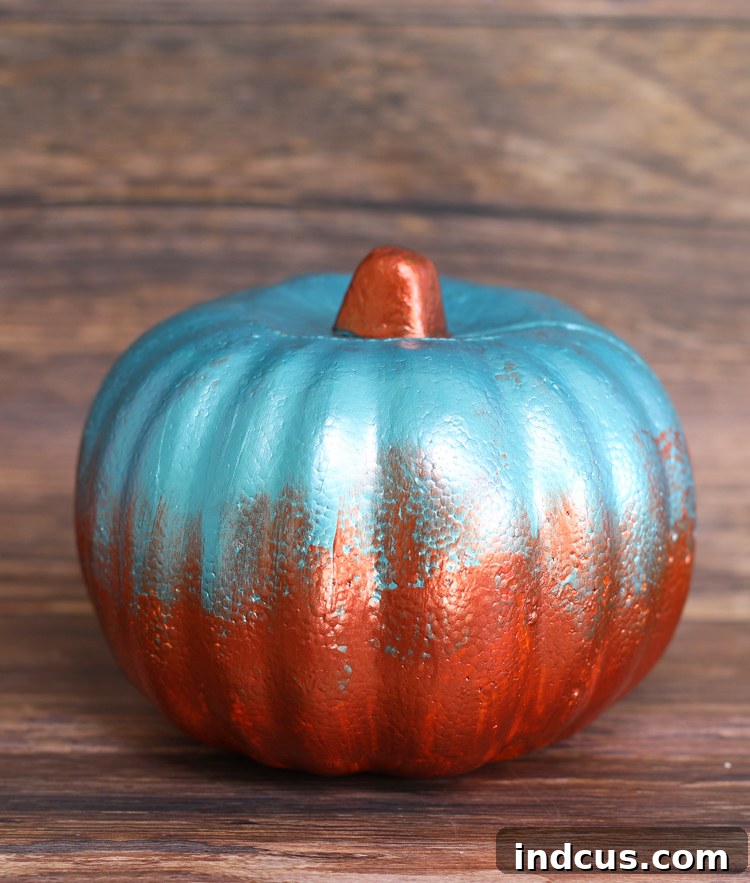
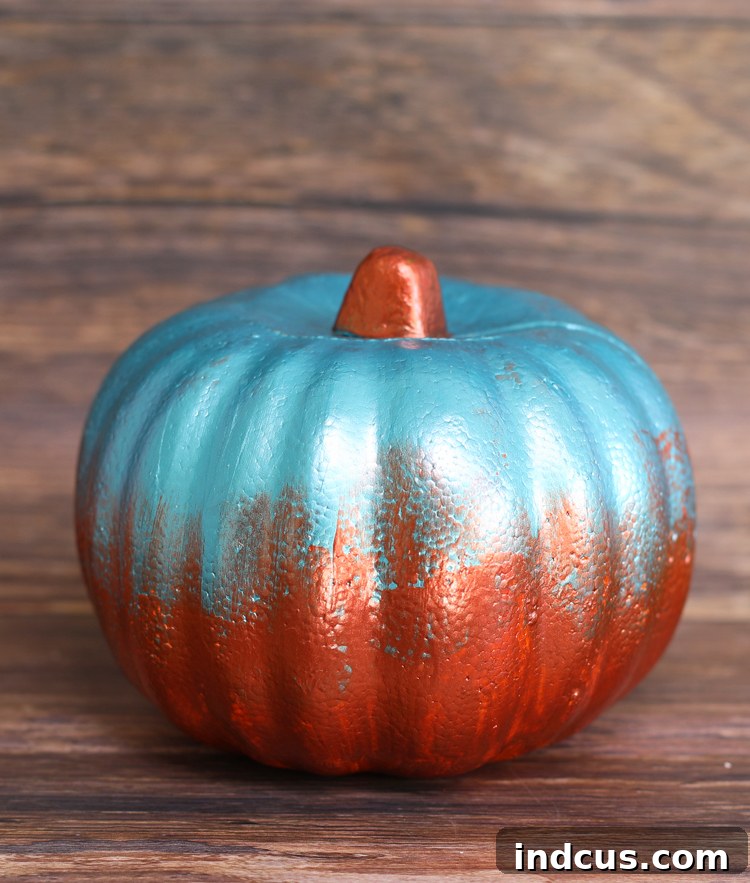
This tutorial will guide you through creating a truly eye-catching piece of decor: a gorgeous two-toned metallic pumpkin. Using a simple technique, you’ll transform an ordinary pumpkin into a glam, elegant accent that beautifully reflects the light. The combination of rich copper and vibrant aquamarine creates a unique blend that is both modern and timeless, making it suitable for display throughout the entire fall season. Whether adorning your mantel, gracing a tabletop centerpiece, or welcoming guests on your porch, these metallic beauties are sure to impress.
If you’re looking for more inspiration, don’t miss our extensive collection featuring over 30 amazing painted pumpkin ideas that cater to every style and skill level. But first, let’s dive into this specific project, which promises a high-end look without the high-end effort.
Embrace the Elegance: Why Metallic Pumpkins Are a Must for Fall
Painted pumpkins have soared in popularity, offering a stylish departure from the mess and fleeting nature of carved gourds. Metallic paints, in particular, bring an unparalleled level of sophistication and visual interest. The shimmery finish catches the light beautifully, adding depth and dimension to your fall vignettes. This project is not only quick and easy but yields results that look incredibly expensive and professionally done, making it a fantastic weekend craft for anyone looking to elevate their seasonal home decor.
Beyond their aesthetic appeal, painted pumpkins offer several practical advantages. Unlike carved pumpkins, which quickly rot, painted pumpkins (especially faux ones) can be enjoyed for months, even years, saving you time and money. They are also a safer option for homes with small children or pets, as there are no sharp tools involved in their creation. Plus, you can tailor the colors and designs to perfectly match your existing home decor, ensuring a cohesive and personalized look.
Visual Guide: Metallic Painted Pumpkin Process
Video Tutorial Snapshot
While the detailed steps are outlined below, a visual demonstration can often clarify the process. Imagine watching a quick, concise video showing the easy brush strokes and blending technique that transforms a plain pumpkin into a metallic masterpiece. This visual aid simplifies the learning curve, ensuring you can replicate the stunning results with confidence.
Gather Your Glamorous Gear: Materials Needed
Part of the beauty of this project lies in its simplicity. You won’t need an extensive array of supplies, just a few key items to get started. Before you begin, ensure you have a clean, well-ventilated workspace protected by a drop cloth or newspaper to catch any spills.
(Please note: some affiliate links are used to help you find the exact products mentioned.)
- Pumpkin: Your canvas! This technique works equally well on real or artificial pumpkins. For this demonstration, inexpensive foam pumpkins from your local dollar store or craft supply store are ideal. They are lightweight, durable, and can be reused year after year.
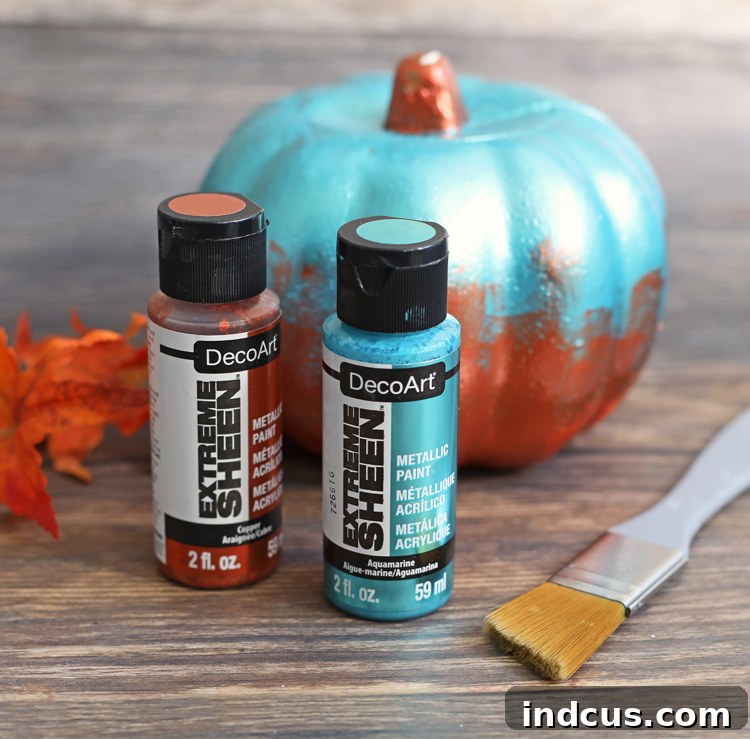
- Metallic Craft Paint in Two Complementary Colors: The star of the show! Choose colors that resonate with your personal style or existing decor. The original project uses DecoArt Extreme Sheen in Copper and Aquamarine, a stunning combination that evokes both autumnal warmth and refreshing coolness. Other fantastic metallic pairings include gold and silver, rose gold and champagne, or even a deep bronze with a bright pewter. These paints are readily available at craft stores, often at a more affordable price than online retailers like Amazon.
- Quality Paint Brush: A flat or angled brush, about 1-2 inches wide, is perfect for applying paint smoothly and creating the feathered blend. You might also want a smaller detail brush for touch-ups.
- Optional but Recommended:
- Painter’s Tape: If you prefer a crisp, defined line between your two colors rather than a blended edge.
- Spray Primer: Especially useful if your pumpkin surface is particularly slick or non-porous (common with some fake pumpkins) or if your chosen paint struggles to adhere.
- Sealant/Clear Top Coat: To protect your finished masterpiece, especially if it will be displayed outdoors or handled frequently. A spray-on clear coat is usually the easiest to apply.
- Damp Cloths/Paper Towels: For quick clean-ups and brush maintenance.
Choosing Your Pumpkin Canvas: Real vs. Faux
The choice between a real and fake pumpkin depends on your priorities. Real pumpkins offer authentic texture and an organic feel, but require proper cleaning and will eventually decompose. If opting for a real pumpkin, ensure you give it a thorough cleaning first. Wash it gently with soap and water to remove any dirt, grime, or residue, then dry it completely. This step is crucial for paint adhesion.
Faux pumpkins, typically made from foam, plastic, or paper-mâché, are a fantastic investment. They come in various sizes and shapes, are often very inexpensive, and can be transformed into beautiful decor pieces that last for many seasons. If you find your paint struggling to adhere to a very slick fake pumpkin, a light coat of spray primer will create a perfect surface for your metallic paints to cling to.
Step-by-Step Instructions: Creating Your Metallic Masterpiece
This project is incredibly forgiving, making it perfect for crafters of all skill levels. Take your time, enjoy the process, and don’t be afraid to experiment!
- Prepare Your Workspace and Pumpkin:
- Lay down your drop cloth or newspaper to protect your surfaces.
- If using a real pumpkin, ensure it’s thoroughly cleaned and dry. For a fake pumpkin, a quick wipe-down might suffice, or apply a primer if needed and let it dry completely.
- Shake your metallic paints well before opening to ensure the pigments are evenly mixed for optimal sheen.
- Apply the First Metallic Color to the Top Half:
- Choose your first metallic color. It’s often easiest to start with the color you want on the top half of the pumpkin.
- Using your paintbrush, carefully apply an even coat of paint to the upper portion of the pumpkin. You’ll want to aim for roughly halfway, but the exact line isn’t critical, especially since we’ll be blending.
- Metallic paints, especially lighter shades, may require multiple coats to achieve full, opaque coverage and maximum shimmer. Allow each coat to dry completely to the touch before applying the next. This prevents streaks and ensures the metallic flakes lay smoothly. Patience here is key!
- Depending on your paint and pumpkin, two to three thin coats are usually sufficient.
- Let this first color dry completely before moving on to the next step. This can take anywhere from 30 minutes to a few hours, so check the paint manufacturer’s recommendations.
- Apply the Second Metallic Color and Create the Feathered Blend:
- Once the first color is bone dry, load your paintbrush with your second metallic color.
- Begin painting the bottom half of the pumpkin, working your way up towards the already painted top half.
- As you approach the demarcation line where the two colors will meet, use a technique called “feathering.” Instead of creating a hard, crisp line, use light, upward strokes with your brush, allowing some of the second color to lightly overlap and blend with the edge of the first color.
- To achieve a soft, diffused edge, you can also apply a little bit of both colors to your brush and gently blend them directly on the pumpkin, or use a clean, dry brush to lightly blend the wet edges together. The goal is to create a seamless, gradient effect where the two colors softly transition into one another, rather than a harsh division.
- Again, you may need multiple coats of the second color to achieve full coverage, making sure to feather the edges each time.
- Once satisfied with the blend and coverage, allow the entire pumpkin to dry completely.
- Optional: Apply a Protective Sealant:
- For added durability and to protect your metallic finish from dust and wear, consider applying a clear sealant. A satin or gloss finish spray sealant will enhance the metallic shimmer.
- Follow the product instructions for application and drying times.
And that’s all there is to it! With just a few simple steps, you’ve created a gorgeous, shiny metallic pumpkin that will be a stunning focal point in your fall decor.
Tips for Pumpkin Painting Success
- Patience is a Virtue: Rushing the drying process between coats is the quickest way to end up with a streaky, uneven finish. Always ensure each layer is fully dry before applying the next.
- Thin Coats are Best: Multiple thin coats provide better adhesion and a smoother, more professional finish than one thick, heavy coat.
- Work in Good Lighting: Ensure your workspace is well-lit so you can clearly see your brush strokes and any areas needing more coverage or blending.
- Ventilation Matters: Especially when using spray primers or sealants, work in a well-ventilated area or outdoors.
- Practice Makes Perfect: If you’re nervous about the blending technique, try it out on a scrap piece of cardboard or a less visible part of the pumpkin first.
- Clean Your Brushes: Rinse your brushes thoroughly with water immediately after use to prolong their life.
Creative Variations & Display Ideas
While the copper and aquamarine combination is stunning, don’t limit yourself! Experiment with different metallic pairings:
- Classic Elegance: Gold and silver for a timeless, luxurious feel.
- Warm Tones: Rose gold and champagne for a soft, inviting glow.
- Bold & Modern: Deep bronze with a vibrant metallic teal or purple.
- Ombre Effect: Instead of a distinct two-toned blend, try a gradual ombre transition from one metallic color to another across the entire pumpkin.
You can also enhance your metallic pumpkins with additional embellishments:
- Glitter: A dusting of fine glitter while the paint is still slightly tacky can add extra sparkle.
- Stenciling: Use stencils to add geometric patterns, monograms, or seasonal words in a contrasting metallic shade.
- Vinyl Decals: Apply intricate vinyl decals for a precise design.
- Ribbons & Embellishments: Tie a luxurious velvet ribbon around the stem or attach faux fall leaves and berries.
These metallic pumpkins make fantastic centerpieces, mantel decorations, or additions to a festive porch display. Group them with other painted pumpkins, gourds, candles, or natural elements like pinecones and branches for a truly captivating fall arrangement.
Caring for Your Painted Pumpkin
If you’ve used a faux pumpkin, congratulations! Your metallic masterpiece is ready to be stored and enjoyed for many seasons to come. Simply wipe it clean with a dry cloth and store it in a box where it won’t be scratched. For real pumpkins, while the paint offers some protection, they will eventually decompose. Enjoy them for as long as possible, but be prepared to dispose of them once they start to soften or show signs of decay.
Your Fall Decor Transformation Awaits!
Creating these two-toned metallic pumpkins is a simple yet incredibly rewarding DIY project. It’s an opportunity to infuse your home with personalized elegance and capture the magical essence of the fall season. With minimal materials and straightforward steps, you can craft beautiful, long-lasting decorations that will garner compliments from all who see them.
So, gather your supplies, pick your favorite metallic hues, and get ready to add a touch of glam to your autumn decor. We can’t wait to see your dazzling creations!
Loved this tutorial? Pin it to your favorite fall decor board so you can easily find it later!