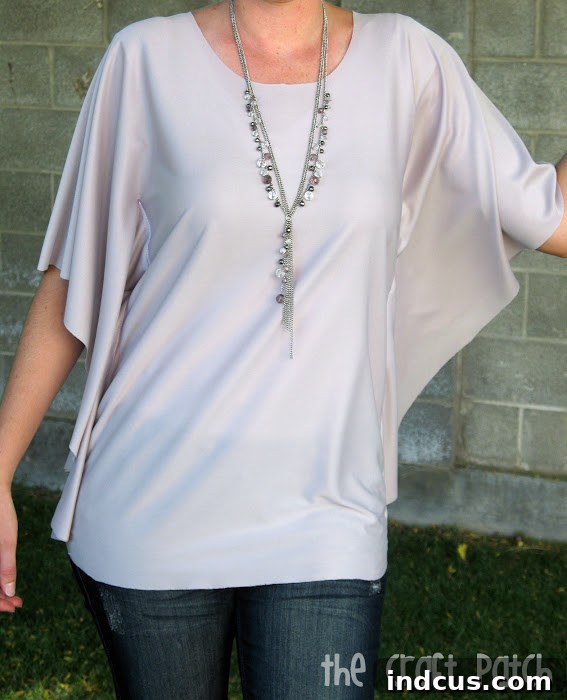
Effortless Elegance: Your Guide to Sewing a Simple Circle Shirt from Knit Fabric
Embark on a creative journey with this comprehensive tutorial to sew a stylish and incredibly comfortable circle shirt from knit fabric. While my initial forays into crafting this seemingly simple garment were fraught with learning curves—from wrestling with slippery sheer fabrics to grappling with a temperamental serger and even discovering the magic of water-soluble stabilizer—the ultimate triumph lies in the straightforward approach detailed here. This guide distills those experiences into an easy, frustration-free method, proving that a chic, custom-made top can be yours in less than an hour. Forget the complexities; embrace the simplicity of sewing with the right materials and techniques, ensuring a rewarding project even for novice sewists.
Why Sew a Circle Shirt? The Ultimate Blend of Comfort and Style
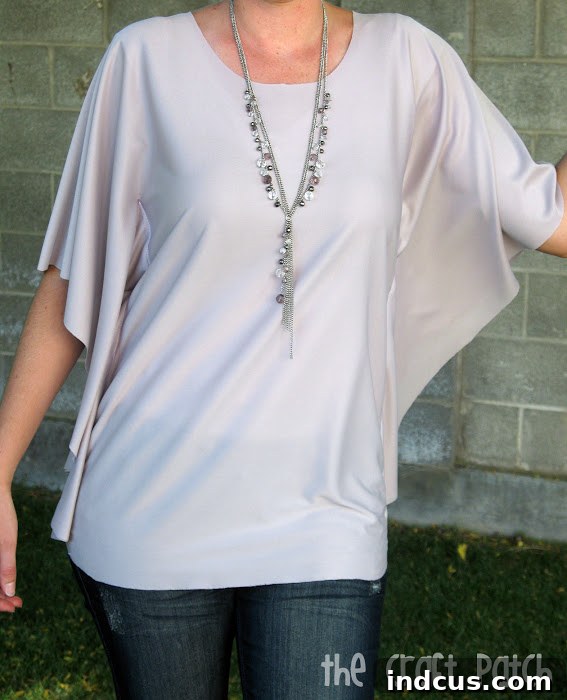
The circle shirt, sometimes known as a “no-pattern top,” is a celebrated wardrobe staple for its unique combination of comfort, versatility, and ease of creation. Its generous, flowing silhouette offers unparalleled comfort, making it perfect for everyday wear, lounging, or even dressing up for a casual outing. The beauty of this design lies in its simplicity: a single piece of fabric expertly cut and minimally stitched transforms into a flattering garment that drapes beautifully on various body types. It’s a fantastic project for beginners looking to build confidence with their sewing machine, offering instant gratification with quick results. Plus, the ability to customize fabric choice, neckline, and fit means you can create a truly unique piece that reflects your personal style.
Choosing Your Perfect Fabric: The Key to a Stress-Free Project
Selecting the correct fabric is paramount to the success and enjoyment of sewing a circle shirt, especially when aiming for a quick and easy outcome. My journey, riddled with early setbacks, taught me this crucial lesson firsthand. While the allure of sheer, delicate fabrics might seem appealing for their flowy nature, they often present significant challenges for beginner sewists, particularly when it comes to cutting and seaming without specialized tools or advanced techniques.
Recommended Fabric: Jersey Knit (or other stable knits)
- Jersey Knit: This is your best friend for a project like this. Jersey knit fabric is incredibly forgiving, boasts excellent drape, and—most importantly for a beginner project—does not fray when cut. This eliminates the need for complex hemming techniques on the body and sleeve edges, saving you time and effort. Its inherent stretch allows for a comfortable, flexible fit without complex pattern adjustments. Look for a medium-weight jersey that isn’t too thin, as thinner knits can still be a bit tricky to handle.
- Other Stable Knits: Interlock knit, Ponte de Roma, or even some double knits can also work wonderfully. The key is to choose a knit fabric with good recovery (it springs back into shape) and minimal curl at the edges. Avoid very thin, slippery knits or those with excessive stretch that might distort easily during cutting and sewing.
Fabric Dimensions:
For an ideal circle shirt, you will need approximately 1 yard of 60-inch wide knit fabric. The wider width is crucial for achieving a desirable length and drape for most adult sizes. While 45-inch wide fabric might seem sufficient, it will likely result in a much shorter top, possibly too short for comfortable wear or the intended aesthetic. If you prefer a longer top or have a larger frame, consider purchasing 1.25 to 1.5 yards of 60-inch wide fabric.
Essential Tools and Materials
Beyond your chosen fabric, gathering the right tools will streamline your sewing process and ensure a professional finish. These are standard items for any sewing enthusiast, making this project accessible with minimal specialized equipment.
- 1 yard 60” wide Jersey Knit Fabric: As discussed, this non-fraying, stretchy fabric is ideal for this simple circle shirt tutorial.
- Matching Thread: Choose a high-quality polyester thread that matches your fabric color. Polyester thread offers durability and a slight stretch, which is beneficial when sewing knit fabrics.
- Fabric Scissors or Rotary Cutter and Mat: Sharp fabric scissors are a must for clean, precise cuts. A rotary cutter with a self-healing mat can be even more effective for cutting knits, as it minimizes fabric distortion.
- Sewing Machine: Any standard home sewing machine capable of a straight stitch and a basic zigzag stitch will suffice. While a serger (overlocker) can create professional-looking seams, it is by no means essential for this project due to the non-fraying nature of the fabric.
- Pins or Fabric Clips: Essential for holding layers of fabric together securely before sewing. Clips are often preferred for knits as they don’t snag or create holes.
- Measuring Tape or Ruler: For accurate measurements and marking.
- Fabric Chalk or Washable Marker: To mark cutting lines, necklines, and seam allowances.
Pre-Sewing Preparation: Setting Up for Success
A little preparation goes a long way in ensuring your sewing project is smooth and enjoyable. Don’t skip these crucial steps, especially when working with knit fabrics for your circle shirt.
- Pre-wash Your Fabric: Always pre-wash and dry your fabric according to its care instructions before cutting. This step is vital to pre-shrink the fabric, preventing any unwanted shrinkage after your garment is completed. Knits, in particular, can be prone to shrinking.
- Iron Your Fabric: Once dry, iron your fabric flat to remove any wrinkles or creases. A smooth, flat surface is essential for accurate cutting, especially for a garment that relies on precise folding.
- Prepare Your Workspace: Clear a large, flat surface for cutting. A clean, spacious area prevents fabric from hanging off the table and distorting while you cut your circle shirt.
- Gather All Tools: Ensure all your materials and tools are readily accessible before you begin.
- Test Your Machine: If you’re new to sewing knits, practice on a scrap piece of your chosen fabric. Test different stitches (straight stitch with a slight stretch, narrow zigzag) and tension settings to find what works best. For knits, a walking foot can be incredibly helpful to feed the fabric evenly.
Step-by-Step Instructions: Crafting Your Simple Circle Shirt
Now that your materials are ready and your workspace is set, let’s dive into the fun part: creating your custom circle shirt. Remember, the beauty of this project lies in its simplicity and adaptability, making it an ideal easy sewing project.
Step 1: Preparing Your Fabric for Cutting
Begin by taking your pre-washed and ironed knit fabric. Carefully fold the fabric in half, aligning the selvage edges (the finished edges of the fabric). Ensure that the fabric is folded smoothly, without any wrinkles or bumps. Then, square up the raw cut edges of the fabric so that all corners form perfect 90-degree angles. This squaring process is crucial for ensuring your shirt hangs evenly and symmetrically. Use your fabric ruler or a large carpenter’s square to check your angles and trim away any uneven portions, creating a neat foundation for your DIY circle top.
Step 2: Shaping the Lower Edge for a Flowing Silhouette
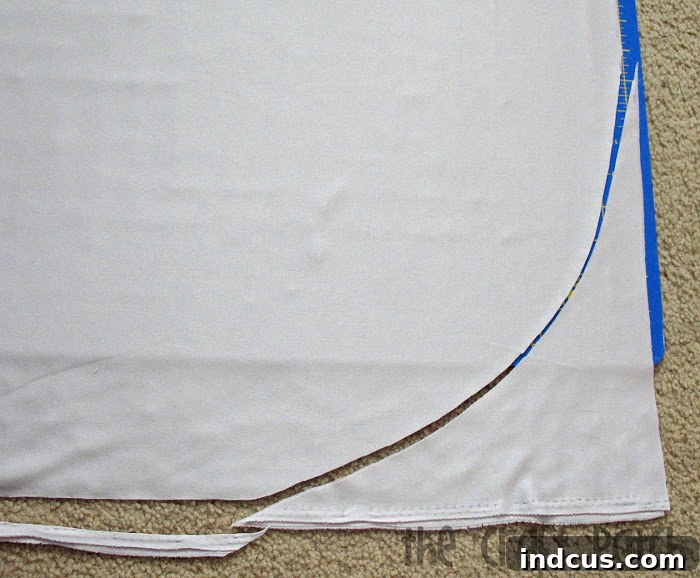
With your fabric still folded in half and squared, you will now create the distinctive rounded bottom edge of your circle shirt. This rounded cut gives the shirt its elegant drape and soft, flowing hemline. To ensure symmetry and a professional finish, round off the two bottom corners of your folded fabric. An effective trick for perfect mirroring is to cut one rounded corner first. Then, take the fabric scrap you just removed and flip it over to the opposite side, aligning it precisely with the raw edges. Use this scrap piece as your template to cut the second corner, guaranteeing both sides are perfectly even. You can freehand this curve or use a large plate or bowl as a guide for a more consistent arc, adding a touch of personalized design to your easy sewing project.
Step 3: Crafting Your Perfect Neckline
The neckline is a key design element that can dramatically alter the look of your circle shirt. This step allows for personal expression and ensures a comfortable fit around your neck. The easiest way to achieve a flattering neckline is to use a favorite tank top or a similar shirt that already has a neckline you love as a guide. Lay your guide shirt on top of your folded fabric, aligning the shoulders and center folds.
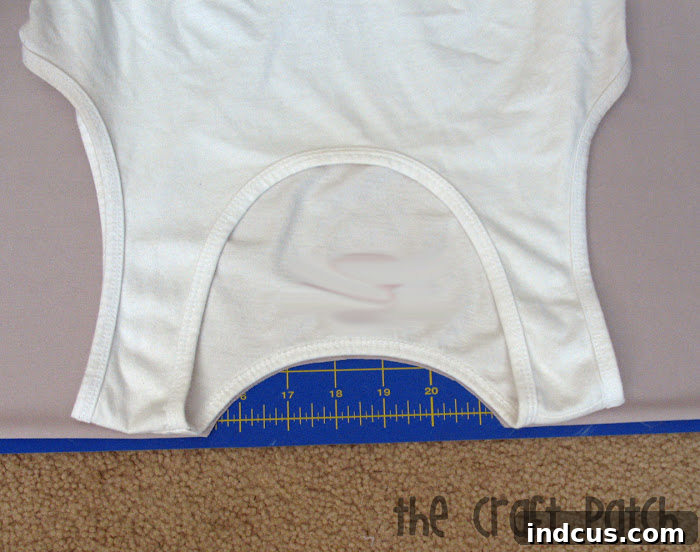
Carefully cut through both thicknesses of your folded fabric along the back edge of your guide shirt’s neckline. This creates the back of your shirt’s neckline. Next, move your guide tank out of the way. To create the front neckline, which is typically lower than the back for comfort and style, you will only cut through the top layer of your folded fabric. Decide how deep you want your front neckline to be and cut a smooth curve from the shoulder seam down to your desired depth.
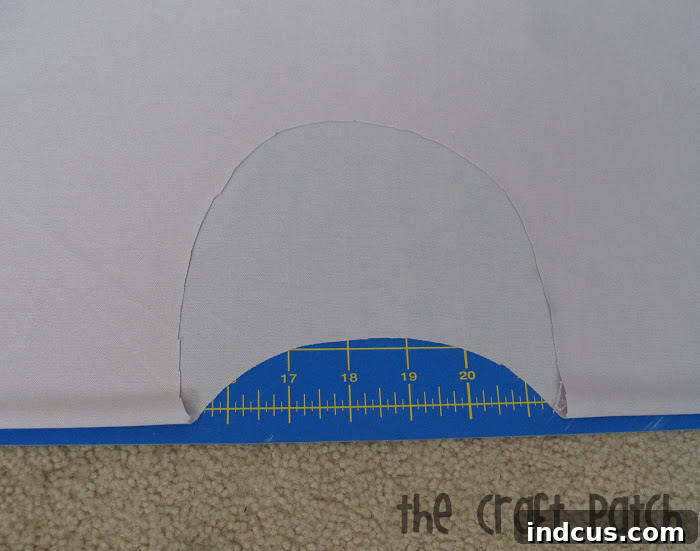
Feel free to get creative here! You could opt for a wide boat neck, a deeper scoop neck, a subtle V-neck, or even a dramatic, gaping off-the-shoulder style. Whatever your preference, ensure your cut is smooth and even. To double-check for perfect symmetry, refold your shirt down the center, aligning the side edges. Carefully trim and even out any uneven curves around the neckline. This simple trick ensures a beautifully balanced finish for your knit fabric shirt.
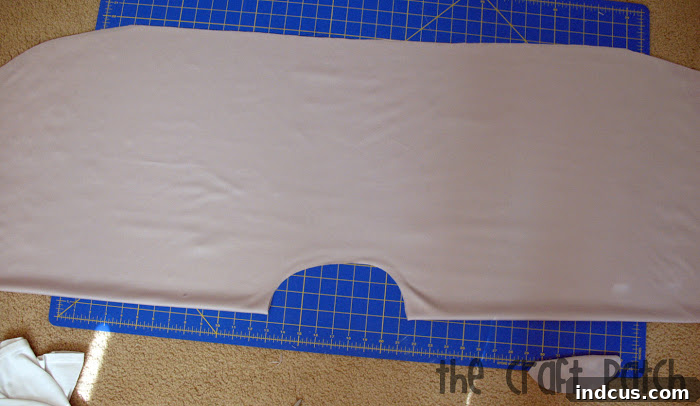
Step 4: Sewing the Side Seams for a Custom Fit
This is where your garment truly takes shape! Unfold your fabric completely so it lays flat as a large rectangle with rounded bottom corners and a cutout neckline. Now, fold the fabric in half again, but this time, fold it lengthwise (hot dog style), matching the shoulder seams (which are now the top edges) and the rounded bottom edges. The front and back necklines should be aligned.
To create the side seams that will fit around your middle, you will sew two lines up the sides of your folded fabric. The beauty of this design is its adaptability. For a truly custom and flattering fit, instead of sewing perfectly straight lines, curve your stitching to follow the natural contours of your body. If your fabric has moderate stretch, you might leave a bit more room for a looser, more relaxed fit. If it’s very stretchy, you can sew a closer curve. Start your stitching approximately 5-7 inches down from the top fold (which forms your shoulder/sleeve line) and gently curve inwards towards your waist, then out towards your hips, before curving back slightly towards the rounded bottom edge. Use pins or fabric clips to hold the layers together along your desired stitching line. Remember to use a stretch stitch, a narrow zigzag stitch (0.5mm width, 2.5mm length), or a walking foot on your sewing machine to prevent the knit fabric from stretching and puckering as you sew. Backstitch at the beginning and end of each seam to secure it.
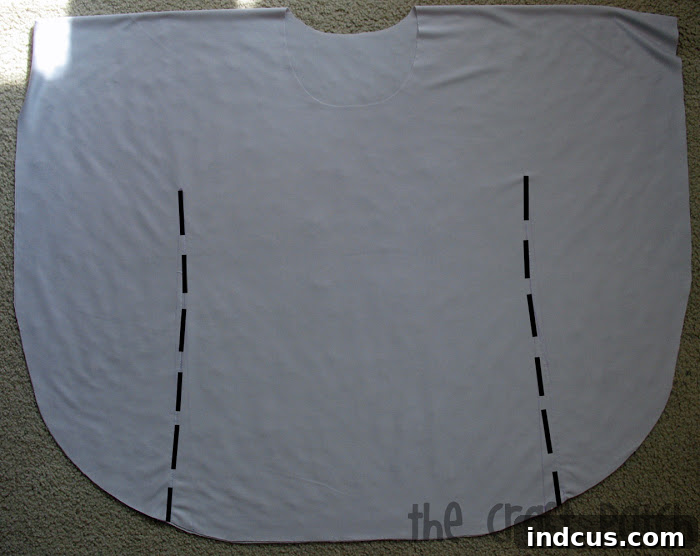
Finishing Touches: Elevating Your Handmade Garment
While knit fabric’s non-fraying nature means hemming isn’t strictly necessary for durability, adding a finished edge elevates the professionalism and aesthetic appeal of your circle shirt. Consider these options for a polished look:
- Neckline Finish: For the neckline, a simple rolled hem with a serger or a narrow zigzag stitch on a sewing machine can provide a clean edge. Alternatively, you can fold the raw edge under by about 1/2 inch and stitch it down with a stretch stitch or a twin needle for a ready-to-wear look. A twin needle creates two parallel lines of stitching on the right side and a zigzag on the wrong side, allowing for stretch.
- Bottom Hem: Since your knit fabric won’t fray, you can choose to leave the rounded bottom edge raw for a minimalist, modern aesthetic. However, if you prefer a more finished feel, you can hem it similarly to the neckline. A single fold hem (folding the edge up by about 1/2 inch and stitching) or a twin needle hem will work beautifully and provide a touch of refinement.
- Armhole Finish: The “armholes” of a circle shirt are typically formed by the unstitched upper portion of the side seams. Because knit fabric won’t fray, these can also be left raw. If you desire a more defined look, you can add a narrow binding or simply fold and stitch a narrow hem.
Styling Your New Circle Shirt: Versatility at Its Best
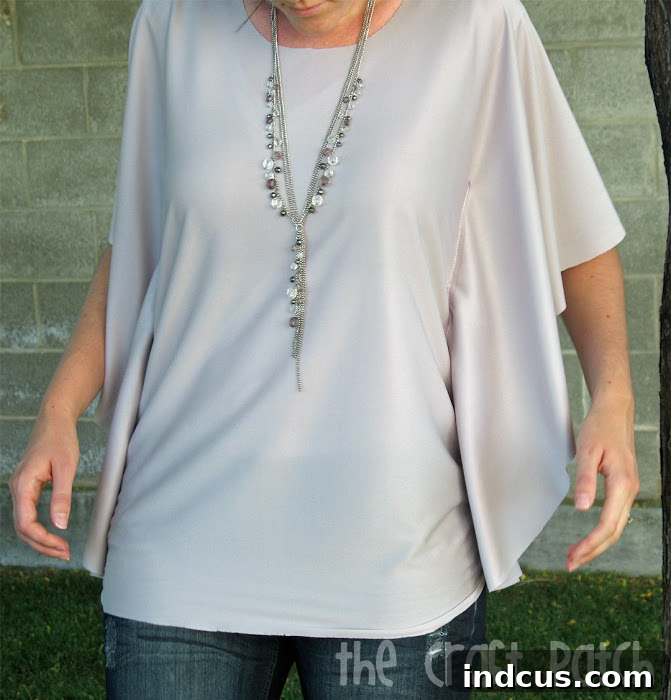
Congratulations, you’ve just sewn a versatile and stylish circle shirt! Now comes the fun part: integrating it into your wardrobe. The beauty of this simple design is its incredible adaptability:
- Casual Chic: Pair your circle shirt with jeans, leggings, or capris for an effortlessly comfortable everyday look. Add some stylish sneakers or sandals for a relaxed vibe.
- Layering Essential: Its loose fit makes it ideal for layering. Wear it over a long-sleeve t-shirt during cooler months, or under a blazer or cardigan for a more put-together ensemble.
- Dress it Up: Tuck it partially into a skirt (pencil or A-line) or wear it over tailored trousers for a smart-casual office look or an evening out. Accessorize with statement jewelry or a chic belt to define your waist.
- Beach Ready: Choose a lightweight, breathable knit fabric for a perfect beach cover-up that’s easy to throw on and take off.
Troubleshooting Common Knit Sewing Issues
Even with the right fabric, sewing with knits can sometimes present minor challenges. Here are a few quick tips to help you if you encounter any bumps while making your circle shirt:
- Wavy Seams: This usually happens when the fabric is stretched while sewing. Use a walking foot, adjust your presser foot pressure, or use a differential feed if your machine has one. Avoid pulling the fabric through the machine.
- Skipped Stitches: Knits require a ballpoint or stretch needle. These needles have a rounded tip that pushes fabric fibers aside instead of piercing them, preventing skipped stitches and fabric damage. Ensure your needle is new and correctly inserted.
- Puckering: If your seams are puckering, your tension might be too tight, or your stitch length too short. Experiment with slightly looser tension and a slightly longer stitch length.
- Fabric Slipping: For very slippery knits (which we tried to avoid, but if you’re experimenting), pins or fabric clips every inch or two can help immensely. Sometimes a thin layer of tissue paper underneath the fabric can help it feed more smoothly, and you can tear it away afterward.
Conclusion: Your Quick Path to a Handmade Wardrobe Staple
What started as a journey of frustration and discovery has culminated in this incredibly straightforward and rewarding tutorial. The lesson learned is clear: the right fabric makes all the difference. By opting for a stable jersey knit, you bypass the common pitfalls associated with more challenging materials and can create a beautiful, custom-fitted circle shirt in an astonishingly short amount of time. This project isn’t just about sewing a shirt; it’s about empowering you to create, to personalize, and to enjoy the satisfaction of wearing something made by your own hands. So, gather your materials, set up your machine, and prepare to be amazed at how quickly you can add this comfortable, stylish, and utterly unique piece to your wardrobe. Happy sewing!