Transform Your Outdoor Space: Easy DIY Polka Dot Hanging Planters from Dollar Tree
Are you looking to inject some fresh charm into your outdoor living areas without breaking the bank? Today, we’re diving into a delightful, budget-friendly DIY project that proves a little creativity can go a long way. I’m thrilled to share how I took ordinary, plain hanging planters from Dollar Tree and transformed them into eye-catching polka dot masterpieces, perfect for adding a touch of whimsical elegance to any balcony, porch, or garden nook. This simple craft is not only incredibly easy but also offers a fantastic way to personalize your space, making it uniquely yours with minimal effort and cost. Get ready to turn basic into beautiful!
The Inspiration: A Balcony Awaiting Transformation
Our new home boasts a charming balcony just off the master bedroom, a wonderful feature situated on the front of the house. While it offered incredible potential for outdoor relaxation and aesthetic appeal, it was a blank canvas, waiting for a personal touch. I envisioned it as a vibrant extension of our living space, a place where morning coffee could be enjoyed amidst blooming flowers and greenery. You can see its humble beginnings in the fall, a stark yet inviting space ready for some character.
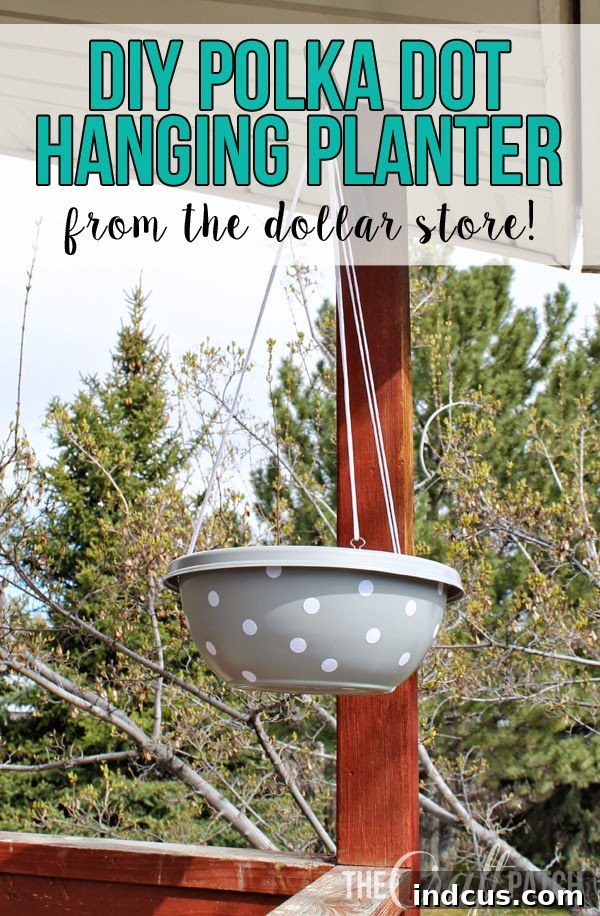
One of the existing elements that immediately sparked inspiration was the pair of sturdy posts on the balcony, each conveniently fitted with hooks specifically designed for hanging planters. This detail made the decision easy: hanging planters were a must-have for this space. On a recent trip to Dollar Tree, I stumbled upon plain gray hanging planters that were the perfect size and shape. Given their incredibly affordable price point, I scooped up two, knowing they would be the ideal candidates for a creative transformation that would bring life and color to our balcony.
Materials You’ll Need for Your Planter Makeover
This DIY project is remarkably straightforward, requiring only a few key items. The beauty lies in how accessible and affordable these materials are, ensuring anyone can recreate this look. Here’s what you’ll need:
- Plain Hanging Planters: I found mine at Dollar Tree, but any plain, inexpensive planter will work. Look for a smooth surface for best sticker adhesion.
- Sticker Paper: This is your primary decorating tool. I used white sticker paper to create a striking contrast against the gray planters, but you could choose any color to match your decor. Vinyl sticker paper is often more durable for outdoor use.
- A Cutting Machine (e.g., Silhouette, Cricut): While a cutting machine makes creating perfect circles (or any shape!) incredibly easy and efficient, it’s not strictly essential.
- Alternatives for Cutting Circles:
- Craft Punches: Various sizes of circle craft punches can yield similar results.
- Scissors & Templates: Simply trace circles onto the sticker paper using stencils or everyday items like coins, bottle caps, or cups, then carefully cut them out.
- Cleaning Supplies: A damp cloth and mild soap to clean your planters.
- Optional: Clear Sealant Spray: For added durability and weather resistance, especially if your planters will be exposed to the elements year-round.
Step-by-Step Guide: Crafting Your Polka Dot Planters
Transforming these plain planters into charming decor pieces is a quick and satisfying process. Follow these simple steps to create your own:
Step 1: Prepare Your Planters
Before you begin decorating, ensure your planters are clean and dry. Dust, dirt, or residues can prevent the sticker paper from adhering properly. Wipe them down thoroughly with a damp cloth, and if necessary, use a little mild soap. Allow them to dry completely before moving on to the next step. A clean surface is crucial for a smooth and lasting finish.
Step 2: Design and Cut Your Polka Dots
This is where your chosen method for creating circles comes into play. If you’re using a cutting machine like a Silhouette, load your sticker paper and design a sheet full of circles of varying sizes in your software. I opted for a mix of sizes to give a more dynamic and organic feel to the polka dot pattern. Cut them out, and then carefully weed away the excess sticker paper, leaving just your dots on the backing sheet.
If you’re hand-cutting, use your craft punches or templates to create your circles. It might take a little longer, but the result will be just as charming. Create a generous amount of dots, as you’ll want plenty to cover the surface of your planters.
Step 3: Apply the Dots to Your Planter
Now for the fun part! Begin peeling your polka dots from their backing and applying them directly to the surface of your planter. I started by randomly placing larger dots and then filled in the gaps with smaller ones, ensuring a balanced and pleasing distribution. Don’t be afraid to overlap slightly or let some dots extend over the edges, you can trim them later for a seamless look.
Pay special attention to both the sides and, crucially, the bottom of the planter. Since these are hanging planters, the bottom will be prominently visible from ground level or from below the balcony. Covering the bottom ensures a cohesive and finished look from all angles. Press each dot firmly to remove any air bubbles and ensure strong adhesion. Take your time to achieve the desired density and pattern.
Step 4: Optional – Seal for Durability
If your planters will be exposed to rain, sun, or frequent watering, a clear sealant spray can significantly extend the life of your polka dot design. Once all your dots are applied and firmly pressed down, take your planter to a well-ventilated area and apply a light, even coat of clear acrylic sealant. This will protect the sticker paper from peeling, fading, or water damage, ensuring your beautiful design lasts through the seasons.
The Charm of Polka Dots: Why This Design Works
Polka dots are a timeless pattern that effortlessly adds a touch of playfulness and sophistication to any item. On these otherwise plain gray planters, the white dots create a striking contrast, instantly elevating their visual appeal. The random arrangement of different-sized circles gives them a whimsical, handcrafted feel that is both charming and inviting. It’s a simple graphic that communicates cheerfulness and style, making these planters a delightful focal point in any outdoor setting. This design choice proves that sometimes, the simplest patterns can make the biggest impact, turning an ordinary object into something truly special.
Beyond Polka Dots: Customization Ideas for Your Planters
While polka dots offer a classic and adorable look, the beauty of using sticker paper is the endless customization possibilities. Don’t limit yourself to just circles! Here are a few ideas to spark your imagination:
- Stripes or Chevron: Cut long strips or zig-zag patterns for a more modern or geometric feel.
- Monograms or Initials: Personalize your planters with your family initial or a meaningful symbol.
- Abstract Shapes: Cut organic, free-form shapes for an artistic, contemporary vibe.
- Themed Decals: Think leaves, flowers, or even small animal silhouettes for a specific garden theme.
- Color Play: Experiment with different colors of sticker paper. Imagine bright yellow dots on a navy planter, or metallic gold on a black one!
- Layering: Use multiple colors or layers of different shapes for a more intricate design.
This method allows you to match your planters perfectly to your existing outdoor decor or create a completely new aesthetic with minimal investment.
The Big Reveal: Before and After Transformation
It’s truly amazing what a little creativity and some sticker paper can accomplish! The small change of adding polka dots completely transformed these dollar store planters into something truly adorable and unique. What started as dull, functional containers are now vibrant, personality-filled pieces of decor ready to enhance our balcony. This before-and-after contrast perfectly illustrates how easy it is to elevate everyday items into statement pieces, proving that high style doesn’t have to come with a high price tag. Our balcony is now poised to become a lively and inviting haven, all thanks to this simple DIY.
Awaiting Spring: Final Touches and Future Plans
While the planters are now perfectly adorned and ready for their starring role, Mother Nature has reminded us that spring isn’t quite ready to fully commit here yet! After experiencing a huge snowstorm yesterday and the day before, I’ve decided it’s best to wait a little longer before planting any delicate flowers. The last thing I want is for them to freeze! Can someone please send a memo to the weather gods that it is, indeed, officially spring? Once the risk of frost has passed, I envision these planters overflowing with colorful, trailing annuals, perhaps petunias, ivy, or verbena, adding another layer of beauty and life to our newly decorated balcony space.
Share Your Dollar Store Finds!
This project is a fantastic reminder that inspiration and incredible finds can come from the most unexpected places, like your local dollar store. I hope this easy DIY encourages you to look at ordinary items with a fresh, creative perspective. What are your favorite budget-friendly decor projects or amazing dollar store finds lately? Share your ideas and successes in the comments below – I’d love to hear how you’re spicing up your home for less!