DIY Extra Long Towel Bar: A Brilliant & Budget-Friendly Bathroom Upgrade
Hello fellow home improvers! If you’ve been following my home projects, you’ll know that alongside tackling the pantry, I’ve been diligently working on a complete refresh for our upstairs bathroom. We’re in the final stretch now, with just a few finishing touches remaining, and I’m thrilled to share one of the most impactful — yet incredibly simple — transformations: creating an extra-long towel bar. This project solved a common household dilemma and proved that effective home solutions don’t have to break the bank. Let me show you the “before” and explain how I achieved this fantastic upgrade.
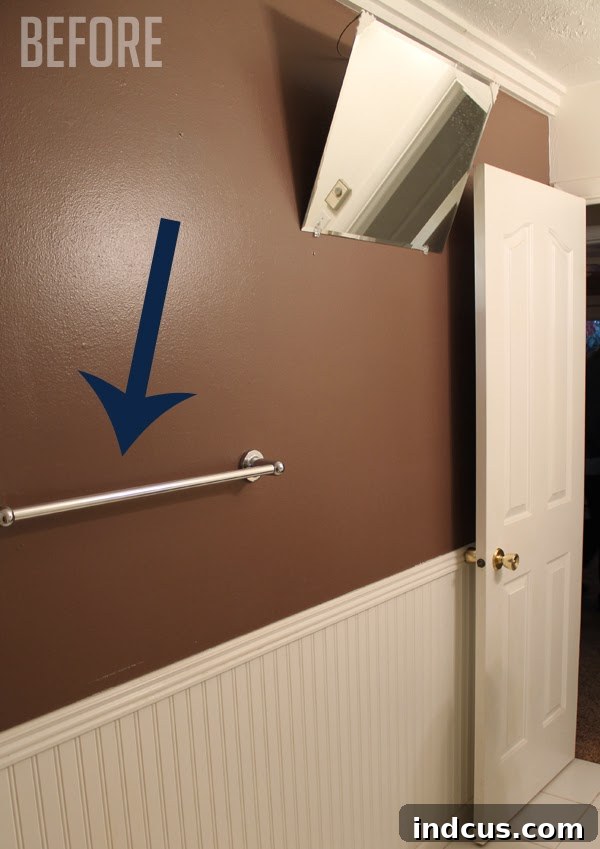
As you can see from the image above, our old towel rod was simply inadequate. In a busy household, especially one needing to accommodate three towels daily, the existing setup was a source of constant frustration. We could barely squeeze two towels onto it, leaving them cramped, perpetually damp, and certainly not contributing to a tidy bathroom aesthetic. This common problem often leads to towels not drying properly, which can contribute to mildew and an overall uninviting bathroom environment. It was clear: a longer, more functional solution was desperately needed.
The Unexpected Hero: Electrical Conduit for DIY Projects
Finding the right solution often involves thinking outside the box, and in this case, the answer was literally hiding in plain sight – or rather, in my garage! I happened to have some leftover electrical conduit from a previous DIY curtain rod project. On a whim, I tested it with the existing towel bar mounts, and to my absolute delight, it was a perfect fit! This discovery instantly opened up a world of possibilities for an affordable, durable, and custom-length towel bar.
Electrical conduit, primarily designed to protect electrical wiring, is an incredibly versatile material for various home improvement and craft projects. It’s surprisingly robust, readily available, and best of all, incredibly inexpensive. You can find it at any major home improvement store like Home Depot or Lowe’s, typically in the electrical section. While it might take a moment to spot amidst the wires and junction boxes, don’t hesitate to ask a store associate for assistance; they’ll gladly point you in the right direction. The last time I purchased a 10-foot length, it cost me a mere $2 – an unbeatable price for such a long and sturdy piece of material!
When selecting your conduit, consider the diameter. Different sizes are available, and the key is to find one that either fits snugly into your existing towel bar mounts or allows you to purchase new, compatible mounts. Measuring your current setup or the interior diameter of potential new mounts will ensure a seamless integration. The affordability and durability of electrical conduit make it an ideal choice for anyone looking to create custom lengths for rods, rails, or even decorative elements without a significant financial outlay.
Transforming Utility into Style: The Power of Spray Paint
The secret to making an industrial material like electrical conduit blend seamlessly into your bathroom decor lies in a simple yet effective technique: spray painting. To elevate the conduit from its utilitarian appearance to a sophisticated fixture, I opted for a “brushed nickel” spray paint. This finish offers a modern, clean look that complements a wide range of bathroom styles and fixtures, making it a popular choice for contemporary updates.
The process itself is straightforward but requires careful attention to detail for a professional finish:
- Preparation is Key: Before painting, ensure the conduit and any existing mounts are thoroughly cleaned. Remove any dust, grime, or oils with soap and water, then dry completely. For optimal adhesion, a light sanding with fine-grit sandpaper (around 220-grit) can also be beneficial, followed by wiping down with a tack cloth.
- Choose the Right Environment: Always spray paint in a well-ventilated area, preferably outdoors or in a garage with open doors. Lay down a drop cloth or old newspaper to protect surrounding surfaces from overspray.
- Apply Even Coats: Hold the spray can about 8-12 inches from the surface and apply paint in light, even strokes. It’s crucial to apply multiple thin coats rather than one thick coat, which can lead to drips and an uneven finish. Allow adequate drying time (as per the manufacturer’s instructions) between each coat. Patience here will yield significantly better results.
- Consider a Primer: For some materials or if you’re uncertain about paint adhesion, a high-quality primer formulated for metal can provide an excellent base, ensuring your chosen finish adheres beautifully and lasts longer.
- The Brushed Nickel Effect: Many spray paints are designed to mimic the appearance of brushed nickel, offering a subtle sheen and textured look. Experiment with a test piece if you’re unsure about the finish.
While I was meticulously painting the conduit rod and its mounts, I seized the opportunity to extend this budget-friendly makeover to other visible bathroom fixtures. This “while you’re at it” approach ensures a cohesive and polished look throughout the space. I also gave the toilet paper holder and the hand towel ring the same brushed nickel treatment. (I’ll delve into those specific mini-makeovers in a future post, but rest assured, they look fantastic!) To provide extra durability and protection against the high moisture and daily wear and tear of a bathroom environment, I applied a clear protective topcoat to all the newly painted items. This clear coat acts as a shield, preventing chips, scratches, and water damage, ensuring your DIY fixtures maintain their beautiful finish for years to come.
The Grand Reveal: Ample Space and Elegant Functionality
The transformation is truly remarkable. Gone are the days of struggling to fit towels, of damp, crumpled fabric that never quite dried. With the installation of our new, custom-made jumbo rod, there is now ample space for all three towels to hang freely, allowing for proper airflow and efficient drying. This seemingly small change has had a profound impact on the daily functionality and overall tidiness of our bathroom. It’s incredibly satisfying to see clean, dry towels neatly arranged, contributing to a sense of order and calm.
I am absolutely thrilled with how this DIY extra-long towel bar turned out. It’s not just about aesthetics; it’s about practicality and enhancing our daily living. No more cramped towels, no more mildewy smells, just a beautifully organized and functional space. This project perfectly encapsulates the joy of DIY: identifying a problem, finding an innovative and affordable solution, and then executing it with a touch of personal style. The result is a piece that looks custom-made and high-end, but was achieved with minimal cost and effort.
Beyond the Bathroom: Unleashing the Versatility of Conduit Rods
Once this project was complete and I admired my new, perfectly organized bathroom, my mind immediately began to spin with all the other incredible applications for this simple electrical conduit rod. Its affordability, durability, and customizability make it a true chameleon for various home organization and decor needs. Here are just a few ideas to spark your own creativity:
1. The Ultimate Laundry Room Drying Rack
Imagine a full 10-foot length of this conduit installed across your laundry room. It would be absolutely fantastic for hanging laundry to air dry. Delicates, sweaters, or items that need to be line-dried can hang freely, preventing shrinkage and extending their lifespan. You could also use it to hang clothes straight out of the dryer to minimize wrinkles, reducing ironing time. Add a few S-hooks, and it becomes a versatile spot for drying small items like socks or even hanging cleaning supplies.
2. Creative Closet Organization
In a closet, these rods can be installed at varying heights to create multi-level storage. Use them to hang scarves, belts, or ties with specialized hangers. In a child’s closet, a lower rod makes clothes more accessible, fostering independence. You could even use shorter sections inside wardrobe doors for accessories.
3. Garage and Workshop Storage Solutions
The garage is another prime location for conduit rods. Attach them to the wall with sturdy brackets and use “S” hooks or specialized garage organizers to hang tools, gardening equipment, extension cords, or even sports gear. Their strength makes them ideal for holding heavier items, helping to declutter your workspace and keep everything within easy reach.
4. Playroom or Kids’ Room Ballet Bar
For a little dancer, a conduit rod makes an excellent makeshift ballet bar. Mounted at the appropriate height, it provides a stable support for practice, encouraging healthy activity and imaginative play. Alternatively, in a general play area, it can serve as a display for hanging artwork, dress-up clothes, or even a whimsical canopy support over a reading nook.
5. Craft Room or Studio Organization
Crafters, rejoice! Conduit rods are perfect for organizing supplies. Use them to hold rolls of fabric, wrapping paper, ribbon spools, or even tubes of art paper. With hooks, they can store scissors, rulers, and other frequently used tools, keeping your creative space tidy and inspiring.
6. Kitchen Pot Rack or Utensil Holder
In the kitchen, a well-placed conduit rod with S-hooks can transform into an industrial-chic pot rack, freeing up valuable cabinet space. It’s also ideal for hanging frequently used utensils, mugs, or even small herb planters, adding both functionality and a touch of farmhouse or modern aesthetic.
7. Entryway Coat and Accessory Rack
Create a welcoming and organized entryway by installing a conduit rod for coats, hats, and umbrellas. Paired with some decorative hooks, it offers a stylish and practical solution for managing everyday essentials as you come and go.
Essential DIY Tips for Success
To ensure your conduit rod project, whether it’s a towel bar or a creative storage solution, is a resounding success, keep these practical tips in mind:
- Accurate Measurement: Always measure twice, cut once! Determine the exact length you need for your rod, considering the space between mounts or the desired span for your chosen application.
- Cutting the Conduit: Electrical conduit can be cut with a hacksaw or, for a cleaner and easier cut, a specialized pipe cutter. A pipe cutter will give you a smooth, burr-free edge. Always wear safety glasses when cutting.
- Secure Mounting: Ensure your mounts are securely attached to wall studs whenever possible. If mounting into drywall, use appropriate drywall anchors (toggle bolts or self-drilling anchors) rated for the weight you intend to hang.
- Ventilation for Painting: As mentioned, proper ventilation is critical during spray painting. Work in a well-aired space to avoid inhaling fumes.
- Patience with Drying: Resist the urge to handle your newly painted items before they are completely dry, including the clear coat. Rushing this step can lead to smudges, fingerprints, or a less durable finish.
- Maintenance: Once installed, clean your painted conduit rod with a soft, damp cloth and mild soap. Avoid abrasive cleaners or scrubbing pads that could scratch the paint finish.
Embrace Your Inner DIYer!
This simple DIY extra-long towel bar project demonstrates that with a little ingenuity, common materials, and a splash of paint, you can achieve significant upgrades in your home. It’s an incredibly satisfying feeling to transform an everyday problem into a stylish and highly functional solution, all while staying well within your budget. I encourage you to look around your home with fresh eyes – what everyday items could be repurposed? What frustrations could be solved with a simple, creative project like this one?
So, why not give it a try? Whether it’s for your bathroom, laundry room, garage, or any other space needing a touch of organization and style, an electrical conduit rod might just be the versatile, budget-friendly hero you’ve been looking for. Happy crafting, and I can’t wait to hear about your own creative uses for this fantastic material!