
Spooktacular Halloween Treats: Easy & Fun Recipes for Your Party
Halloween is a time for costumes, carved pumpkins, and, most importantly, deliciously spooky treats! Whether you’re hosting a ghoulish gathering or just looking for some fun activities with the kids, these easy and creative Halloween recipes are sure to bring smiles and screams (of delight!). We’ve gathered some of our favorite, tried-and-true ideas that are simple to make but deliver maximum impact, transforming ordinary ingredients into extraordinary Halloween delights. From savory to sweet, these recipes will elevate your Halloween feast and create lasting memories. Get ready to conjure up some culinary magic and make this Halloween truly unforgettable with these crowd-pleasing, family-friendly dishes!
Dive into our collection of fantastic Halloween food ideas, guaranteed to be the stars of any spooky spread. We’ll show you how to craft a savory Stuffed Pizza Snake, create eerie Monster Mouths, whip up delightfully gross Jello Worms, and assemble a decadent Graveyard Pudding. Each recipe is designed to be straightforward, making them perfect for cooks of all skill levels, and especially enjoyable for getting children involved in the kitchen. Let the Halloween cooking adventure begin!
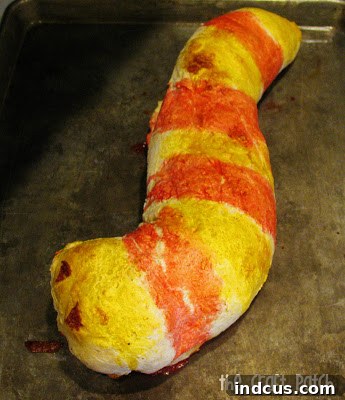
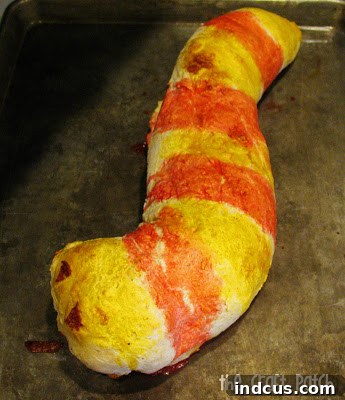
The Spooky Stuffed Pizza Snake: A Savory Centerpiece
Forget ordinary pizza slices! This Stuffed Pizza Snake is an absolute showstopper, perfect for a Halloween dinner or a party appetizer. It’s a delicious, savory treat that combines the irresistible flavors of pizza with a fun, serpentine presentation that’s sure to impress both kids and adults. Plus, it’s incredibly versatile – you can customize the filling with your favorite pizza toppings. This recipe uses readily available frozen bread dough, making it surprisingly simple to create a visually striking and utterly delicious centerpiece for your Halloween feast.
Ingredients for Your Pizza Snake Filling:
- 1 package (approx. 7-8 oz) sliced pepperoni, finely chopped
- 1 teaspoon dried parsley flakes
- 2 cups shredded mozzarella cheese (or a blend of Italian cheeses)
- 1 garlic clove, pressed or minced
- 1 teaspoon Italian dressing powder (for an extra savory kick)
- 1 loaf (1 lb) frozen bread dough, thawed according to package directions, or your favorite homemade bread dough recipe
- Optional: Sliced black olives for eyes
- Optional: A small piece of red bell pepper for the tongue
- Optional: Egg white mixed with a few drops of food coloring (red, green, or black work well) for decorative stripes
Step-by-Step Instructions to Create Your Pizza Snake:
- Prepare the Filling: In a medium-sized bowl, combine the chopped pepperoni, dried parsley, shredded mozzarella cheese, pressed garlic clove, and Italian dressing powder. Mix thoroughly until all ingredients are well distributed. This flavorful mixture will be the heart of your pizza snake.
- Thaw and Roll the Dough: If using frozen bread dough, ensure it’s fully thawed and at room temperature, making it pliable and easy to work with. On a lightly floured surface, roll the dough out into a large rectangle. Aim for a rectangle that is roughly 12×18 inches or large enough to accommodate your filling without being too thin. The exact dimensions aren’t critical, but ensure it’s even in thickness.
- Add the Filling: Carefully spread the prepared pizza filling mixture down the center third of your rolled-out dough rectangle. Leave a good margin on both sides (about 3-4 inches) and at the ends, as these will be used for sealing. Distribute the filling evenly, but avoid overfilling to prevent bursting during baking.
- Roll and Seal the Snake: Gently bring one long edge of the dough over the filling and meet it with the other long edge. Pinch the edges together firmly to create a tight seam, enclosing the filling completely. This forms a long, cylindrical shape. Then, pinch the ends of the cylinder firmly to seal the filling in securely. It’s crucial that the filling is completely encased to prevent it from oozing out during baking.
- Shape Your Serpent: Carefully transfer your filled dough cylinder to a baking sheet lined with parchment paper. Begin to gently shape it into a snake-like form. You can make it coiled, wavy, or simply curved. Create a distinct head shape at one end, slightly larger than the body.
- Decorate for Spookiness (Optional but Recommended!): This is where the snake truly comes to life!
- Eyes: Press two black olive slices onto the “head” for realistic, beady eyes.
- Tongue: Cut a small, forked tongue shape from a piece of red bell pepper and insert it slightly into the front of the snake’s “mouth” area.
- Stripes: For added visual appeal, mix a few drops of red, green, or black food coloring into a small amount of egg white. Using a pastry brush, gently brush stripes or patterns onto the snake’s body. This will create a glossy finish and enhance the spooky look once baked.
- Bake to Golden Perfection: Preheat your oven to 325 degrees Fahrenheit (160 degrees Celsius). Bake the Stuffed Pizza Snake for approximately 20-30 minutes, or until the dough is golden brown and the filling is heated through and bubbly. Baking times may vary depending on your oven and the thickness of your dough, so keep an eye on it.
- Serve Warm: Once golden brown, remove from the oven and let it cool for a few minutes before slicing and serving. It’s fantastic served warm with a side of marinara sauce for dipping.
Tips & Variations for Your Pizza Snake:
- Customizable Filling: Feel free to swap pepperoni for cooked sausage, diced ham, chopped mushrooms, or spinach. Ensure any vegetable fillings are well-drained to prevent excess moisture.
- Cheese Options: A mix of mozzarella, provolone, and parmesan can add extra depth of flavor.
- Dough Alternatives: If you’re short on time, pre-made pizza dough from the refrigerated section of your grocery store works just as well.
- Serving Suggestion: This pizza snake is excellent as a main course for a Halloween dinner or cut into smaller slices as an appetizer for a party.
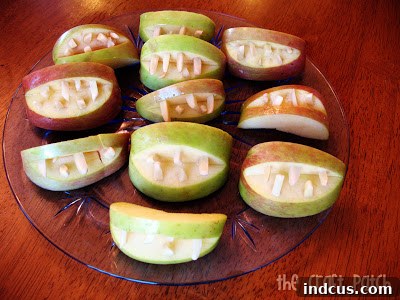
Creepy & Cute Monster Mouths: A Healthy Halloween Snack
Looking for a quick, healthy, and incredibly fun Halloween snack that even the pickiest eaters will love? These Monster Mouths are a perennial favorite! They require minimal ingredients and effort, making them perfect for last-minute party contributions or a simple after-school treat during the spooky season. Combining crisp apple slices with crunchy almond “teeth,” these monster mouths are as delightful to look at as they are to eat, offering a refreshing contrast to the usual sugary Halloween fare.
Ingredients for Monster Mouths:
- 3 medium-sized apples (red or green varieties work best for contrast)
- Lemon juice (freshly squeezed or bottled)
- Slivered almonds (for the teeth)
- Optional: Peanut butter, cream cheese, or sunbutter for “glue”
Simple Steps to Create Monster Mouths:
- Prepare the Apples: Wash the apples thoroughly. Carefully slice each apple into quarters. Once quartered, use a paring knife or a melon baller to remove the core and any seeds from each quarter.
- Carve the Mouth: Take each apple quarter and, using a small, sharp knife, carefully make a slit along the outside curve of the apple, creating a “mouth” opening. You want to cut deep enough to create a cavity but not so deep that you cut through the apple entirely. This will be where the “teeth” are inserted.
- Prevent Browning: To keep your monster mouths looking fresh and appealing, immediately dip the cut apple pieces into lemon juice. The acidity in the lemon juice will prevent the apples from browning. You can either brush the lemon juice on or quickly dip each piece.
- Add the Spooky Teeth: Now for the fun part! Gently poke slivered almonds into the cut slit of each apple piece to resemble monster teeth. You can arrange them in a jagged, uneven fashion for a truly monstrous look. For extra stability, especially if making these ahead of time, you can spread a thin layer of peanut butter, cream cheese, or sunbutter (for nut allergies) inside the “mouth” before inserting the almonds; this acts as a delicious adhesive.
- Serve Immediately: Arrange your finished Monster Mouths on a platter. They are best served fresh and chilled.
Tips & Creative Variations for Monster Mouths:
- Fruit Choices: While apples are traditional, you could also try pears for a different texture.
- Tooth Alternatives: If almonds are an issue due to allergies, small pretzel sticks, sunflower seeds, or even mini marshmallows cut into points can work as creative “teeth.”
- Gummy Tongues: Add a small piece of red fruit leather or a cut gummy worm peeking out of the mouth for an extra grotesque touch.
- Eye-Catching Presentation: Arrange them on a dark platter or serve them alongside other colorful fruit for a vibrant display.
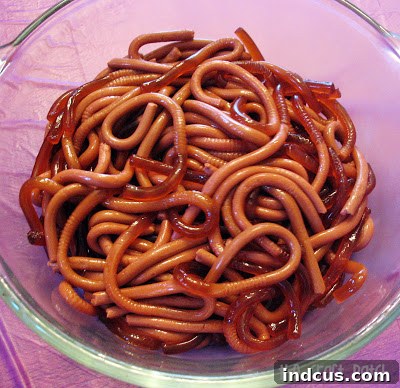
Disgustingly Delicious Jello Worms: The Ultimate Gross-Out Treat
Prepare for squeals and giggles! These Jello Worms are guaranteed to be the “hit of the night” at any Halloween party. While they do require a little patience and a specific technique, the effort is undeniably worth it for the incredibly realistic and delightfully squiggly results. The combination of fruity jello, creamy texture from whipping cream, and a touch of green food coloring creates worms that look just like they’ve been pulled from the earth – a truly authentic gross-out experience that tastes surprisingly good!
Ingredients for Spooky Jello Worms:
- 1 package (3 oz) strawberry Jello (or any red-colored Jello for realistic worm hues)
- 3/4 ounce unflavored gelatin (equivalent to 3 envelopes, typically 0.25 oz each)
- 3 cups boiling water
- 3/4 cup heavy whipping cream
- Green food coloring, approximately 10 drops (adjust for desired “earthy” tone)
- 100+ plastic straws with the bendy necks (essential for shaping)
Detailed Instructions for Crafting Your Jello Worms:
- Prepare the Gelatin Mixture: In a large mixing bowl, combine the flavored strawberry Jello and the unflavored gelatin. Pour 3 cups of boiling water over the gelatin mixture. Stir continuously until both types of gelatin are completely dissolved and there are no granules remaining.
- Cool the Mixture: Allow the gelatin mixture to cool down significantly for about 15-20 minutes. It should still be liquid but not scalding hot. This cooling step is important to ensure the cream doesn’t curdle when added.
- Set Up Your Straw Container: While the gelatin cools, prepare your straw container. You’ll need a tall container with straight sides that is as tall or taller than your straws. A large measuring cup, a tall plastic pitcher, or even a narrow vase can work. The goal is to keep the straws standing upright and packed tightly together.
- Arrange the Straws: Take your plastic straws and smooth out any bendy parts so they are straight. Place them tightly packed into your chosen container, ensuring the bottoms of the straws are flush with the bottom of the container. The tighter they are packed, the more uniform your worms will be. If they’re not staying together well, a rubber band around the tops of the bundled straws can help.
- Add Cream and Color: Once the gelatin mixture has cooled, stir in the 3/4 cup of heavy whipping cream. Then, add approximately 10 drops of green food coloring. Stir well until the color is uniform and achieves a murky, earthy, worm-like hue. You can adjust the amount of food coloring to get your preferred shade of creepy.
- Fill the Straws: Carefully begin pouring the cooled Jello mixture into the tops of the bundled straws. Pour slowly to ensure the mixture fills each straw completely without overflowing too much. The tight packing of the straws should help hold the liquid in. Fill them as full as possible.
- Chill for Setting: Once all the straws are filled, carefully transfer the container with the straws to the refrigerator. Let the Jello cool and set for at least 8 hours, or preferably overnight. This extended chilling time is crucial for the worms to firm up properly for easy removal.
- Remove the Jello Worms (The Tricky Part!): This step requires a bit of patience, but it’s where the magic happens!
- Warm Water Rinse: Gently run the entire bundle of straws under warm tap water for about 10-15 seconds. This slight warming helps loosen the Jello from the straw walls.
- Individual Straw Removal: Take one straw at a time. Hold one end of the straw firmly between your fingers.
- Squeeze Them Out: With your other hand, start squeezing the Jello worm out from the bottom end of the straw, working your way up. It may take a little pressure and wiggling. This can be tiring for your hands!
- Pliers Trick: As noted, a pair of pliers can be incredibly helpful for holding the end of the straw firmly, saving your fingers from fatigue.
- Team Effort: Enlisting a helper can make this process much faster and easier. One person can run the straws under warm water, and the other can squeeze out the worms onto a sheet pan lined with wax paper or parchment paper.
- Final Chill: After all the worms have been extracted from the straws, chill them again on the wax paper-lined sheet pan until serving time. This will ensure they are firm and perfectly wiggly for display.
Presentation & Serving Suggestions for Jello Worms:
- “Dirt” Pudding Bed: Serve your Jello worms on a bed of crushed Oreo cookies (without the cream filling) to mimic dirt, creating a truly authentic “worms in dirt” effect.
- Spooky Garnish: Add a few candy rocks or gummy insects to enhance the creepy crawly theme.
- Individual Servings: These are fantastic presented in clear cups, peeking out of a layer of “dirt” and pudding.
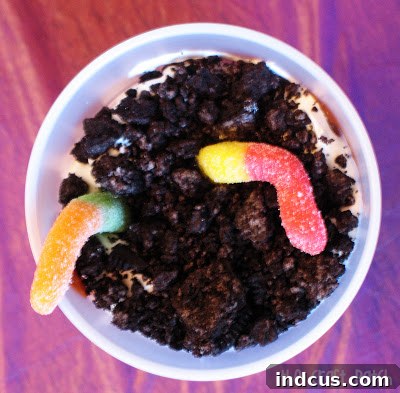
Graveyard Pudding: A Simple & Spooky Delight
When it comes to easy Halloween desserts, Graveyard Pudding is a timeless classic that never fails to please. It’s incredibly simple to assemble, requires no baking, and the results are both visually appealing and absolutely delicious. This recipe transforms humble chocolate pudding, whipped cream, and crushed cookies into a mini edible graveyard, complete with creepy crawly gummy worms. It’s the perfect treat for any Halloween gathering, providing a delightful mix of textures and flavors that everyone will enjoy.
Ingredients for Graveyard Pudding:
- 1 large package (5.9 oz) instant chocolate pudding mix (and milk as per package directions)
- 1 container (8 oz) whipped topping, thawed, or freshly made whipped cream
- 1 package (approx. 14.3 oz) Oreo cookies, finely crushed
- Gummy worms (various colors for extra fun)
- Optional: Graham crackers or Milano cookies for tombstones
- Optional: Black edible marker or icing gel for tombstone inscriptions
Assembling Your Spooky Graveyard Pudding:
- Prepare the Pudding: Follow the package directions to prepare the instant chocolate pudding. Whisk it with the recommended amount of milk until thickened. Let it chill in the refrigerator for at least 5-10 minutes to set further.
- Crush the “Dirt”: Place the Oreo cookies (cream filling included, or remove it for a less sweet, darker “dirt”) into a Ziploc bag and crush them using a rolling pin until they resemble fine dirt crumbs. Alternatively, pulse them in a food processor for quick results.
- Layer the Graveyard:
- In individual clear cups or a large trifle bowl, start with a layer of chocolate pudding.
- Next, add a layer of whipped topping.
- Sprinkle a generous layer of crushed Oreo “dirt” over the whipped cream.
- Repeat the layers: pudding, whipped topping, and “dirt,” until your container is nearly full, ending with a final layer of “dirt.”
- Add the Gummy Worms: Strategically place gummy worms so they appear to be “crawling” out of the “dirt.” Some can be fully exposed, while others can be partially buried for a more realistic effect.
- Create Tombstones (Optional but Recommended!): This adds a fantastic touch!
- Take graham crackers or flat cookies like Milano cookies. You can cut them into tombstone shapes if desired.
- Using a black edible food marker or a tube of black icing gel, write spooky messages like “R.I.P.” or even the names of your guests on the “tombstones.”
- Gently insert the decorated “tombstones” into the “dirt” layer of the pudding, positioning them upright.
- Chill and Serve: Refrigerate the Graveyard Pudding until serving time. This allows the flavors to meld and ensures the pudding is perfectly chilled.
Tips for Your Perfect Graveyard Pudding:
- Individual Portions: Serving in clear plastic cups makes for easy distribution and allows guests to admire the spooky layers.
- Flavor Variations: Experiment with different pudding flavors like dark chocolate or even mint chocolate for a twist.
- Other “Cemetery Critters”: Beyond gummy worms, consider adding candy corn pumpkins, candy spiders, or chocolate rocks for extra graveyard inhabitants.
- Decorating Fun: This is a fantastic recipe for kids to help with – they’ll love crushing the Oreos and arranging the worms and tombstones!
Completing Your Halloween Feast: More Spooky Delights!
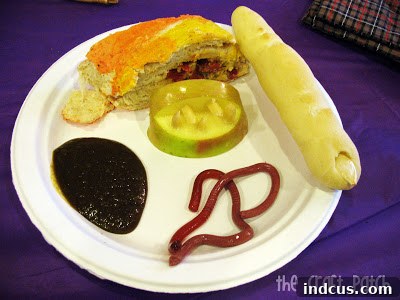
Beyond these fantastic individual recipes, you can easily round out your Halloween dinner with other themed dishes. Imagine serving our Stuffed Pizza Snake as the main course, accompanied by a platter of fresh Monster Mouths, and then finishing with the chilling Graveyard Pudding and wriggly Jello Worms for dessert. The possibilities for a truly memorable and frighteningly fun meal are endless!
Bonus Spooky Side Ideas:
- Witches’ Finger Breadsticks: Transform regular breadsticks into gruesome green fingers by adding a touch of green food coloring to the dough and topping with an almond “fingernail” before baking. Serve them with our Stuffed Pizza Snake for an extra savory component.
- Monster Booger Dip: A surprisingly tasty and visually playful dip! Simply mix green food coloring into your favorite marinara or spaghetti sauce. Serve it warm alongside the Witches’ Finger Breadsticks or as a dip for the pizza snake. It’s a great way to sneak in some veggies or offer a colorful dipping option.
These recipes prove that you don’t need to spend hours in the kitchen to create an epic Halloween spread. With a little creativity and a few simple ingredients, you can whip up a collection of treats that are both delicious and delightfully spooky. From the savory goodness of the pizza snake to the healthy crunch of monster mouths, the wiggly fun of jello worms, and the classic comfort of graveyard pudding, your Halloween party will be the talk of the town!
So gather your ingredients, enlist your little monsters, and get ready to conjure up some magic in the kitchen this Halloween. Happy haunting and happy eating!







