Forget everything you thought you knew about traditional Easter baskets. What if your basket wasn’t just a container for treats, but a treat in itself? A few weeks ago, a truly “sweet” idea sparked in my mind: an edible Easter basket made entirely of chocolate and candy. Imagine a delightful vessel crafted from your favorite confectioneries, ready to be filled with even more sugary delights! This concept sounded so incredibly appealing, so wonderfully whimsical, that I simply had to bring it to life. After a period of creative brainstorming, a handful of playful experiments, and a couple of delightful mishaps, I’m thrilled to announce that the mission was a resounding success!
This isn’t just a craft; it’s an experience, a masterpiece of confectionery design that’s entirely edible. Yes, you heard that right – an Easter basket you can actually eat! The excitement surrounding this project is genuinely contagious. And here’s the best part, the secret ingredient for your confidence: I am by no means a professional chocolatier or an expert baker. My kitchen skills are perfectly average, yet I managed to create this charming edible basket. This means if I, with my everyday crafting abilities, can master this sweet challenge, then absolutely anyone can!
Creating an edible Easter basket transforms the holiday tradition into an even more magical and personalized event. It’s more than just a container; it’s a centerpiece, a conversation starter, and ultimately, a delicious dessert. Move beyond the usual plastic or wicker baskets and embrace a world where every part of the Easter gift is a delightful treat. This project is perfect for adding a unique, homemade touch to your celebrations, impressing guests, or simply enjoying a fun, creative activity with family. It’s a fantastic way to combine the joy of crafting with the indulgence of chocolate, resulting in a memorable and truly special Easter experience.
Unleash Your Inner Chocolatier: Supplies You’ll Need
Gathering your materials is the first exciting step on your journey to creating an edible masterpiece. While the list might seem simple, each item plays a crucial role in the transformation from basic ingredients to a stunning, edible creation. Here’s a detailed look at what you’ll need, along with tips for selection:
- Easter-Colored M&M’s: These vibrant little candies aren’t just for eating; they are your primary decorative elements. Their smooth, colorful shells make them ideal for creating intricate patterns, borders, or even charming candy flowers. Feel free to explore other small, flat candies like Skittles, jelly beans, or even sprinkles if you want to diversify your decorative palette.
- Candy Melts (Green or Your Preferred Color): Candy melts are your structural and adhesive heroes. They melt smoothly and harden quickly, making them perfect for forming the basket and “gluing” your decorations in place. While I opted for green to mimic a grassy base, candy melts come in an extensive array of colors. Choose a color that complements your Easter theme, or select a neutral tone like white or milk chocolate for a classic look. Ensure you have enough, as they’ll be used for both the basket’s body and decoration adhesion.
- Zip Plastic Bag: This humble item is surprisingly versatile. It will serve as a makeshift piping bag, allowing you to precisely apply melted candy melts for decorating. A sturdy sandwich-sized or quart-sized bag works best.
- Balloon: This is the ingenious secret to forming your basket’s shape. A standard round balloon, when inflated, provides the perfect mold for a bowl-like structure. Choose a balloon that’s clean and free of any powder or residue. The size of your inflated balloon will directly determine the size of your finished chocolate basket, so consider what size you envision for your creation.
- Additional Essential Tools: While not listed in the original, these will greatly assist your crafting process. A small, heavy bowl (to hold the balloon steady), a spatula or spoon (for spreading chocolate), parchment paper or a silicone mat (for your workspace), and potentially kitchen scissors (for the zip bag).
Crafting Your Sweet Masterpiece: Step-by-Step Instructions
Embark on this delightful crafting adventure with confidence. Each step is designed to guide you toward a beautifully edible Easter basket. Patience and gentle handling are your best friends throughout this process.
Step 1: Preparing Your Chocolate Foundation
Begin by carefully melting your chosen candy melts. Follow the package directions precisely, as different brands and types of candy melts may have slightly varied instructions. The most common methods include:
- Microwave Method: Place candy melts in a microwave-safe bowl. Heat in 30-second intervals, stirring thoroughly after each interval, until the melts are smooth and creamy. Be careful not to overheat, as this can cause them to seize or become lumpy.
- Double Boiler Method: Place candy melts in a heat-safe bowl set over a saucepan of simmering water (ensure the bowl doesn’t touch the water). Stir continuously until melted and smooth. This method offers more controlled heating and is less prone to overheating.
Achieving the right consistency is key: your melted candy should be smooth, flowing, and free of any lumps, but not too thin. If it’s too thick, you can add a small amount of vegetable shortening (like Crisco) or a specialized candy thinning agent, stirring until the desired consistency is reached. Once melted, set it aside briefly to cool slightly, making it easier to work with without popping the balloon.
Step 2: Preparing Your Balloon Mold
Before you introduce any chocolate, ensure your balloon is perfectly prepared. First, wash the balloon thoroughly with soap and water to remove any potential dust, oils, or manufacturing residue. Rinse it well and dry it completely. Even a tiny bit of moisture can cause your chocolate to seize. Next, blow up your balloon to the desired size for your basket. Remember, the larger the balloon, the larger your basket will be. Tie it off securely. To facilitate easy working, gently tape the knotted end of the balloon to the bottom of a small, heavy bowl. This will keep the balloon stable and upright, preventing it from rolling around as you apply the chocolate.
Step 3: Creating the Chocolate Shell
With your melted chocolate and stable balloon ready, it’s time for the magic to begin. Carefully spread the melted candy melts over the top portion of the balloon. Use a clean spatula or the back of a spoon to smooth the chocolate evenly across the surface. Aim for a consistent, relatively thick layer of chocolate – think 1/8 to 1/4 inch thick. This thickness is crucial for ensuring your finished basket is sturdy and doesn’t easily break. As you spread, pay close attention to creating a clear, even edge around the widest part of the balloon where your chocolate coating ends. This edge will ultimately become the top rim of your beautiful edible basket. Make sure the coating is uniform; thin spots are weak points that can lead to cracks.
Step 4: The Waiting Game – Hardening the Chocolate
Once your balloon is perfectly coated, it’s time for the chocolate to set. Carefully place the chocolate-covered balloon, still secured in its bowl, in a cool, dry place. Avoid placing it in the refrigerator unless your candy melts specifically recommend it, as rapid temperature changes can sometimes cause blooming (white streaks) or condensation, which can affect the chocolate’s texture and appearance. Allow the chocolate to harden completely. This typically takes anywhere from 30 minutes to a couple of hours, depending on the thickness of your chocolate layer and the ambient temperature. Resist the urge to rush this step; full hardening ensures the chocolate maintains its shape once the balloon is removed.
Step 5: The Grand Reveal – Popping the Balloon
Once the chocolate is absolutely firm to the touch, it’s time for the exciting reveal. Gently pop the balloon. You can do this by pricking it with a pin or carefully snipping a small hole near the knot with scissors. As the air escapes, the balloon will slowly pull away from the chocolate shell. This moment is often accompanied by a satisfying little “thwack” as the chocolate separates. Take your time and be extremely gentle during this stage. Sudden movements can cause the delicate chocolate shell to crack or break.
Step 6: Cleaning and Repairing Your Chocolate Shell
With the balloon deflated, carefully remove all its remnants from the inside of your newly formed chocolate bowl. Ensure no tiny pieces of rubber are left behind. Again, extreme gentleness is paramount. Should a piece of your chocolate basket accidentally break during this process – don’t panic! This is a common occurrence, especially for first-timers. The good news is that chocolate is remarkably forgiving. Simply melt a small amount of extra candy melts. Using a small brush or a toothpick, apply a tiny bit of this melted chocolate to the broken edges and gently press the pieces back together. Hold them in place for a few moments until the “glue” sets. This repair technique is surprisingly effective and will make your basket look as good as new.
Step 7: The Art of Decoration – Personalizing Your Basket
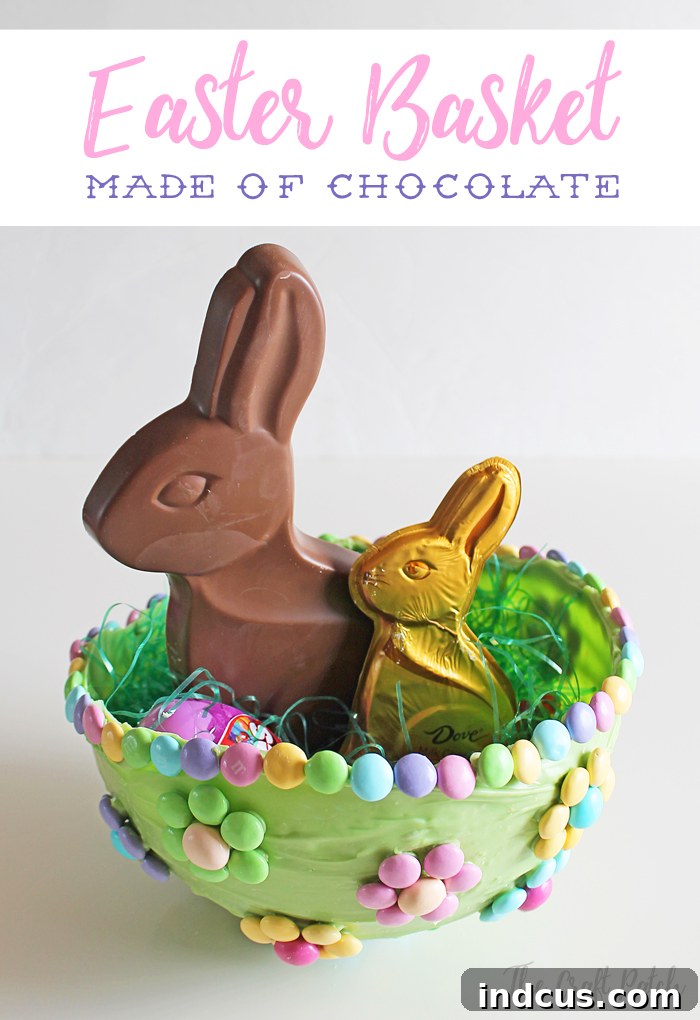
Now comes arguably the most enjoyable and creative part: decorating your edible basket with candy! This is where your imagination can truly run wild. I chose to create charming candy flowers using colorful M&M’s, and then added a simple, elegant border around the top rim of the basket. However, the possibilities are limitless! Consider patterns, stripes, polka dots, or even abstract designs. Use different types of candies – mini chocolate eggs, jelly beans, sprinkles, or even small edible glitter – to add texture and visual interest. Don’t be afraid to experiment with your design; there’s no right or wrong way to personalize your sweet creation.
To attach your chosen candies securely, you’ll utilize more of your trusty candy melts. Scoop a small amount of melted candy into your zip plastic bag. Snip a tiny tip off one corner of the bag – the smaller the snip, the finer the line of “glue” you can pipe. Squeeze a small dab of melted chocolate onto the back of each piece of candy you wish to attach, then gently press it onto the chocolate basket. Hold it for a few seconds until the candy adheres. The melted candy acts as a perfect, edible adhesive, ensuring your decorations stay in place.
Step 8: The Grand Finale – Filling Your Edible Basket
Once you are absolutely satisfied with the artistry and appearance of your beautifully decorated edible basket, it’s time for the ultimate reward: filling it with even more delightful treats! I chose to nestle two adorable chocolate Easter bunnies inside, creating a heartwarming scene of “little bunny friends.” But the choice of fillings is entirely yours! Consider a colorful assortment of foil-wrapped chocolate eggs, various Easter-themed candies, mini cupcakes, or even a selection of small, non-edible trinkets if you wish to mix it up. The aim is to create a visually appealing and utterly delicious presentation that enhances the charm of your handmade creation.
Tips for Success & Troubleshooting Common Issues
Crafting with chocolate can be incredibly rewarding, but like any art form, a few pointers can ensure smoother sailing. Here are some essential tips and solutions to common challenges:
- Temperature Control is Key: Chocolate is sensitive to temperature. Ensure your melted candy melts are not too hot (which can pop the balloon or make them hard to work with) and not too cold (which makes them too thick). A warm, not hot, room temperature workspace is ideal.
- Patience, Patience, Patience: Rushing any step, especially hardening or removing the balloon, can lead to frustration and breakage. Allow ample time for each stage.
- Quality Ingredients Matter: Good quality candy melts melt smoother and taste better. Invest in decent quality for the best results.
- Pre-Plan Your Design: Before you start attaching candies, have a rough idea of your decoration pattern. This helps in efficient application and a cohesive look.
- Handling is Delicate: Once formed, your chocolate basket is fragile. Handle it from the base whenever possible and avoid squeezing the sides.
- Storage: Store your edible basket in a cool, dry place away from direct sunlight. An airtight container can protect it from dust and humidity. Avoid refrigeration unless absolutely necessary, as it can cause condensation and affect texture.
Troubleshooting:
- Chocolate Too Thick: If your melted candy melts are too thick to spread easily, add a teaspoon of vegetable shortening or a few drops of candy-specific thinning agent. Stir until smooth.
- Chocolate Too Thin: If it’s too runny, allow it to cool slightly while stirring. If it remains too thin, you might need to add a few more solid candy melts and remelt slowly.
- Balloon Popping Prematurely: This can happen if the chocolate is too hot, or if there’s a weak spot in the balloon. Ensure your chocolate has cooled slightly before applying.
- Cracks During Balloon Removal: Be extra gentle. If cracks occur, use the repair method described in Step 6. Don’t discard it!
- Candy Not Sticking: Ensure your melted “glue” chocolate is warm enough to adhere but not so hot it melts the decorative candy. Apply a generous, but not excessive, dab.
Beyond Easter: Versatility and Creative Uses
This delightful food-slash-craft project was so incredibly fun and satisfying that I honestly believe I may never want to revert to using a traditional Easter basket again. Why would I, when these edible wonders can be enjoyed from top to bottom? Unlike their non-edible counterparts, you can’t exactly EAT those! This innovative edible basket concept extends far beyond just Easter morning.
- Easter Party Craft: Imagine the joy and engagement of having this as an activity at an Easter party! Kids and adults alike would love the opportunity to decorate their own personalized chocolate baskets, making for a memorable party favor they created themselves.
- Cake Topper or Party Centerpiece: For a truly show-stopping effect, a beautifully decorated edible basket can serve as an incredible cake topper for a larger Easter-themed cake, or as a magnificent party centerpiece for your holiday table. Fill it with vibrant candies or fresh spring flowers (placed in a small container inside, of course) for an instant festive focal point.
- Unique Gift Presentation: Why limit it to Easter? This edible basket can be used to present gifts for birthdays, baby showers, or any special occasion where a touch of sweetness and creativity is appreciated. Fill it with small gourmet chocolates, personalized candies, or even small non-edible gifts.
- Themed Decorations: With different colored candy melts and decorations, you can adapt this concept for other holidays or themes – a spooky Halloween candy bowl, a festive Christmas treat holder, or even a romantic Valentine’s Day chocolate heart box.
The possibilities for fun, creativity, and deliciousness are truly endless with this edible chocolate basket. It’s a project that brings joy in the making and delight in the eating. Fun, fun!
Final Thoughts: Embrace the Sweet Challenge!
Creating your own edible Easter basket is more than just a craft; it’s an invitation to unleash your creativity, indulge in the sweetness of the season, and create lasting memories. It’s a testament to how a simple idea can transform a traditional holiday into something extraordinary and utterly delicious. Whether you’re a seasoned crafter or a beginner in the kitchen, this project offers a rewarding experience with a delectable outcome. So, gather your supplies, embrace the process, and get ready to impress everyone with your unique, homemade edible Easter basket. Share your sweet creations with us – we can’t wait to see the delicious masterpieces you conjure!