
Transforming Forgotten Finds: A DIY Vintage Mirror Back Chalkboard Makeover
Every now and then, a serendipitous discovery leads to an unexpected wave of inspiration. This past weekend, I stumbled upon what I now affectionately call a “hidden gem” – an item that had been silently residing in my home, almost overlooked, yet brimming with untapped potential. For months, it sat there, a silent challenge, until a burst of creativity finally illuminated its true purpose. The journey from forgotten relic to a statement piece of home decor began with a simple idea: upcycling.
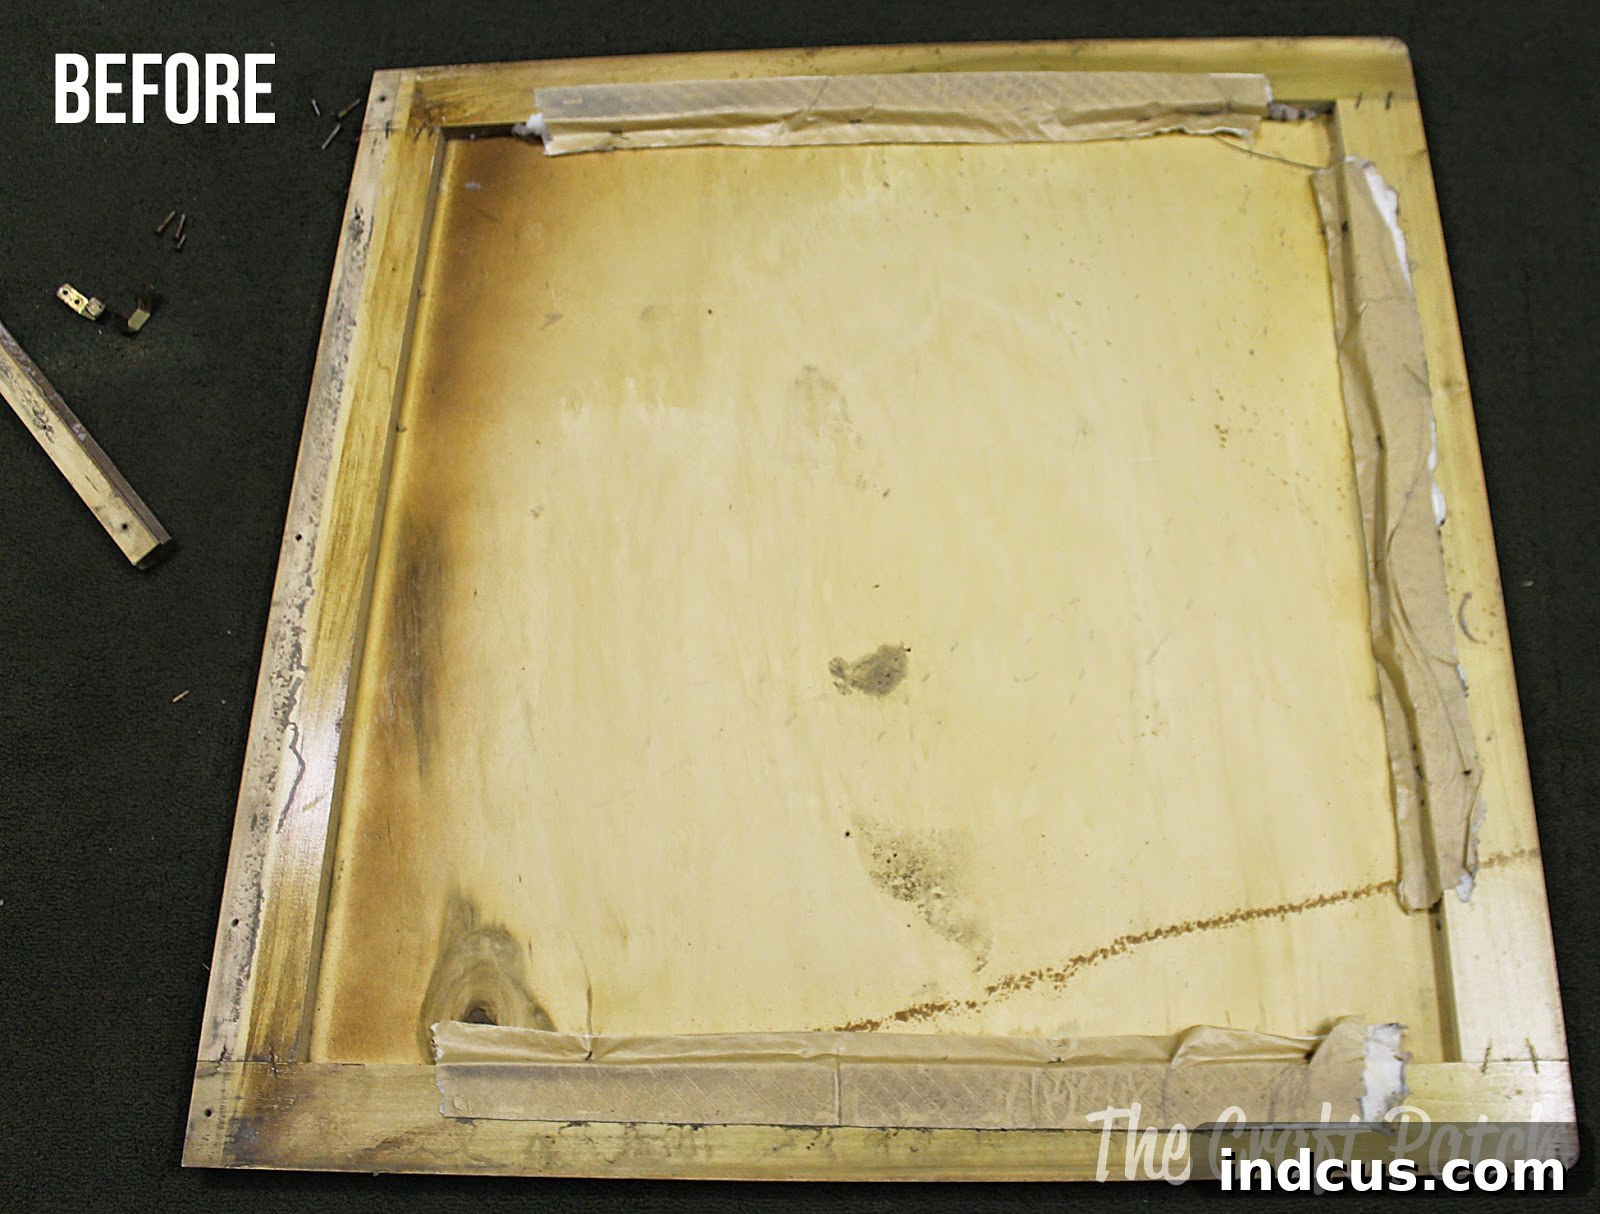
What exactly was this mysterious object, you might ask? Well, it wasn’t immediately obvious, even to me. Take a look at the “before” image, and you might still be guessing:
Ha! Still not clear? Don’t worry, you’re not alone. It’s the sturdy wooden back from a mirror that was once attached to an elegant, antique wooden vanity. Pretty random, right? Its story began last summer when my mom acquired the vanity at a charming yard sale. She loved the vanity itself but had no use for the mirror component, so she generously passed it on to me. At the time, I honestly had no clue what I’d ever do with such an unusual piece. Who would have thought that the unadorned wood behind the mirror would eventually become such a magnificent treasure? And, as an exciting side note, this means I still have the actual mirror itself to ponder a future project for – the upcycling possibilities are truly endless!
The Genesis of a Giant DIY Chalkboard
The journey from a forgotten piece of wood to a functional and stylish home accent is a testament to the power of upcycling and DIY creativity. My vision for this oversized wooden panel was to transform it into a massive, eye-catching chalkboard – a perfect blend of utility and rustic charm. The process, while requiring a bit of elbow grease, was incredibly rewarding and surprisingly straightforward.
Disassembly and Initial Preparation: Setting the Foundation
The first step in this exciting transformation was to meticulously disassemble the mirror’s original structure. This involved carefully unscrewing all the metal brackets and removing any lingering bottom pieces that were designed to support the mirror. Once these elements were removed, I was left with a substantial, albeit rather plain, wooden square, complete with its original frame. It was a blank canvas, ready for its dramatic artistic makeover.
Old furniture, especially pieces that have seen years of use, often comes with minor imperfections. This mirror back was no exception. It had several small holes where screws had been and a few rough patches accumulated over time. To ensure a perfectly smooth and professional finish for my future chalkboard, these imperfections needed addressing. I turned to lightweight spackle, an excellent product for filling minor dents and holes in wood.
Applying the spackle was a simple task. I used a putty knife to press the spackle firmly into each hole and rough area, ensuring it was slightly overfilled. This allowed for a perfectly level surface once dried. I then let the spackle dry completely, which typically takes a few hours, depending on the product and thickness of application. This crucial step is often overlooked but vital for achieving a high-quality finish that looks professionally done rather than a quick DIY fix.
Sanding, Priming, and Painting: Bringing the Vision to Life
With the spackle fully cured, the next phase involved sanding. Sanding is fundamental for two main reasons: it smooths out any excess spackle and creates a slightly abraded surface, which significantly improves paint adhesion. I used a medium-grit sandpaper to carefully smooth down all the spackled areas and lightly scuff the entire wooden surface, including the frame. After sanding, I thoroughly wiped down the piece with a damp cloth to remove all dust, ensuring a pristine surface for painting. This attention to detail prevents any grittiness in the final paint layers.
Before applying the chalkboard paint, I primed the central wooden panel. Priming is a non-negotiable step when working with raw or previously painted wood, especially for a durable finish like a chalkboard. A good quality primer seals the wood, prevents any tannins or old stains from bleeding through the new paint, and provides an ideal base for the topcoat, ensuring vibrant color and optimal adhesion. I applied a single, even coat of wood primer to the central area that would become the chalkboard, allowing it ample time to dry according to the manufacturer’s instructions.
Now for the exciting part: the paint! For the chalkboard surface, I opted for the Folk Art brand chalkboard paint, which I found at Michael’s. An 8oz bottle was more than enough, especially since I managed to snag it for about $3 with a coupon – a true budget-friendly win! I applied two generous coats of the chalkboard paint, allowing each coat to dry completely before applying the next. This multi-coat approach ensures a durable, uniform, and richly pigmented chalkboard surface that will stand up to frequent use. It’s important to apply chalkboard paint smoothly and evenly to avoid streaks, which can be visible when chalk is applied.
While the chalkboard paint was drying, I moved on to the frame. I wanted a color that would pop and complement the deep black of the chalkboard. Serendipitously, I had some beautiful aqua paint leftover from a crib project I completed last summer. This was not only a fantastic way to reuse materials but also allowed for a cohesive aesthetic in my home. I carefully painted the frame with the aqua paint, taking care to create clean lines where it met the chalkboard surface. The contrast was absolutely stunning, giving the entire piece a fresh, vibrant, and personalized look.
The Grand Reveal: A Statement Piece for Your Home
The satisfaction of seeing a DIY project come to fruition is unparalleled. And now, after all the effort, I am the proud owner of a truly magnificent trash-to-treasure chalkboard that is absolutely HUGE! Measuring an impressive three feet across, it’s not just a functional item but a significant piece of wall art that commands attention. I absolutely love, love, love it! Its substantial size makes it perfect for a large, blank wall downstairs that has been practically screaming for some unique decor to fill its expansive space. There’s nothing quite like the feeling when a creative plan comes together perfectly, exceeding all expectations.
This upcycled chalkboard isn’t just about aesthetics; it’s incredibly versatile. Imagine the possibilities: a giant family message board, a rotating display of inspirational quotes, a dynamic menu for dinner parties, a creative space for kids to doodle, or even a sophisticated planner for your weekly tasks. Its vintage origins, combined with its fresh, modern makeover, give it a character that mass-produced items simply cannot replicate. It’s a focal point, a conversation starter, and a daily reminder of creative ingenuity.
Mastering Chalkboard Lettering: Tips and Tricks for Beautiful Displays
One of the most frequently asked questions about any chalkboard project revolves around the lettering: “How did you get such neat lettering on your chalkboard?” My initial, playful response is always, “I am just that good!” Just kidding, of course! While practice certainly helps, there’s a fantastic, easy-to-master technique that allows anyone to achieve professional-looking chalkboard art without needing to be an expert calligrapher.
The Secret to Perfect Chalkboard Art: The Transfer Method
The trick lies in a clever transfer method that uses a printed design as a guide. Here’s a detailed breakdown of how I achieve those crisp, beautiful chalk designs:
- Design in Photoshop (or other design software): First, I design my desired quote, phrase, or illustration in Photoshop. This allows me to experiment with different fonts, layouts, and sizes until I achieve the perfect aesthetic. You can use free fonts and templates available online to find a style that suits your decor.
- Print Large-Scale: Once the design is finalized, I print it out large-scale. For a chalkboard as massive as mine, this means printing the design in sections across multiple sheets of standard paper. Most printers have an option for “poster printing” or “tiling” that will automatically break a large image into smaller, printable segments.
- Assemble the Design: After printing, I carefully tape all the individual pieces of paper together to recreate the full, large-scale design. It’s crucial to align the edges precisely to ensure an accurate transfer.
- Prepare for Transfer: Now for the magic step! I used THIS technique, but instead of pencil, I rubbed white chalk generously all over the entire back side of the printed design. Ensure complete coverage so that every part of the lettering has a layer of chalk.
- Transfer the Outline: Carefully position your chalk-backed printout onto the chalkboard surface. Use painter’s tape to secure it in place, ensuring it doesn’t shift. Then, using a pencil or a dull stylus, trace over every line and curve of your printed design with firm pressure. As you trace, the chalk dust on the back of the paper will transfer a faint but clear outline onto your chalkboard.
- Fill in and Refine: Once you’ve traced the entire design, carefully remove the paper. You’ll be left with a perfect chalk outline on your board. Then, it’s simply a matter of filling in the outlines by hand with chalk. This method provides a flawless guide, allowing you to focus on neatness rather than struggling with freehand drawing. You can use chalk pens for extra precision or regular chalk sharpened to a point for filling larger areas.
This technique worked like a charm, giving me incredibly neat and professional-looking lettering that really elevated the entire project. For those who want to take their chalkboard art even further, consider investing in a set of good quality chalk markers, which offer vibrant colors and cleaner lines, or explore different chalk types for various effects. Practicing basic strokes on a smaller test board can also build confidence.
Embrace the Art of Upcycling: Find Your Own Hidden Gems
This DIY vintage mirror back chalkboard makeover is a perfect example of how repurposing old items can lead to beautiful and unique home decor. It’s a journey that combines creativity, resourcefulness, and the satisfaction of transforming something overlooked into something truly cherished. Not only is it an eco-friendly approach to decorating, but it also allows you to infuse your home with pieces that tell a story and reflect your personal style.
I hope this project inspires you to look at everyday objects with a fresh perspective. Before you discard something, pause and consider its potential. That old piece of furniture, a forgotten frame, or even a random wooden panel might just be your next hidden gem, waiting to be transformed into a functional work of art. Dive into the world of upcycling – it’s rewarding, sustainable, and incredibly fun. Happy crafting, and may you find endless inspiration in the most unexpected places!







