Craft Your Own Unique Style: The Joy of DIY Handmade Bags
In a world increasingly dominated by mass-produced items, there’s a unique satisfaction in owning something truly bespoke, something crafted with your own hands. The allure of unique accessories has never been stronger, and recently, my passion for handmade bags reached a new peak. After seeing countless adorable and inspiring creations on platforms like Etsy and various craft blogs, I felt an undeniable urge to delve into the world of bag making myself. There’s something incredibly rewarding about transforming raw materials into a functional and beautiful accessory that perfectly complements your personal style.
Why Embark on a DIY Bag Making Journey?
Creating your own handmade bag offers a multitude of benefits that extend far beyond simply having a new item. It’s a journey of creativity, personalization, and sustainable living.
- Uniqueness & Personalization: No more blending in with the crowd! A DIY bag allows you to choose every detail, from the fabric pattern to the lining and hardware, ensuring your bag is truly one-of-a-kind. It’s an extension of your personality, a wearable piece of art.
- A Creative Outlet: Sewing is a wonderful way to express creativity, reduce stress, and develop new skills. The process of selecting fabrics, cutting patterns, and stitching pieces together is incredibly meditative and satisfying.
- Cost-Effectiveness: While initial tool investments might be necessary, making your own bags can often be more budget-friendly than purchasing designer or even boutique handmade options. Plus, you can utilize fabric scraps or repurposed materials, making it even more economical.
- Sustainability: By crafting your own items, you contribute to a more sustainable lifestyle. You can choose eco-friendly fabrics, reduce textile waste by using remnants, and avoid the environmental impact associated with fast fashion production.
- The Joy of Gifting: Handmade bags make incredibly thoughtful and personal gifts for friends and family, demonstrating the time, effort, and love you put into their creation.
Finding Your Muse: Inspiration for Your Next Project
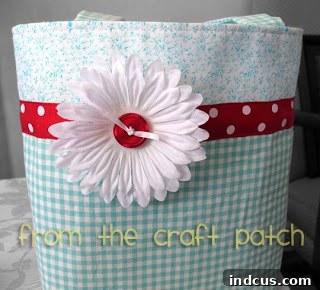
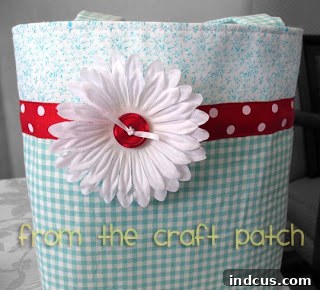
Inspiration can strike anywhere, and for my latest project, it began with a treasure trove of fabrics. I discovered some lovely cotton fabrics tucked away in my mom’s fabric stash – a common and much-loved resource for many crafters (thanks, Mom!). These particular prints instantly sparked an idea. I envisioned them paired with a vibrant red, a color combination I adore. I believe this might just be my favorite color palette on the planet – at least until tomorrow, when a new exciting combination catches my eye! Online platforms like Etsy, Pinterest, and Instagram are fantastic resources for endless design ideas, fabric pairings, and unique bag styles. Don’t be afraid to mix patterns, experiment with textures, and let your personal style guide your choices.
Essential Materials and Tools for Your Handmade Bag
Before you dive into stitching, gathering the right materials and tools is crucial for a successful and enjoyable bag-making experience. A well-prepared workspace and quality supplies will make all the difference.
The Heart of the Bag: Fabric Selection
The choice of fabric sets the entire tone for your bag. For my project, I opted for cotton fabric from my mom’s collection. While cotton is versatile and easy to work with, it can sometimes be a bit flimsy on its own, especially for a bag that needs to hold its shape. Consider the final use of your bag when choosing:
- Quilting Cotton: Great for beginners, comes in an endless array of prints.
- Canvas or Duck Cloth: More durable and naturally structured, ideal for tote bags.
- Denim: Sturdy and casual, perfect for everyday bags.
- Linen: Elegant and breathable, good for lightweight summer bags.
- Upholstery Fabric: Very durable and often has beautiful textures, but can be thicker to sew.
Always pre-wash your fabrics to prevent shrinkage and color bleeding later on.
Giving it Form: Interfacing and Stabilizers
This step is critical, especially when working with lighter fabrics. As my chosen cotton fabric was pretty flimsy by itself, I knew it would need some extra support. This is where Pellon (or any suitable interfacing/stabilizer) comes into play. Interfacing is a material fused or sewn to the back of your fabric to give it body, structure, and durability. Without it, many handmade bags would sag and lose their shape.
- Fusible Interfacing: The most common type, ironed onto the fabric. Available in various weights (lightweight, medium, heavy).
- Sew-in Interfacing: Stitched directly into the seams, suitable for delicate fabrics or when you prefer not to use heat.
- Decovil or Peltex: Heavier-duty stabilizers perfect for creating very structured bags that stand on their own, like clutches or professional-looking totes.
The right interfacing prevents your bag from collapsing, protects its contents, and gives it a professional finish.
The Inner World: Lining and Pockets
A well-lined bag not only looks more polished but also adds durability and functionality. The lining encloses all raw seams, giving the inside of your bag a clean, finished appearance. For my bag, I ensured it was fully lined and even included an inner pocket. Inner pockets are incredibly useful for keeping smaller items organized and easily accessible, preventing you from digging around for essentials like your car keys, phone, or lip balm. You can customize the size and number of pockets to suit your needs, adding zipper pockets, slip pockets, or even a pen holder.
Beyond Fabric: Notions and Hardware
Don’t forget the details that complete your bag:
- Thread: Choose a high-quality polyester thread that matches or complements your fabric.
- Zippers, Snaps, or Buttons: For closures and pockets.
- D-rings, O-rings, Sliders: For adjustable straps or decorative elements.
- Webbing or Leather Straps: For comfortable and durable shoulder straps.
Your Workshop Essentials: Tools
A basic sewing toolkit will include:
- Sewing Machine: A reliable machine with basic stitches.
- Sharp Fabric Scissors or Rotary Cutter: For precise cutting.
- Cutting Mat and Ruler: Essential for rotary cutting.
- Pins or Fabric Clips: To hold fabric pieces together.
- Iron and Ironing Board: Crucial for pressing seams and applying fusible interfacing.
- Measuring Tape or Seam Gauge: For accurate measurements.
- Seam Ripper: Your best friend when mistakes happen (and they will!).
The Creative Process: Bringing Your Vision to Life
Once you have all your materials, the fun truly begins. While I won’t provide a full step-by-step tutorial here, understanding the general flow of bag making will help you embark on your own project with confidence.
Planning and Preparation
Start with a pattern. You can find countless free patterns online, purchase professional patterns, or even draft your own simple design. Read through the instructions thoroughly, then cut out your fabric pieces precisely. Don’t skip pre-washing and ironing your fabrics, as these steps prevent future issues.
Building the Structure
Apply your interfacing to the designated fabric pieces according to the manufacturer’s instructions. This step alone makes a huge difference in the final look and feel of your bag. Then, begin sewing the main body pieces together, taking care with seam allowances and corners to ensure a crisp finish.
Adding Functionality and Flair
Next comes the lining. Sewing the lining separately and then attaching it to the main bag body is a common technique that creates a professional, clean interior. This is also the stage where you’d incorporate any inner pockets. For my bag, the inner pocket was sewn onto a lining panel before the lining itself was assembled. Finally, attach your straps, closures, and any external embellishments. Careful pressing at each stage will ensure your seams are flat and your bag looks professionally finished.
Personalization: Making Your Bag Truly Yours
The beauty of a handmade bag lies in its ability to be completely customized. Don’t be afraid to add your personal touch:
- Embroidery or Appliqué: Add monograms, intricate designs, or fabric patches.
- Unique Straps: Experiment with different materials like leather, rope, or woven straps.
- Hardware: Choose unique zippers, buckles, or metal feet for the bottom of the bag.
- Charms and Tassels: Attach decorative elements to the zipper pull or strap.
- Contrast Stitching: Use a contrasting thread color to highlight seams.
My Personal Sewing Saga: From Inspiration to Addiction
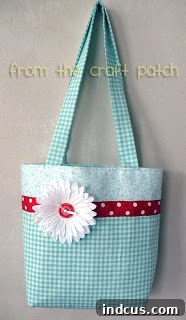
Let me tell you, this project was so much fun to make! The combination of the beautiful cotton fabrics I found and the striking red accents turned out exactly as I’d imagined, creating a truly charming and practical accessory. The decision to use Pellon was definitely the right one, giving the bag the perfect amount of structure without making it too stiff. And the inner pocket? A game-changer for keeping my car keys secure and easily accessible. But here’s the kicker: bag making is incredibly addicting! Now that this one is finished and proudly displaying its unique charm, I’m already brimming with ideas for more. The satisfaction of creating something functional and beautiful from scratch is a powerful motivator to keep on sewing.
Tips for Aspiring Bag Makers
If you’re feeling inspired to start your own bag-making journey, here are a few tips to help you along the way:
- Start Simple: Begin with an easy tote bag or a basic clutch pattern to build your confidence and learn fundamental techniques.
- Read Instructions Carefully: Don’t rush! Understand each step before you sew.
- Press, Press, Press: Ironing your seams after each stitch dramatically improves the professionalism of your finished product.
- Don’t Fear Mistakes: Everyone makes them. A seam ripper is your friend, and every mistake is a learning opportunity.
- Watch Tutorials: YouTube is a fantastic resource for visual learners.
- Join Communities: Connect with other sewers online or in local groups for advice, encouragement, and inspiration.
Beyond Your First Creation: The Endless Possibilities
Once you’ve successfully crafted your first bag, a whole world of possibilities opens up. You might find yourself wanting to experiment with different styles – from chic clutches and versatile crossbody bags to spacious duffels and functional backpacks. Each new project presents an opportunity to learn new techniques, work with different materials, and further refine your skills. You could even consider making bags as personalized gifts or, if your passion truly takes hold, perhaps even selling your unique creations.
There’s an undeniable magic in creating something with your own hands, especially an item as frequently used and cherished as a bag. It’s more than just a container for your belongings; it’s a statement of style, a testament to your creativity, and a little piece of your soul you carry with you. So, if you’ve been pondering a new sewing adventure, take this as your sign. Dive into the wonderful world of DIY handmade bags, embrace the process, and soon you’ll be proudly showcasing your own unique creation to the world. Happy sewing!