

Remember that exhilarating thrill of scratching off a silver panel to reveal a hidden prize or message? That surge of anticipation as you slowly unveil what lies beneath? For many of us, it’s a nostalgic memory, often tied to sweepstakes and advertisements that promised untold riches. The idea that this simple, captivating joy could be recreated at home seemed almost too good to be true. Imagine the surprise when I discovered that making your own scratch-off cards is not only possible but incredibly easy and rewarding! This revelation, initially spotted on a creative hub like BHG, sparked an immediate desire to try it myself, and I can enthusiastically confirm: it absolutely works!
The beauty of a DIY scratch-off card lies in its versatility and personal touch. It transforms a simple gift or message into an interactive experience, full of suspense and fun. Whether you’re planning a unique birthday surprise, a special anniversary gesture, or simply want to add an element of playfulness to an everyday note, homemade scratch cards are a fantastic solution. They allow you to customize every aspect, from the design of the card to the specific messages or prizes hidden beneath the “magic” scratch layer. This means you can tailor it perfectly to the recipient, making your gift truly one-of-a-kind and unforgettable.
For my first venture into this exciting craft, I decided to create a special Valentine’s Day scratch-off card for my husband. Instead of a single prize, I designed it with multiple hidden hearts, each concealing a different thoughtful gift or favor. The idea was to let him scratch off whichever heart appealed to him most, adding an element of choice and surprise to his Valentine’s treat. This interactive approach made the gift far more engaging than a traditional card, turning the act of giving into a memorable game. The finished product was a testament to how a simple craft can elevate a special occasion, creating lasting smiles and cherished moments.

Under each carefully crafted heart, a unique surprise awaits. This innovative gift allows the recipient to choose their adventure, scratching off the heart that calls to them and revealing their personalized prize. It’s an exciting way to present multiple options, ensuring that the gift is exactly what they desire at that moment. This interactive element adds a layer of fun and personalization that traditional cards simply cannot match, making the unveiling of the gift a joyful event in itself.
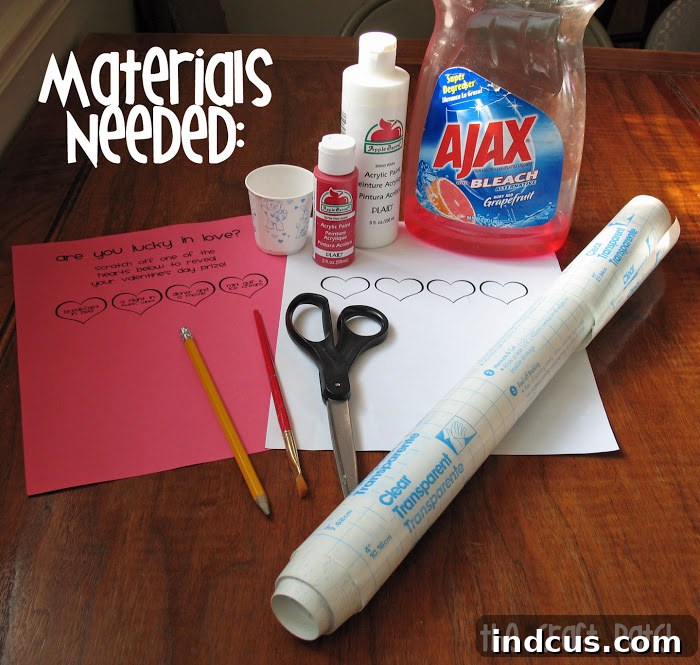
Essential Materials for Your DIY Scratch-Off Card
Creating your own scratch-off cards is surprisingly straightforward, requiring only a handful of readily available and inexpensive materials. The beauty of this project lies in its simplicity, making it accessible for crafters of all skill levels. Before you begin, gather these items to ensure a smooth and enjoyable crafting experience. Each component plays a crucial role in the success of your personalized scratch-off creation.
- A Valentine’s Day Card (or any custom card): This forms the base of your project. High-quality cardstock is recommended for durability and a professional finish. You can design your own from scratch or use a pre-made card.
- Con-Tact Paper (or clear adhesive vinyl): This is key for creating the smooth, non-porous surface that allows the scratch-off paint to adhere and be easily removed. Look for clear, self-adhesive contact paper often found in kitchen or crafting aisles.
- Acrylic Paint: Any acrylic craft paint will do. Opt for a color that contrasts nicely with your card design, or a classic metallic like silver or gold for that authentic scratch-off look. Acrylic paint provides the necessary opacity and dries quickly.
- Liquid Dish Soap: An everyday household item, dish soap is the secret ingredient that makes the paint scratchable. It breaks down the paint’s bond just enough to allow for easy removal with a coin.
- Paint Brush: A small, soft-bristled brush is ideal for applying thin, even coats of your special scratch-off paint. This ensures a smooth finish and proper opacity.
- Small Paper Cup (or mixing container): You’ll need this to mix your acrylic paint and dish soap. A disposable cup makes cleanup a breeze.
- Scissors: For cutting out your card design, the Con-Tact paper shapes, and the final scratch-off stickers with precision.
- Pencil: Essential for tracing the shapes onto the Con-Tact paper, ensuring your scratch-off areas perfectly align with your card’s design.
- Penny: The classic tool for scratching off the reveal! Including one with your finished card adds a thoughtful and functional touch.
Step-by-Step Guide to Crafting Your Own Scratch-Off Cards
Ready to bring your creative vision to life? Follow these detailed instructions to transform simple materials into a magical, interactive scratch-off card. Each step is designed to be clear and easy to follow, ensuring you achieve professional-looking results that will delight your recipient. Pay attention to the details, especially during the painting and drying phases, to ensure your scratch-off layer functions perfectly.
Step 1: Design and Prepare Your Custom Card
The foundation of your scratch-off card is its design. This is where you infuse personality and tailor the card to your specific occasion and recipient. Begin by creating your card. While I opted for Photoshop, which allowed for quick and precise design in about ten minutes, you can just as easily use user-friendly programs like Microsoft Word, Google Docs, Canva, or even hand-draw your design. Consider the theme – for Valentine’s Day, hearts, love notes, or romantic imagery are perfect. Think about the messages or gifts you want to hide. Will they be written directly on the card, or will they be small images? Ensure the areas designated for scratching are clearly defined and appropriately sized for your chosen shapes (like hearts in this example).
Once your design is complete, print it out on sturdy cardstock. The weight of cardstock is important; it provides a durable base that won’t easily tear or bend during the scratching process, giving your handmade card a professional feel. If you’re using a pre-made card, simply ensure there are blank areas large enough to accommodate your scratch-off elements. The clarity and appeal of your underlying design are crucial, as this is what will be revealed with excitement.

Step 2: Prepare the Con-Tact Paper Shapes
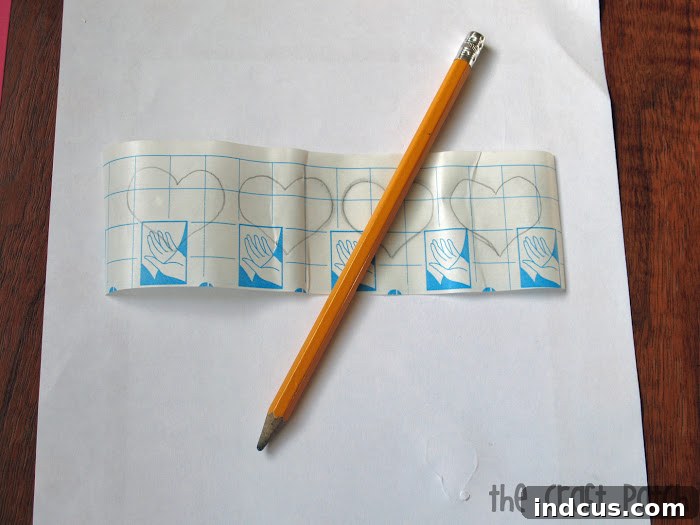
The Con-Tact paper will serve as the canvas for your scratch-off paint. To ensure a perfect fit, carefully cut a strip of Con-Tact paper that is large enough to cover all the areas you intend to make scratchable. For multiple hearts, as in my Valentine’s card, make sure the strip is wide enough to accommodate all four with a little extra margin around each. Lay the Con-Tact paper, paper-side up, directly over the printed hearts or designated scratch-off areas on your card. Using a pencil, gently trace the outline of each shape onto the paper backing of the Con-Tact paper. Precision here is key; accurate tracing will ensure that your scratch-off stickers perfectly align with your card’s design, creating a seamless and polished final product.
This step ensures that once you cut out and apply the painted sections, they will neatly cover the hidden messages without overlapping excessively or leaving gaps. Double-check your tracings before moving on, as these lines will guide your cutting in a later step. If you’re creating geometric shapes, a ruler can help you achieve crisp, straight lines. For organic shapes like hearts, a steady hand will do the trick. Remember, the clearer your tracing, the easier and more accurate your cutting will be.
Step 3: Mix Your Special Scratch-Off Paint
This is where the magic happens! The secret to making paint scratchable lies in a simple, non-toxic mixture. In your small paper cup or mixing container, combine two parts acrylic paint with one part liquid dish soap. While precise measurements aren’t strictly necessary – I often just eyeball it – aiming for this ratio provides the best results. For example, if you use two teaspoons of paint, add one teaspoon of dish soap. The dish soap acts as a release agent, preventing the paint from bonding too strongly to the Con-Tact paper, making it easy to scratch off once dry.
Stir the mixture thoroughly until it’s completely smooth and well combined, with no streaks of unmixed soap or paint. The consistency should be somewhat fluid but not watery. If it’s too thick, add a tiny bit more soap; if too thin, a touch more paint. This concoction will create the opaque, yet easily removable, layer that transforms your card into an interactive surprise. Prepare a small batch at a time, as you don’t need a large quantity for most projects, and fresh mixture works best.
Step 4: Apply the Scratch-Off Layer
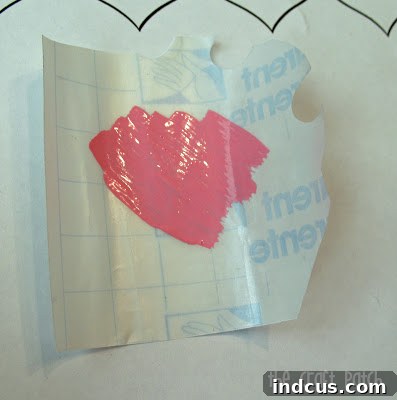
Now it’s time to apply your specially formulated paint! Using your paintbrush, apply a thin, even coat of the paint mixture to the shiny, plastic side of the Con-Tact paper, making sure to cover each traced heart (or designated shape) completely. The key here is to apply multiple thin coats rather than one thick coat. A thick coat can take a very long time to dry and may crack or peel unevenly. After applying the first thin layer, allow it to dry completely. This usually takes about 10-15 minutes, depending on the paint thickness and humidity.
Once dry, apply a second thin coat, and if necessary, a third coat. The goal is to achieve complete opacity – you should not be able to see through the paint to the paper backing or any underlying design. Hold it up to the light to check. If any light filters through, another thin coat is needed. Patience during the drying process is crucial for a smooth, durable, and perfectly scratchable finish. The multiple layers build up an even, consistent surface that will peel away beautifully when scratched, revealing the delightful surprise beneath.
Step 5: Cut, Peel, and Apply Your Scratch-Off Stickers
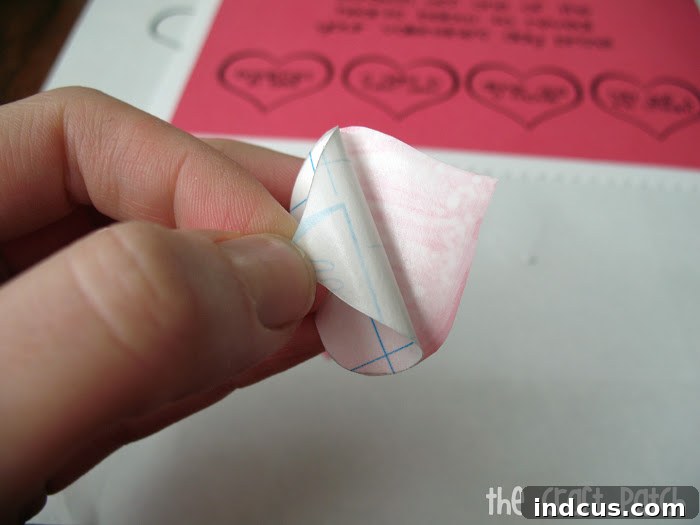
Once the paint layers are completely dry and opaque, it’s time to finalize your scratch-off stickers. Carefully cut out each painted heart or shape following the pencil lines you traced in Step 2. Take your time to cut precisely, as neat edges will contribute to a professional and aesthetically pleasing finish. Once cut, gently peel off the paper backing from each shape. The adhesive side will now be exposed, and the painted side will be the scratch-off surface.
Carefully align each scratch-off sticker over its corresponding message or gift area on your Valentine’s card. Press down firmly to ensure it adheres smoothly and securely, avoiding any air bubbles. The goal is for the scratch-off layer to perfectly cover the hidden message, leaving no peek-through areas. This step brings your card to life, transforming it into an interactive game of chance and discovery. Ensure all edges are firmly pressed down to prevent premature lifting.
Step 6: The Grand Reveal – Include a Scratching Tool
To complete the experience and ensure your recipient can immediately enjoy their personalized scratch-off card, don’t forget the essential scratching tool! A shiny new penny is the classic choice and perfectly fits the aesthetic of a fun, nostalgic scratch-off game. You can either tape the penny directly onto the card in a prominent spot or tuck it into an accompanying envelope. This thoughtful addition makes the gift complete and instantly usable, eliminating any delay in the excitement of the reveal.
Presenting the card with the penny attached adds to the overall charm and convenience. Your Valentine, or any recipient, will then have everything they need to uncover their hidden prize or message, making the moment of revelation seamless and enjoyable. This small detail significantly enhances the interactive nature of your handmade gift, ensuring a delightful and memorable experience from start to finish.

Tips for Scratch-Off Success
While the process is straightforward, a few expert tips can help you achieve flawless results every time. Always allow ample drying time between paint coats; impatience can lead to a sticky, uneven, or easily smudged scratch-off layer. Consider testing your paint mixture on a small scrap of Con-Tact paper before applying it to your main project. This allows you to check for opacity and scratchability. Work in a well-ventilated area, especially when painting, to ensure proper drying and air circulation. Finally, remember that consistency is key – aim for even, thin coats for the best scratch-off effect. Don’t press too hard when tracing or cutting to avoid damaging the Con-Tact paper or your card.
Beyond Valentine’s Day: Creative Variations
The beauty of DIY scratch-off cards extends far beyond romantic gestures. Imagine creating birthday invitations where the party location is a surprise reveal, or anniversary gifts that offer a choice of date night activities. They’re perfect for gender reveals, turning the announcement into an interactive game for friends and family. Use them as unique party favors or prizes at gatherings, or even as engaging elements in a chore chart for kids, where a completed task leads to a fun reward. Teachers can use them for classroom incentives, and event planners for raffle tickets. The possibilities are truly endless, allowing your creativity to shine through in countless applications, making every occasion a little more special and engaging.
Why Choose DIY? The Power of the Personal Touch
In a world saturated with mass-produced items, a handmade gift carries unparalleled sentimental value. Crafting your own scratch-off card is not just about saving money, although it is a cost-effective alternative to store-bought options. It’s about investing your time, thought, and effort into creating something truly unique and meaningful. The ability to customize every detail – from the specific message to the choice of colors and designs – ensures that your gift perfectly reflects your feelings and the recipient’s personality. This personal touch transforms a simple card into a cherished keepsake, a testament to the effort and love poured into its creation. It’s an interactive, memorable, and deeply personal way to express care, making the act of giving a truly special experience for both the giver and the receiver.
Unleash Your Inner Crafter: Start Creating Today!
Making your own scratch-off cards is a wonderfully rewarding and surprisingly simple craft that adds a unique, interactive dimension to any gift or message. From the initial spark of inspiration to the final reveal, the process is filled with creative joy and the satisfaction of crafting something truly personal. Whether you’re aiming for a romantic Valentine’s surprise, a fun birthday game, or a creative way to convey any message, this DIY project offers endless possibilities. So, gather your materials, follow these steps, and prepare to delight your loved ones with the magic of a handmade scratch-off card. It’s an experience that’s sure to bring smiles and create lasting memories. Dive into the world of custom scratch cards and let your imagination scratch away!







