
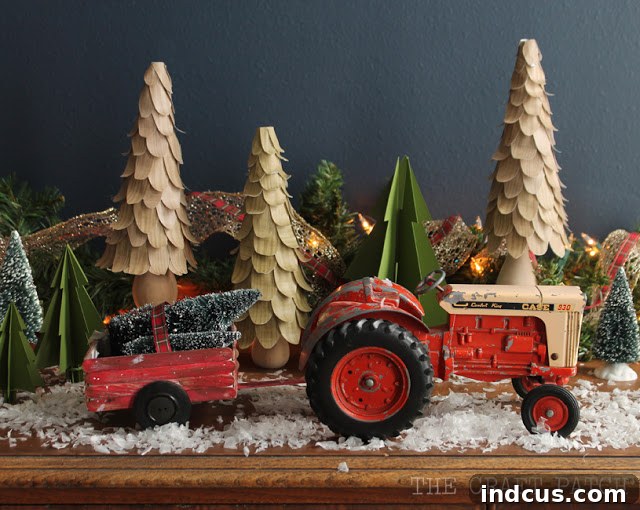
Welcome, fellow craft enthusiasts and lovers of all things festive! As the holiday season draws near, there’s nothing quite like adorning our homes with decorations that tell a story, evoke warmth, and sprinkle a little handmade magic. If you recently enjoyed a glimpse of our Christmas home tour, you might have spotted a particular charming detail that truly captured our hearts: a vintage red tractor, now made even more special with its very own, custom-built Christmas cart.
Today, we’re diving deep into the delightful details of this project, a creative endeavor that transformed a beloved antique into a quintessential piece of DIY Christmas decor. This simple yet incredibly impactful addition takes less than an hour to create, yet it radiates an undeniable festive charm, perfectly embodying the spirit of a rustic, nostalgic Christmas. Prepare to be inspired as we unveil the secrets behind crafting a miniature cart to complement your own cherished vintage red tractor Christmas decoration, ready to be filled with adorable bottle brush trees.
The Heart of the Project: A Vintage Red Tractor and its Story
Every piece of vintage decor carries a history, a quiet narrative whispered through its worn paint and timeless design. Our vintage red tractor is no exception. It’s a classic piece that has always held a special place in our holiday displays, but this year, we envisioned something more. We wanted to elevate its festive appeal, to give it a purpose beyond just standing still. The idea sparked: a miniature cart, perfect for carrying a whimsical cargo of bottle brush Christmas trees, instantly transforming it into a delightful focal point for any Christmas village display or tabletop arrangement.
This project is more than just crafting; it’s about celebrating the beauty of incorporating cherished heirlooms and flea market finds into your modern holiday aesthetic. A vintage tractor, often a symbol of hard work and simpler times, brings a touch of farmhouse charm and genuine nostalgia to your home. Adding a handmade cart not only enhances its visual appeal but also creates a unique, personalized element that store-bought decorations simply cannot replicate. It’s a perfect example of how a small DIY Christmas craft can make a big impact.
Gathering Your Supplies: Crafting a Rustic Miniature Cart
One of the many joys of this particular project is its simplicity and the accessibility of its materials. You likely have most of what you need already tucked away in your craft drawer! For this charming handmade Christmas cart, we rely on a few humble items that, when combined, create a truly captivating effect. Here’s a detailed look at what you’ll need to embark on this quick and rewarding crafting journey:
- Popsicle Sticks (Craft Sticks): These form the primary structure and rustic siding of your cart. Their uniform size and smooth surface make them incredibly versatile. You’ll want standard-sized sticks, but feel free to experiment with wider ones for a different aesthetic.
- Vintage Black Buttons: These ingenious little details serve as the perfect wheels for our miniature cart, adding an authentic, old-world touch. The black color offers a striking contrast and mimics classic tractor wheels. If vintage buttons aren’t available, new black buttons or even small painted wooden discs can work beautifully.
- Regular White Cardstock: This will be the foundational support for your cart, providing a sturdy inner box structure that the popsicle sticks will adhere to. Any sturdy cardstock will do, as it will be entirely covered.
- Craft Paint (Acrylic): We used paint to achieve an “old wood” look for the cardstock base, enhancing the rustic feel before adding the sticks. A neutral brown, grey, or even a diluted black will work well for this effect.
- Hot Glue Gun and Glue Sticks: Your best friend for quick and secure assembly. Hot glue ensures that everything stays firmly in place, making this an incredibly fast project.
- Craft Knife or Scissors: Essential for precisely trimming the popsicle sticks and shaping your cardstock. A self-healing cutting mat is also recommended for protecting your work surface.
- Ruler and Pencil: For accurate measurements and scoring the cardstock to ensure clean folds.
Step-by-Step Guide: Crafting Your Rustic Miniature Christmas Cart
This project is surprisingly quick, taking less than an hour from start to finish, yet it yields a decoration you’ll cherish for years. Follow these easy steps to create your own enchanting DIY miniature tractor cart:
Step 1: Building the Cardstock Foundation
The first step involves creating the internal structure of your cart. Take your regular white cardstock and fold it into a simple box shape. The dimensions will depend on the size of your vintage tractor and how large you want the cart to be. A good starting point might be a box roughly 3-4 inches long, 2 inches wide, and 1.5-2 inches tall. Use a ruler and pencil to mark your cuts and folds, ensuring clean, straight lines. Score the fold lines gently with a craft knife (don’t cut through!) for crisp edges. Once folded, use hot glue to secure the flaps, forming a sturdy, open-top box. This inner box will provide the robust support for your popsicle stick exterior.
Step 2: Preparing for the Weathered Wood Look
Before adding the popsicle sticks, it’s a great idea to paint the cardstock box. This step might seem counter-intuitive since the sticks will cover most of it, but it’s crucial for achieving that authentic “old wood” appearance, especially if there are any small gaps between your sticks. Choose a craft paint in a muted brown, a weathered grey, or even a dark, earthy tone. Apply a thin, even coat to the exterior of your cardstock box. You don’t need to be perfectly neat, as this is just a base layer. Allow the paint to dry completely. This pre-painting step adds depth and ensures no bright white cardstock peeks through your rustic siding.
Step 3: Applying the Popsicle Stick Siding
Now for the fun part – transforming your painted cardstock box into a charming wooden cart! Begin hot gluing the popsicle sticks to the outside of the box. Start from one end and work your way around, ensuring the sticks are aligned neatly. A key trick for a seamless, professional finish is to cut off the curved ends of the popsicle sticks. This allows them to fit tightly together, creating a solid, realistic wooden panel effect. Use a craft knife (with caution!) or strong scissors for this. Apply a thin line of hot glue to the back of each stick and press it firmly onto the cardstock. Continue until all sides of your cart are covered, trimming any excess length as needed. The result is an incredibly convincing miniature wooden cart.
Step 4: Adding the Wheels and Connector Piece
No cart is complete without its wheels! This is where your vintage black buttons come into play. Hot glue two buttons to each side of the cart, positioning them as wheels. For a more authentic look, you might use slightly larger buttons for the back wheels and smaller ones for the front. Next, you’ll need to create a connector piece so your cart can be pulled by the tractor. This can be as simple as gluing a small piece of a popsicle stick or a thin dowel to the front center of your cart, extending out enough to hook onto your tractor. Ensure it’s securely attached with hot glue. This step truly brings your miniature cart to life, ready to embark on its festive journey.
The Joy of Display: Filling Your Cart and Setting the Scene
With your miniature cart complete, the final, most satisfying step is to fill it and integrate it into your Christmas display. We chose an assortment of charming bottle brush trees in various shades of green and perhaps a touch of frosted white. Arrange them snugly within the cart, creating a miniature forest scene. You can add a dusting of faux snow, a sprinkle of glitter, or even a tiny string of fairy lights for an extra magical touch. Imagine tiny presents or miniature pinecones nestled among the trees for added detail.
This rustic Christmas decoration is incredibly versatile. It makes a perfect centerpiece for a mantelpiece, a charming addition to a bookshelf, or a delightful accent on an entryway table. It effortlessly blends with other Christmas village accessories, enhancing any festive tableau with its unique character. The combination of the classic vintage tractor and the handmade cart creates a focal point that is both nostalgic and enchanting, a true conversation starter that will delight family and guests alike.
Why This Project is a Christmas Favorite
I have to say, despite its quick assembly time, this easy Christmas project has quickly become one of my absolute favorite decorations this year. There’s something inherently delightful about seeing my beloved vintage tractor, a piece I’ve always cherished, now pulling a cart brimming with festive bottle brush trees. It transforms a static decorative item into a dynamic, storytelling scene, making me love it all the more. It’s a testament to how a small creative effort can yield such profound decorative joy.
This project is a shining example of how crafting with everyday materials can result in stunning, personalized decor. It’s budget-friendly, requiring only a few inexpensive supplies, and incredibly satisfying. The simple act of creating something with your own hands infuses your home with a unique warmth and character that store-bought items often lack. Whether you’re a seasoned crafter or just starting, this DIY Christmas craft is accessible to everyone, promising a beautiful outcome with minimal effort.
Beyond the Holiday Season: Versatility and Customization
While designed for Christmas, the beauty of this handmade miniature cart lies in its potential for year-round versatility. Imagine filling it with miniature pumpkins and hay for a charming autumn display, or perhaps tiny flowers and bird nests for a spring vignette. The cart itself, with its rustic wooden aesthetic, can be adapted to various themes simply by changing its cargo. You could even paint the tractor a different color if you wished to refresh its look or match a specific decor scheme, although the classic red is undeniably festive.
For those who love to customize, consider adding tiny wreaths to the tractor’s grill, stringing miniature battery-operated fairy lights around the cart, or even crafting tiny gifts to place alongside the trees. The possibilities are endless when it comes to personalizing this setup to reflect your unique style and holiday vision. This flexibility makes it not just a seasonal decoration, but a beloved piece that can evolve and adapt with your home’s decor through the years.
Thank you for stopping by and joining us on this creative journey. We hope this detailed guide inspires you to create your own charming vintage Christmas decor. Happy crafting and happy holidays!







