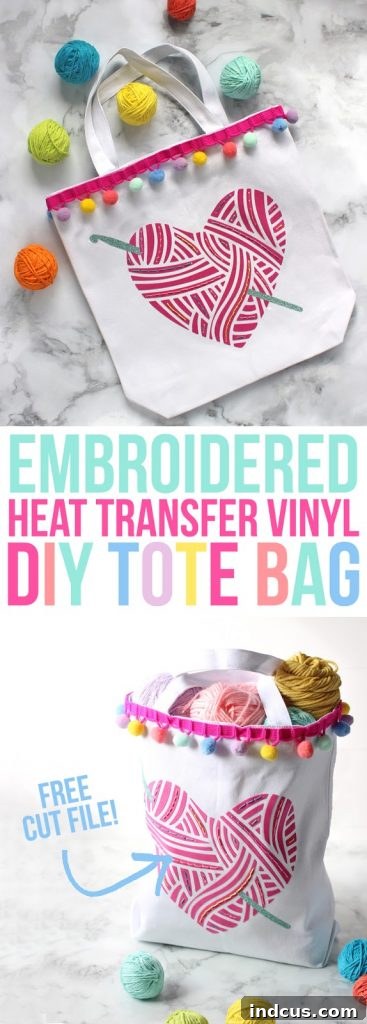
Unleash Your Creativity: Crafting a Custom Embroidered Tote Bag with Heat Transfer Vinyl
There’s a unique satisfaction that comes from creating something truly your own, especially when it’s both functional and beautiful. This delightful craft project combines the modern convenience of heat transfer vinyl (HTV) with the timeless charm of hand embroidery, resulting in a personalized tote bag that’s bursting with character. Whether you’re an avid knitter, a crochet enthusiast, or simply someone who appreciates unique, handmade accessories, this tutorial will guide you through making a custom tote bag perfect for holding your yarn, craft supplies, or everyday essentials.
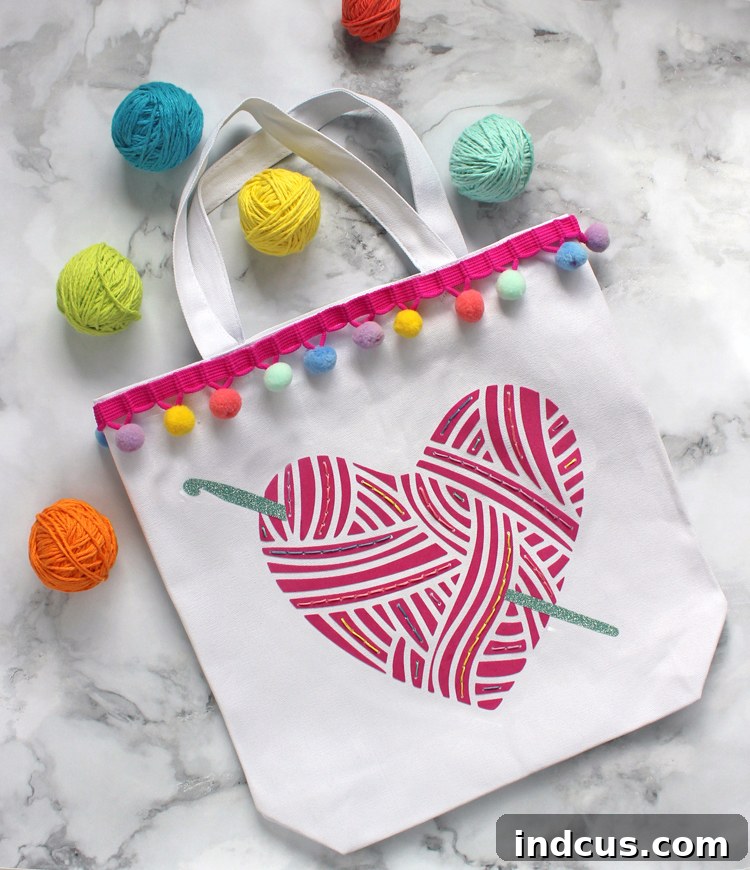
The inspiration for this project stemmed from seeing the innovative blend of HTV and hand embroidery, a technique beautifully showcased by my friends, The Pretty Life Girls, on an amazing sweatshirt. The immediate appeal of this hybrid approach was undeniable, sparking a desire to apply it to a project of my own. The result is this cheerful and highly functional tote bag, designed specifically to cradle yarn and tools for those cozy knitting or crochet sessions.
Integrating a touch of hand embroidery into a vinyl design elevates its aesthetic to an entirely new level. It adds texture, depth, and a bespoke quality that mass-produced items simply can’t replicate. The subtle stitches transform a simple graphic into a tactile piece of art, making your custom tote bag truly stand out. This tutorial focuses on creating a charming yarn-themed design, but the techniques learned here can be applied to countless other personalized projects. Let’s dive into making your own unique embroidered tote!
Materials and Tools You’ll Need:
- Blank Tote Bag (canvas or cotton works best)
- Heat Transfer Vinyl (HTV) – a flocked variety like Stripflock for the main design, and a contrasting type like glitter HTV for accents.
- Embroidery Floss in various colors
- Embroidery Needle
- Scissors
- Weeding Tool (for HTV)
- Iron or Heat Press
- Parchment paper or Teflon sheet
- Cutting Machine (e.g., Silhouette Cameo, Cricut)
- Computer with design software
- Optional: Pom-pom trim or other embellishments
Step-by-Step Guide to Crafting Your Custom Tote Bag:
Step 1: Acquire Your Design Files and Prepare for Customization
The journey to your personalized tote begins with the perfect design. I’ve thoughtfully prepared a collection of free, versatile designs tailored for knitting and crochet enthusiasts. These designs offer various options, including versions with and without text, allowing you to choose what best suits your style. Simply click the link below, and you’ll gain access to a comprehensive folder containing all the available design files. Take your time to browse and select the one that resonates most with your creative vision. Remember, these files are designed to be easily compatible with popular cutting machines like the Silhouette Cameo or Cricut, making the initial setup a breeze for any crafter.
Step 2: Resize, Mirror, and Cut Your Heat Transfer Vinyl
Once you’ve selected your desired design, open it in your cutting machine’s software. The first crucial step is to resize the image to perfectly fit the dimensions of your chosen tote bag. Consider the overall balance and how the design will look on the bag. After resizing, it is absolutely essential to mirror the image before sending it to cut. This step is critical because HTV is applied “face down,” and mirroring ensures your design appears correctly once pressed. Next, prepare your cutting mat by loading it with your chosen heat transfer vinyl, ensuring the shiny side (the carrier sheet) is facing down. For this project, I opted for Pink Stripflock HTV from Expressions Vinyl. The fuzzy, slightly raised texture of Stripflock HTV adds a wonderful tactile element that perfectly complements the hand embroidery, giving the design an almost embroidered feel before you even start stitching. Adjust your cut settings in the software according to the specific type of HTV you are using – a test cut is always recommended to ensure clean lines and easy weeding. Finally, send your design to your cutting machine and watch it work its magic!
Step 3: Weed Your Design with Precision
After your cutting machine has finished its work, carefully remove the HTV from the cutting mat. Now comes the weeding process, which involves removing all the excess vinyl that is not part of your final design. Using a weeding tool, meticulously peel away the negative space, leaving only your chosen design adhered to the clear carrier sheet. Pay close attention to small details and inner cuts. For this specific project, remember to meticulously remove all the tiny dots or perforations within the design. These seemingly small details are incredibly important, as they are precisely where you will perform your beautiful hand embroidery later. Clean weeding ensures a crisp, professional look for your HTV base, providing the perfect canvas for your stitches.
Step 4: Apply the HTV Design to Your Tote Bag
With your design beautifully weeded, it’s time to transfer it onto your tote bag. Lay your tote bag flat on a heat-safe surface. Position your weeded HTV design onto the bag, ensuring it’s perfectly centered and aligned exactly where you want it. The clear carrier sheet should be facing up, protecting your design. If you’re fortunate enough to own a heat press, this is its moment to shine, providing even heat and pressure for a flawless application. However, a standard household iron works just as effectively! If using an iron, ensure it’s set to the recommended temperature for your HTV (usually cotton/linen setting with no steam). Place a piece of parchment paper or a Teflon sheet over the carrier sheet for added protection. Press down firmly and evenly for the recommended time (check your HTV instructions, typically 15-20 seconds), moving the iron slowly across the entire design to ensure all areas receive adequate heat and pressure. Avoid sliding the iron, as this can shift your design.
Step 5: Peel the Carrier Sheet and Add Accent HTV
Patience is key after applying your HTV. Allow the design to cool completely before attempting to peel away the clear carrier sheet. Rushing this step can cause the vinyl to lift or distort. Once cool, gently peel back the carrier sheet at a shallow angle. Your beautiful HTV design should now be perfectly adhered to the tote bag. If any part lifts, simply lay the carrier sheet back down, re-press with your iron or heat press, and allow it to cool again before trying to peel. This is also the perfect moment to add any secondary HTV elements, such as the knitting needle or crochet hook for our yarn bag design. For these accents, I chose a contrasting jade glitter HTV. Glitter HTV adds a fantastic sparkle and texture, creating a delightful visual contrast with the matte or flocked main design. Apply these smaller pieces using the same heating and cooling process to ensure secure adhesion.
Step 6: Embrace the Art of Hand Embroidery
Now, for my absolute favorite part – bringing the design to life with hand embroidery! This is where your personal touch truly shines. Select a few vibrant and complementary colors of embroidery floss. Thread your needle and prepare to stitch into the strategically placed holes within your HTV design. These small perforations act as a guide, making the embroidery process incredibly straightforward, even for beginners. A simple backstitch or running stitch works beautifully for outlining or filling these areas, creating definition and a lovely handmade texture. Choose colors that pop against your HTV and tote bag, adding depth and dimension. As you stitch, you’ll see the design transform from a flat graphic into a rich, tactile artwork. Take your time, enjoy the meditative rhythm of stitching, and let your creativity flow through each colorful thread. This combination of HTV and embroidery not only looks stunning but also offers a durable finish, perfect for a frequently used item like a tote bag.
Step 7: Add Finishing Touches and Enjoy Your Custom Creation
To give your custom embroidered tote bag an extra playful and polished look, consider adding a decorative trim. A bit of fun and colorful pom-pom trim sewn around the top edge of the bag can add a charming whimsical touch, instantly enhancing its appeal. I found my trim easily at Walmart, but you can explore various haberdashery stores or online retailers for a wide array of options, from tassels to fringe. Secure the trim with a simple running stitch or using fabric glue if preferred, ensuring it’s firmly attached. Once this final detail is in place, your unique, handmade tote bag is complete! You’re now ready to carry your yarn, crafting projects, or daily essentials with undeniable style and a proud sense of accomplishment. This custom tote bag isn’t just a functional item; it’s a testament to your creativity and a wonderful conversation starter.
Beyond the Yarn Bag: Endless Possibilities
While this tutorial focused on creating a delightful yarn bag, the technique of combining heat transfer vinyl with hand embroidery opens up a world of creative possibilities. Imagine personalized t-shirts, decorative throw pillows, unique wall hangings, or even custom gifts for friends and family. The durability of HTV paired with the intricate beauty of embroidery makes this method incredibly versatile. Experiment with different types of HTV – textured, metallic, holographic – and various embroidery stitches to create truly one-of-a-kind pieces. Your Silhouette Cameo or Cricut machine will be your best friend in cutting intricate designs, and your embroidery floss will add that irreplaceable handmade charm.
Caring for Your Embroidered HTV Tote Bag
To ensure your beautiful custom tote bag lasts for years to come, proper care is essential. When washing, turn the bag inside out to protect the HTV and embroidery. Machine wash on a gentle cycle with cold water, using a mild detergent. Avoid using harsh bleaches or fabric softeners. Tumble dry on a low heat setting or, even better, air dry by laying it flat or hanging it. If ironing is needed, do so from the inside out or place a pressing cloth over the HTV and embroidery to prevent direct contact with the hot iron. Following these simple care instructions will help preserve the vibrant colors and intricate details of your handmade masterpiece.
Your Next Favorite DIY Project Awaits!
There’s nothing quite like the joy of crafting something with your own hands, especially when the result is as charming and useful as this custom embroidered tote bag. This project is a fantastic way to explore different crafting techniques, blend modern tools with traditional skills, and ultimately create a piece that perfectly reflects your personal style and passions. Whether you’re making it for yourself or as a thoughtful gift for a fellow crafter, the unique combination of HTV and hand embroidery ensures a truly special outcome. So gather your supplies, fire up your cutting machine, and get ready to stitch some magic into your next favorite accessory!