
After what felt like an endless search, the elusive camera charger has finally resurfaced! It was discovered nestled deep within my husband’s closet, cleverly hidden beneath a stack of his shoes. Yes, you read that right – a perfectly logical storage solution for essential electronic accessories. While the mystery of its disappearance may now be solved, it certainly gives us a clear indication of who bears the primary responsibility for its initial vanishing act. All joking aside, the relief of finding it is immense, as it means I can now power up and dive back into sharing all the exciting home decor transformations I’ve been immersed in lately.
The past few weeks have been a whirlwind of creative activity, largely spurred by the anticipation of welcoming company into our home. There’s nothing quite like knowing guests are on their way to kickstart those long-overdue decorating projects! My current focus has been on revitalizing two key areas: our basement family room and the kids’ bedroom. These spaces were ripe for a refresh, and I was eager to infuse them with new energy and style.
For the basement family room, the design challenge revolved around our existing black leather sofa. This piece is undeniably a strong focal point, and with several other elements already in play within the room, I decided to simplify the decor palette dramatically. Sticking to a classic and sophisticated scheme of black, white, and grey allows for a cohesive look that feels both modern and timeless. This neutral foundation provides a calming backdrop, ensuring the room feels welcoming without being overly cluttered or visually chaotic. It’s a versatile palette that offers endless possibilities for layering textures and subtle patterns, creating depth and interest without overwhelming the space.
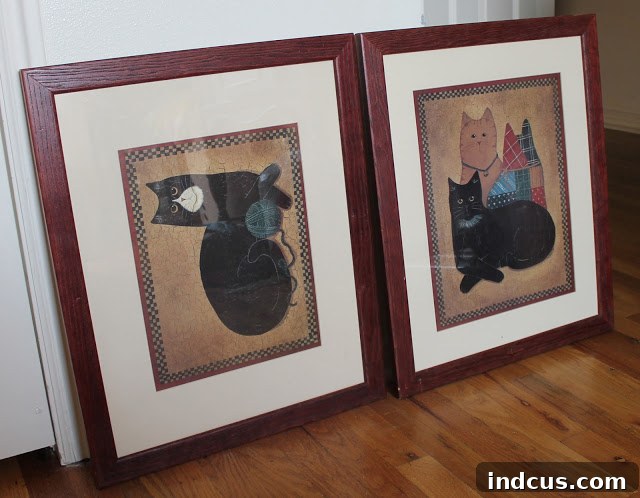
My journey into this particular decor project began, as many of my favorite transformations do, with a fortunate find at a local yard sale. As I browsed the various treasures, my eyes landed on two remarkably large picture frames, each measuring an impressive 18 by 22 inches. The fact that they were a matching pair, and being offered for a mere 50 cents each, made them an absolute steal I couldn’t resist. These kinds of finds are rare, and I instantly knew they had potential to become significant statement pieces.
I envisioned these frames proudly displayed above my couch, adding a much-needed artistic touch to the wall. However, there was one minor detail: the original prints inside depicted cats. While I appreciate feline friends, cat prints weren’t quite the aesthetic I was aiming for in my modern, neutral-themed family room. Their transformation, therefore, became an immediate priority. The sooner I could begin, the better, so I could align them with my vision for the revitalized space.
The first step in their metamorphosis was giving the frames themselves a sleek update. I opted for a sophisticated grey spray paint, which instantly modernized their appearance. After the frames were perfectly prepped and painted, my attention shifted to the picture mats. Upon closer inspection, I realized they were a rather dated, funky cream color – definitely not the crisp white I needed to complement the black, white, and grey scheme. This presented a slight conundrum, but then I remembered a clever DIY trick: you can paint picture mats!
This revelation was, and still is, a game-changer for me and anyone who loves to hunt for budget-friendly decor. It completely opens up a new realm of possibilities when sifting through yard sales and thrift stores. No longer are you limited by the original color of a mat; with a can of spray paint (or even craft paint), you can customize it to perfectly match your project. For these mats, I chose a bright, pure white, which immediately elevated their look and made them feel fresh and contemporary.
The newly painted mats looked infinitely better – clean, crisp, and ready to frame some truly striking art. With the frames and mats perfectly aligned with my vision, it was time to tackle the artwork itself. Inspired by contemporary aesthetics, I decided to try my hand at creating some abstract art to fill these grand frames.
My initial approach was quite straightforward. I began by painting directly over the existing cat prints with a solid coat of white paint. This served as a fresh canvas, completely obliterating any trace of the former felines. Once this base layer was dry, I strategically applied masking tape to create geometric patterns and lines. The idea was to section off certain areas before applying different shades of grey, silver, black, and white paints. I experimented with layering and blending these colors to achieve a dynamic, textured look. The final touch for this first attempt involved carefully peeling away the tape after the paint had dried, revealing crisp, white lines where the tape had been. This technique often yields incredibly satisfying results, creating a graphic and modern effect.
Alas, the abstract creation, despite my best efforts, didn’t quite hit the mark. While the process itself was enjoyable, the end result left me feeling underwhelmed. The combination of colors and lines, once framed, gave off a distinct vibe that was far too reminiscent of a specific era – let’s just say, a couch from the 1980s. It simply didn’t align with the sophisticated, timeless feel I was striving for in our family room. Sometimes, even with the best intentions and creative execution, a project doesn’t pan out exactly as envisioned. It’s all part of the DIY journey – learning, experimenting, and knowing when to pivot.
Undeterred by the first attempt, I quickly moved on to Plan B, which thankfully yielded far more satisfying results. My inspiration for this second artistic endeavor came from a beautiful Valentine’s Day card I had previously pinned on Pinterest. I absolutely adored its aesthetic, but there were two main hurdles: the image resolution was far too low to be printed at a large scale for wall art, and it prominently featured the phrase “Happy Valentine’s Day,” which wasn’t suitable for year-round display. Recognizing its potential, I decided to recreate my own version of the design in Photoshop.
This digital approach allowed for complete creative control. I meticulously designed a graphic that captured the essence of the original card’s charm while making it my own. To enhance the “riding” theme that I vaguely felt within the original design, I incorporated some charming old-fashioned bicycle clip art. This addition perfectly complemented the aesthetic and added a whimsical, yet sophisticated, touch. Once I was happy with the composition, I placed the two distinct images (designed to be complementary, not identical) into an 18×24 inch Photoshop document. The next step was a genius budget hack: I sent the file to Staples to be printed as an engineering print.
For those unfamiliar, engineering prints are typically used for blueprints and architectural drawings. They are printed on large, thin paper in black and white (or sometimes limited color, but black and white is most cost-effective) and are incredibly inexpensive compared to standard photo prints. An 18×24 inch engineering print cost me a mere $1.79! This method is a fantastic way to create large-scale, custom artwork without breaking the bank. When the prints arrived home, I simply cut the single 18×24 inch sheet in half, resulting in two perfectly sized, striking art pieces. And just like that, with a little digital magic and a smart printing choice, I had two large, custom prints for less than $5 total.
The transformation was complete, and I was absolutely thrilled with the outcome of my second attempt. These elegant, custom prints now perfectly fill the formerly empty wall space above our couch, contributing significantly to the sophisticated black, white, and grey aesthetic of the family room. The entire project, from finding the frames to creating the art, was not only incredibly budget-friendly but also immensely satisfying. It’s a testament to the power of DIY and how a little creativity can elevate a space without a hefty price tag. The joy of seeing a vision come to life, especially when it costs so little, is truly unparalleled. It’s proof that beautiful, personalized home decor is accessible to everyone.
Wouldn’t you agree that the final result is a significant improvement? The new art pieces tie the room together beautifully and add a touch of modern elegance. This project has truly revitalized the family room, making it a more inviting and stylish space for both our family and our upcoming guests. It serves as a wonderful reminder that with a bit of ingenuity, patience, and a willingness to try (and sometimes re-try), you can achieve incredible transformations in your home.







