
Transform Your Decor: DIY Spooky Halloween Book Covers
As the leaves begin to turn and a crisp chill fills the autumn air, our thoughts inevitably drift towards the magic and mystery of Halloween. While traditional decorations are always charming, there’s something truly special about adding a touch of personalized, gothic elegance to your home. For those who, like me, always have decorative books gracing their living spaces – perhaps on a mantelpiece, a coffee table, or even a piano – the arrival of spooky season presents a unique opportunity. Instead of simply packing away these beloved literary pieces, imagine transforming them into ancient, mystical tomes straight out of a forgotten library, perfect for setting an enchanting Halloween mood.
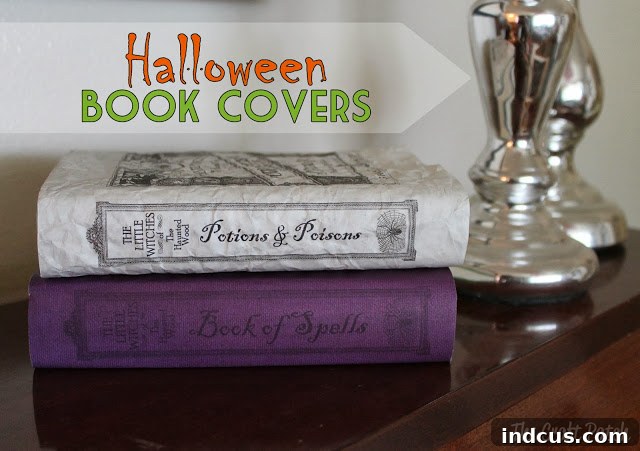
This year, I decided to embark on a creative journey, crafting custom book covers that would instantly turn my everyday decorative books into eerie, vintage treasures. The result? A stunning display of “spooky old books” that beautifully complement the Halloween aesthetic without requiring entirely new decor. This DIY project is not only incredibly fun and satisfying but also offers a cost-effective way to infuse your home with an authentic, haunting charm. Let’s delve into how you can easily replicate this captivating transformation and give your existing book collection a delightfully dreadful makeover.
The Allure of Aged Aesthetics: Why Vintage Book Covers for Halloween?
There’s an undeniable charm to vintage aesthetics, especially when it comes to Halloween decor. Old books, with their weathered pages and mysterious engravings, evoke a sense of history, forgotten secrets, and ancient magic that perfectly aligns with the spirit of the season. By creating custom covers, you’re not just decorating; you’re storytelling. Each book can hint at a forgotten spell, a ghastly tale, or a potion recipe from a bygone era, adding layers of intrigue to your seasonal display.
My quest for these perfectly eerie designs led me to the incredible archives of The Graphics Fairy, a treasure trove of public domain vintage images. Their collection provided the ideal starting point for my “wicked” artistic endeavors. These classic illustrations, ranging from arcane symbols to haunting landscapes and gothic portraits, lend themselves beautifully to creating covers that appear genuinely ancient and mysterious. The beauty of using such resources is the ability to adapt and personalize these timeless images to suit your specific vision, ensuring your Halloween decor is truly one-of-a-kind.
Crafting Your Own Spooky Masterpieces: A Step-by-Step Guide
Once you’ve gathered your inspiration, the process of bringing these spooky book covers to life is straightforward and incredibly rewarding. Here’s how you can transform your decorative books into captivating Halloween curiosities:
Step 1: Selecting and Editing Your Vintage Imagery
The first step involves diving into the vast world of vintage imagery. Websites like The Graphics Fairy offer an abundance of high-quality, public domain graphics perfect for this project. Look for images that evoke a sense of mystery, the gothic, or classic Halloween themes – think skeletal figures, antique botanical illustrations, celestial maps, or eerie portraits. I carefully selected several images that resonated with the old-world, slightly sinister vibe I was aiming for.
Once you’ve chosen your favorite graphics, it’s time for a little digital magic. Using a photo editing software like Photoshop (or free alternatives such as GIMP or Canva), you can customize these images to perfection. This stage allows you to resize the images to fit various book dimensions, adjust colors to give them an aged, sepia-toned look, and even add text for titles and author names. I spent some time experimenting with different layouts and effects, ensuring each cover had its own distinct character while maintaining a cohesive theme. This personalized touch is what truly elevates a DIY project, making each book cover a unique piece of art.
Step 2: Preparing for Print – Sizing and Paper Choice
After meticulously editing your designs, the next crucial step is preparing them for print. Accurate sizing is key here. Measure the height, width, and spine of the books you intend to cover. You’ll want to adjust your digital designs to these specific dimensions, adding a little extra margin on the top, bottom, and sides for wrapping. It’s often a good idea to print a test strip on plain paper first to ensure the scale is correct before committing to your final print. This helps avoid waste and ensures a perfect fit.
The type of paper you choose can also significantly impact the final look. For a truly authentic, aged feel, consider using matte photo paper or a slightly heavier cardstock. While standard printer paper works, these options provide a more substantial feel and prevent ink from bleeding through. Experiment with different paper textures if you wish to add another layer of authenticity to your spooky creations. Remember, the goal is to make these covers look as though they’ve been preserved for centuries in a dusty attic.
Step 3: The Art of Wrapping Your Books
Once your custom covers are printed and cut to size, the final step is wrapping them around your chosen books. This is a simple process, much like wrapping a gift. Carefully align the center of your printed cover with the spine of the book. Gently fold the paper around the front and back covers, making crisp creases along the edges of the book’s spine and covers. Once it’s perfectly aligned, use a small amount of double-sided tape or a glue stick to secure the inner flaps of the cover to the inside of the book’s original covers. This ensures a neat, professional finish and prevents the new cover from slipping.
The beauty of this method is that your original decorative books remain completely unharmed, allowing you to easily remove the Halloween covers once the season is over. This flexibility makes it an ideal solution for temporary seasonal decor, letting you refresh your style with ease. And since I went to all the trouble of making them, I figured I might as well share the designs too! Just click on the images below to save them to your computer. Then print them out (you may have to play with sizing to match your specific books) and wrap them around an old book. Enjoy creating your own haunted library!
Beyond the Piano: Displaying Your Spooky Literary Treasures
While my original intention was to adorn my piano with these eerie volumes, their versatility extends far beyond a single display spot. Imagine these custom-covered books gracing a variety of locations throughout your home, each contributing to a rich, immersive Halloween atmosphere. Place them on a mantelpiece alongside flickering LED candles and faux cobwebs to create a focal point of gothic elegance. Stack them on a coffee table next to a bowl of candy corn, inviting guests to ponder their mysterious contents. Arrange them on a bookshelf, interspersing them with other seasonal trinkets, transforming your everyday library into a cabinet of curiosities.
These spooky books also make fantastic props for a Halloween party. Use them as part of a tablescape for a haunted dinner, or as decorative elements on a bar cart serving potions and elixirs. Their unique appearance will undoubtedly spark conversation and add an extra layer of thematic detail that purchased decorations often lack. The possibilities are truly endless, limited only by your imagination and your desire to imbue every corner of your home with the spirit of Halloween.
Personalizing Your Spooky Library: Font Choices and Titles
One of the most exciting aspects of this DIY project is the ability to fully customize the titles and author names on your book covers. This is where you can truly let your creativity run wild, inventing intriguing titles that hint at dark arts, forgotten lore, or chilling tales. To achieve an authentic vintage, gothic look, the choice of font is paramount. For my designs, I found that the fonts Blackadder and Poor Richard worked exceptionally well. Blackadder offers a flowing, slightly ornate style reminiscent of ancient manuscripts, while Poor Richard provides a more solid, traditional yet still aged aesthetic.
However, don’t feel limited to just these two! There’s a vast world of free and commercial fonts that can enhance the spooky vibe. Look for styles categorized as “gothic,” “horror,” “old English,” or “medieval” to find fonts that perfectly complement your chosen vintage imagery. Think about titles like “Grimoire of Shadows,” “Ancient Incantations,” “Potions & Poisons,” “The Ghastly Almanac,” “Whispers from the Crypt,” or “Forgotten Rituals.” You can even add fictional author names like “Mordecai Macabre” or “Elara Nightshade” to complete the illusion. Experiment with different combinations and enjoy the process of bringing your imagined library of horrors to life, one exquisitely designed cover at a time.
Conclusion: Embrace the Spirit of DIY Halloween Decor
Creating these DIY spooky Halloween book covers is more than just a craft project; it’s an invitation to infuse your home with a personalized touch of seasonal magic. It’s an opportunity to transform ordinary items into extraordinary pieces of decor, all while embracing your inner artist and saving on costly store-bought decorations. The satisfaction of seeing your decorative books transform into intriguing, ancient tomes, perfectly aligned with your Halloween theme, is truly immense.
Whether displayed prominently on your piano, nestled among other autumnal accents, or serving as a centerpiece for your Halloween festivities, these custom book covers will undoubtedly enchant and delight. So gather your materials, let your imagination guide you through the archives of vintage imagery, and embark on this wonderfully “wicked” journey of creation. Your home will thank you for the unique and mysterious ambiance you’ve cultivated. Happy haunting, and happy crafting!







