
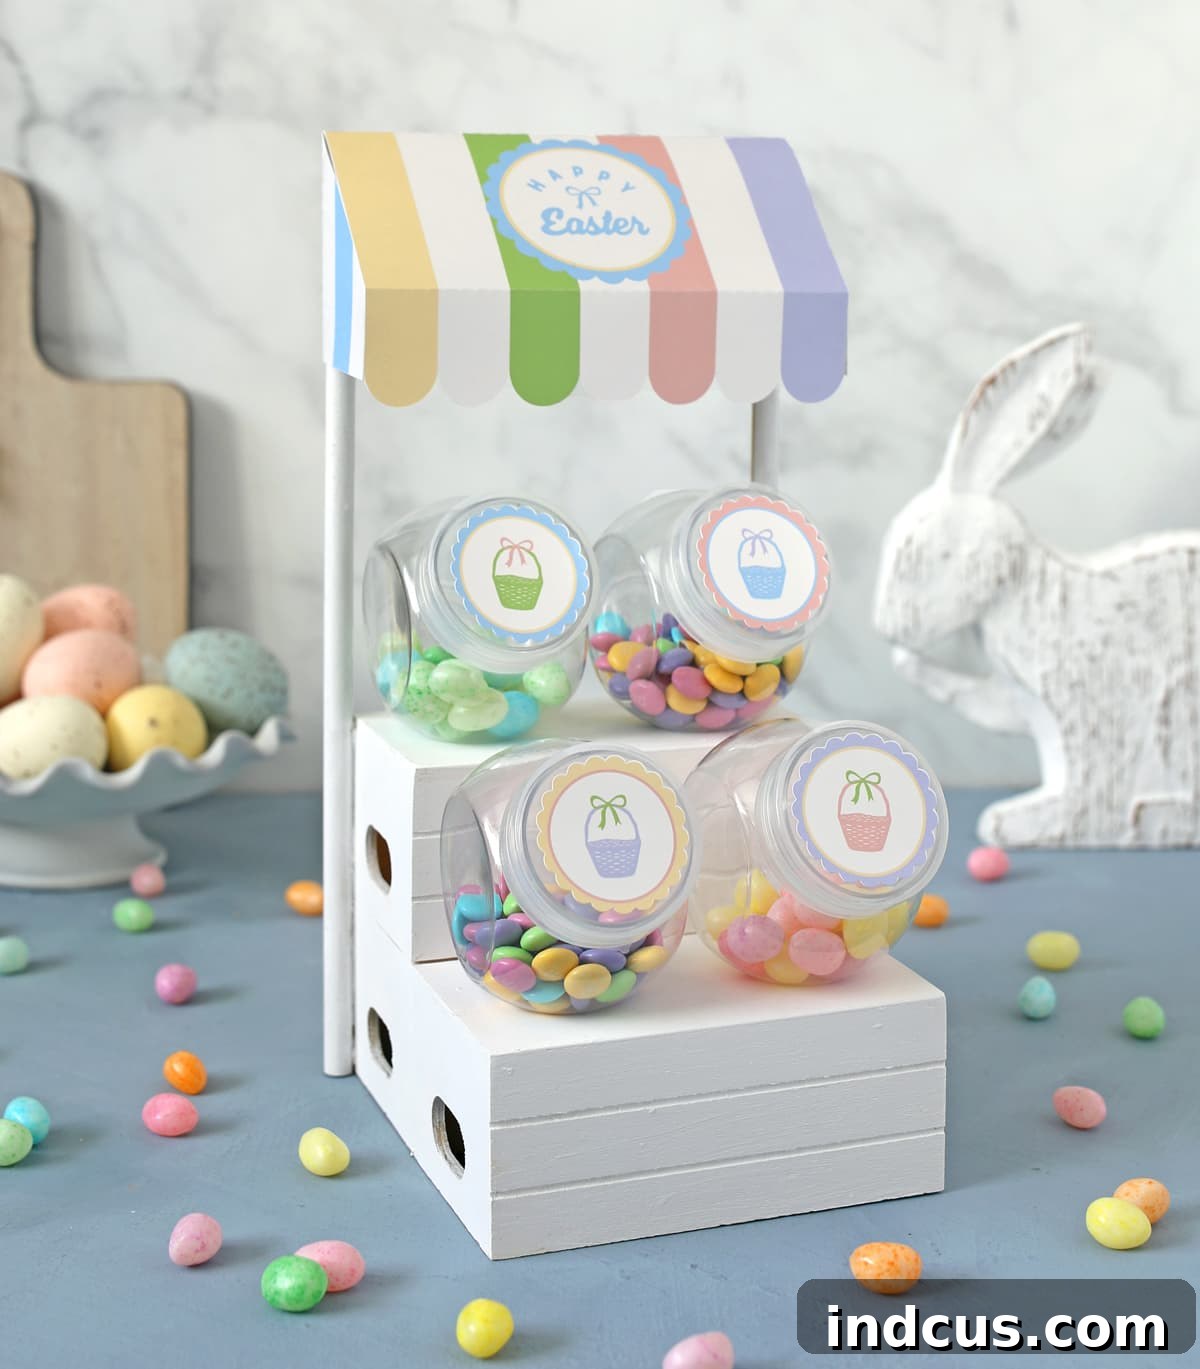
Craft a Whimsical Easter Candy Shop Display: Your Ultimate Dollar Tree DIY Guide
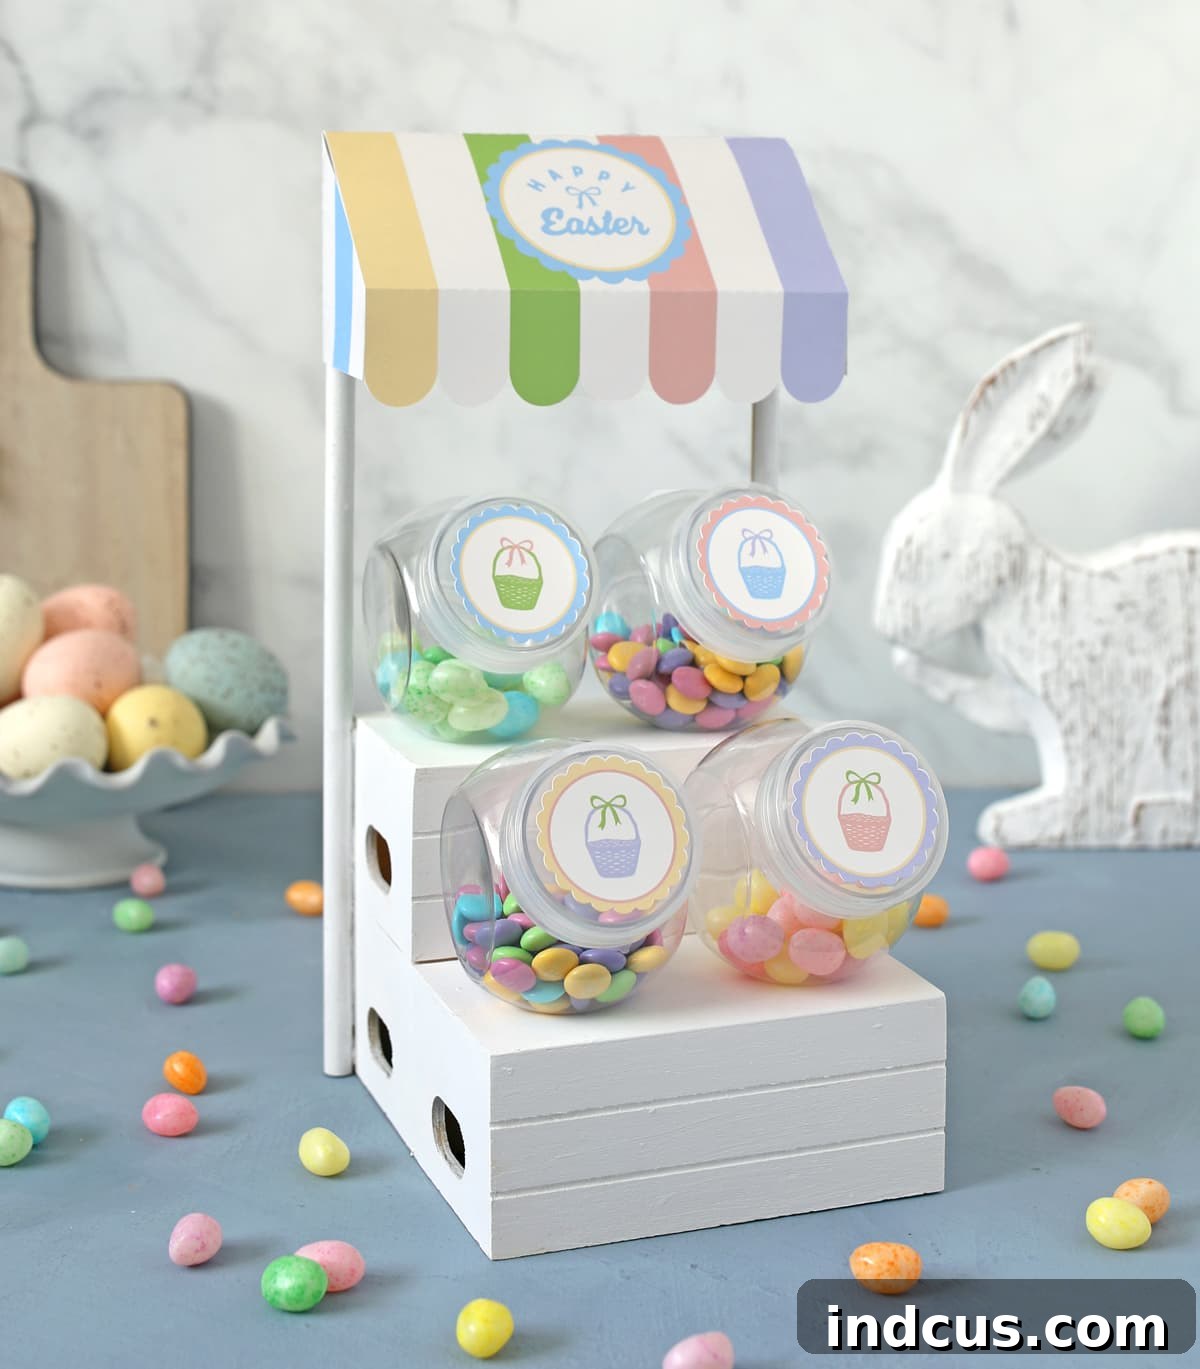
As promised, we’re thrilled to unveil the latest addition to our beloved holiday candy shop series – a delightful design perfect for Easter! This charming display will bring a touch of sweet spring cheer to your home, making it an ideal centerpiece for your Easter celebrations, a fun project for the kids, or simply a festive accent for your seasonal decor.
If you’re just joining our creative journey, earlier this year we embarked on a mission to craft a unique candy shop display for every major holiday and season, primarily utilizing incredibly affordable supplies from Dollar Tree. The response to our inaugural Cupid’s Candy Shoppe was overwhelmingly positive, inspiring us to continue this fun and budget-friendly crafting adventure throughout the year.
So far, our festive collection includes:
- Cupid’s Candy Shoppe for Valentine’s Day: A romantic display overflowing with love-themed treats.
- Shamrock Sweets Shop for St. Patrick’s Day: Bringing luck and sweetness with vibrant green accents.
- Uncle Sam’s Candy Emporium for the Fourth of July: A patriotic tribute to summer celebrations.
- Farmer’s Market Fruit Stand for Summer: A fresh and vibrant take, perfect for warmer days.
And now, we’re adding an adorable Easter candy shop to this growing lineup! This new design incorporates pastel colors, cute bunny motifs, and all the whimsical charm you’d expect from an Easter display. It’s truly a “hoppy” addition that promises to delight both young and old.
One of the most appealing aspects of this candy shop project is its incredible versatility. Once you’ve constructed the robust wooden base, you can effortlessly transform your display for each new holiday or season simply by swapping out the paper awning and refreshing the candy jar lid decorations. This ingenious design allows you to enjoy a continually evolving decorative piece without starting from scratch every time. We adore anything that can be easily customized for every season – there’s something incredibly satisfying and fun about it!
Why Create Your Own Easter Candy Shop?
Beyond the sheer joy of crafting, making your own Easter candy shop offers numerous benefits. It’s a fantastic way to personalize your holiday decor, adding a handmade touch that mass-produced items simply can’t replicate. This project is also incredibly budget-friendly, utilizing many items readily available at your local Dollar Tree, allowing you to create a high-impact display without breaking the bank. Furthermore, it’s a wonderful activity to share with family, creating cherished memories as you craft together.
Imagine the delight on your children’s faces when they see this festive display, brimming with their favorite Easter treats. It serves as a charming focal point for Easter brunch, a unique way to present Easter basket goodies, or a cheerful addition to any spring-themed party.
To embark on your very own Easter candy shop crafting adventure, gather the following supplies. Many of these items are staples in our series, so you might already have some on hand from previous projects!
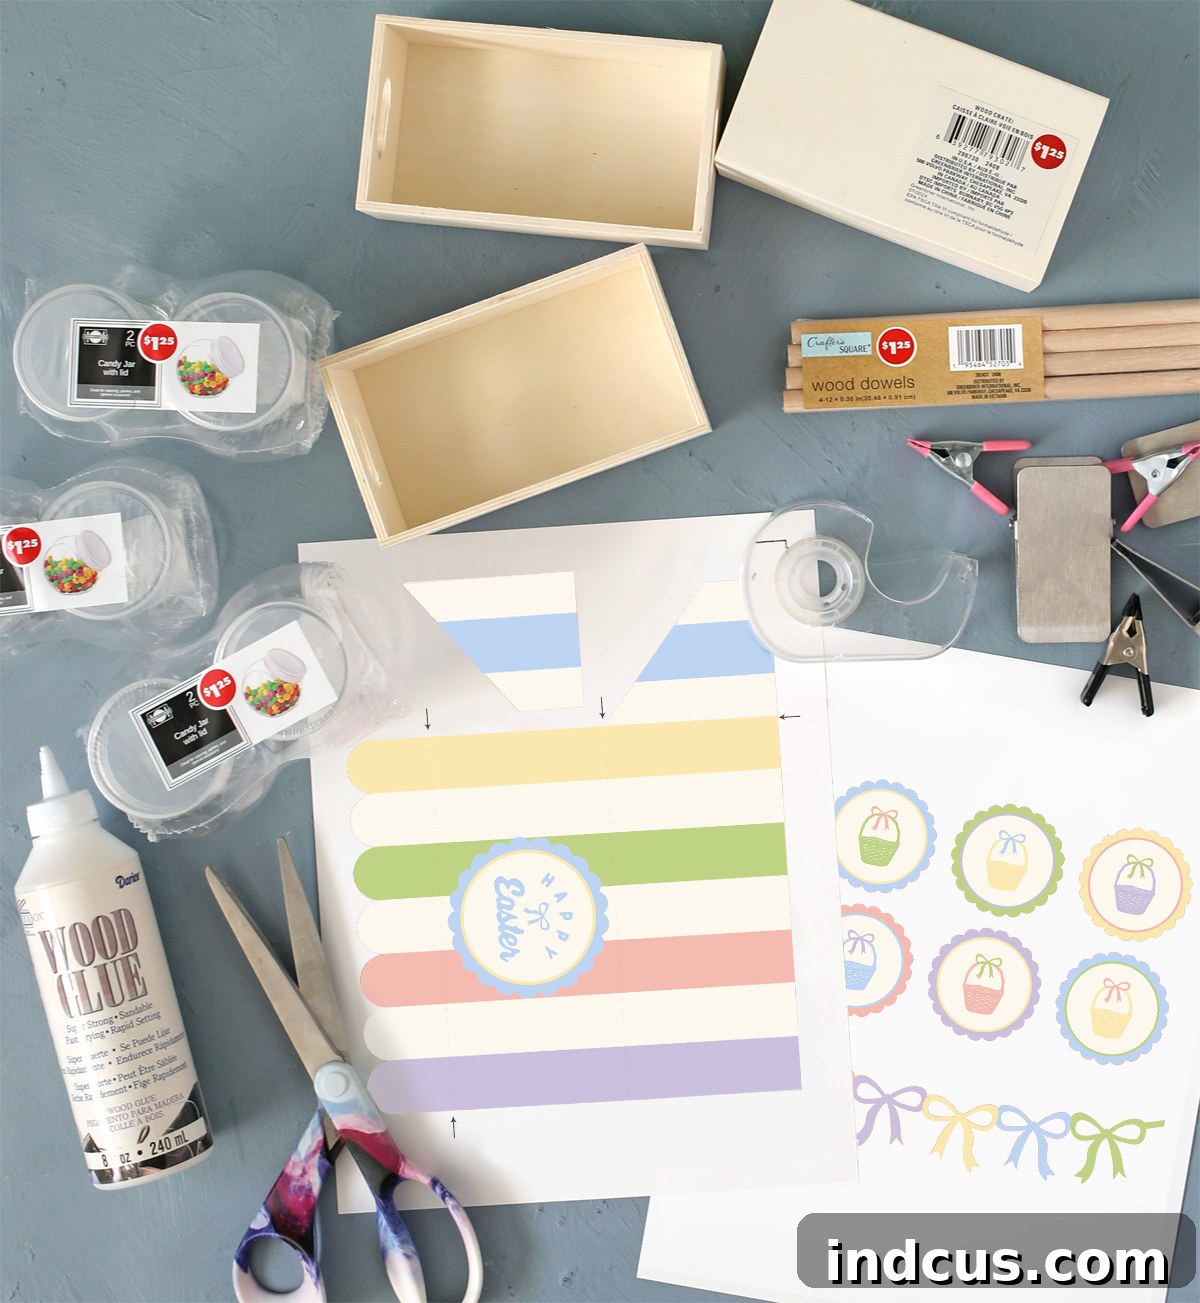
Materials Needed for Your Easter Candy Shop
- 3 Wooden Crates: Look for “Crafter’s Square Wood Crate with Handles” at Dollar Tree. These form the sturdy base of your display. While linked online for reference, we highly recommend purchasing these in-store to avoid bulk online orders.
- Wooden Dowels: You’ll need two dowels, typically found in 4-count packs in the craft section. These will support your festive awning.
- Small Candy Jars with Lids (4 total): Dollar Tree often carries various small jars perfect for holding candies. The specific style isn’t crucial, but ensure they have lids for the printable toppers.
- White Cardstock: Essential for printing your awning and jar lid decorations. A heavier weight cardstock (65-80lb) is recommended for durability.
- Printable Candy Shoppe Awning: This custom-designed template is available for download at the bottom of this post and features cheerful Easter-themed graphics.
- Wood Glue: For securely bonding the wooden crates together.
- Clamps: “Crafter’s Square Metal Craft Clamps” from Dollar Tree are perfect for holding the crates in place while the wood glue dries.
- Hot Glue Gun + Glue Sticks: Your best friend for quick, strong bonds, especially when attaching the dowels.
- Craft Paint or Spray Paint: Choose pastel colors like mint green, baby pink, soft yellow, or sky blue to perfectly complement your Easter theme.
A quick tip regarding purchasing materials: while we’ve linked to the exact items online for your convenience and visual reference, we strongly advise heading to your local Dollar Tree store. Online purchases often require buying in bulk (e.g., 24 units), which isn’t ideal for a single craft project. Browsing in-store also allows you to pick the best quality items and discover other potential embellishments.
Initially, I purchased six candy jars for this project, thinking I might place two on the “table” in front of the stand. However, I ultimately decided that four jars, arranged neatly on the tiers, created a cleaner and more appealing look. Feel free to experiment with the number of jars based on your personal preference and the amount of candy you wish to display.
Step-by-Step Instructions for Your Easter Candy Shop
Creating this charming Easter candy shop is a rewarding experience. Follow these detailed steps to bring your festive display to life!
Step 1: Assemble the Wooden Crate Base
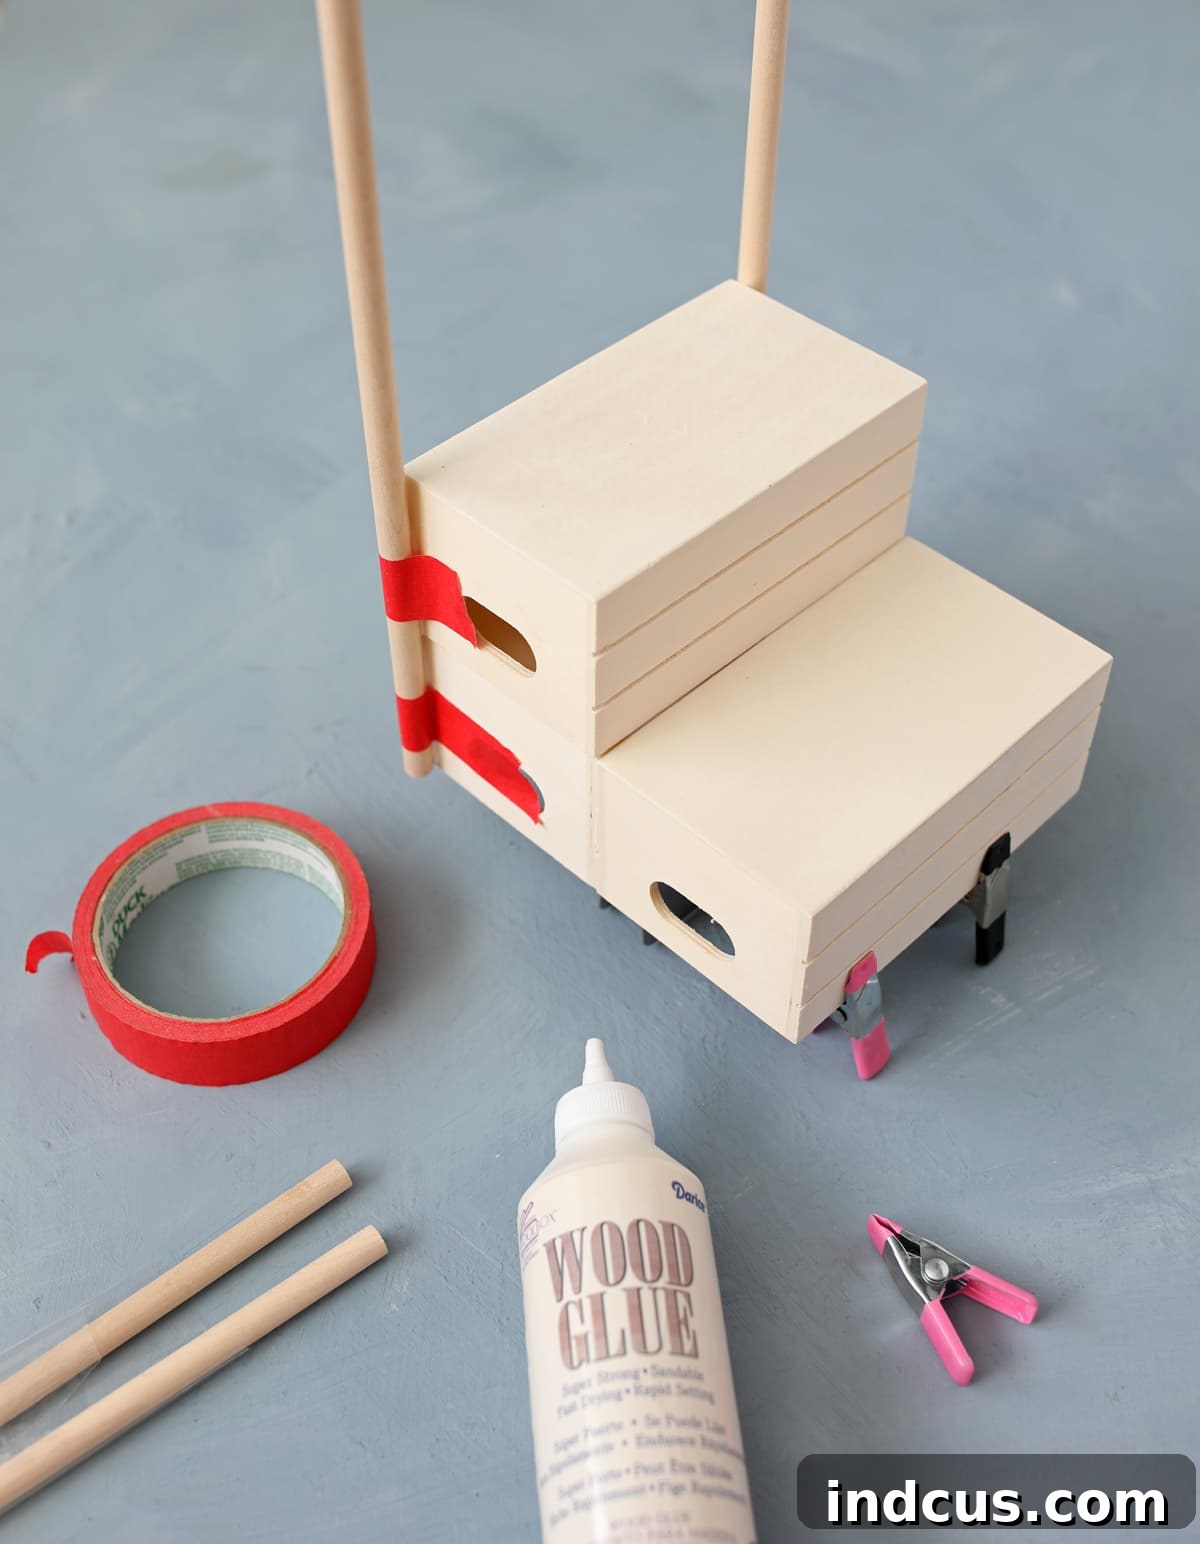
Begin by carefully removing any store stickers or price tags from all three wooden crates. Take your wood glue and apply it generously to the edges where the crates will meet. Arrange them as shown in the initial images: two crates forming the bottom layer, side-by-side, and one crate stacked centrally on top. Crucially, ensure the crates are positioned upside down so that their solid bottom sides face upwards, creating stable flat surfaces for your display. Once positioned, use your clamps to firmly hold the glued crates together. Proper clamping is essential for a strong bond. Allow the wood glue ample time to dry, ideally a minimum of one hour, but overnight is even better for maximum stability. This foundational step is critical for a durable candy shop structure.
Step 2: Attach the Support Dowels
Once your crate base is completely dry and stable, it’s time to add the dowels that will support the awning. Position one dowel on each side of the top-stacked crate, aligning them vertically with the back edge. For this step, hot glue is your best friend! I initially attempted to use wood glue, but it proved ineffective due to the small surface area and the need for an instant bond. Hot glue, however, molds beautifully around the dowels, filling any minor gaps or uneven spots in the wood, and provides superior, immediate adhesion. Apply a generous amount of hot glue to the bottom of each dowel and press it firmly onto the crate, holding for a few seconds until set. Repeat for the second dowel, ensuring they are parallel.
Step 3: Paint Your Candy Shop
Now that your candy shop structure is assembled, it’s time to add a splash of color! You can choose between spray paint for a quick, even finish, or regular craft paint for more control and detail. Given that outdoor spray painting might not be feasible in all weather conditions, craft paint is a fantastic alternative. Opt for charming Easter pastel hues – soft pinks, light blues, mint greens, or sunny yellows would be perfect. Apply several thin coats of paint, allowing each coat to dry thoroughly between applications, to achieve a smooth and vibrant finish. Painting your base ensures a cohesive and professional look for your seasonal display.
Step 4: Prepare the Printable Awning
This is where your candy shop truly comes to life! We’ve designed a special printable awning that perfectly captures the spirit of Easter. To accommodate different crafting preferences, I’ve created two variations:
- An SVG file: Ideal for use with electronic cutting machines like Silhouette or Cricut.
- A PDF version: Perfect for those who prefer to cut by hand with scissors.
You’ll find both file types conveniently located in the download folder at the bottom of this post. Please double-check to ensure you download the correct file format for your specific crafting method. Both printable files include the main large awning shape and a smaller separate piece designed to form one side of the awning. This two-piece design was necessary to ensure the entire awning could fit on a standard piece of paper without compromising scale or detail.
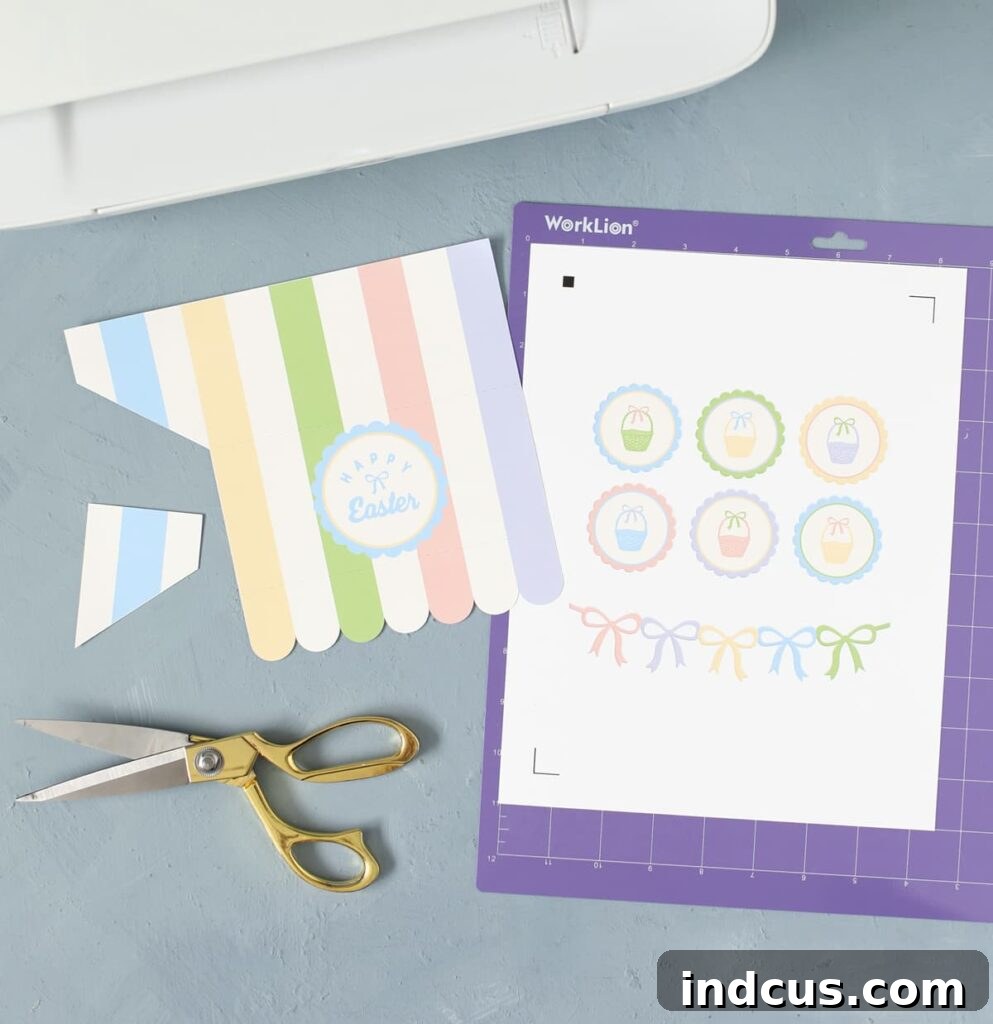
While some of the following tutorial photos illustrate steps from our Cupid’s Candy Shoppe, the underlying methods for cutting, folding, and assembling the awning are identical. This allows us to share this exciting Easter project with you even quicker!
ELECTRONIC CUTTING MACHINE INSTRUCTIONS
If you are fortunate enough to own a Silhouette or Cricut machine, the included SVG file will make this step incredibly fast and precise. The “Print and Cut” feature allows your machine to accurately cut out the printed design, resulting in a professional finish. If you’re new to using your Silhouette machine’s Print and Cut function or simply need a quick refresher, please refer to our detailed Print and Cut tutorial for step-by-step guidance.
Just a few important notes for machine users:
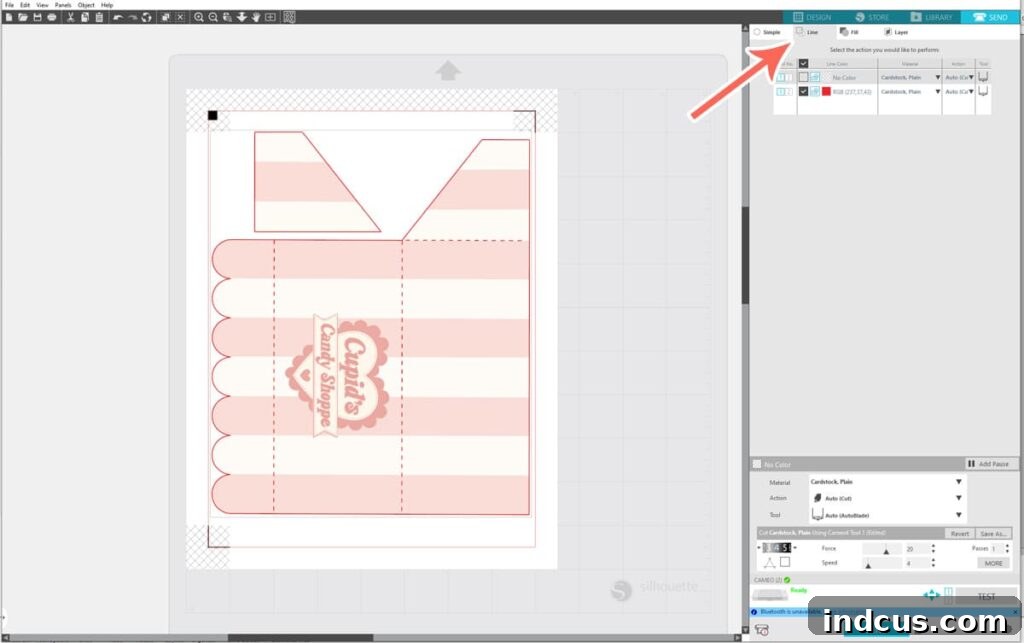
- Registration Marks are Key: Before sending your design to print, do not forget to activate your machine’s registration marks. These small marks printed on your cardstock are vital. They act as precise guides, telling your electronic cutter exactly where the printed design is on the page, ensuring that the cut lines align perfectly with the artwork. Without them, your cuts may be misaligned.
- Optimizing Cut Lines: When you navigate to the “SEND” tab within your machine’s software (e.g., Silhouette Studio), you might initially see numerous cut lines across the entire design, some of which are not meant to be cut. To avoid this, make sure to select the “LINE” sub-tab. This option instructs your machine to cut only along the predefined lines of the design, ensuring clean, accurate cuts around the awning shape and its folding tabs. Your software screen should resemble the image below when it’s correctly set up and ready to send to your machine.
CUTTING BY HAND INSTRUCTIONS
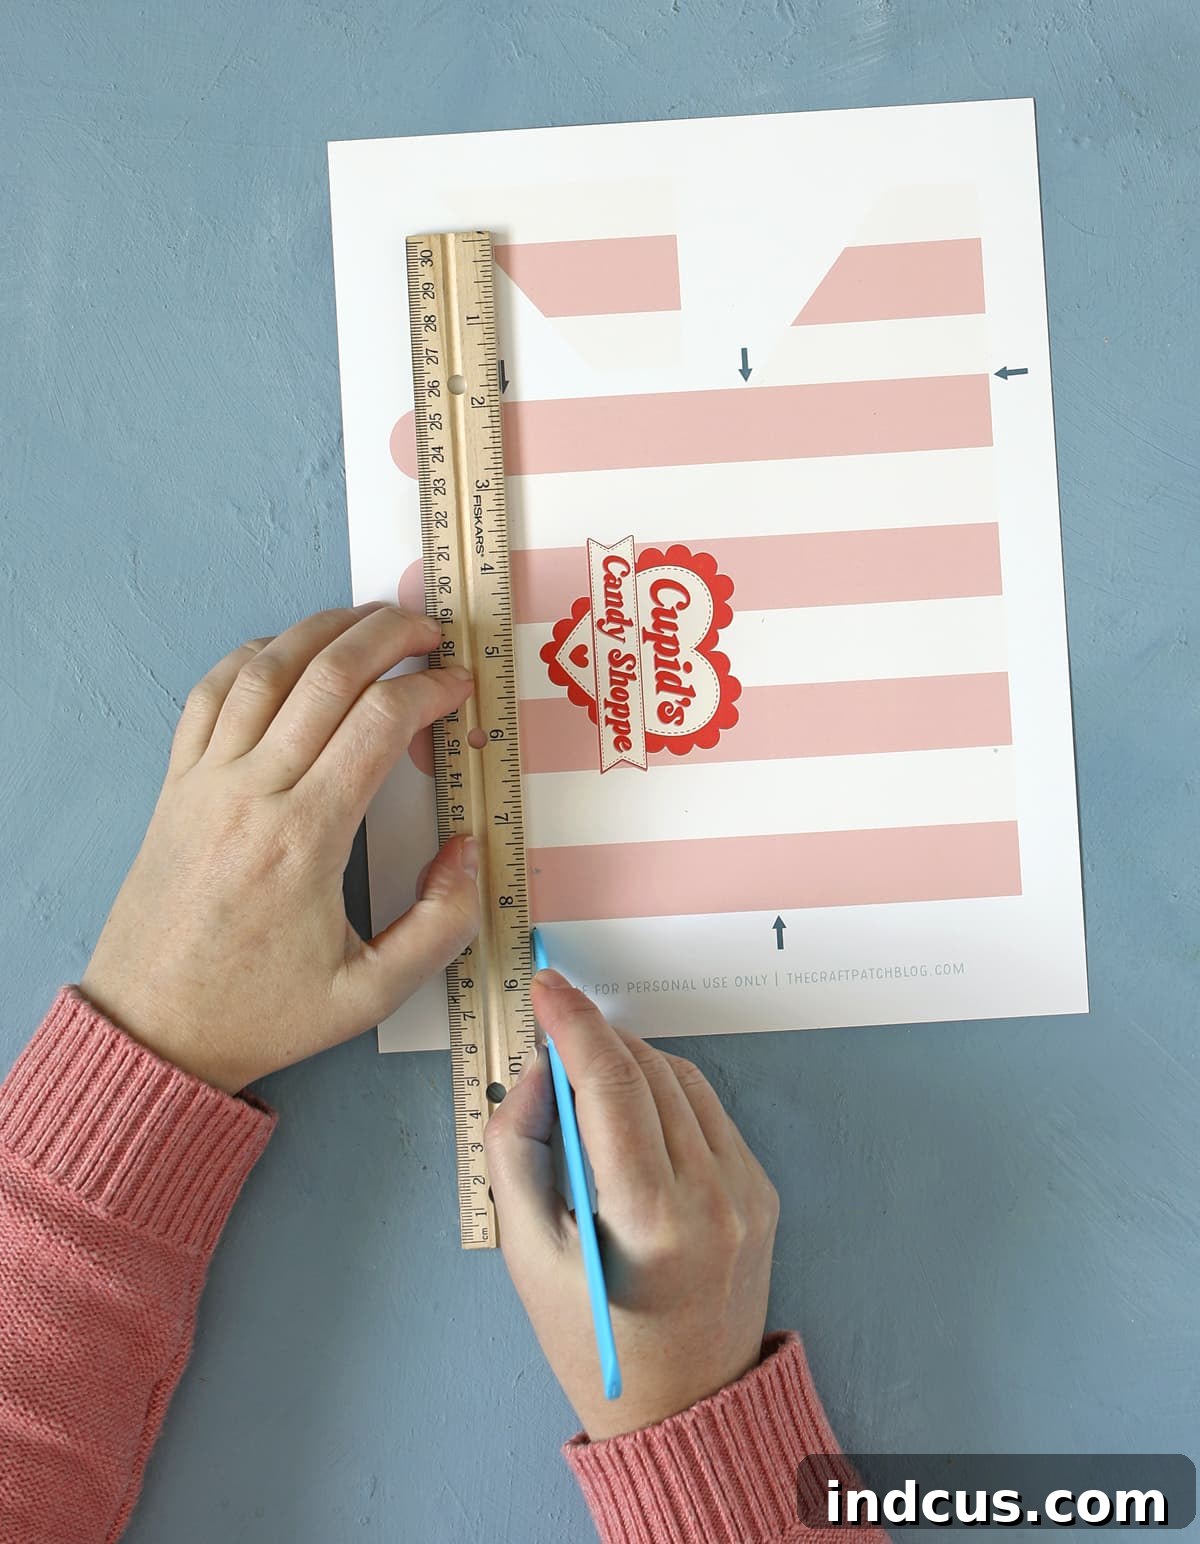
Don’t have an electronic cutting machine? No problem at all! You can absolutely still create this charming craft with ease. Simply download the PDF version of the awning design and print it onto a sheet of white cardstock. Before you begin cutting, take a scoring tool (a dull butter knife, bone folder, or even an empty ballpoint pen works well) and a ruler. Using the gray arrows indicated on the printable, carefully score along these lines. Scoring creates a crease that makes folding much cleaner and more precise, preventing cracks in the cardstock. After scoring, proceed to carefully cut out both shapes. We’ve thoughtfully designed the printable this way to ensure there are no visible cutting or fold lines on your finished project, resulting in a pristine look.
Once you’ve scored the fold lines (if cutting by hand), proceed to carefully cut around the two shapes of the awning. To help clarify exactly where you should cut, we’ve outlined the shapes in the photo below. Can you clearly identify the main awning piece and the smaller, separate piece that will form one of the awning’s sides? The small piece is crucial for giving the awning its three-dimensional structure.
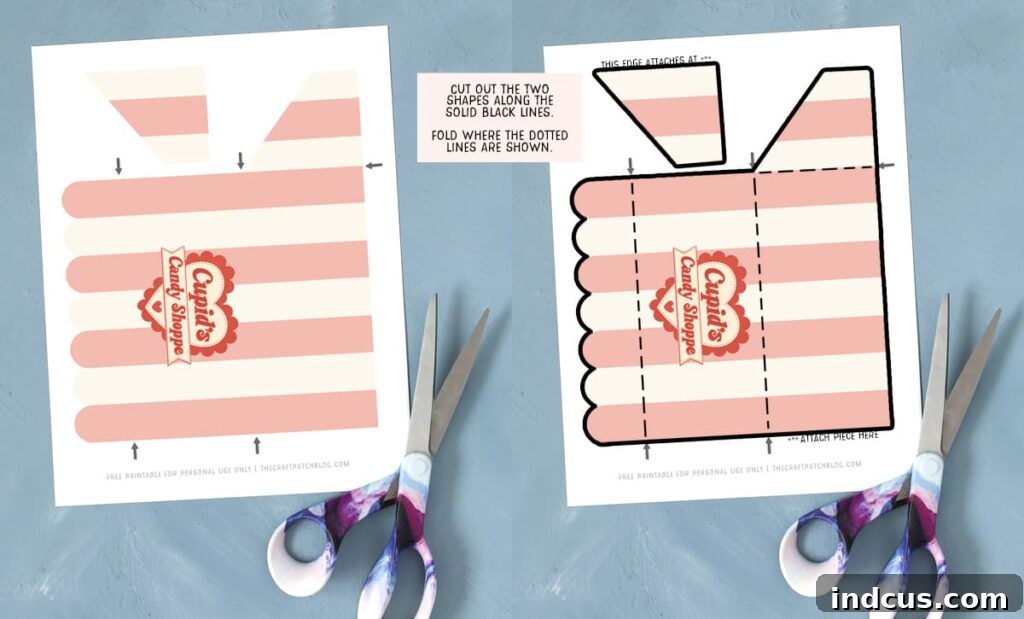
After both shapes are perfectly cut out—whether by hand or machine—it’s time for assembly. Carefully fold all of the designated fold lines away from you. This creates a neat, professional edge. Then, use clear tape to attach the side pieces of the awning to the main center section. If you’re unsure about this step, please refer to the video tutorial provided below for a visual demonstration. The finished awning should look like a classic store awning, with a distinct overhang. Its structural integrity will be surprising!
Step 5: Attach the Awning to the Dowels
With your beautifully assembled awning in hand, it’s time to attach it to the wooden dowels you previously secured to the crate base. For this step, we highly recommend using clear tape or a few dots of hot glue. Tape offers a significant advantage: it allows you to easily adjust the awning’s position if you don’t get it perfectly straight on your first attempt. Furthermore, using tape makes it incredibly simple to remove the awning for storage or to swap it out for a different holiday design once Easter is over. This ensures the longevity and versatility of your candy shop base. Carefully align the awning’s tabs with the top of the dowels and secure them.
Step 6: Embellish Your Candy Jars with Easter Toppers
To add an extra layer of adorable Easter charm, we’ve included matching scalloped circle printables specifically designed to adorn your candy jar lids. These delightful toppers feature festive Easter basket designs and other cute motifs that perfectly tie into the overall theme. You’ll find these printables in the same convenient download folder as the awning. Simply print them onto cardstock, cut them out, and use a small dab of glue or double-sided tape to attach them to the center of each candy jar lid. This small detail elevates the entire display, making your candy shop even more enchanting and cohesive.
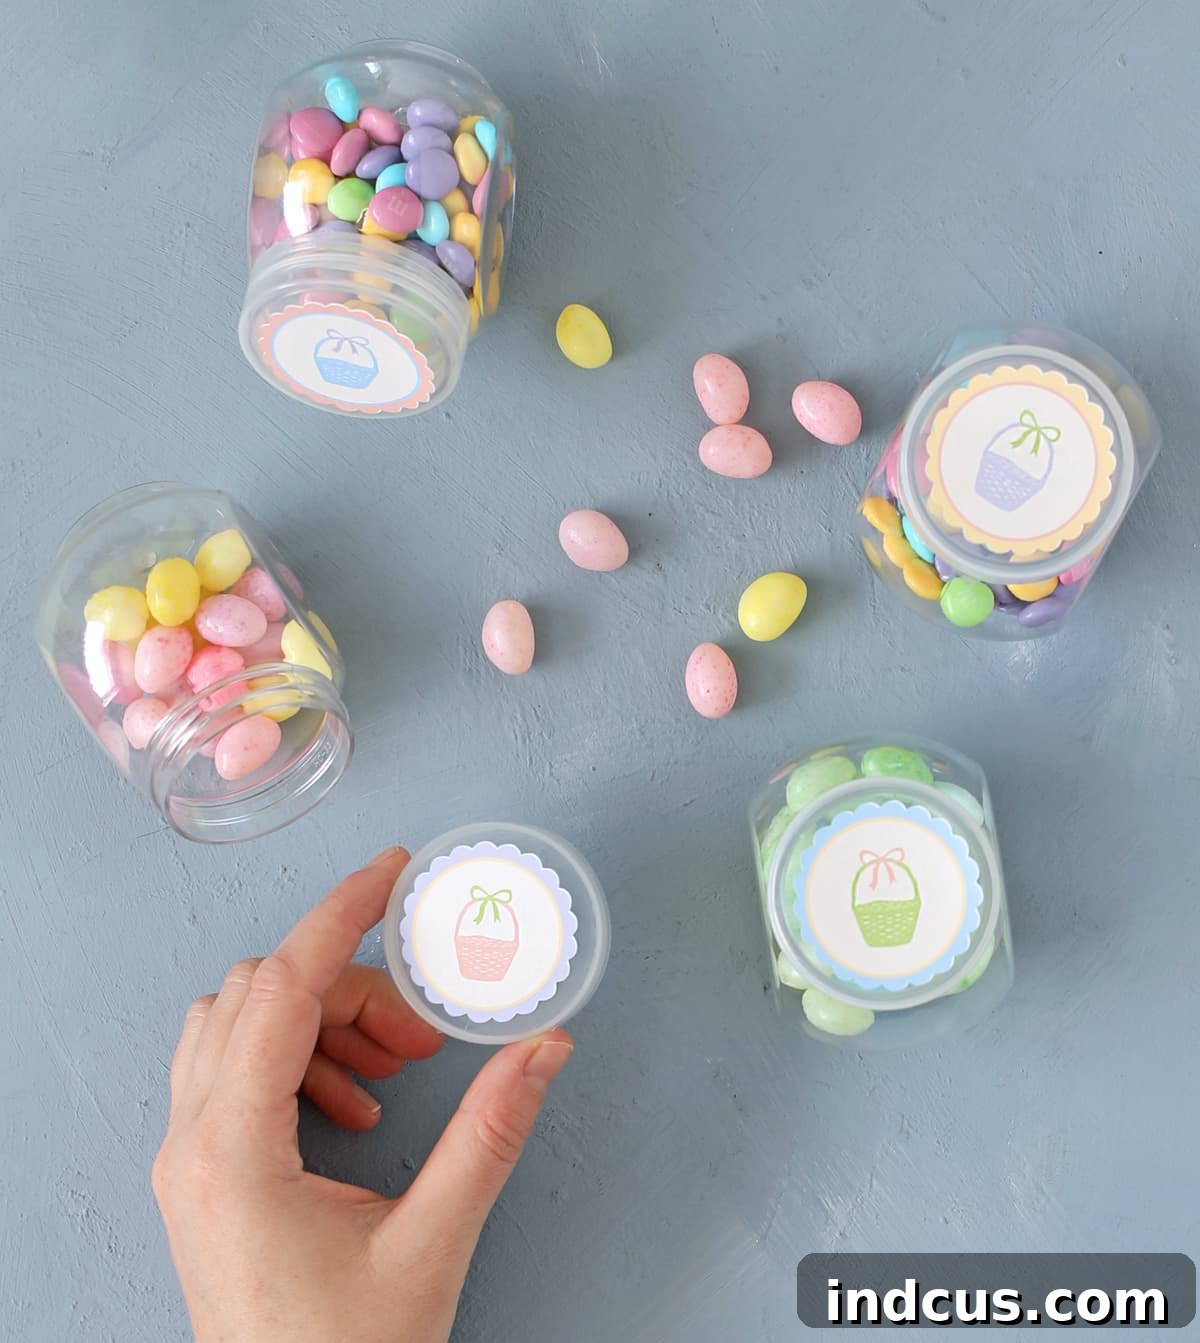
Finally, the moment you’ve been waiting for! Fill each of your decorated jars with an assortment of colorful Easter candies. Think jelly beans, mini chocolate eggs, pastel M&Ms, or foil-wrapped bunnies. Arrange these sweet treasures artfully on the different tiers of your newly crafted wooden candy stand. And just like that, your charming DIY Easter candy shop is complete and ready to bring smiles and sweetness to your holiday celebrations!
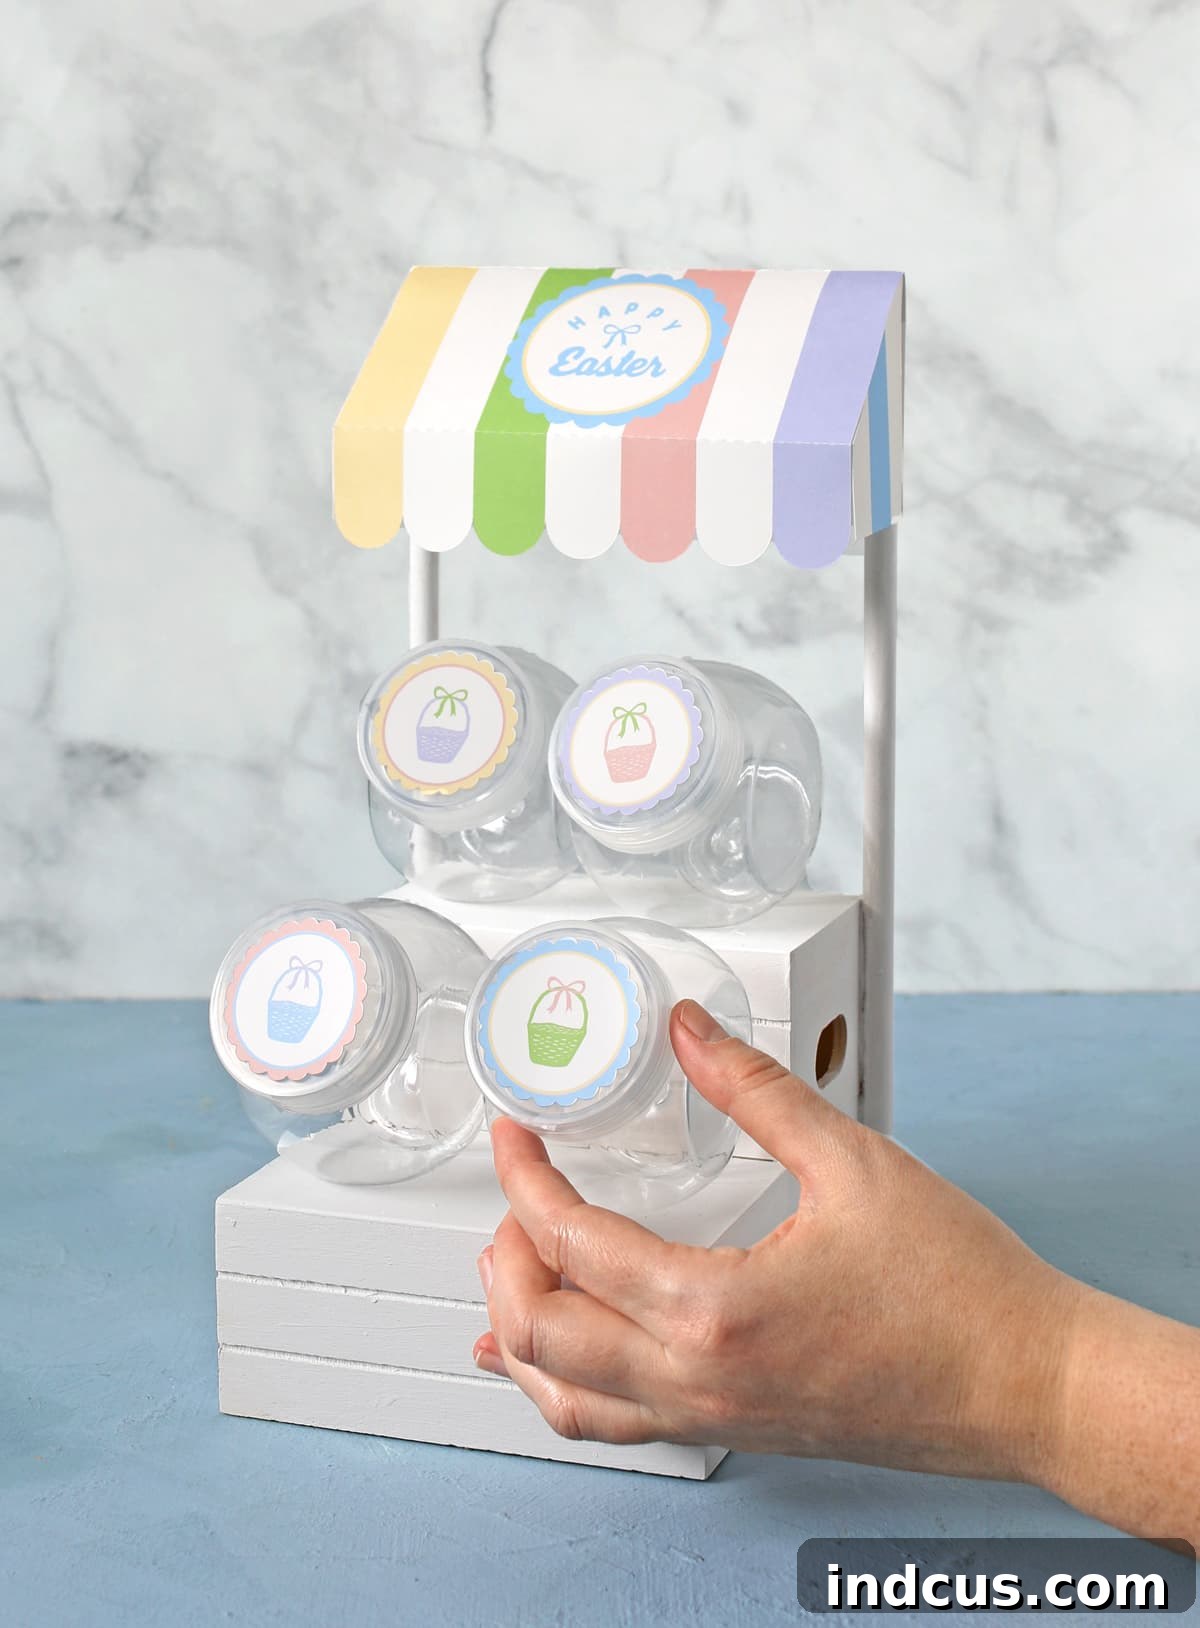
Watch the Candy Shop Video Tutorial!
For those who prefer visual guidance, our comprehensive video tutorial walks you through each step of creating your holiday candy shop. It’s a fantastic resource for clarifying any part of the process, from assembling the base to attaching the delicate awning. Hit play and craft along with us!
We absolutely adore how this Easter candy shop turned out! It’s incredible what you can create with just a few affordable supplies. For an investment of around $7.50 in materials from Dollar Tree, we’ve created a beautiful and lasting piece of holiday decor that we’ll proudly use for many years to come. The thought of my kids coming home from school and seeing this festive display fills me with joy. I know they’ll have so much fun with it, and it’s these little handmade touches that truly fill our home with happiness and create lasting, sweet memories. We hope you feel inspired to create your own and share the sweetness!
Explore More Holiday & Seasonal Candy Shop Printables!
Loved creating your Easter candy shop? Don’t stop there! Discover all the delightful holiday and seasonal candy shop designs in our ongoing series. Each one offers a unique theme and comes with its own printable awning and lid toppers, ensuring your candy stand can celebrate year-round.
-
Cupid’s Candy Shoppe Valentine’s Day Craft
-
DIY Easter Candy Shop
-
Farmer’s Market Fruit Stand Candy Shop Craft
-
Halloween Candy Shop Craft
-
Shamrock Sweets Shop St. Patrick’s Day Craft
-
Patriotic Candy Shop Craft







