
Ultimate Guide to DIY Nursery Curtains: Beautiful, Budget-Friendly, and Easy!
Decorating a nursery is an exciting journey, but the costs can quickly add up, especially when it comes to seemingly simple items like curtains and curtain rods. Store-bought options often come with hefty price tags, making it challenging to achieve a dreamy look without breaking the bank. If you’re yearning for charming, functional curtains that complement your nursery’s aesthetic without draining your budget, you’ve come to the right place. This comprehensive guide will walk you through creating stunning DIY nursery curtains and a custom curtain rod for a fraction of the cost, proving that style and savings can go hand-in-hand. Even if your nursery already has mini-blinds for functionality, decorative curtains add that essential touch of warmth, texture, and personality, transforming the room into a cozy haven for your little one.
The Genius of the DIY Curtain Rod: Electrical Conduit
The first major hurdle in our budget-friendly quest was finding an affordable yet sturdy curtain rod. Traditional curtain rods can be surprisingly expensive, with even basic designs costing upwards of $20-$50. This is where a stroke of DIY genius comes into play: electrical conduit. This often-overlooked material from the hardware store is a game-changer for budget home decor enthusiasts.
Why Electrical Conduit is Your New Best Friend for DIY Curtain Rods
Electrical conduit, typically a metal or plastic tube used to protect electrical wiring, offers an incredible solution for a DIY curtain rod. Its advantages are manifold:
- Unbeatable Price: You can purchase a 10-foot section of sturdy metal electrical conduit for as little as $2-$5. This dramatically undercuts the cost of any conventional curtain rod on the market.
- Exceptional Durability: Despite its low cost, conduit is designed to be robust and long-lasting, capable of supporting a good amount of fabric without sagging. This makes it perfect for even heavier decorative curtains.
- Easy Availability: Electrical conduit is readily available at any major hardware store like Home Depot or Lowe’s, making it a convenient choice for your DIY project.
- Customizable Length: The 10-foot length provides ample material, allowing you to cut it to the precise size needed for your window, or even divide it to create rods for multiple windows. Simple tools like a hacksaw or conduit cutter can make this task easy.
- Paintable Surface: Its metal surface is ideal for spray paint, enabling you to match it perfectly with your nursery’s color scheme and achieve a high-end, custom look.
For this project, we only needed half of the 10-foot conduit, costing us a mere $1.00 – an incredible saving compared to traditional curtain rods. The remaining half can be reserved for another window, perhaps in the master bedroom or a guest room, making this investment even more economical.
Crafting Your Own Curtain Rod Mounts: Ditching Overpriced Hardware
Once the ingenious curtain rod solution was established, the next challenge arose: mounting hardware. Just like the rods themselves, curtain rod mounts often come with inflated prices. Expecting to pay $5 or more for a pair of simple brackets seemed absurd, especially when seeking a budget-conscious approach. The solution, much like the rod itself, lay in creative exploration at the hardware store.
The High Cost of Store-Bought Curtain Hardware
Standard curtain rod brackets, even basic ones, can easily run $5-$10 per pair. For a single window requiring two mounts, this isn’t terrible, but if you have multiple windows or desire a more intricate setup, these costs accumulate quickly. Moreover, generic mounts often lack character and can feel mass-produced, clashing with the personalized feel of a DIY nursery.
Scouting for Hardware at the Home Store: A Treasure Hunt
Instead of settling for expensive options, a strategic wander through the aisles of Home Depot or Lowe’s can yield surprising results. The key is to look for individual metal pieces designed for various purposes – plumbing, electrical, or general hardware – that can be repurposed and assembled into a functional and stylish mount. With a keen eye for form and function, you can discover hidden gems.
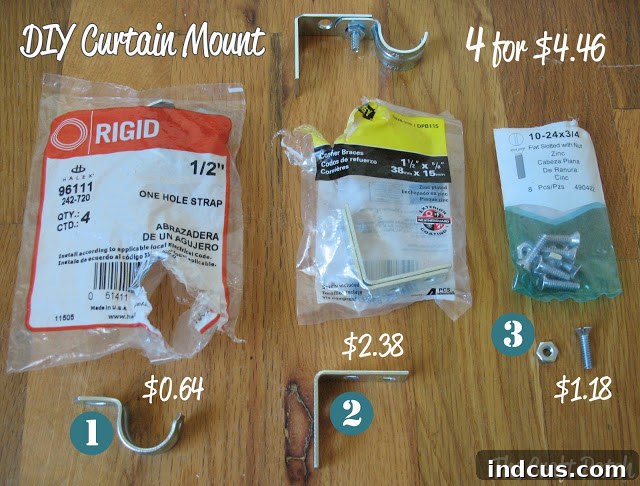
After a bit of searching, a collection of small, sturdy metal components was gathered. These unassuming pieces, often costing pennies individually, could be combined to form a robust curtain rod mount. The beauty of this approach lies in its flexibility; you might find different combinations of L-brackets, pipe straps, corner braces, or small plates that work perfectly for your specific needs. The goal is to find pieces that can be securely fastened together to create a U-shaped or open-hook bracket to hold the conduit.
Assembly Instructions for Your Custom Mounts
Once you have your chosen metal pieces, assembly is straightforward. By simply screwing them together, you can create a custom mount that perfectly cradles your electrical conduit rod. The exact assembly will depend on the pieces you select, but the general principle involves forming a strong, open bracket shape. For example, two small L-brackets might be combined with a flat plate, or pipe straps could be bent and secured. The key is to ensure they are firmly attached and can securely hold the rod a sufficient distance from the wall.
In total, four robust mounts were crafted for an astonishing $4.46. This means each pair of mounts for a single window cost approximately $2.23 – less than half the price of the cheapest store-bought alternative. This significant saving allows more budget for other nursery essentials or decorative accents.
Creative Finials on a Dime: Golf Ball Ingenuity
No curtain rod is complete without finials – those decorative end pieces that add a finished, polished look. Unfortunately, finials can be even more overpriced than the rods and mounts themselves, often costing $10-$20 a pair for anything remotely stylish. This project called for a creative and completely free solution.
Beyond Basic Finials: Embracing Repurposed Charm
Rather than investing in costly store-bought finials, the perfect solution was discovered in an unexpected place: a toy box! Old golf balls, with their perfectly round shape, offered an ideal, cost-free alternative. This kind of repurposing not only saves money but also adds a unique story and character to your decor.
Golf Ball Ingenuity: Attaching Your Upcycled Finials
Attaching the golf balls was a simple process:
- Prepare the Conduit: To ensure a snug fit and a strong bond, the ends of the electrical conduit were lightly stuffed with scrap fabric. This provides a buffer and extra surface area for the glue.
- Apply Hot Glue: Generous amounts of hot glue were smeared around the opening of the conduit and onto the scrap fabric. Hot glue is excellent for quick adhesion and creates a strong bond on porous and non-porous surfaces alike.
- Secure the Golf Ball: Each golf ball was then firmly pressed into the hot-glued end of the conduit, holding it in place until the glue cooled and set completely. This ensures a secure and lasting attachment.
While golf balls worked perfectly for this nursery theme, the possibilities for creative finials are endless! Consider other roundish objects you might have on hand: ping pong balls, decorative wooden beads, old Christmas ornaments, plastic toy balls, or even cleverly shaped pieces of wood. The key is to find something that can be securely attached and painted to blend seamlessly with your rod.
The Magic of Spray Paint: Unifying Your Hardware
With the conduit rod, custom mounts, and golf ball finials all assembled, the collection of disparate parts still looked like, well, disparate parts. The transformative power of spray paint was the next crucial step. A single coat of spray paint instantly unifies all components, disguising their origins and creating a cohesive, professional finish that belies their humble beginnings.
Unifying Your Hardware with Color
The choice of spray paint was Krylon’s Bright Idea, a cheerful and vibrant color perfect for a nursery. However, you can choose any color and finish that matches your decor – matte black for a modern look, metallic gold for a touch of elegance, or a soft pastel for a subtle effect. The paint instantly blends the electrical conduit, metal mounting pieces, and golf ball finials into one harmonious unit. Once painted, no one would ever suspect that the elegant finials were once golf balls!
Painting Tips for a Professional Finish
- Proper Preparation: Before painting, ensure all pieces are clean, dry, and free of any dust or grease. Lightly sanding metal parts can help the paint adhere better.
- Work in a Well-Ventilated Area: Always spray paint outdoors or in a garage with open doors to ensure good ventilation.
- Apply Thin, Even Coats: Instead of one thick coat, apply several light, even coats. This prevents drips and runs and results in a smoother, more durable finish. Allow adequate drying time between coats.
- Protect Your Workspace: Lay down drop cloths or newspaper to protect surfaces from overspray.
For just $3.75, a can of quality spray paint elevated the entire hardware assembly, making it look custom-designed and expensive. The total cost for this cheerful, functional, and custom curtain rod, including the conduit, mounts, finials, and paint, came in at approximately $7-$8.
From Sheet to Chic Curtains: The Ultimate Fabric Hack
With the curtain rod perfected, attention turned to the curtains themselves. Fabric can be incredibly expensive, especially for large window treatments. The solution? A brilliant and budget-friendly hack: transforming a clearance twin-sized flat sheet into stylish curtain panels.
The Unbeatable Value of Clearance Sheets
Clearance sections in department stores or home goods shops often hide treasures. A twin-sized flat sheet, snagged for a mere $4 on clearance, provided more than enough fabric for two curtain panels. Sheets offer several advantages for DIY curtains:
- Cost-Effective: Significantly cheaper than purchasing fabric by the yard.
- Pre-Hemmed Edges: Many sheets come with neatly hemmed sides and a larger hem at one end, reducing sewing time.
- Wide Variety: Available in countless colors, patterns, and fabric blends, making it easy to find one that matches your nursery theme.
- Generous Size: A twin flat sheet typically measures around 66×96 inches, providing ample length and width for most standard window panels.
Transforming Your Sheet into Panels: Cutting and Hemming
The transformation process was incredibly simple:
- Cut the Sheet: The twin sheet was carefully cut down the center lengthwise, yielding two equally sized panels. This immediately created the basic shape for two curtains.
- Hemming: A quick run on the sewing machine was all that was needed to hem the newly cut raw edges. If you’re not a sewing enthusiast, fabric glue or iron-on hemming tape can achieve a similar clean finish without any stitching.
Faux Pleats: A Clever Shortcut for a Tailored Look
One of the most ingenious parts of this curtain hack involves creating faux pleats. Standard flat sheets often feature one end with a thicker, more substantial hem that’s almost like a pocket – perfect for this trick! Instead of intricate pleating techniques, which can be time-consuming and challenging for novice sewers, a simple method was employed:
Small slits were cut through the thick, pocket-like part of the sheet’s hem. Crucially, these slits were made only through the back layer of fabric, ensuring the front remained untouched and smooth. These slits create channels, allowing the curtain rod to be threaded through, which naturally forms soft, tailored-looking pleats when gathered. This method provides the appearance of professional pleats without any complex sewing or hardware.
This faux pleat technique is undeniably a “cheating” method for perfectionist sewers, but for anyone seeking a quick, easy, and effective solution, it works like a charm! It offers a tailored look with minimal effort, making it ideal for budget-conscious DIYers. While a high school home economics teacher might cringe, the end result is undeniably charming and functional.
Adding Personality: Embellishments and Tie-Backs
To further personalize the solid fabric of the sheet-turned-curtains and add a touch of whimsy perfect for a nursery, various embellishments were added from a craft stash. This is where creativity truly shines, allowing you to match the curtains perfectly to your nursery’s unique theme.
Personalizing Your Curtains with Stash Supplies
From a collection of leftover craft supplies, beautiful lace, colorful ribbon, and playful ric rac were selected. These trims were strategically applied to the curtain panels to add visual interest and texture. The beauty of using stash items is that it keeps costs at zero while allowing for maximum customization. Other embellishment ideas include:
- Fabric Paint: Stencils and fabric paint can add custom designs, patterns, or even personalized names.
- Appliques: Iron-on or sew-on appliques (stars, moons, animals) can enhance a nursery theme.
- Buttons or Pom-Poms: Sewn along edges or scattered across the fabric for a playful touch.
- Fringe or Tassels: For a more bohemian or luxurious feel.
No-Sew Embellishment Techniques
For those who prefer not to sew, or simply want a quicker application, hot glue came to the rescue for some of the embellishments. While sewing offers a more permanent bond, hot glue can be surprisingly effective for attaching trims like lace and ribbon, especially if the curtains won’t undergo frequent washing or heavy use. Fabric glue is another excellent no-sew alternative for a more durable bond.
Finally, simple lace tie-backs were crafted to complete the look. Tie-backs not only hold the curtains neatly open but also add an extra decorative element. These could be made from matching lace, braided ribbon, or even strips of coordinating scrap fabric.
With the embellishments and tie-backs in place, the curtains themselves cost a mere $4 – the price of the clearance sheet. This brings the total cost for a complete set of custom curtains, including the rod, mounting hardware, finials, and the curtains themselves, to an astonishingly low price point.
Your Budget-Friendly Nursery Transformation: The Grand Total
Let’s recap the incredible savings achieved with this DIY approach:
- Electrical Conduit (for one window): Approximately $1.00 (half of a $2-$5 10-foot section)
- DIY Mounting Hardware (for two mounts): Approximately $2.23 (half of $4.46 for four pieces)
- Spray Paint: $3.75
- Golf Ball Finials: FREE
- Clearance Twin Flat Sheet (for two panels): $4.00
- Lace, Ribbon, Ric Rac (from stash): FREE
- Lace Tie-Backs (from stash): FREE
The Unbeatable Value of DIY
The grand total for a complete, custom, and charming set of nursery curtains, rod, and mounting hardware comes to an unbelievable **around $11-$12!** In an age where a single curtain panel can cost $20-$50, and a basic rod and hardware set can easily exceed $30, this DIY project offers unparalleled value. You get a personalized, high-quality look for a fraction of the cost of retail options, leaving you with more budget for other nursery necessities or splurges.
Beyond the Nursery: Versatility of DIY Curtains
The principles and techniques outlined here aren’t limited to the nursery. This budget-friendly approach to curtain making can be applied to almost any room in your home. Imagine custom curtains for a guest bedroom, a playful set for a child’s playroom, or even an understated design for a home office, all crafted with the same ingenuity and cost-saving methods. By choosing different sheet patterns, paint colors, and embellishments, you can create a unique aesthetic for any space. The versatility of electrical conduit and clearance sheets makes them invaluable tools for any home decorator on a budget.
Conclusion: A Beautiful Nursery, On Your Terms
Creating a beautiful and functional nursery doesn’t have to be an expensive endeavor. This DIY project demonstrates how creativity, resourcefulness, and a little elbow grease can transform inexpensive materials into stunning home decor. By making your own curtain rod from electrical conduit, crafting custom mounts, repurposing golf balls as finials, and turning a clearance sheet into elegant curtains, you’ve not only saved a significant amount of money but also injected a unique, personal touch into your little one’s room. The satisfaction of creating something beautiful with your own hands, especially when it saves you money, is truly rewarding. With these charming, custom curtains now in place, the nursery is almost complete, eagerly awaiting its final touches. Get ready to enjoy the compliments on your clever and chic design!







