The Ultimate Guide to Magical Unicorn Ice Cream Cones: A DIY Party Treat
Unicorns have galloped their way into our hearts and homes, becoming an undeniable sensation in party themes, fashion, and delightful treats. Their allure lies in their enchanting blend of magic, vibrant colors, and a touch of glitter that captivates imaginations of all ages. If you’re planning an unforgettable unicorn birthday party, a whimsical playdate, or simply crave a sweet, charming dessert, you’ve stumbled upon the perfect food craft idea. Today, we’re diving into how you can transform ordinary sugar cones into breathtaking, edible unicorn horns that will add a truly magical touch to any celebration.
Imagine the smiles and gasps of delight when your guests see these homemade unicorn horns perched atop scoops of colorful ice cream. This project is not only incredibly fun and visually stunning but also surprisingly simple to execute. Whether you’re a seasoned crafter or a complete beginner in the kitchen, you’ll find this guide easy to follow, enabling you to create your own batch of dazzling unicorn magic. Let’s embark on this enchanting culinary journey together and discover just how effortlessly you can bring these whimsical treats to life.
Why Unicorns Are the Reigning Party Theme
The global obsession with unicorns isn’t just a fleeting trend; it’s a testament to the timeless appeal of fantasy and wonder. Unicorns represent purity, magic, and individuality, making them a perfect symbol for celebrations. From their iridescent horns to their flowing rainbow manes, every aspect of these mythical creatures inspires joy and creativity. Incorporating unicorn elements into your party, especially through food, creates an immersive experience that transports guests into a fantastical realm. These edible unicorn horns are more than just a dessert; they are a statement piece, a conversation starter, and a symbol of the joyful spirit of your event.
Crafting Your Own Unicorn Magic: An Overview
This delightful project centers around the transformation of humble sugar cones into majestic unicorn horns. The process involves a few simple steps: gathering vibrant candy melts and an array of sprinkles, melting the candy to a smooth consistency, dipping and swirling the cones to create a beautiful marbled effect, and finally, adding sparkling sprinkles for that essential unicorn glitter. The beauty of this craft lies in its simplicity and the endless possibilities for customization. You can choose any combination of colors and sprinkles to match your party theme or simply let your imagination run wild. The result is always a unique, eye-catching treat that tastes as good as it looks.
Essential Supplies for Your Unicorn Horn Creation
Before you begin your magical transformation, it’s crucial to gather all your materials. The beauty of this craft is that most items can be easily found in the baking or candy-making aisle of your local craft store or supermarket. A trip to a store like Hobby Lobby, Michaels, or even a well-stocked grocery store will yield everything you need. Here’s a detailed list of your magical ingredients:
Candy Melts: A Spectrum of Unicorn Hues
The heart of your unicorn horns will be the candy melts. These versatile wafers come in a dazzling array of colors and are designed to melt smoothly, providing a perfect coating for your cones. For a truly enchanting unicorn effect, choose a selection of vibrant, pastel, or iridescent colors. Think pinks, blues, purples, mint greens, and even some shimmery whites. Selecting at least three different colors will allow you to achieve a beautiful marbled effect. High-quality candy melts will ensure a smooth finish and excellent adhesion to the cones.
Sparkling Sprinkles: The Glittery Touch
What’s a unicorn without a touch of sparkle? Sprinkles are non-negotiable for this project. Don’t be shy; load up on a variety! You’ll want to choose a mix of sizes and types to add texture and glitter. Options include classic rainbow sprinkles, nonpareils, jimmie sprinkles, sparkling sugar, and, of course, edible glitter or star-shaped sprinkles for that extra magical touch. Consider using metallic gold or silver sprinkles to mimic a true unicorn horn shimmer. The more variety, the more whimsical your cones will appear.
Sugar Cones: The Foundation of Your Horns
Any standard sugar cone will work perfectly for this project. Ensure they are fresh and not cracked, as you’ll be handling them quite a bit. The classic pointed shape of a sugar cone naturally lends itself to becoming a unicorn horn. You might also experiment with waffle cones for a different texture, though sugar cones offer the most traditional “horn” silhouette.
Other Useful Tools
- Microwave-safe plates or bowls: You’ll need separate containers for each color of candy melt.
- Spoons or silicone spatulas: For stirring and spreading the melted candy.
- Parchment paper or wax paper: To line a tray for drying your cones, preventing them from sticking.
- Baking tray: To hold the parchment paper and drying cones.
- Optional: Small bowls for sprinkles, toothpick for intricate swirling.
During my shopping trip, I was particularly thrilled to discover these beautiful edible gold stars. I knew instantly that their shimmering elegance would be the perfect final flourish for a truly magical unicorn dessert. They add a sophisticated sparkle that elevates the entire look of the cones.
Step-by-Step Guide: How to Make Enchanting Unicorn Horn Cones
With all your supplies neatly organized, it’s time to unleash your inner artisan and begin crafting these whimsical wonders. Follow these simple steps to create perfectly dazzling unicorn horns that will be the highlight of your party.
Step 1: Gathering Your Dazzling Ingredients
First, unpack your chosen candy wafers. Carefully pour each color onto a separate microwave-safe plate or into separate microwave-safe bowls. Keeping the colors distinct is key, as this allows you to control the marbling effect later on. Arrange them in a way that makes it easy to dip your cones without colors blending prematurely. This initial separation is crucial for achieving that distinct, beautiful swirl of colors.
Step 2: Melting the Candy Colors
Place one plate of candy melts into the microwave. Heat the candy in 30-second intervals, stirring thoroughly after each interval. Candy melts can seize if overheated, so patience is key. Continue microwaving and stirring until the candy is smooth, completely melted, and free of lumps. Repeat this process for each color. You’ll want the candy to be fluid enough for dipping but not so hot that it runs off the cone too quickly. If it seems too thick, a tiny bit of shortening can sometimes help, but generally, proper heating should suffice.
Step 3: Dipping and Swirling Your Cones
Now for the fun part! Take one sugar cone and gently roll it in the melted candy. Start with one color, coating about two-thirds of the cone. Then, quickly move to another color, rolling the cone through it, allowing the colors to slightly overlap and swirl. You can use a clean finger or a small spoon to gently smooth the coating and create beautiful marbled patterns. Don’t overwork it; a few natural swirls look best. The aim is to create an organic, magical blend of colors reminiscent of a unicorn’s ethereal beauty.
Step 4: The Golden Sprinkle Shower
Immediately after dipping a cone, while the candy coating is still wet and tacky, generously dust it with your chosen sprinkles, especially the delicate gold stars. The wet candy acts as a perfect adhesive for the sprinkles. Gently rotate the cone to ensure even coverage. If you’re using larger sprinkles, consider dipping just the bottom rim of the cone into them for a distinct, glittery edge, similar to how you’d salt the rim of a margarita glass. I found that large sprinkles spread across the entire cone can sometimes overwhelm the marbled effect, but a strategic application can look fantastic.
Step 5: Allowing Your Unicorn Horns to Set
Once dipped and sprinkled, carefully place each unicorn horn upright on a tray lined with parchment or wax paper. Ensure they have enough space between them to prevent sticking. Allow the cones to dry completely at room temperature. Depending on your environment, this could take anywhere from 15 minutes to an hour. For quicker setting, you can place the tray in the refrigerator for about 10-15 minutes, but be mindful of condensation forming. Once dry, the candy coating will be firm and your unicorn horns will be ready for their grand debut!
Creative Ways to Serve Your Unicorn Treats
Now that your stunning unicorn horns are complete, it’s time to showcase them! These versatile treats offer several delightful serving options, each promising to enchant your guests and elevate your party decor.
Unicorn Ice Cream Cups: A Whimsical Presentation
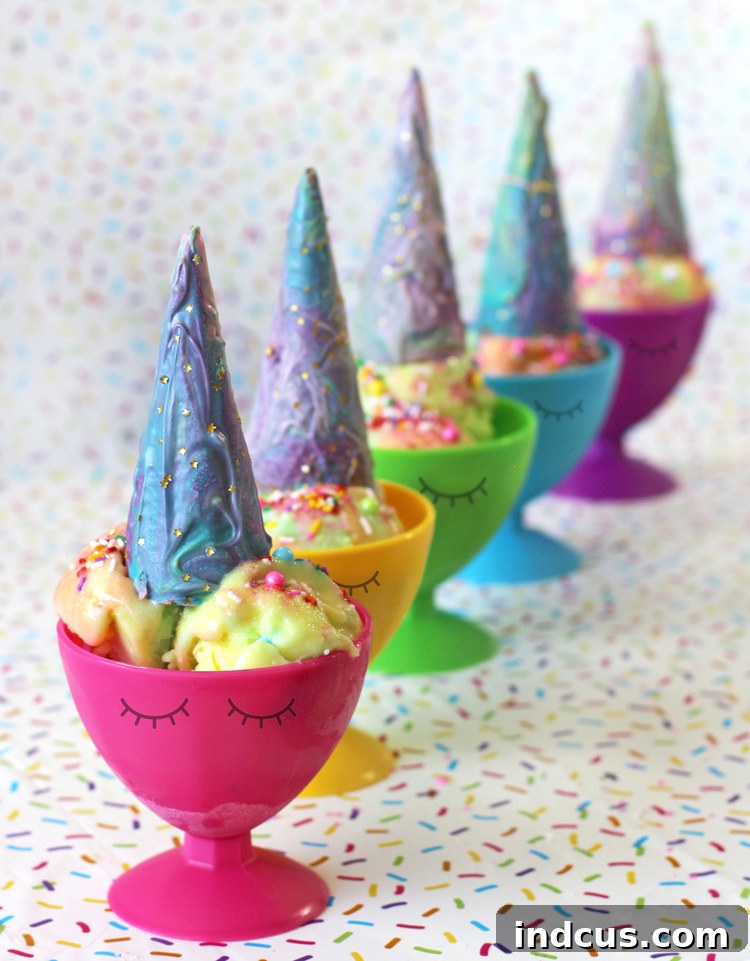
For a truly whimsical and mess-free serving option, scoop a few generous portions of your favorite colorful ice cream into adorable individual dishes or clear cups. Opt for rainbow sherbet, pastel-colored ice creams, or even classic vanilla with food coloring swirled in for an extra pop of color. Once the ice cream is in place, gently insert one of your handmade unicorn horns on top. The horn stands tall, creating an instant magical centerpiece for each serving. For an added touch of cuteness, I love drawing little sleepy eyes on the outside of my ice cream dishes with a black Sharpie marker – it’s a simple, optional detail that brings so much character to the presentation. This method is fantastic for younger guests, as it helps contain drips and makes for easy handling.
Classic Cone Presentation: Simplicity Meets Sparkle
Alternatively, you can serve these magnificent creations as traditional ice cream cones. Simply scoop your chosen ice cream directly into the unicorn-decorated sugar cones. This classic approach highlights the beauty of the decorated cone itself, allowing it to shine as the primary visual element. The marbled effect and golden sprinkles truly pop against the backdrop of a vibrant scoop of ice cream. It’s a timeless and equally charming way to present your magical treats, evoking a sense of nostalgic joy.
The marbled effect on the cones, created by swirling multiple candy melt colors, is undeniably captivating. Combined with the delicate shimmer of golden star sprinkles, each cone truly embodies the essence of unicorn magic. It’s a feast for both the eyes and the palate, promising to be a memorable addition to any celebration. The bright, playful colors instantly evoke a sense of wonder and make these treats irresistible to everyone.
Beyond Ice Cream: Other Serving Ideas
While ice cream is the obvious companion, your unicorn horns can be used in other creative ways:
- Cupcake Toppers: Break off smaller pieces or use mini cones to top cupcakes.
- Cake Decorations: Arrange several horns around a birthday cake for a fantastical display.
- Stand-Alone Treats: Serve them on a platter as a candy-coated snack for guests to grab and enjoy.
- Party Favors: Individually wrap dried cones in clear cellophane bags with a ribbon for unique take-home favors.
Tips for a Flawless Unicorn Party Experience
To ensure your unicorn party, complete with these dazzling treats, runs smoothly and enchantingly, consider these additional tips:
Prepare Ahead
The beauty of making these unicorn horns is that they can be prepared in advance. Once the candy coating is completely dry and set, you can store the decorated sugar cones in an airtight container at room temperature for several days without losing their magic or freshness. This significantly reduces stress on the day of your party, allowing you to focus on other preparations and enjoy the celebration.
Engage Your Guests
If you’re hosting a smaller gathering or a playdate, turning the cone decorating into an activity can be incredibly fun! Set up a “Unicorn Horn Creation Station” with melted candy melts (kept warm in a small slow cooker on a low setting or in heated chafing dishes, supervised by an adult), and various sprinkles. Kids and adults alike will love customizing their own magical horns, making the treat even more personal and memorable.
Photography Tips
These unicorn ice cream cones are incredibly photogenic! Make sure to capture their beauty. Use natural light, a simple background (a pastel tablecloth or a plain wall works wonders), and photograph them from different angles. Encourage guests to snap photos with their treats too – these will be cherished memories of a truly magical event.
The Magic of DIY Unicorn Treats: A Conclusion
Creating these magical unicorn ice cream cones is more than just a recipe; it’s an experience. It’s about bringing a touch of whimsy and wonder into your home and sharing that joy with others. The simple act of transforming everyday ingredients into something so extraordinary speaks to the power of imagination and the delight of homemade treats. Whether for a grand birthday bash or a quiet afternoon pick-me-up, these unicorn horns are guaranteed to spread smiles and sprinkle a little bit of magic into anyone’s day. So, gather your supplies, unleash your creativity, and get ready to create some truly enchanting memories with these irresistible, shimmering unicorn treats!