
DIY Delight: Crafting Beautiful & Budget-Friendly Easter Eggs for Your Home
As the days grow longer and a hint of warmth returns to the air, there’s an undeniable buzz of excitement for the arrival of Easter. It’s a season synonymous with renewal, fresh starts, and, of course, charming decorations that infuse our homes with the joyful spirit of spring. While the thought of adorning our living spaces can spark immense delight, the reality of purchasing new decor each year often brings a common dilemma: how to achieve that coveted aesthetic without breaking the bank?
Fear not, fellow decor enthusiasts! This year, we’re diving into a project that promises both immense satisfaction and significant savings. Forget those pricey, generic store-bought decorations that often fall short of our vision. We’re going to transform humble, often overlooked plastic Easter eggs into bespoke pieces of art that perfectly complement your personal style. Get ready to unleash your creativity and craft stunning, customized Easter eggs that look far more expensive than they truly are, proving that beautiful home decor doesn’t have to come with a hefty price tag.
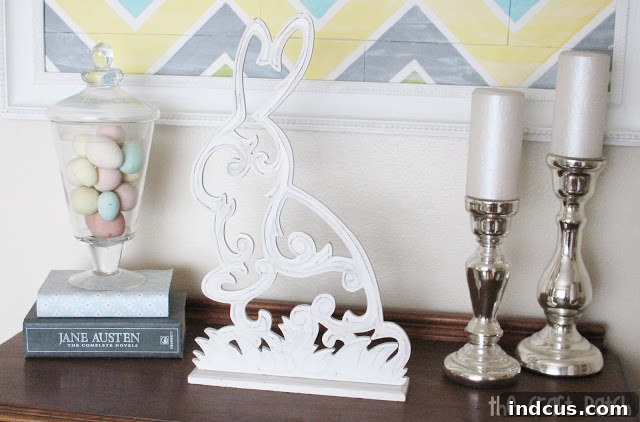
My own collection of Easter decor, while modest, brings me immense joy each spring. It features a charming wooden bunny, a lucky find from a yard sale for just a dollar, and a cheerful scattering of these very painted plastic eggs. This simple ensemble is more than enough to set a festive mood and always serves as a delightful reminder of one of Easter’s greatest pleasures: stocking up on a year’s supply of those irresistibly delicious Cadbury Mini Eggs. Mmmm, a little sweet indulgence is definitely an essential part of the holiday spirit!
The Quest for Pretty Eggs: Why DIY is the Ultimate Budget-Friendly Solution
One of my perennial decorating desires involves filling my beloved apothecary jars and other clear glass vessels with elegant, spring-themed eggs. These containers are perfect for displaying seasonal items, allowing their beauty to shine through. However, a quick browse through retail stores always leaves me disheartened. The prices for faux decorative eggs are often exorbitant. It’s truly baffling! We’re talking about *fake* eggs, people, typically made of plastic or foam. They simply shouldn’t command such a hefty price tag, often costing an arm and a leg for just a handful. Why invest so much in something that doesn’t even offer the natural beauty of real eggs or the lasting quality of high-end ceramic decor?
This frustration led me to a simple yet brilliant revelation: why buy when you can create? The solution to achieving those coveted pretty eggs for my apothecary jars, and indeed for any corner of my home, was staring me right in the face – a classic DIY project involving the most common and accessible of Easter items: the humble plastic egg. This approach not only saves money but also ensures that my decor reflects my unique taste.
Transforming Ordinary into Extraordinary: Your Comprehensive DIY Painted Easter Egg Guide
Most of us have a stash of those regular, inexpensive plastic Easter eggs lurking in a closet, attic, or the bottom of a holiday bin. They’re typically brightly colored, sometimes a bit garish, and often intended for quick egg hunts or candy fillers. But with a little bit of craft paint and imagination, these forgotten treasures can be transformed into sophisticated decorative elements that perfectly match your home’s aesthetic. This project is not only incredibly cost-effective – often free if you already own the eggs – but it’s also a wonderfully relaxing and creatively fulfilling endeavor that adds a personal touch to your holiday decorations.
What You’ll Need for Your DIY Easter Egg Project:
- Plain Plastic Easter Eggs: The more, the merrier! Gather all those old eggs you have lying around. Consider various sizes for added visual interest.
- Craft Paint: Acrylic craft paints work perfectly as they are inexpensive, dry quickly, and come in a vast array of colors. Choose a variety of colors that align with your desired palette – whether you prefer soft pastels, earthy tones, shimmering metallics, or vibrant brights.
- Paint Brushes: A few different sizes are ideal. You’ll want a flat brush for base coats and finer-tipped brushes for detailing. Sponges or even an old toothbrush can also create interesting textures like speckles.
- Small Container for Water: Essential for rinsing your brushes between colors.
- Paper Towels or Old Cloths: For dabbing brushes, absorbing excess water, and quick clean-ups.
- Newspaper or Drop Cloth: Crucial for protecting your work surface from paint spills and splatters.
- Optional Embellishments & Sealants:
- Mod Podge: Matte or gloss finish, for sealing the paint and adding durability.
- Fine-tipped Markers or Paint Pens: For intricate designs, lettering, or outlining.
- Glitter: For a touch of sparkle and festive glam.
- Stencils: To create consistent patterns or motifs.
- Clear Spray Sealant: An alternative to Mod Podge, offering a quick and even protective layer.
- Drying Rack: An old egg carton (turned upside down with small holes poked in the bottom of each cup), skewers stuck into a foam block, or even pushpins in a cardboard box are ideal for drying your painted eggs without smudging.
Step-by-Step Painting Process for Perfect DIY Easter Eggs:
- Prepare Your Workspace: Lay down newspaper or a drop cloth to thoroughly protect your surfaces. Ensure good ventilation, especially if using spray sealants. Gather all your materials within easy reach to maintain a smooth workflow.
- Clean the Eggs: If your plastic eggs are dusty or dirty from storage, give them a quick wipe with a damp cloth and let them dry completely. This ensures better paint adhesion.
- Apply a Base Coat: Choose your first color. It’s often easiest to hold the egg by one end or to gently insert a skewer into the bottom hole (if available) to use as a handle. Apply an even coat of paint over the entire egg. Don’t worry if it’s not perfectly opaque on the first go; multiple thin coats are always better than one thick, gloopy coat.
- Allow to Dry (First Side/Coat): Carefully place the painted egg on your designated drying rack. An empty egg carton with the eggs nestled in the cups works wonderfully. Let this side dry completely to the touch, which usually takes 15-30 minutes, depending on paint thickness and ambient humidity.
- Paint the Second Side/Coat: Once the first side is dry to the touch, flip the egg and paint the remaining unpainted portion. You will likely need a second coat over the entire egg for full, rich color saturation and to completely hide the original plastic color. Repeat the drying process thoroughly.
- Add Details and Embellishments (Optional but Recommended): This is where the magic truly happens and your eggs become unique!
- Speckled Effect: For a rustic, natural, or robin’s egg look, dip a stiff-bristled brush (like an old toothbrush) into a contrasting paint color (e.g., brown, black, or metallic gold). Hold the brush over the dried base coat and tap it against your finger or another object to create fine, even speckles. Practice on a piece of paper first to get the desired density.
- Stripes or Dots: Use a fine-tipped brush or paint pen to add precise patterns, geometric designs, or playful polka dots.
- Ombré or Gradient: Blend two or more colors seamlessly from one end of the egg to the other for a beautiful gradient effect.
- Marbling: Swirl a few drops of different paint colors on a palette and lightly drag a toothpick through them before dabbing onto the egg for an elegant marbled look.
- Glitter Glam: While the final coat of paint is still slightly tacky, sprinkle fine glitter over the egg. Once dry, seal with Mod Podge or clear spray to prevent shedding.
- Seal Your Masterpiece (Optional but Recommended): Once all paint and details are completely dry (allow several hours or even overnight for best results), you can apply a protective coat of Mod Podge or a clear spray sealant. This step not only protects the paint from chipping and wear but also gives a consistent finish (matte, satin, or glossy) and ensures your beautiful eggs last for many Easters to come.
Addressing the “Seam” Issue with Grace and Practical Solutions
Now, let’s address the elephant in the room: those tell-tale seams on plastic eggs. Yes, they exist. And yes, sometimes they are noticeable even after painting, especially with lighter colors. But here’s the thing: these eggs were *free* (or incredibly cheap). A minor seam is a small price to pay for custom, handmade decor that didn’t cost a fortune. I can absolutely handle the seams, and I encourage you to embrace the charm of your handmade efforts!
If they truly bother you, consider these practical tips: you can try to lightly sand them down with fine-grit sandpaper before painting, though this can be tricky and may damage the egg’s integrity if not done carefully. Alternatively, and perhaps more simply, strategically position the eggs with the seams facing downwards or towards the back when arranging them in your displays. Another creative approach is to use the seam as a guide for a stripe, a line of glitter, or another decorative element, turning a perceived flaw into a unique design feature. Ultimately, the charm of handmade items often lies in their unique character and slight imperfections, and a seam can simply be part of that story, adding to the authenticity of your DIY Easter decor.
The Magic of Custom Colors: Perfectly Matching Your Home’s Aesthetic
One of the most satisfying aspects of this DIY project is the complete control you have over the color palette. Gone are the days of being limited to whatever garish or mismatched colors are available in mass-produced store-bought assortments. With acrylic craft paint, you can mix and match to your heart’s content, creating shades that perfectly complement your home’s existing decor, whether it’s modern, farmhouse, bohemian, or traditional.
I personally love to mix paints to achieve a variety of soft, earthy pastels. Think muted blues reminiscent of a spring sky, dusty pinks, serene sage greens, creamy off-whites, and gentle grays. These sophisticated hues lend a natural, understated elegance to any space, moving away from the often overly vibrant traditional Easter palette. However, your imagination is the only limit! You could opt for bold, bright colors for a modern and playful look, shimmering metallics for a touch of glam and sophistication, or even deep jewel tones for a more dramatic and luxurious statement. The ability to customize ensures your Easter decor seamlessly integrates with your personal style, making your holiday display truly one-of-a-kind and reflective of your taste.
Creative Display Ideas for Your Beautiful DIY Easter Eggs
Once your custom-painted eggs are dry and beautifully sealed, the fun continues with arranging them throughout your home. Beyond simply tossing them in a basic basket, here are some elegant and inspiring ways to showcase your handmade creations, turning them into true focal points:
- Apothecary Jars & Glass Cloches: As mentioned, these are perfect for displaying a curated collection of eggs. The clear glass allows the colors and textures to shine, creating an elegant focal point on a mantel, console table, dining buffet, or kitchen island.
- Decorative Bowls & Trays: Arrange a charming cluster of eggs in a beautiful ceramic bowl, a rustic woven basket, a sleek metallic tray, or a vintage wooden tray. Enhance the display with some natural elements like Spanish moss, small faux bird nests, delicate branches, or faux spring flowers for an organic and inviting touch.
- Easter Centerpieces: Combine your painted eggs with fresh spring flowers (tulips, daffodils, hyacinths, or cherry blossoms), lush greenery, and perhaps some decorative candles to create a stunning and personalized centerpiece for your Easter brunch or dinner table.
- Shelves & Mantelpieces: Tuck a few eggs into existing vignettes alongside books, cherished picture frames, and other decorative objects. Use them to add subtle pops of color and seasonal charm to any shelf or mantelpiece.
- Vases & Urns: Fill clear glass vases, elegant ceramic urns, or even repurposed bottles with your painted eggs, perhaps alternating with small bundles of pussy willows, curly willow branches, or faux floral picks for added height and texture.
- DIY Easter Tree: If you have a small decorative tree, a sturdy bare branch (collected from your yard), or even a slender tabletop birch tree, carefully hang your lighter plastic eggs (you can add a loop of ribbon with hot glue or a small drill hole) for a whimsical and delightful display.
- Place Settings: For a thoughtful and special touch during your Easter meal, place a beautifully painted egg at each guest’s plate. It doubles as a charming party favor and a lovely token of the holiday.
- Tiered Trays: Populate a stylish tiered serving tray with your eggs, small decorative birds, mini nests, and perhaps some mini cupcakes or other treats for a delightful and versatile display in your kitchen or dining room.
- Window Sills & Bookcases: Even small spaces can benefit from a touch of Easter cheer. Arrange a few eggs on a window sill or tucked into a bookcase for subtle pops of seasonal color.
The Unbeatable Benefits of Embracing DIY Easter Decor
Beyond the sheer aesthetic appeal and the joy of creating something beautiful, choosing the DIY route for your Easter decor offers a plethora of advantages that make it a truly rewarding endeavor:
- Unparalleled Cost Savings: This is arguably the biggest win. By repurposing existing items and utilizing affordable craft supplies, you can achieve a high-end, custom look without the high-end price tag. The satisfaction of knowing you’ve created something beautiful for next to nothing is immense. Man, I truly love “free” or incredibly cheap decor that looks expensive!
- Complete Customization & Personalization: Every aspect, from color and pattern to finish and embellishments, is entirely up to you. This ensures your decor perfectly reflects your personal style, integrates seamlessly with your existing home aesthetic, and creates a cohesive, inviting, and truly unique space that speaks to you.
- Creative Outlet & Mindful Activity: Engaging in a craft project like painting eggs is a wonderful way to unwind, tap into your innate creativity, and enjoy a mindful moment away from daily stresses. It’s incredibly satisfying and therapeutic to create something beautiful with your own hands, providing a sense of accomplishment.
- Eco-Friendly & Sustainable Approach: Reusing old plastic eggs instead of purchasing new, mass-produced decorative items is a small but significant step towards more sustainable decorating practices. It reduces waste, gives new life to items that might otherwise be discarded, and promotes a conscious approach to consumption.
- Fun for All Ages & Family Activity: Painting plastic eggs is a simple, safe, and engaging activity that can be enjoyed by the whole family. It’s a fantastic way to involve children in holiday preparations, fostering their creativity, improving fine motor skills, and making lasting, cherished memories together.
- Unique & Authentic Personal Touch: Your homemade decorations will carry a unique charm, character, and story that mass-produced items simply cannot replicate. They add warmth, personality, and a genuine handmade feel to your home, making your holiday decor truly special and memorable.
- Durability & Reusability: By sealing your painted eggs, you ensure their durability. These handmade treasures can be stored and reused year after year, becoming a cherished part of your family’s Easter traditions.
This simple yet impactful project proves that you don’t need a huge budget or extensive crafting skills to create stunning holiday decor. With a little paint, a dash of imagination, and perhaps some forgotten plastic eggs, you can transform ordinary items into beautiful, customized accents that celebrate the joy and renewal of Easter. So, gather your supplies, pick your favorite colors, and get ready to infuse your home with delightful, budget-friendly spring cheer. Happy crafting and Happy Easter!







