
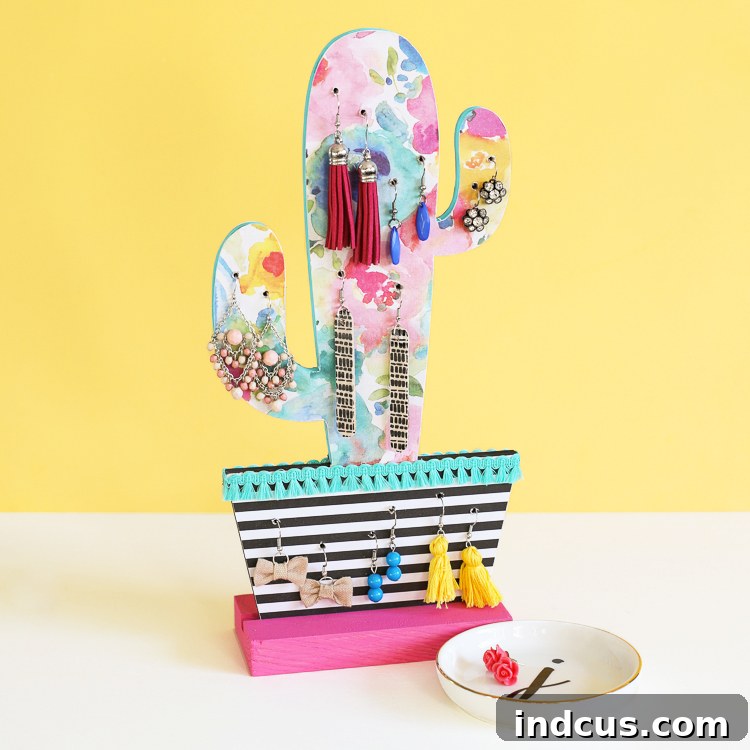
Craft Your Own Chic Cactus Earring Holder: A Fun & Easy DIY Project
Are you tired of tangled earrings hidden away in a cluttered jewelry box? Imagine transforming your accessory storage into a vibrant, eye-catching piece of room decor! This DIY cactus earring holder offers a delightful solution, combining whimsical design with practical functionality. It’s not just a place to hang your favorite studs and hoops; it’s a colorful statement piece that adds a touch of personality to any bedroom or vanity. Best of all, this charming craft is surprisingly simple to make, requiring just a few basic materials and a leisurely afternoon.
This project is perfect for crafters of all skill levels, from beginners looking for an easy win to seasoned DIY enthusiasts seeking a quick and rewarding project. Its adaptability also makes it an ideal craft for teens, offering a fantastic opportunity to personalize their space and express their creativity. Get ready to embark on a fun journey to create a unique display that celebrates your love for both jewelry and handcrafted decor.
Why Choose a DIY Cactus Earring Holder?
Beyond its undeniable cuteness, crafting your own earring holder comes with a host of benefits. Here’s why this project is a must-try:
- Personalization Power: Unlike mass-produced organizers, your DIY cactus holder will be uniquely yours. You get to choose the colors, patterns, and embellishments, ensuring it perfectly matches your room’s aesthetic and your personal style.
- Budget-Friendly Decor: High-end jewelry displays can be pricey. This DIY option uses readily available and affordable materials, allowing you to create a stylish solution without breaking the bank.
- Doubles as Decorative Art: It’s more than just storage; it’s a piece of art! The vibrant cactus design adds a playful and modern touch to your decor, making your jewelry display a focal point rather than just a functional item.
- Sense of Accomplishment: There’s immense satisfaction in creating something beautiful and functional with your own hands. This project is straightforward enough to be enjoyable, yet rewarding enough to leave you feeling proud of your craftsmanship.
- Perfect Gift Idea: Looking for a thoughtful, handmade gift for a friend or family member? A personalized cactus earring holder makes an excellent present for birthdays, holidays, or just because!
Gather Your Crafting Essentials: Materials Needed
To bring your adorable cactus earring holder to life, you’ll need the following supplies. Many of these can be found at your local craft store like Hobby Lobby, or even repurposed from items you already have at home.
Materials List:
- Cactus Chipboard Shape: (Easily found at craft stores like Hobby Lobby, or you can cut your own from sturdy cardboard or thin wood if you have the tools.)
- Scrap of Wood: For the base – ensures stability.
- Craft Paint: Choose colors that complement your scrapbook paper and room decor. Acrylic paints work perfectly.
- Paint Brush: For applying craft paint.
- Scrapbook Paper: (Select a pattern or solid color that speaks to your style. Two contrasting patterns can add visual interest.)
- Mod Podge or A Glue Stick: For adhering paper to chipboard. Mod Podge offers a durable, sealed finish.
- Fringe Trim: (Optional, but adds a lovely textural detail to the “pot” of the cactus.)
- Hot Glue Gun: For attaching the fringe trim and other embellishments.
- Drill: With a small bit for creating earring holes.
- Sandpaper: Fine-grit for smoothing edges and creating a seamless paper finish.
Step-by-Step Guide: Crafting Your Cactus Earring Display
Follow these detailed instructions to create your custom cactus earring holder. Take your time with each step, and don’t be afraid to add your own creative flair!
Step 1: Preparing Your Cactus Shape with a Splash of Color
Begin by painting the exposed edges of your chipboard cactus shape. Choose a craft paint color that either matches or beautifully contrasts with your chosen scrapbook paper. This step is crucial for creating a polished, finished look, as it prevents any raw chipboard from showing once the paper is applied. Allow the paint to dry completely before moving on.
Step 2: Tracing and Cutting Your Decorative Paper
Flip your chosen scrapbook paper to its backside. Carefully place the chipboard cactus shape on top and trace around its perimeter with a pencil. Accuracy here is key to ensuring your paper covers the shape well. Once traced, use a sharp pair of scissors to cut precisely along your pencil line. You may find that cutting slightly outside the line (by a hair) gives you a tiny bit of wiggle room, which will be tidied up in a later step.
Step 3: Adhering the Paper to the Chipboard
Generously apply Mod Podge or a glue stick evenly across one side of your chipboard cactus. Ensure full coverage, paying close attention to the edges. Carefully align your cut scrapbook paper with the chipboard shape and press it down firmly, smoothing out any air bubbles or wrinkles as you go. Don’t worry if the paper slightly overhangs the edges; this is perfectly normal and will be addressed in the next step. Let the glue dry sufficiently so the paper is well-bonded.
Step 4: Achieving a Seamless Finish with Sandpaper
This is where the magic happens for a professional-looking finish! Once the glue is completely dry, take a piece of fine-grit sandpaper. Gently sand around the edges of the chipboard, always moving your sandpaper from the front of the paper towards the back edge of the chipboard. This technique cleanly removes any overhanging paper, creating a perfectly flush and integrated look. The friction of the sandpaper almost “fuses” the paper to the chipboard, resulting in incredibly smooth and neat edges, making it look as though the cactus was originally made from the patterned paper itself.
The result of this sanding technique is truly impressive, giving your paper-covered shape a crisp, finished appearance that elevates the entire project. Take a moment to admire the clean lines:
Step 5: Adding Decorative Fringe Trim (Optional)
If you desire to add extra dimension and texture to your cactus, now is the time to attach fringe trim. Using a hot glue gun, carefully apply a thin line of glue along the top edge of the cactus “pot” section. Gently press the fringe trim onto the glue. This step is entirely optional, but a well-chosen trim can beautifully accentuate the design and give your holder a more finished, whimsical touch. Explore different types of trim, like pom-poms or ribbon, to see what best fits your vision.
Step 6: Creating the Earring Display Holes
Now, let’s make it functional! With a drill and a small drill bit (ensure it’s small enough for earring posts but large enough for hooks), carefully drill holes into the cactus shape where you intend to hang your earrings. Plan your spacing in advance to accommodate various earring sizes. Drill slowly and steadily, applying gentle pressure to avoid tearing the paper. If you’re nervous about tearing, you can place a piece of masking tape over the spot where you’re drilling to provide extra stability to the paper.
Step 7: Crafting a Stable Wooden Base
To ensure your cactus stands upright, you’ll need to create a sturdy base. Take your scrap piece of wood and cut a groove into its center that is the same thickness as your chipboard cactus. If you have access to a table saw, you can carefully lower the blade and make multiple passes to achieve the desired groove thickness, as the original crafter’s husband did. If a table saw isn’t an option, here are some alternatives:
- Chisel Method: Carefully chisel out a groove using a hammer and chisel. This requires patience and precision.
- Layered Wood: Glue two smaller pieces of wood parallel to each other onto a wider base, leaving a gap in between that matches the thickness of your cactus. Once dry, your cactus can slide into this gap.
- Dowel/Slot Router: If you have a router, a straight bit can easily cut a perfect slot.
Once the groove is created, you can paint or stain your wooden base to match or complement your cactus design. Allow it to dry completely.
Bringing It All Together: Your Darling Earring Holder
With all your components ready, the final step is incredibly satisfying! Once the base piece is dry, carefully slide the bottom of your cactus shape into the groove of the wooden base. It should fit snugly and stand upright, proudly displaying your craftsmanship. Step back and admire your brand-new, darling earring holder! Its funky, whimsical design is sure to bring a smile to your face every time you pick out your accessories. This colorful creation is more than just an organizer; it’s a celebration of personal style and DIY charm.
Tips for Personalizing Your Cactus Earring Holder
One of the greatest joys of DIY is making a project truly your own. Here are some ideas to infuse even more personality into your cactus earring holder:
- Vary Your Paper & Paint: Don’t limit yourself to one style. Experiment with geometric patterns, floral prints, or even glitter scrapbook paper. Try ombré painting on the edges for a gradient effect.
- Add Extra Embellishments: Beyond fringe trim, consider small pom-poms, rhinestones, glitter glue, fabric flowers, or even tiny painted details (like white dots for cactus needles) to make your cactus pop.
- Explore Different Shapes: While the cactus is undeniably cute, think about other shapes that could work! A pineapple, a star, or even a simple geometric shape could also make a unique earring display.
- Mix Media: Instead of scrapbook paper, consider covering your chipboard with fabric scraps, thin cork, or even small mosaic tiles for a different texture.
- Gift It Forward: This makes an exceptional personalized gift! Tailor the colors and style to the recipient’s taste for a truly thoughtful present.
Beyond Jewelry: Creative Uses for Your Cactus Creation
While designed as an earring holder, your charming cactus can serve multiple purposes:
- Keychain Organizer: Hang frequently used keys on the lower holes for easy access.
- Desk Accessory Display: Use it to hold small desk items like paper clips or elastic bands (with small hooks).
- Kid’s Room Decor: Even without earrings, it makes a fun and vibrant decorative piece for a child’s bedroom or playroom.
- Memo Board: If you used cork for the cactus, you could use pushpins to attach small notes or photos.
Frequently Asked Questions About This DIY Earring Holder
Here are answers to some common questions you might have about this fun craft project:
- Q: How long does this project typically take to complete?
- A: Most crafters can comfortably finish this project in a single afternoon, generally within 2-4 hours, allowing for drying times for paint and glue.
- Q: What if I don’t have a drill? Are there alternative ways to create holes?
- A: Yes! For softer materials like chipboard, a sharp awl or even a sturdy pushpin can create small holes. Alternatively, you could use small adhesive hooks or hot-glue tiny eye hooks to the surface.
- Q: Can I use different shapes of chipboard or wood?
- A: Absolutely! The beauty of DIY is customization. Any flat, sturdy shape can be adapted using these same techniques. Think animals, stars, or even geometric designs.
- Q: How can I clean my finished earring holder?
- A: Gently wipe it with a dry, soft cloth to remove dust. Avoid using wet cleaners, especially if you used Mod Podge or a glue stick, as moisture could damage the paper.
- Q: Is the base sturdy enough to hold many earrings?
- A: Yes, with a properly fitted wooden base, your cactus holder will be stable enough to hold a good collection of earrings. Ensure the groove is snug and the base is wide enough to prevent tipping.
Unleash Your Inner Crafter: A Beautiful & Functional Creation Awaits!
This DIY cactus earring holder isn’t just a craft project; it’s an invitation to unleash your creativity and bring a pop of joy into your living space. It’s a testament to how simple materials can be transformed into something both beautiful and incredibly functional. Imagine your earrings, once hidden, now organized and displayed like tiny works of art on their vibrant cactus home. Whether you’re making it for yourself, for a daughter’s room, or as a thoughtful gift, this project is guaranteed to bring satisfaction and a splash of color. So grab your supplies, put on some music, and get ready to craft your very own charming jewelry display!
Pin this inspiring DIY project now, so you can easily find it whenever your creative spirit calls!







