
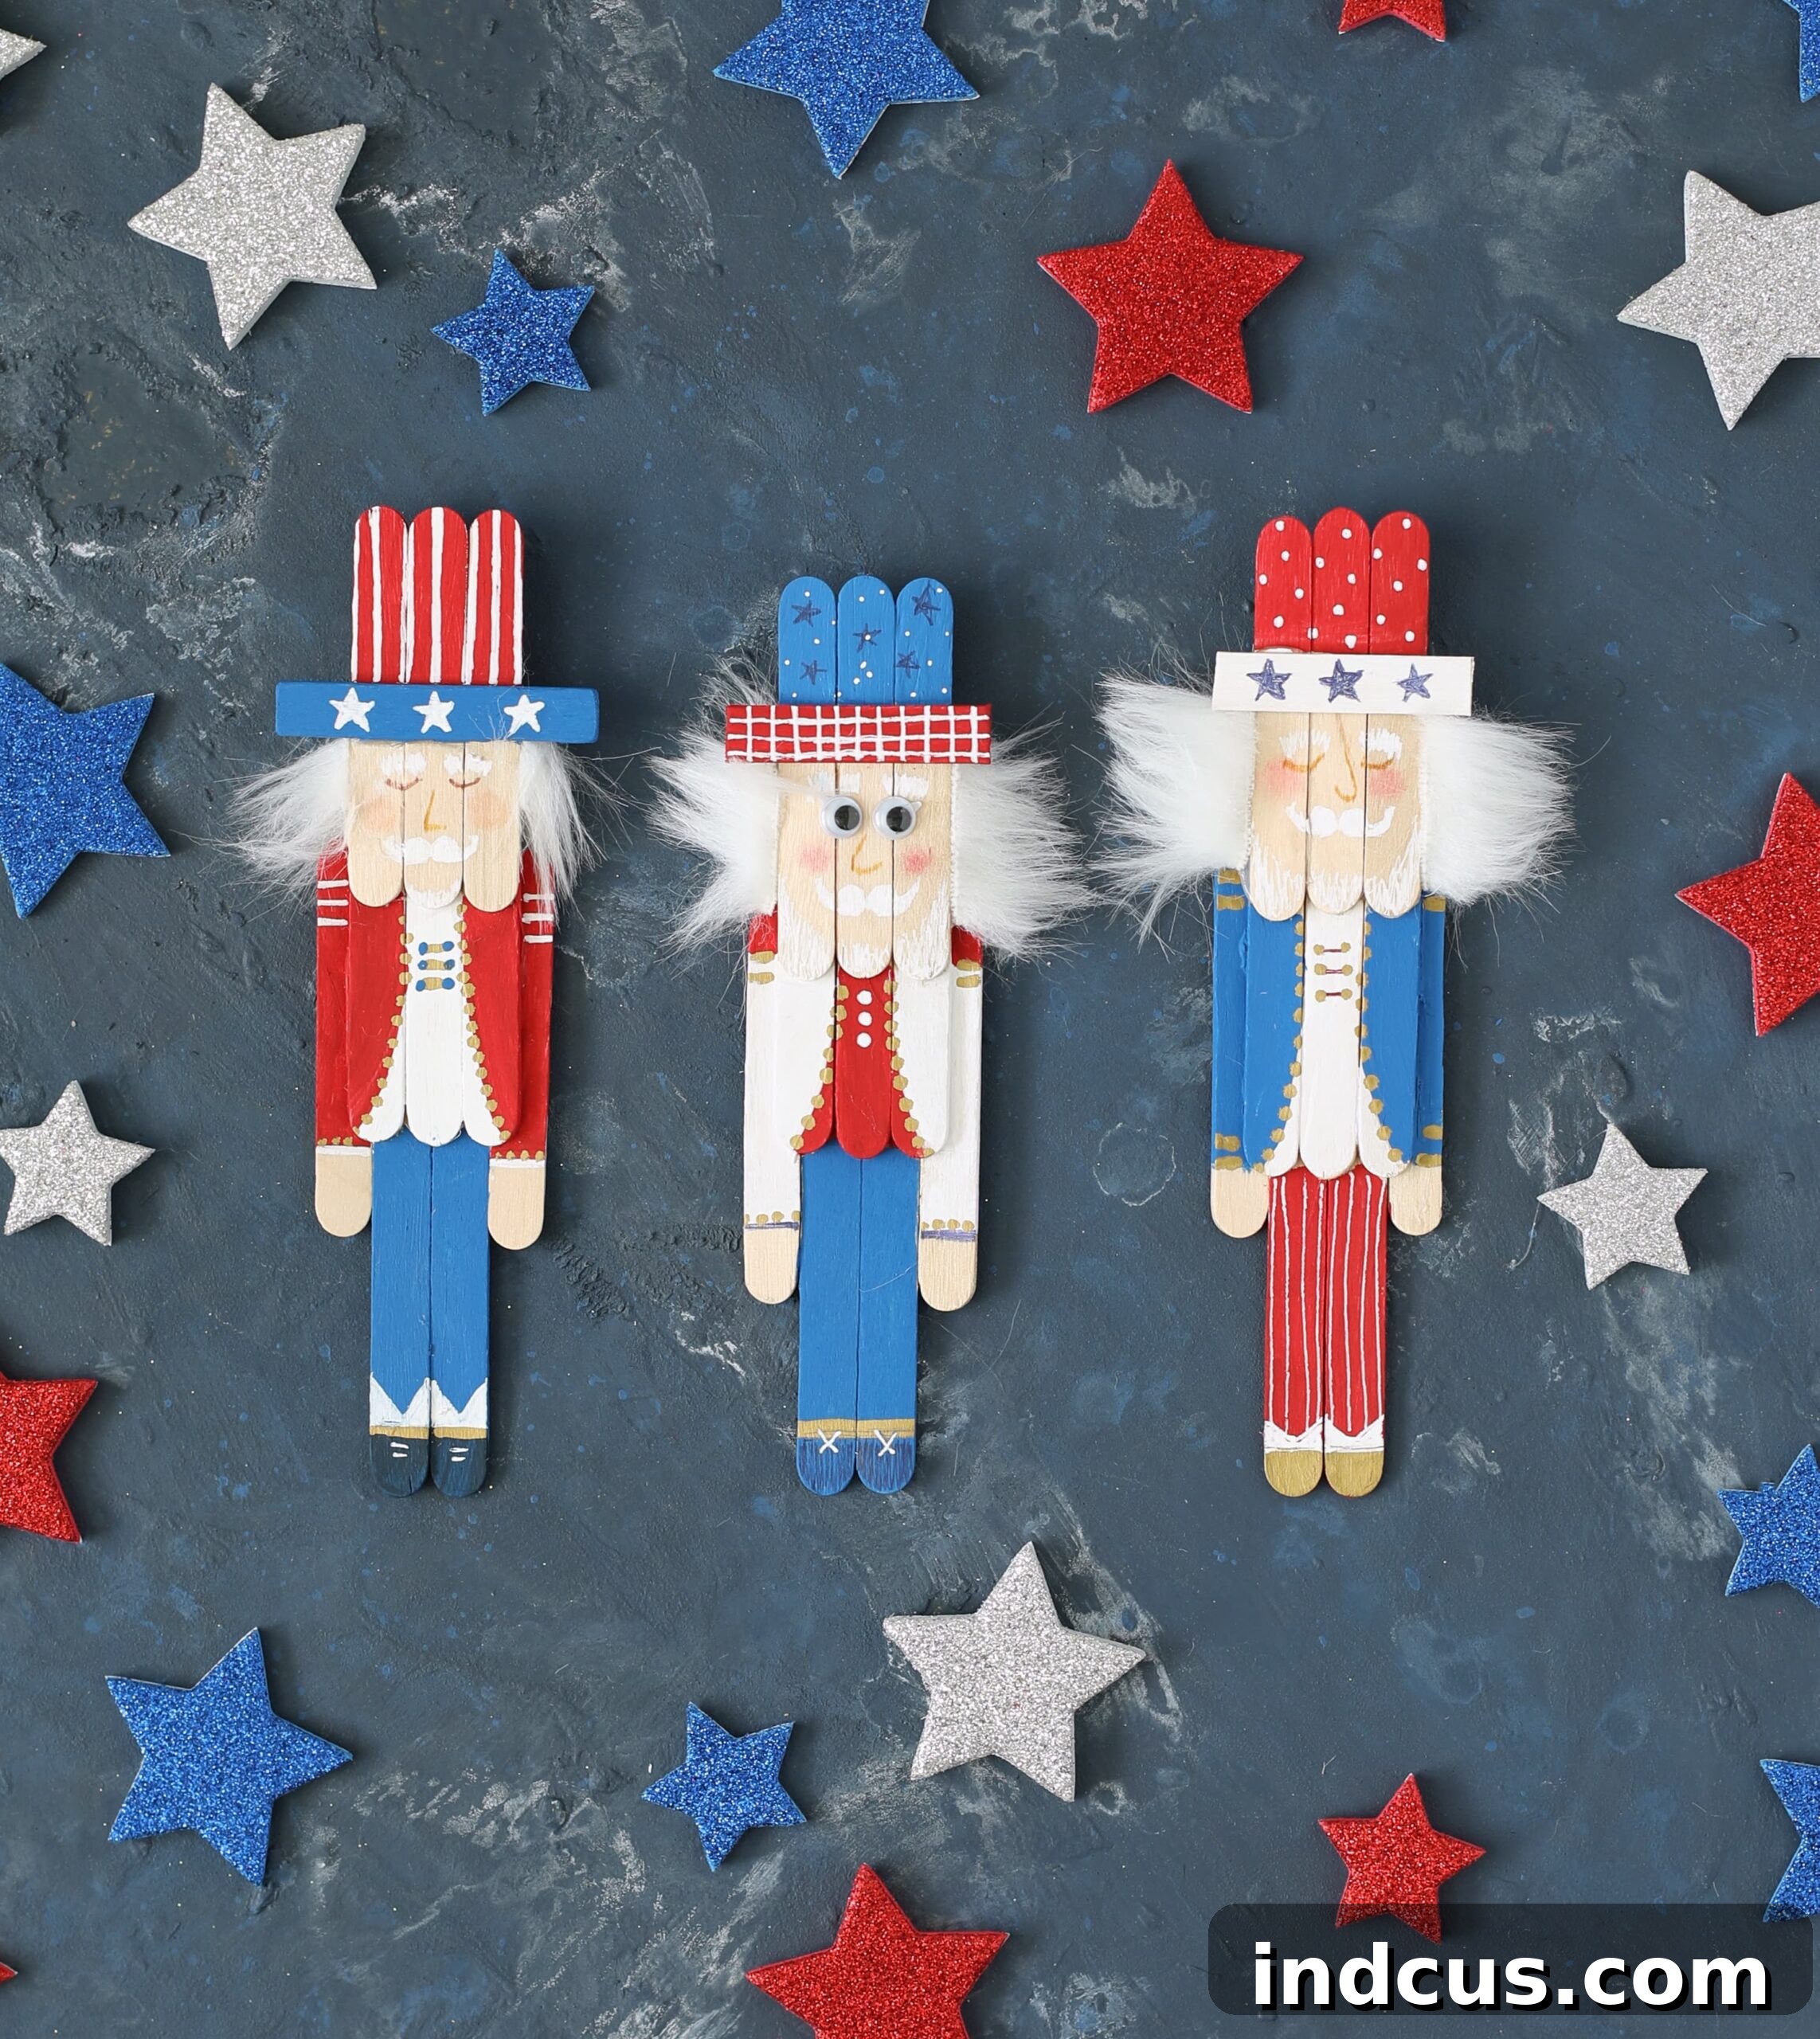
DIY Popsicle Stick Uncle Sam: Craft Your Patriotic Spirit for the Fourth of July
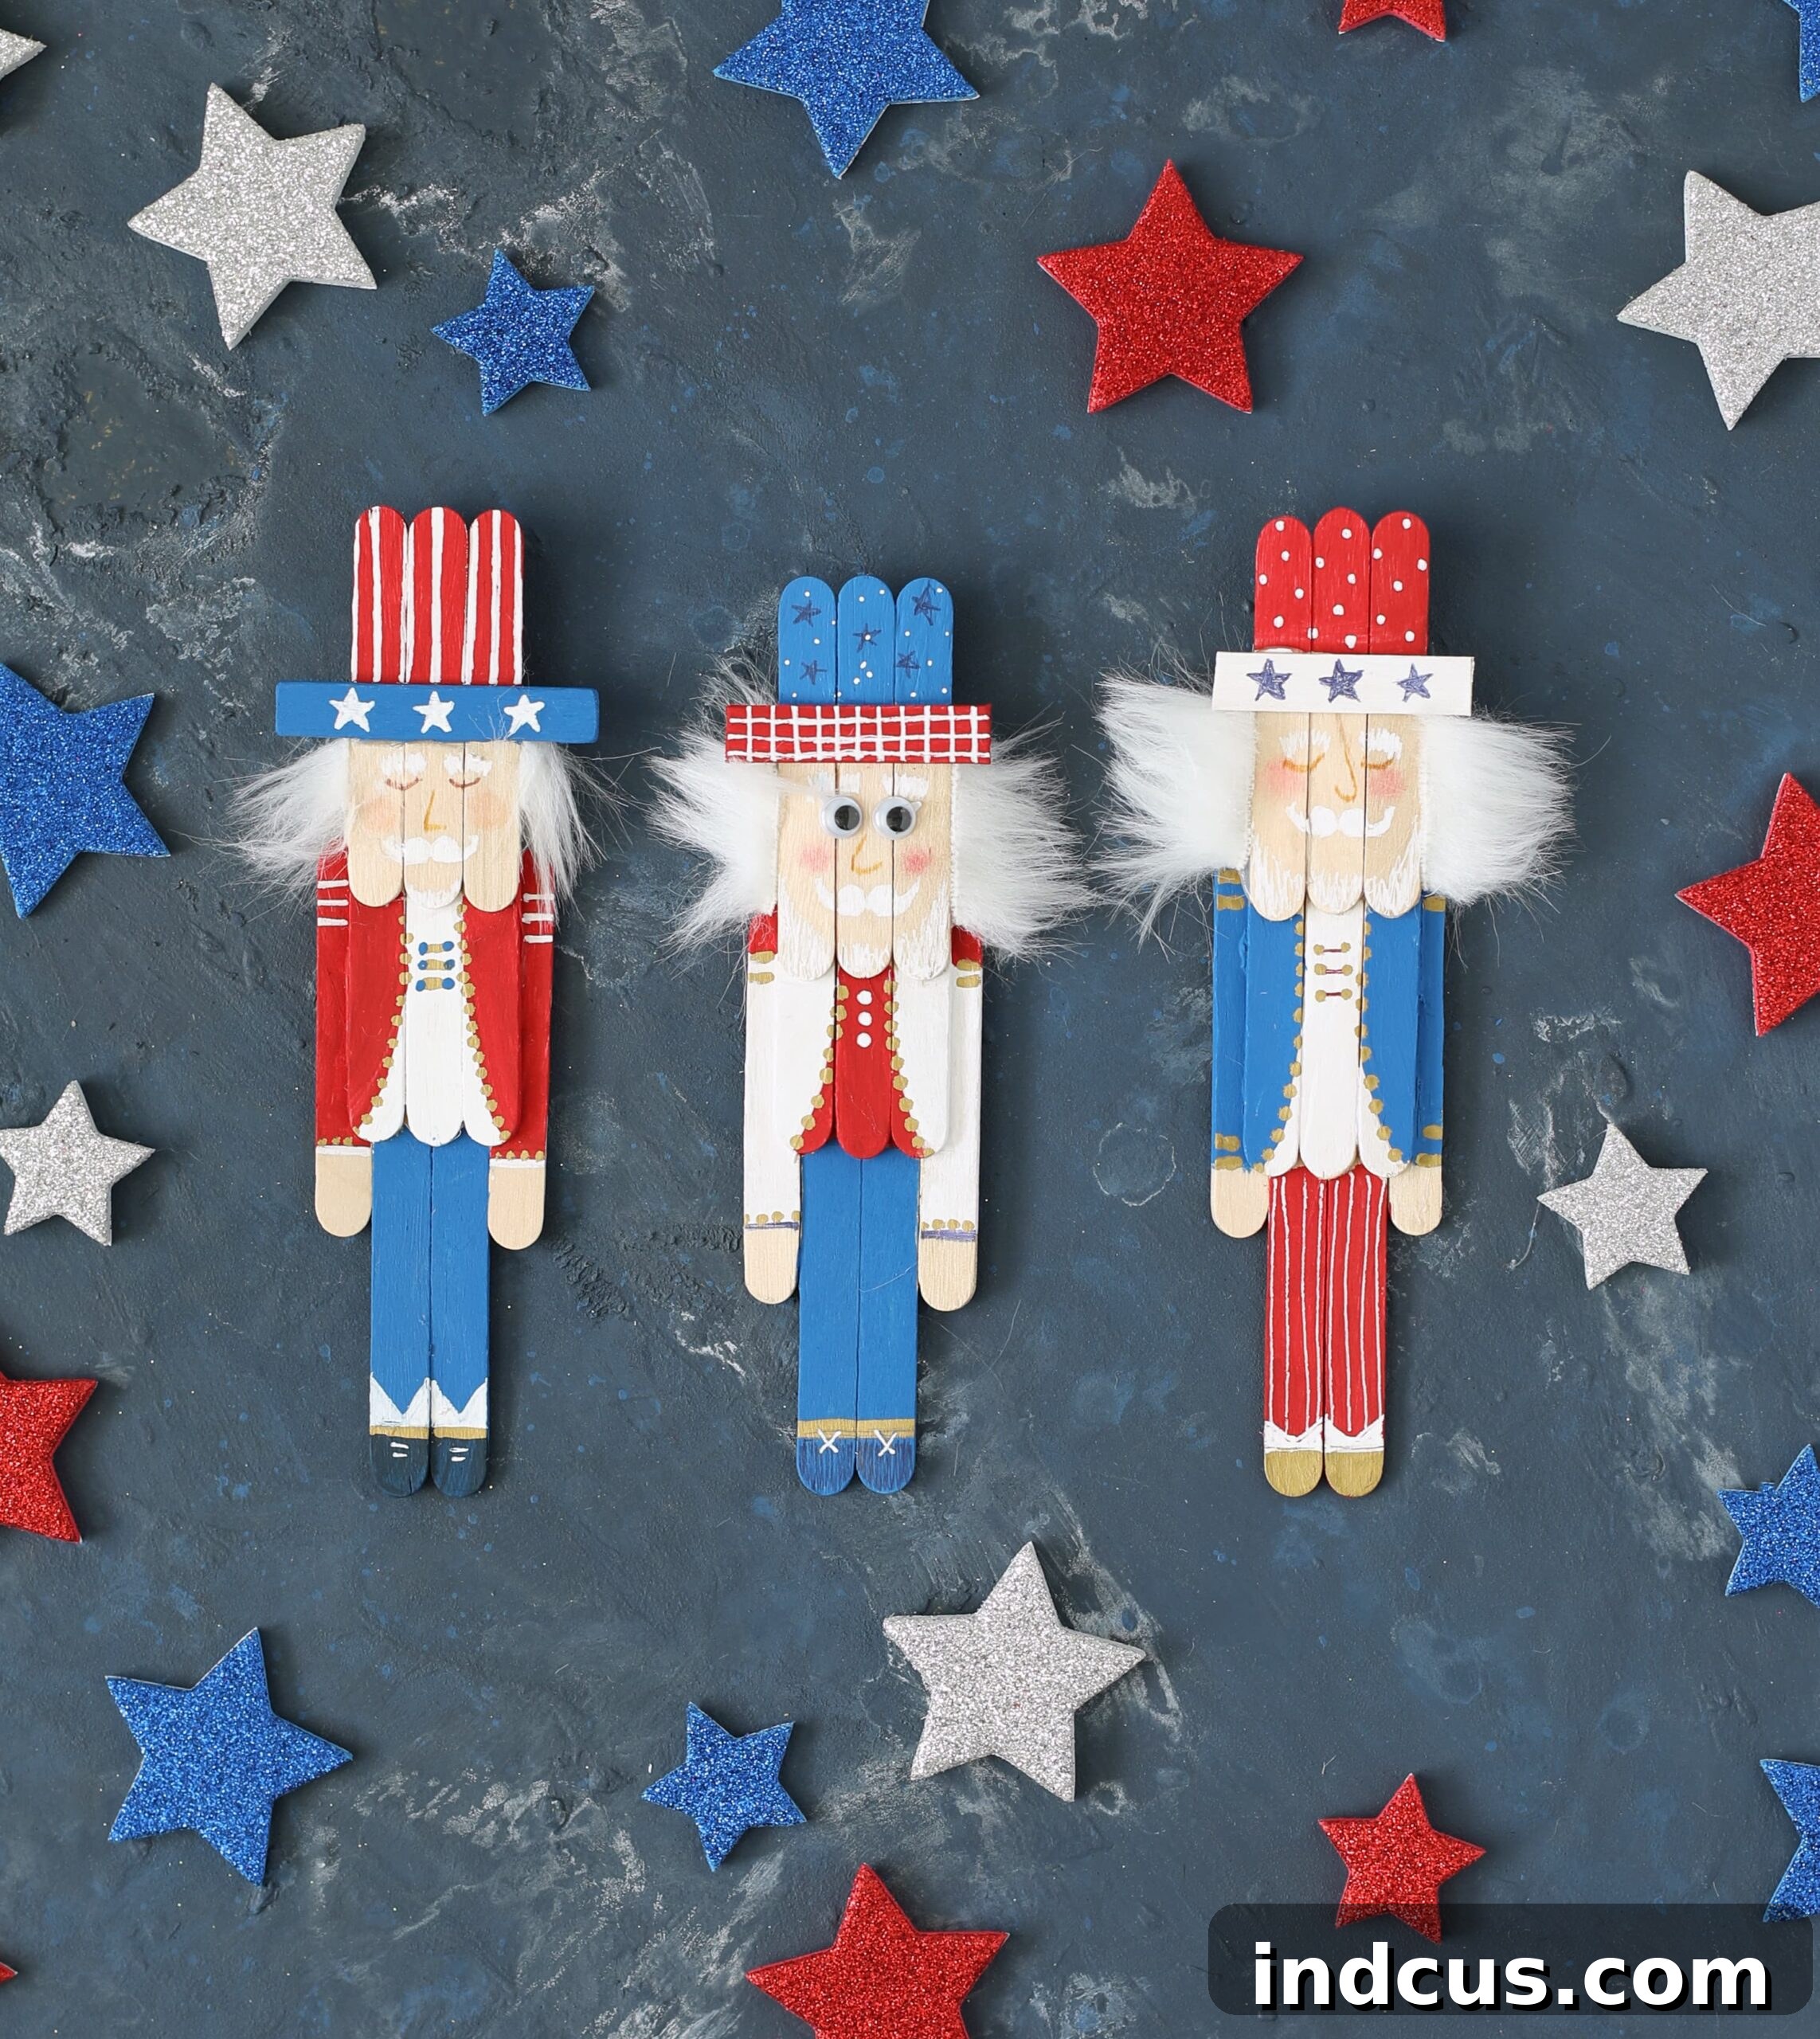
As the Fourth of July approaches, the air fills with anticipation for celebrations, fireworks, and patriotic displays. While store-bought decorations are always an option, there’s something truly special about adorning your home with unique, handmade creations. If you’ve enjoyed crafting our popsicle stick nutcrackers during Christmas or the playful popsicle stick leprechauns for St. Patrick’s Day, you’ll love our latest seasonal project: an adorable Uncle Sam crafted entirely from popsicle sticks!
This charming Uncle Sam craft is not only incredibly fun to make but also remarkably quick and inexpensive. It’s an ideal project for all ages, offering a wonderful opportunity to infuse personality into each little figure with delightful details. Finding truly engaging and distinctive crafts for the Fourth of July can sometimes be a challenge, which is why we’re thrilled to present a project that we believe will bring immense joy and a vibrant patriotic flair to your Independence Day festivities. Let’s dive in and create a truly memorable piece of Americana!
Why Choose a DIY Popsicle Stick Uncle Sam for Your Fourth of July Celebrations?
The Fourth of July is more than just a holiday; it’s a celebration of freedom, unity, and American spirit. What better way to honor this special day than by engaging in creative activities that reflect its essence? Crafting a DIY Uncle Sam offers numerous benefits beyond just a pretty decoration:
- Unleash Creativity: This project encourages imaginative design, from painting facial expressions to choosing unique patterns for his iconic outfit.
- Family Bonding: It’s an excellent activity for families, allowing parents and children to collaborate, share ideas, and create lasting memories together.
- Budget-Friendly Decor: Made primarily from inexpensive craft sticks and paint, this Uncle Sam helps you decorate patriotically without breaking the bank.
- Unique Personal Touch: Unlike mass-produced items, your handmade Uncle Sam will have a distinct character, making your holiday decor truly one-of-a-kind.
- Educational Aspect: For younger crafters, it’s an opportunity to learn about American symbols and the significance of Uncle Sam as a representation of the United States.
- Sense of Accomplishment: There’s immense satisfaction in creating something beautiful and festive with your own hands, ready to display proudly.
Whether you’re looking for a new tradition, a rainy-day activity, or simply a way to add a personal touch to your Independence Day decor, this popsicle stick Uncle Sam is the perfect choice. His whimsical charm will undoubtedly bring smiles and a burst of patriotic cheer to any setting.
Gather Your Crafting Essentials: What You Need
Before embarking on this delightful crafting journey, it’s essential to gather all your materials. The beauty of this project lies in its simplicity and the accessibility of its components. Most items can be found at your local craft store, an online retailer, or even around your home. Having everything organized beforehand will ensure a smooth and enjoyable crafting experience, allowing you to focus on the fun of creation.
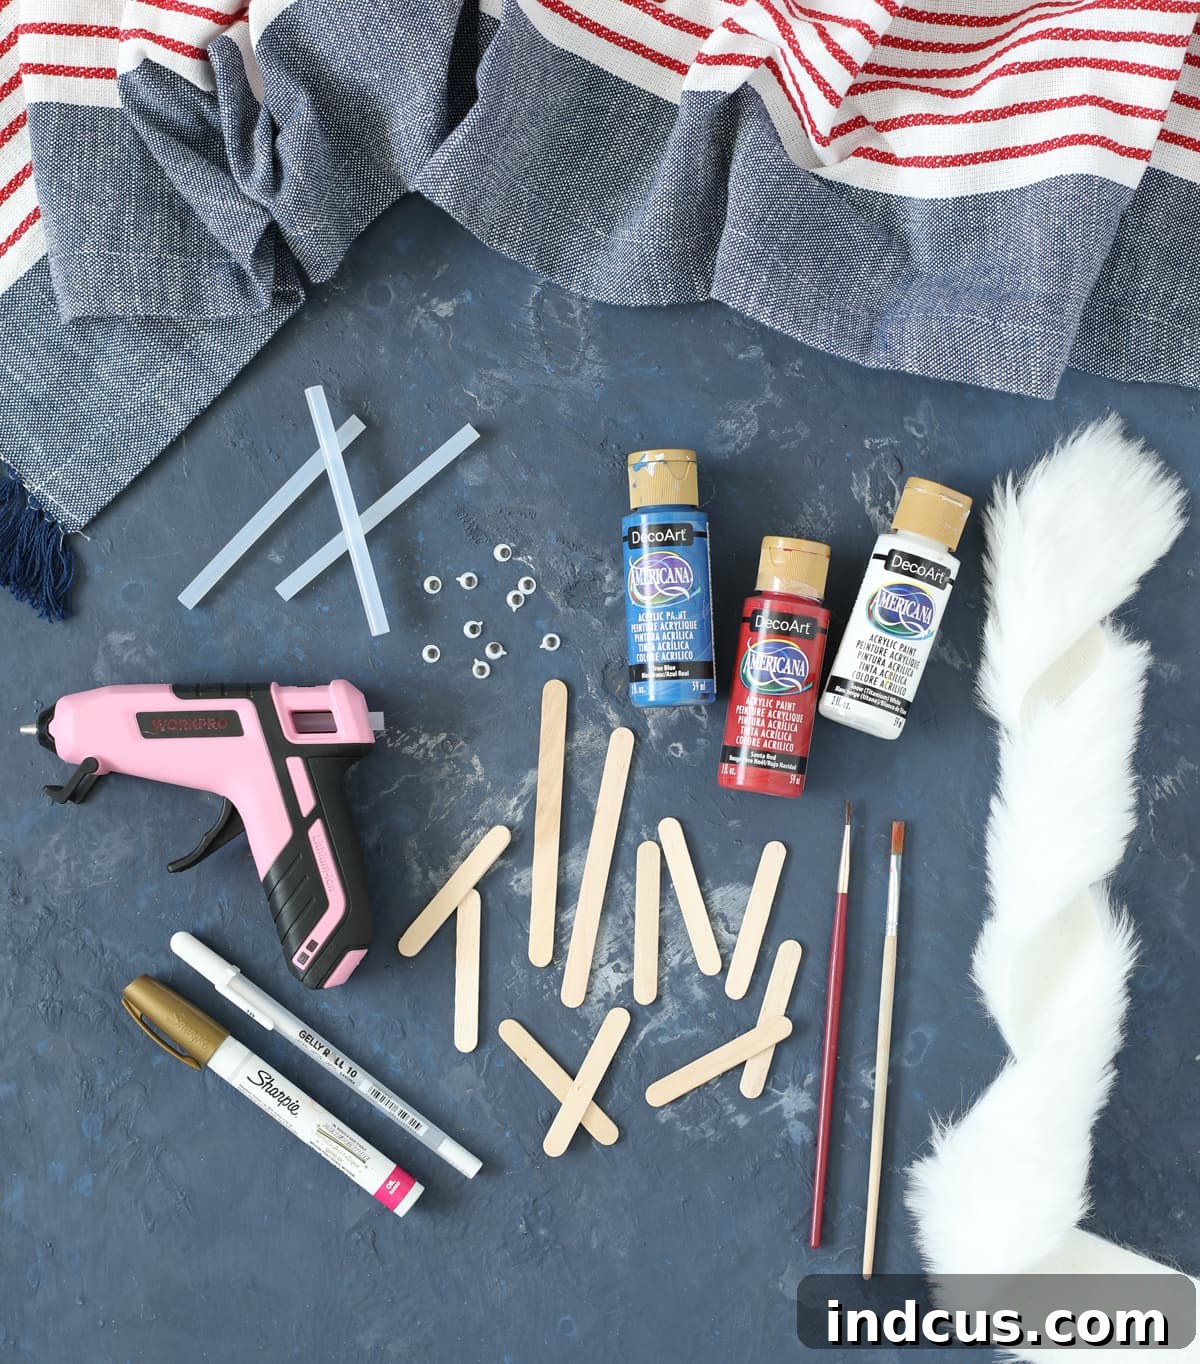
Materials Needed for Your Popsicle Stick Uncle Sam:
- 8 Small Craft Sticks (approximately 2.5 inches long): These form the crucial structural elements of Uncle Sam’s hat and body. You can find these at any craft store or online here.
- Two Regular Craft Sticks (approximately 4.5 inches long): These longer sticks serve as the foundational base for your Uncle Sam figure. Easily available here.
- Hot Glue Gun + Glue Sticks: Essential for quickly and securely assembling the craft sticks. Always exercise caution when using a hot glue gun, especially with children. A reliable model can be found here.
- Craft Paint: To bring Uncle Sam to life with vibrant patriotic colors.
- Red Craft Paint: For his iconic jacket or stripes.
- White Craft Paint: For crisp details, shirt, or hat accents.
- Blue Craft Paint: For his patriotic hat and trousers.
- Small Paint Brushes: For applying base colors and initial details with precision.
- Paint Pens: Ideal for adding intricate details, facial features, and fine lines.
- White Paint Pen: For stars, buttons, and highlights.
- Gold Paint Pen: For decorative accents or belt buckles, adding a touch of shine.
- Black Paint Pen: For outlining, eyes, and other bold features.
- White Faux Fur: To create Uncle Sam’s signature white hair and beard, adding a delightful textural element. Find it here.
Step-by-Step Guide: Crafting Your Patriotic Uncle Sam
Now that you have all your materials ready, let’s transform these simple craft sticks into a cheerful Uncle Sam. Follow these detailed instructions carefully to ensure a sturdy and adorable finished product. Take your time, enjoy the process, and don’t be afraid to add your own creative flair!
Instructions:
Step 1: Constructing the Frame – The Foundation of Uncle Sam
Begin by meticulously assembling the popsicle sticks to form the basic structure of your Uncle Sam. This initial step is crucial for the overall stability and shape of your craft.
- Lay the Base: Place the two longest craft sticks side by side on your work surface. These will form the main body and central support for your figure.
- Attach the Top Crossbar: Apply a line of hot glue to one small craft stick. Carefully place it horizontally on top of the two long sticks, ensuring it is perfectly centered and its top edges align with the top edges of the longer sticks. This piece begins to define the hat brim and upper body.
- Secure the Hat’s Base: Add hot glue to the areas immediately adjacent to the first small stick on the two long sticks. Press two more small sticks down, one on each side, ensuring their ends line up with the outer edges of the two long sticks. This creates a solid base for Uncle Sam’s iconic hat.
- Form the Lower Body Support: Flip the structure over or carefully apply glue to the underside. Glue two small sticks underneath, positioned so they are even with the bottom of the long sticks but securely attached to the three small sticks you just placed on the front. These act as the lower support for the body.
- Build the Hat’s Crown: Apply glue along the top edge of the three small sticks. Attach three more small sticks vertically, lining up their bottom edges so they slightly overlap (about 1/3 of their length) the existing sticks. This forms the distinctive tall crown of Uncle Sam’s hat. Ensure all pieces are firmly adhered for a robust structure.
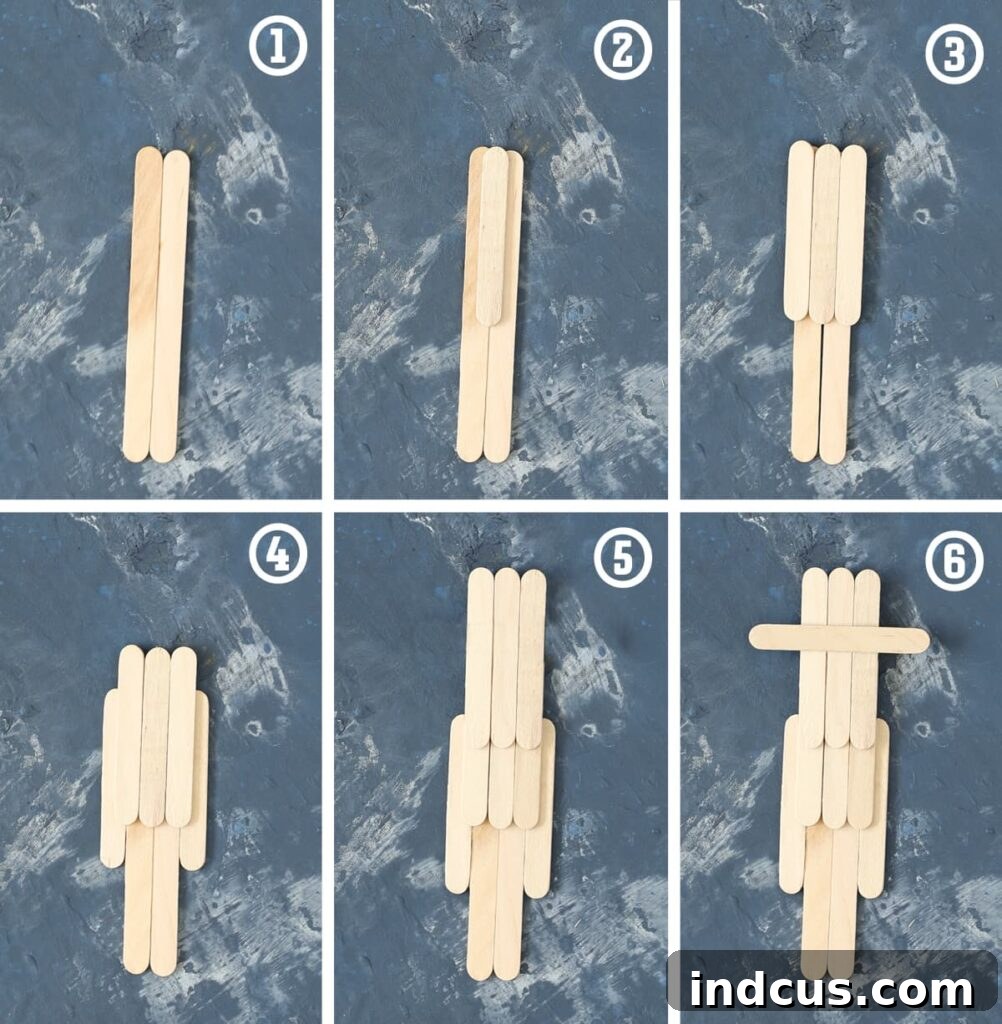
Step 2: Refining the Hat Band – Achieving Perfect Proportion
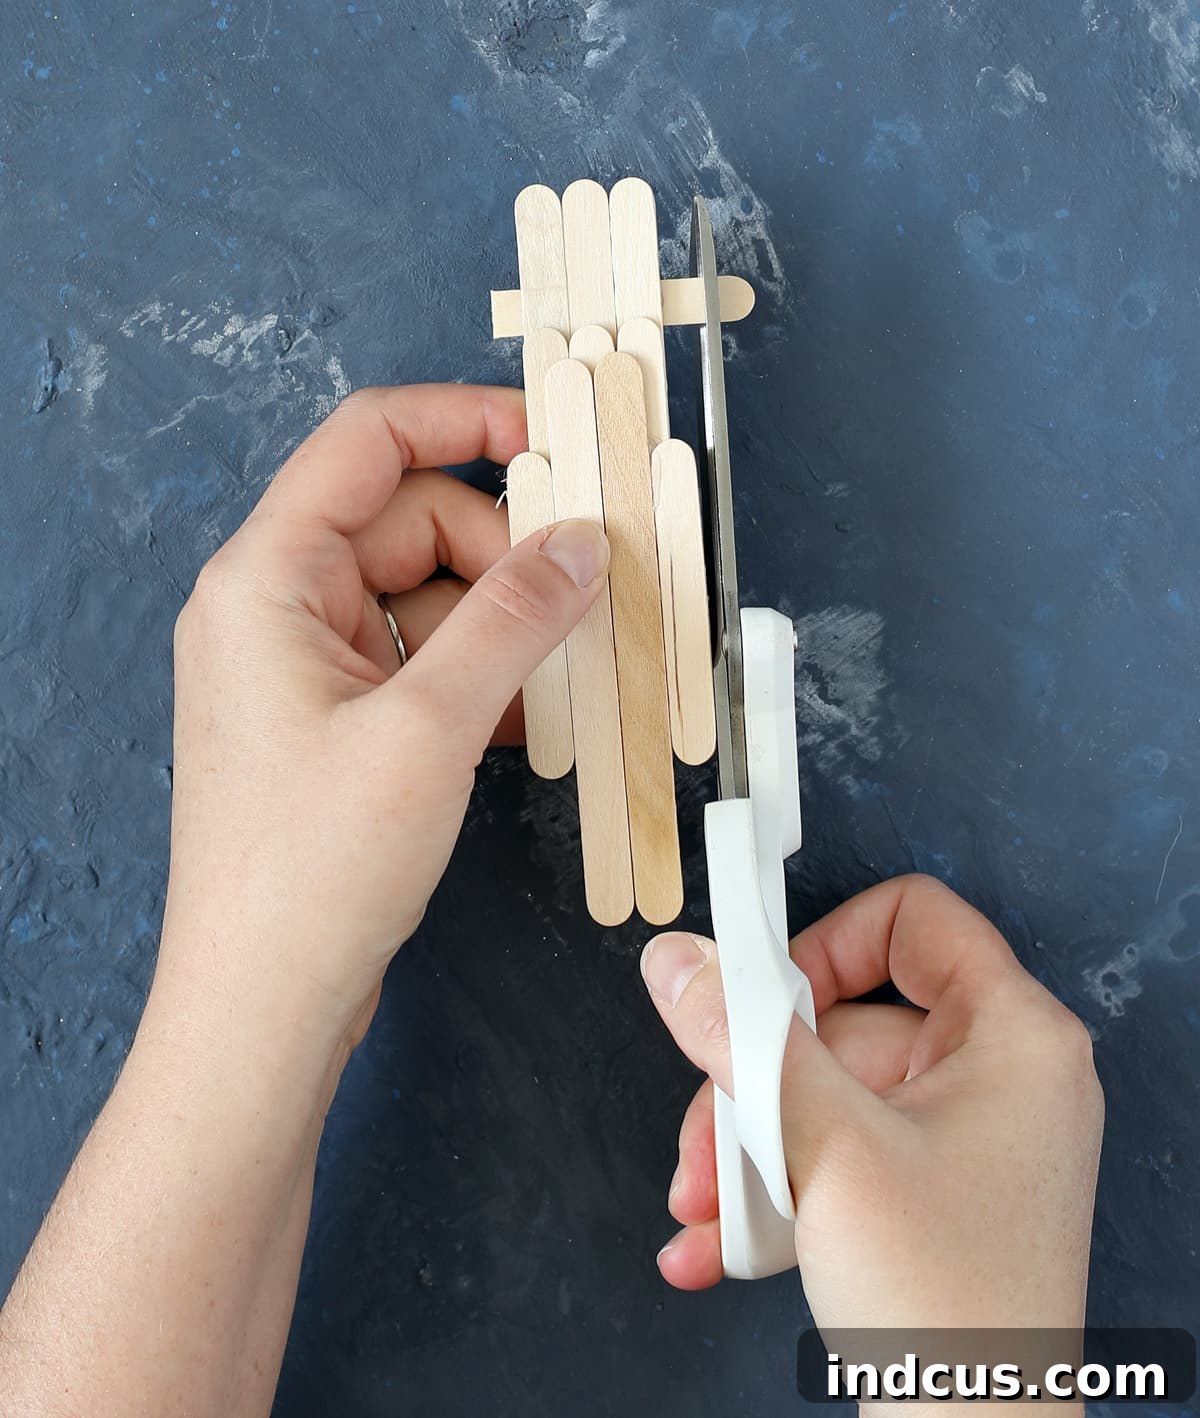
This step, while optional, significantly enhances the aesthetic appeal of Uncle Sam’s hat, giving it a more polished and proportionate look. If you desire a cleaner finish, carefully trim the ends of the hat band.
Using a pair of sharp craft scissors, gently trim off the outermost ends of the small sticks that form the hat band. Aim to make them slightly shorter, ensuring they are more in proportion with the rest of the figure. This small adjustment can make a big difference in the overall neatness and visual balance of your Uncle Sam. If you prefer a more rustic or elongated look, feel free to skip this step.
Step 3: Bringing Color to Life – The Base Coat
Once the glue has completely dried and your Uncle Sam’s structure is solid, it’s time for the exciting part: adding color and personality! This base coat sets the stage for all the intricate details to come.
Carefully paint the top section of your figure to resemble Uncle Sam’s iconic blue hat, leaving a natural wood area for his face. Then, proceed to paint the base colors of his clothing. For a classic look, we recommend a vibrant red shirt, a crisp white jacket, and bold blue pants. However, feel free to experiment with any combination of red, white, and blue that sparks your creativity!
Important Note: Remember to leave the face area and the “hand” sections (the tips of the two long sticks) as raw wood. This will create a natural skin tone and a distinct separation for his features. For the white jacket, I painted a curved line in the center of the red section to give the illusion of a lapel or an open jacket, adding more visual interest to the figure. Allow each color to dry completely before applying the next to prevent smudging and ensure crisp lines.
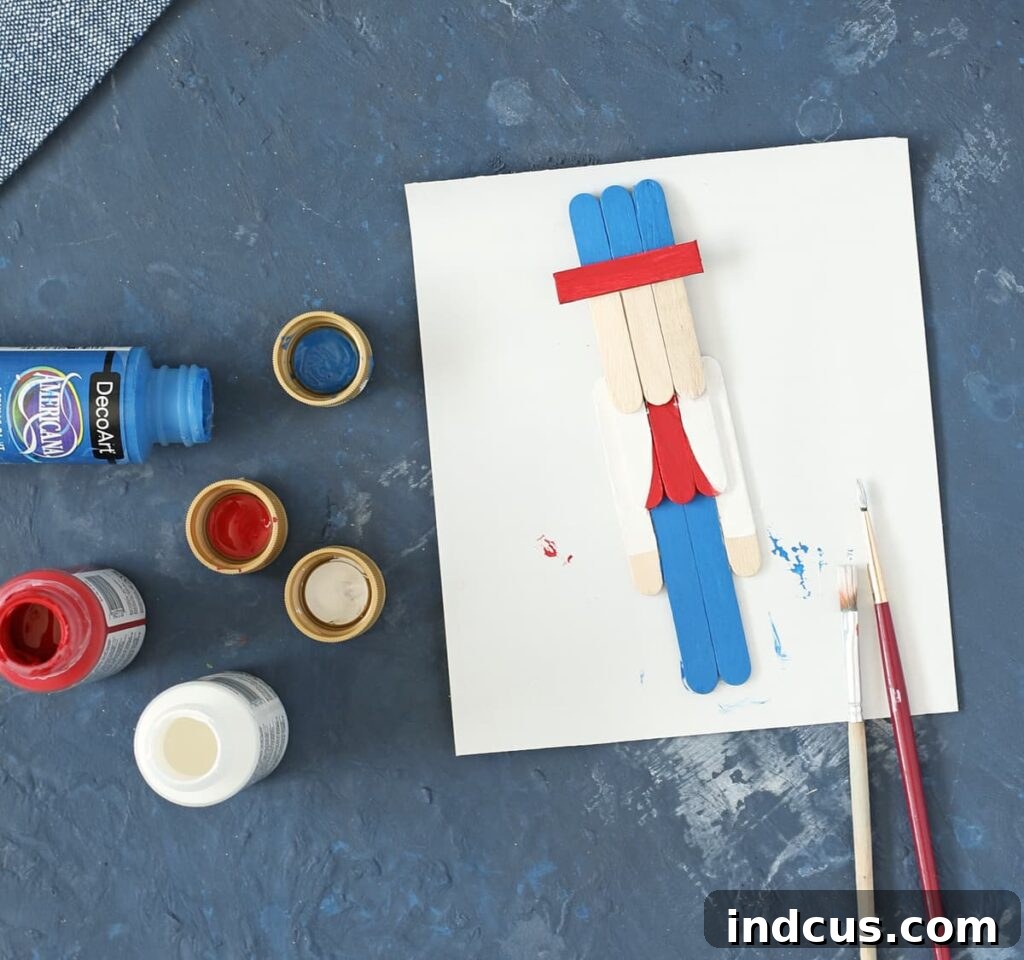
At this stage, your Uncle Sam might look like a simple arrangement of painted sticks, but trust the process! We’re about to delve into the magical phase where personality truly emerges!
Step 4: The Art of Detail – Adding Personality with Paint Pens
This is where your Uncle Sam truly comes to life! Using fine-tipped paint pens, you can add all the charming and intricate details that give him character. Embrace your inner artist and have fun with this step, as more detail often leads to a more engaging and expressive figure.
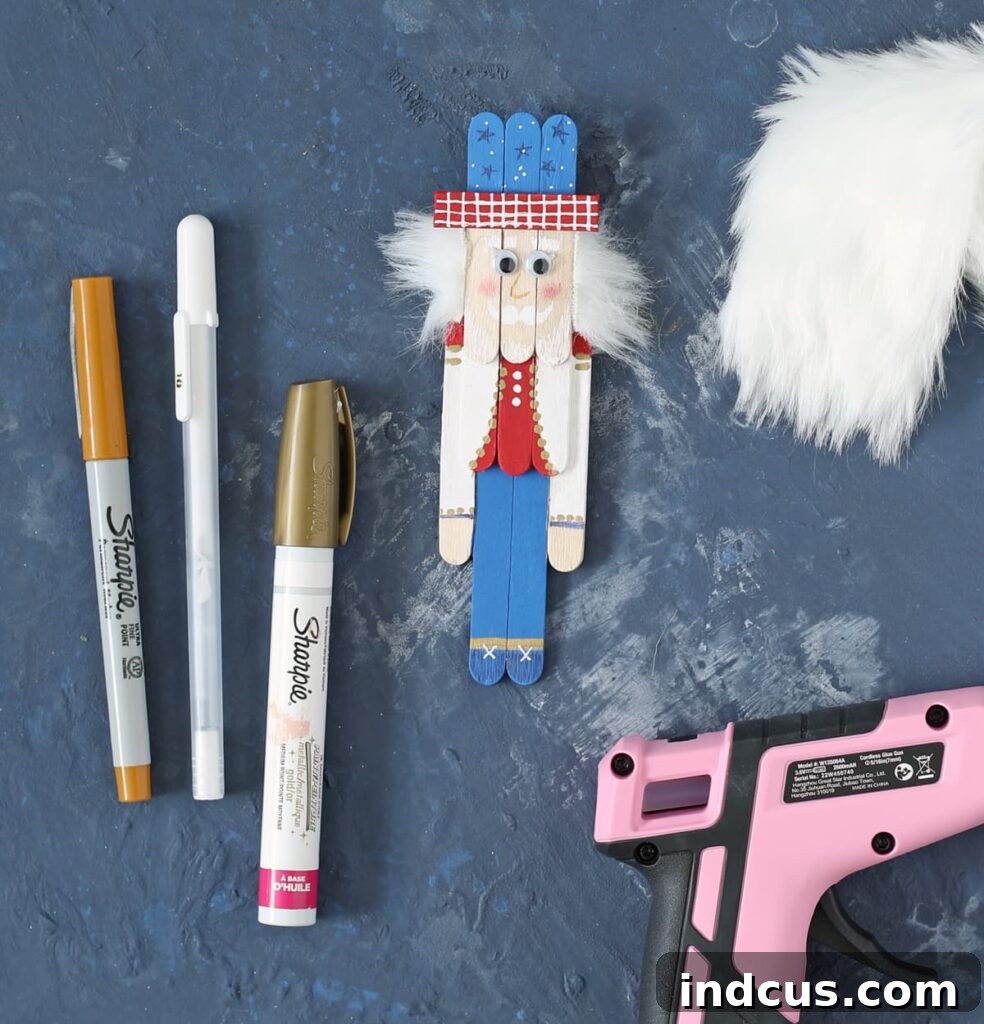
- Facial Features: Carefully draw on eyes, a nose, and a mouth. You can give him a friendly smile, a stern expression, or even a playful wink! For a classic Uncle Sam look, consider adding a distinguished handlebar mustache or a full, flowing beard. As an alternative, googly eyes can be glued on for a whimsical touch; experiment with both drawn and glued eyes to see what you prefer.
- Clothing Accents: Enhance his outfit by adding details like sleeve cuffs, collar lines, and decorative buttons. Don’t forget shoelaces or boots at the bottom of his pants.
- Hat Details: Decorate his hat band with stars, stripes, or other patriotic patterns. A gold paint pen can add a metallic sheen to buckles or hat emblems.
- Creative Patterns: Feel free to add patterns to his clothing, such as stripes on his shirt or subtle textures on his jacket. This is where your unique style can shine!
Remember, this is your creation. Embrace the philosophy that “more is more” when it comes to adding these endearing details, allowing each Uncle Sam to develop his own unique persona. Nobody ever accused a crafter of being too minimalist when it comes to adding charm!
Step 5: The Finishing Touch – Iconic Hair and Beard
No Uncle Sam is complete without his characteristic white hair and beard. This final step adds texture, depth, and that unmistakable iconic look to your patriotic figure.
Take your white faux fur and carefully cut tiny strips. These strips will form Uncle Sam’s hair, sideburns, and beard. Apply a small amount of hot glue to the sides of the raw wood face area and along the chin line, then gently press the faux fur strips into place. Trim any excess fur to achieve your desired length and shape, giving him a distinguished and fluffy appearance.
HELPFUL TIP for Cutting Faux Fur: If you’re new to crafting with faux fur, here’s a trick for clean cuts: always cut from the back side of the fabric. Slide the very tip of your scissors just under the backing fabric, making sure you are cutting only the fabric base and not the fur strands themselves. This technique prevents choppy edges and keeps the fur looking soft and natural.
Displaying Your Patriotic Creations & Creative Variations
Oh my goodness, aren’t these little men just delightful? The amount of personality that shines through from such simple materials is truly amazing. This craft is seriously so much fun, and it really is all about those wonderful, unique details. Just look at the individuality of each one!
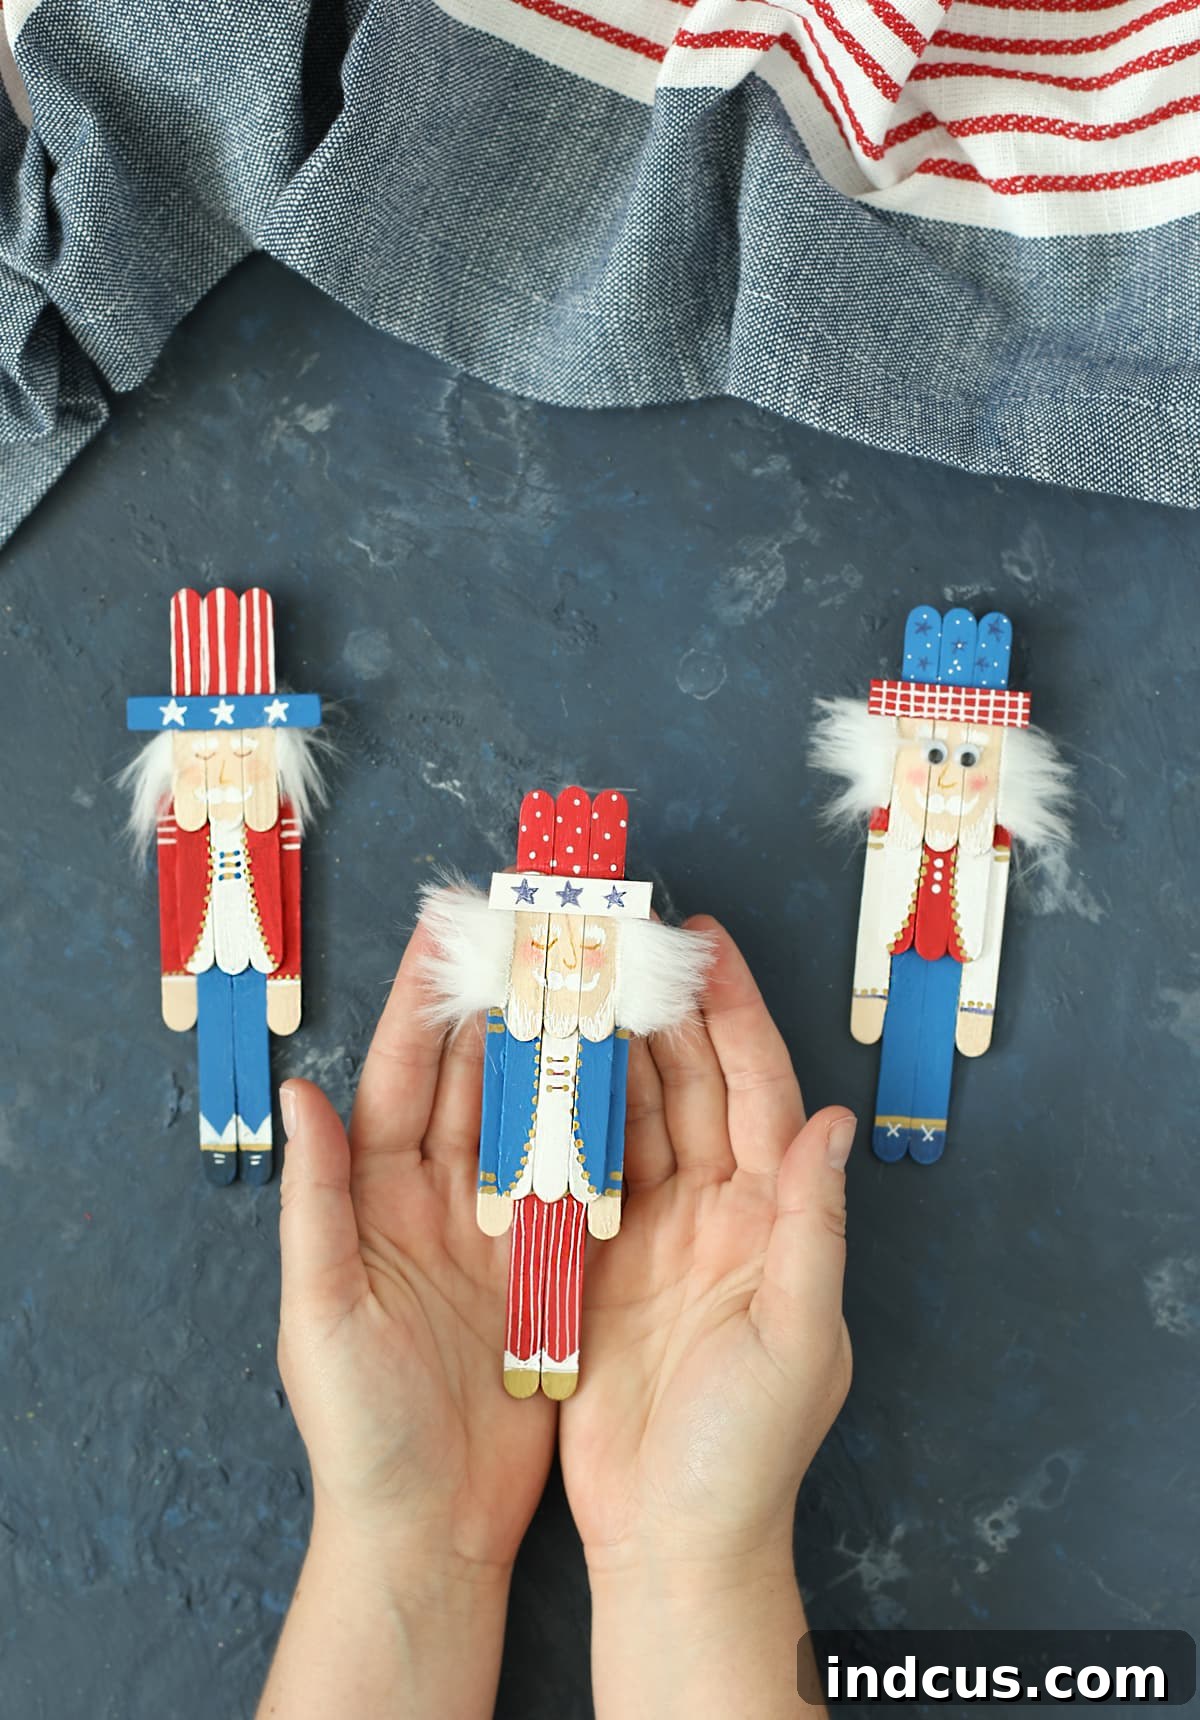
Once your charming Uncle Sam figures are complete, the possibilities for displaying them are endless:
- Shelf Decor: Arrange them on a mantel, bookshelf, or windowsill to add a patriotic touch to any room.
- Table Centerpiece: Group several Uncle Sams together as a festive centerpiece for your Fourth of July picnic or dinner.
- Wreath Embellishment: Glue them onto a seasonal wreath to welcome guests with a burst of patriotic cheer.
- Gift Toppers: Attach one to a gift for a truly unique and handmade present.
- Ornament: Add a loop of string to the top and hang them on a decorative tree or garland.
Extend the Fun: Tips and Variations
- Vary Sizes: Use different sizes of craft sticks to create a family of Uncle Sams in various heights.
- Custom Outfits: Experiment with different patterns for his vest, tie, or hat. Think stars, stripes, or even tiny flags.
- Different Facial Hair: Instead of a classic beard, try a goatee, mutton chops, or just a simple mustache.
- Add Accessories: Give him a tiny flag to hold, a mini drum, or even a tiny firecracker (non-flammable, of course!).
- Glitter Galore: Add a touch of glitter to his hat or jacket for extra sparkle, especially if he’ll be catching some sunlight.
- Kid-Friendly Modifications: For younger children, pre-assemble the stick structure and let them focus on the painting and detailing. Use craft glue instead of hot glue for safer assembly, allowing for longer drying times.
Watch the Magic Unfold: Video Tutorial
Sometimes, seeing a craft come together visually can make all the difference. For those who prefer a dynamic demonstration, here’s a comprehensive video tutorial that walks you through each step of creating your popsicle stick Uncle Sam:
Celebrate with Handmade Charm This Independence Day!
Crafting this popsicle stick Uncle Sam is more than just a project; it’s an invitation to infuse your Fourth of July celebrations with personal charm, creativity, and a dash of patriotic spirit. From selecting your materials to meticulously adding the final details, each step is a rewarding part of bringing this iconic figure to life. These cheerful little men are sure to become beloved additions to your holiday decor, sparking conversations and smiles among your guests.
We hope this guide inspires you to gather your supplies, call your crafting companions, and embark on this wonderful journey. Share your unique Uncle Sams with us—we’d love to see the personalities you bring forth! Happy crafting, and have a truly joyous and patriotic Fourth of July!







