
Every homeowner knows the unique satisfaction that comes from finally checking off a long-delayed task. For me, that moment arrived not with a hammer or a paintbrush, but with the rather amusing discovery of a long-lost camera charger. Tucked away in what my husband playfully calls his “strategic storage zone” (read: under his shoes in the closet), its reappearance signaled more than just the end of a minor household mystery. It marked the green light to share a creative journey, a recent home decor adventure that has brought fresh life and style to our basement family room.
The timing couldn’t be more perfect. With dear company arriving in just a few weeks, the motivation to refresh our living spaces reached an all-time high. There’s something truly special about preparing your home for guests – it’s an invitation to view your surroundings with fresh eyes, to identify areas that could benefit from a little love and creative energy. Our basement family room, a frequently used hub for relaxation and family time, and the kids’ bedroom were at the top of my list for a much-needed decorative overhaul. The goal was to create welcoming, stylish, and comfortable environments without breaking the bank.
Our basement family room already features a prominent black leather sofa, a piece of furniture that anchors the space with its sleek, modern aesthetic. To ensure a cohesive and sophisticated look that wouldn’t overwhelm the room, I decided to embrace a classic and elegant color palette: black, white, and grey. This trio offers incredible versatility, allowing for layers of texture and visual interest while maintaining a sense of calm and order. It’s a timeless choice that complements existing elements and provides a clean backdrop for future decor changes, ensuring longevity and adaptability in our design choices.
The Thrill of the Thrift: Discovering Hidden Gems for Budget-Friendly Art
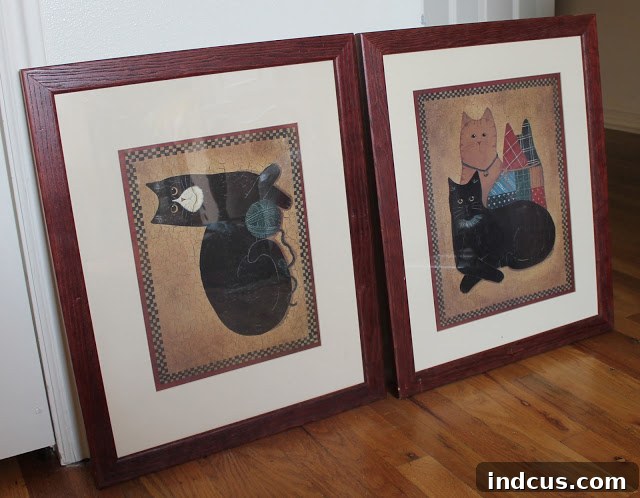
One of the most rewarding aspects of decorating on a budget is the hunt for unique finds. I firmly believe that some of the best decor pieces come from unexpected places – yard sales, thrift stores, and antique shops are treasure troves waiting to be explored. On a recent weekend, I stumbled upon a truly remarkable find that immediately sparked my imagination: two generously sized picture frames, each measuring an impressive 18″x22″, priced at an unbelievable 50 cents each. Finding two matching frames of this caliber is a rare occurrence, making them an instant must-have. I knew instantly that these frames, despite their current inhabitants, were destined for the wall above our black leather sofa, perfectly poised to become a focal point in our newly refreshed family room.
While the frames themselves were a fantastic deal, the existing artwork within them – rather charming cat prints – wasn’t quite aligned with the sophisticated black, white, and grey aesthetic I envisioned for the family room. My initial excitement quickly pivoted to a creative challenge: how to transform these humble yard sale finds into striking pieces of large-scale wall art that would seamlessly integrate into our refreshed space. The answer, as it often is with budget-friendly home decor, lay in a bit of DIY magic and a willingness to experiment. The transformation had to happen, and the sooner the better!
From Drab to Fab: Transforming Frames and Mats with Paint
The first step in revitalizing my yard sale treasures was to address the frames themselves. While structurally sound, their original finish didn’t quite fit the contemporary look I was aiming for. A few coats of high-quality grey spray paint quickly gave them a modern, updated appearance. Spray painting is a fantastic technique for breathing new life into old frames, offering a smooth, even finish with minimal effort. Remember to clean your frames thoroughly, use painter’s tape to protect any areas you don’t want painted, and apply several light coats for the best results, allowing adequate drying time between each application.
Next, my attention turned to the picture mats. These often-overlooked components can significantly impact the overall presentation of artwork. The mats in my newly acquired frames were a rather dated, funky cream color. Instead of discarding them or spending money on new ones, I decided to put a little-known DIY hack to the test: painting them! Yes, you can paint picture mats, and it’s an absolute game-changer for anyone who loves thrifting or upcycling. Using a simple white craft paint, I carefully painted over the cream, transforming them into crisp, bright white mats. This simple step instantly brightened the frames and provided a clean, modern border for whatever art I chose to display. This technique truly opens up a whole new realm of possibilities when browsing yard sales and thrift stores, allowing you to customize nearly any framed piece to suit your specific decor needs.
The transformation was immediate and dramatic. What were once tired, cream-colored mats now exuded a fresh, clean white. This subtle change alone significantly elevated the perceived value and modernity of the frames, making them the perfect vessels for the new artwork I planned to create. The difference was truly remarkable – much better, indeed!
Creative Detour: Embracing the Learning Curve of Abstract Art (Plan A)
With the frames and mats beautifully refreshed, it was time to focus on the art itself. My first inclination was to try my hand at some abstract art, hoping to create original pieces that would perfectly complement the black, white, and grey palette. The existing cat prints, which were still intact beneath the newly painted mats, became my canvas. I decided to paint right over them with a base layer of white paint, effectively erasing the former feline inhabitants. This initial step provided a clean slate for my creative experiment.
After the white base dried, I used painter’s tape to create geometric patterns and then proceeded to layer different shades of grey, silver, black, and white paint. The idea was to create dynamic lines and shapes, adding depth and modern flair. Once the paint was dry, I carefully removed the tape, revealing crisp white lines against the monochromatic backdrop. It was an exciting process of experimentation, layering colors and textures to achieve a unique visual effect.
However, once completed and viewed in the context of the room, I realized that my abstract creation wasn’t quite hitting the mark. Despite the effort, the design felt a little too reminiscent of a patterned sofa from the 80s, rather than the chic, contemporary look I was aiming for. And so, after a moment of honest reflection, I made the decision to pivot. This is a crucial part of any DIY project – not being afraid to admit when something isn’t working and having the courage to try a different approach. Sometimes, the most valuable lesson comes from acknowledging a creative detour and moving on to “Plan B.”
The Genius of Engineering Prints: Affordable Large-Scale Art (Plan B)
Undeterred by my first attempt, I moved on to “Plan B,” which proved to be an absolute revelation for creating stunning, large-scale art on a shoestring budget. My inspiration came from a beautifully designed Valentine’s Day card I had pinned on Pinterest. While I adored its aesthetic, the card wasn’t suitable for printing large-scale due to its low resolution and, of course, the seasonal text. This challenge, however, sparked an idea: why not create my own version?
Leveraging my digital design skills, I recreated a similar aesthetic in Photoshop, ensuring high resolution for a larger print. To align with a subtle “riding” theme that I felt would add a charming touch to the family room, I sourced some old-fashioned bicycle clip art. Combining these elements, I designed an 18×24 inch document in Photoshop, carefully arranging the visuals to create two distinct yet complementary art pieces. The flexibility of digital design allowed me to perfectly tailor the artwork to my vision and the room’s color scheme.
The real magic happened when it came to printing. Instead of opting for expensive fine art prints, I discovered the incredible value of “engineering prints” at my local Staples. These prints, typically used for blueprints and architectural drawings, are surprisingly affordable and perfect for creating large, matte artwork. For an 18×24 inch print, the cost was an astonishing $1.79! This budget-friendly option is a game-changer for anyone looking to fill empty walls without draining their wallet. When ordering, simply ensure your image is high-resolution and that you select the correct size and paper type (often standard bond paper for engineering prints).
Once I retrieved my engineering print, I brought it home and with a simple cut down the middle, I had two beautiful, large-format prints ready for my refurbished frames. The process was incredibly straightforward, and the result was far beyond my expectations. This approach not only saved a significant amount of money but also allowed me to create truly personalized artwork that perfectly reflected my style and the envisioned aesthetic of the family room.
The Final Reveal: A Masterpiece Under $5
I cannot express how much happier I am with this second attempt. The engineering prints, framed in their freshly painted grey frames and crisp white mats, now adorn the wall above our sofa, providing the perfect touch of sophisticated, personalized decor. The “riding” theme with the vintage bicycles adds a subtle narrative and a touch of whimsy, perfectly complementing the black, white, and grey color scheme of the basement family room. To have two large pieces of custom wall art that cost less than $5 combined is an absolute triumph of budget-friendly home styling. Yippee!
This project is a testament to the power of creative problem-solving and the immense satisfaction that comes from transforming forgotten items into cherished home decor. It’s proof that you don’t need a massive budget to achieve a stylish and inviting home. With a little imagination, some paint, and the clever use of affordable resources like engineering prints, anyone can create stunning, personalized spaces.
The transformation is truly remarkable. From outdated yard sale finds to contemporary, custom wall art, the journey was filled with creativity, a minor setback, and ultimately, a fantastic success. Much better now, wouldn’t you agree? I hope this inspires you to look at your thrift store finds with new eyes and embark on your own DIY art adventures!







