
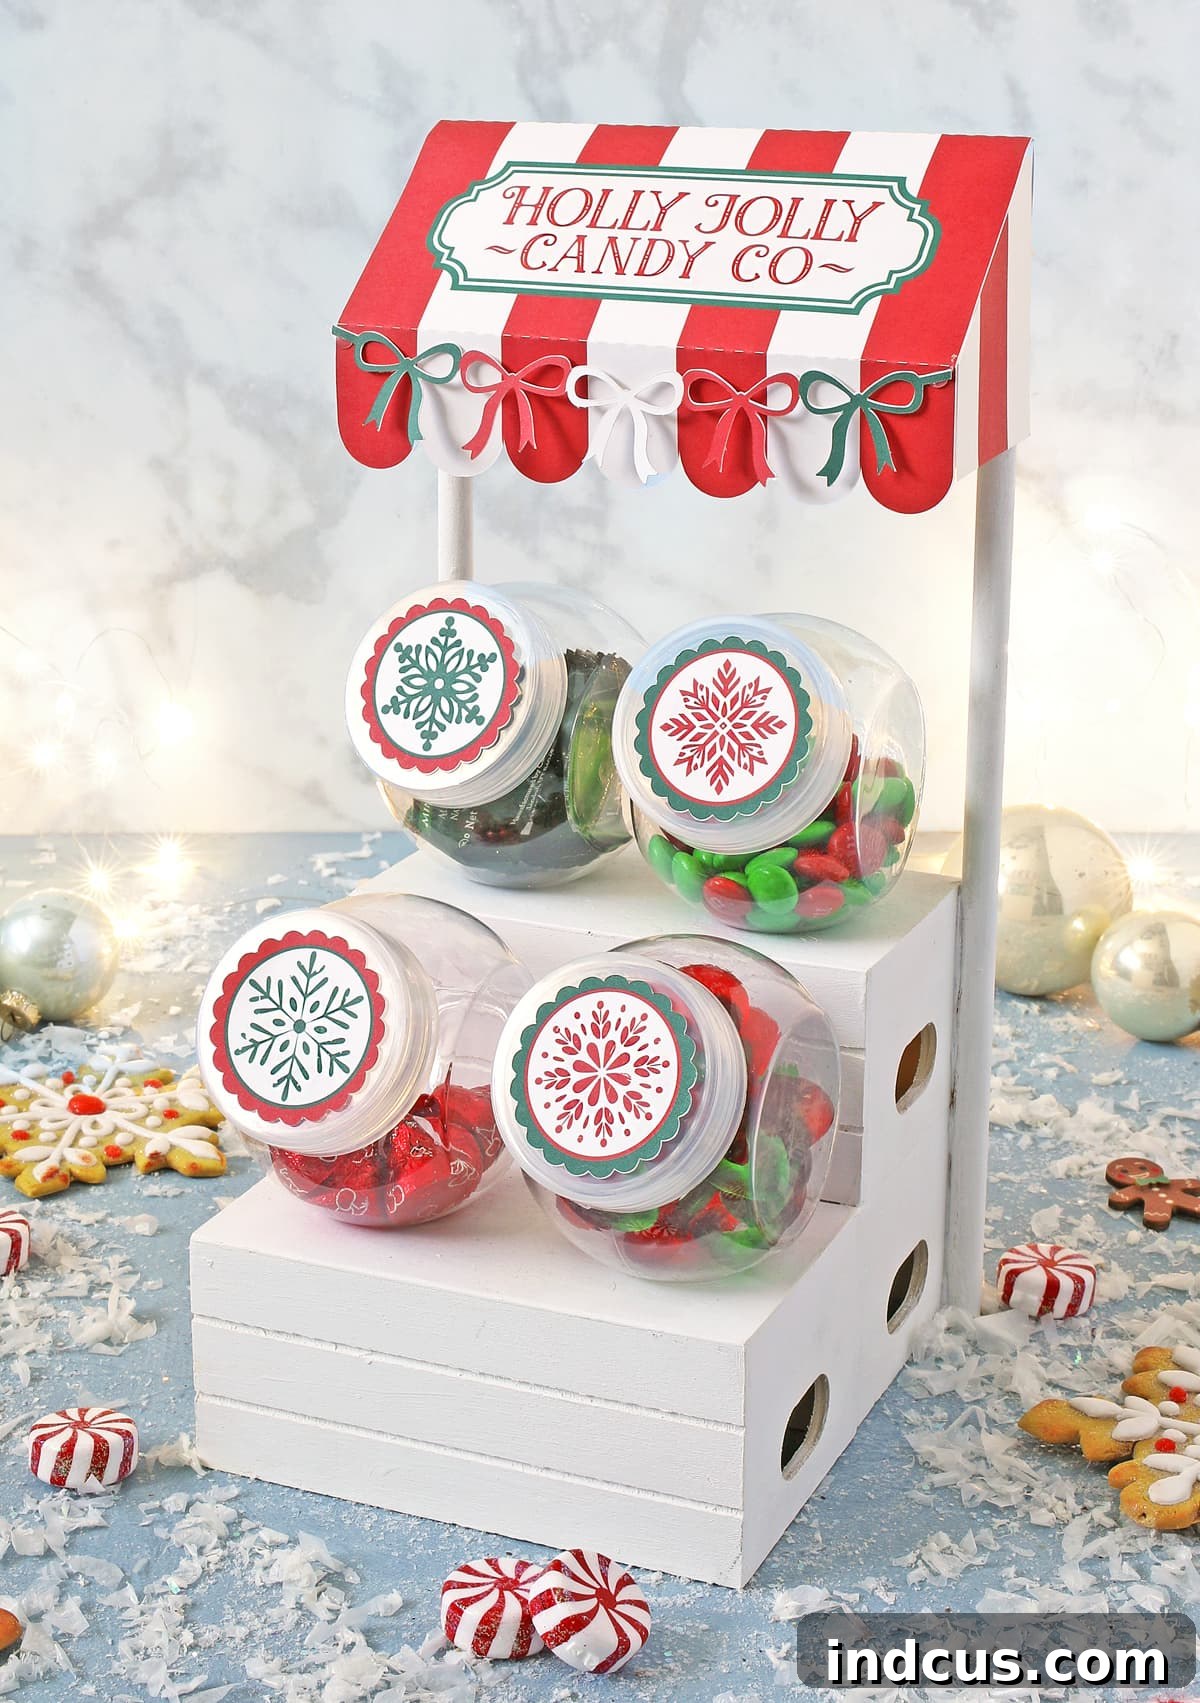
Create a Charming DIY Christmas Candy Shop Display with Dollar Tree Finds
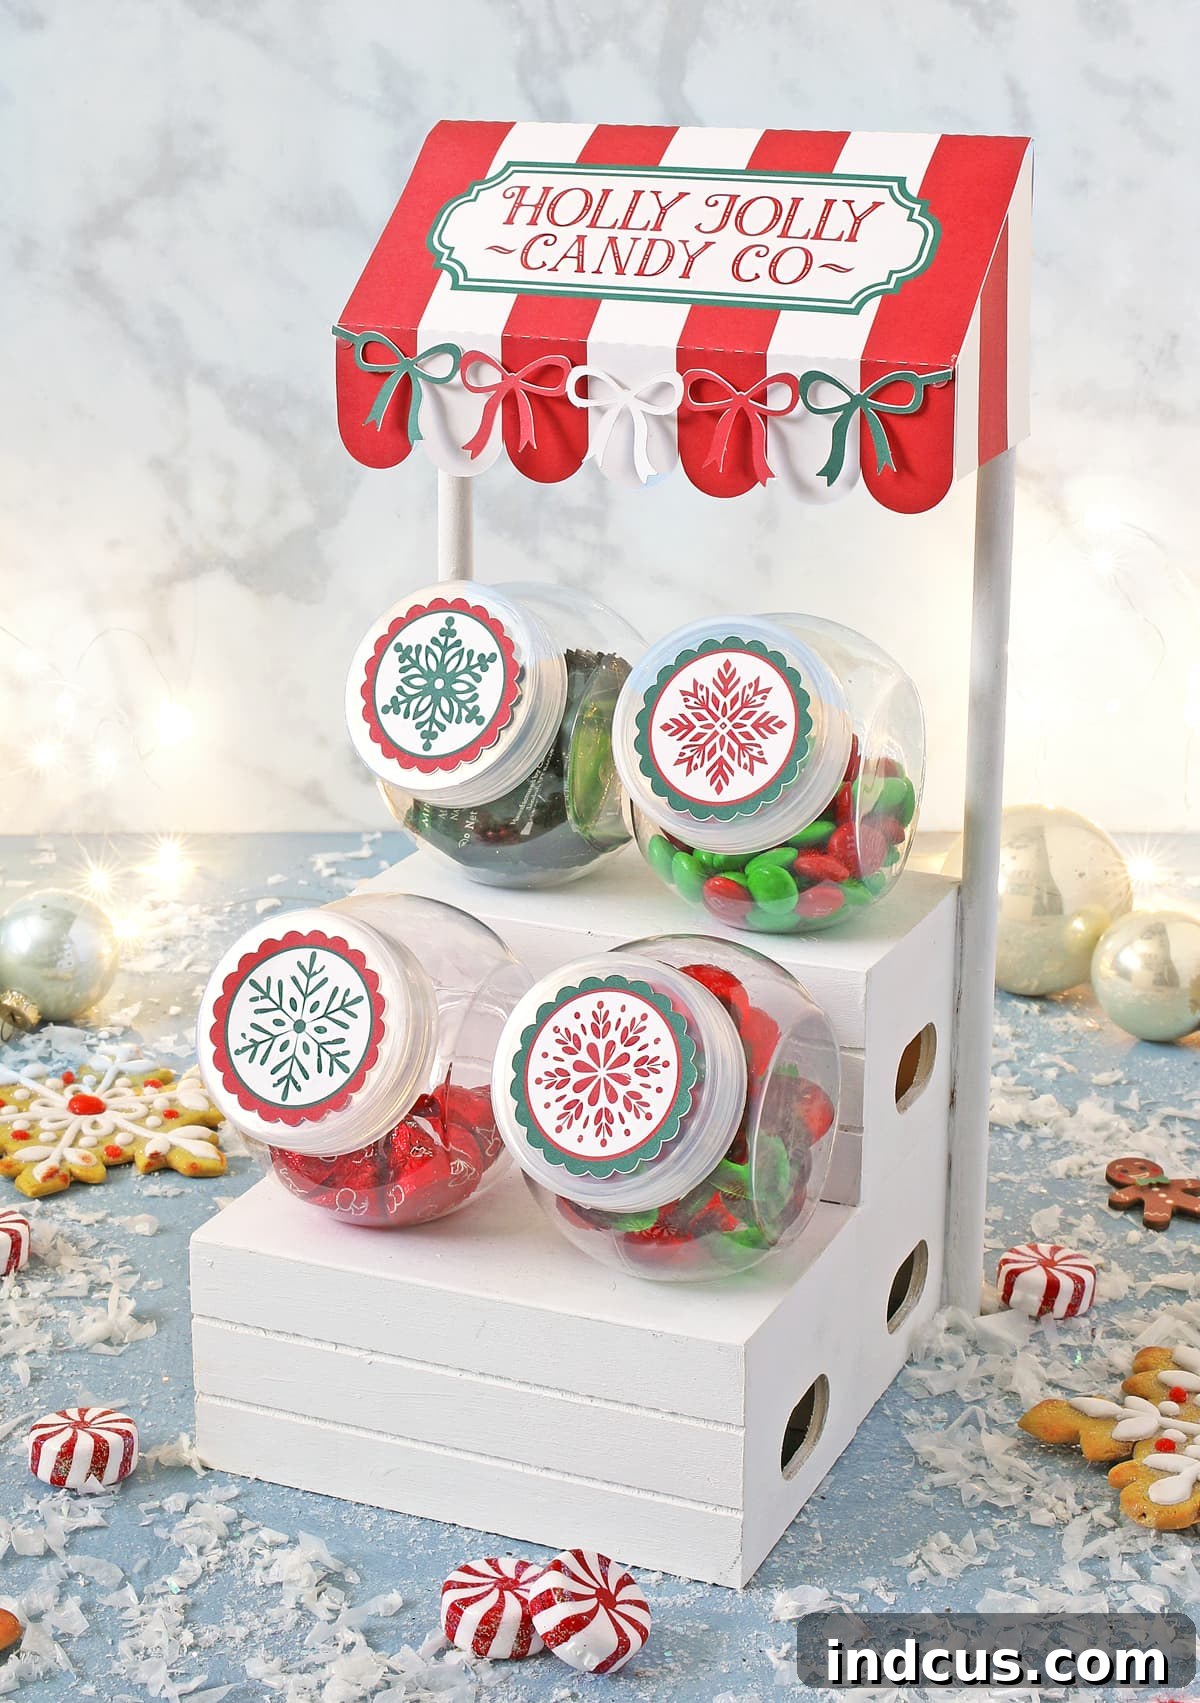
Transform your holiday season into a whimsical wonderland with an enchanting miniature Christmas candy shop display, crafted effortlessly with budget-friendly supplies from your local Dollar Tree. This delightful project isn’t just a craft; it’s an invitation to spark joy, creativity, and a touch of nostalgic charm in your home. Perfect for unique gifts, festive decor, or simply indulging your inner child, this Dollar Tree Christmas craft offers an accessible and incredibly rewarding experience for crafters of all skill levels. Dive into the magic of handmade holiday decorations with this easy-to-follow guide.
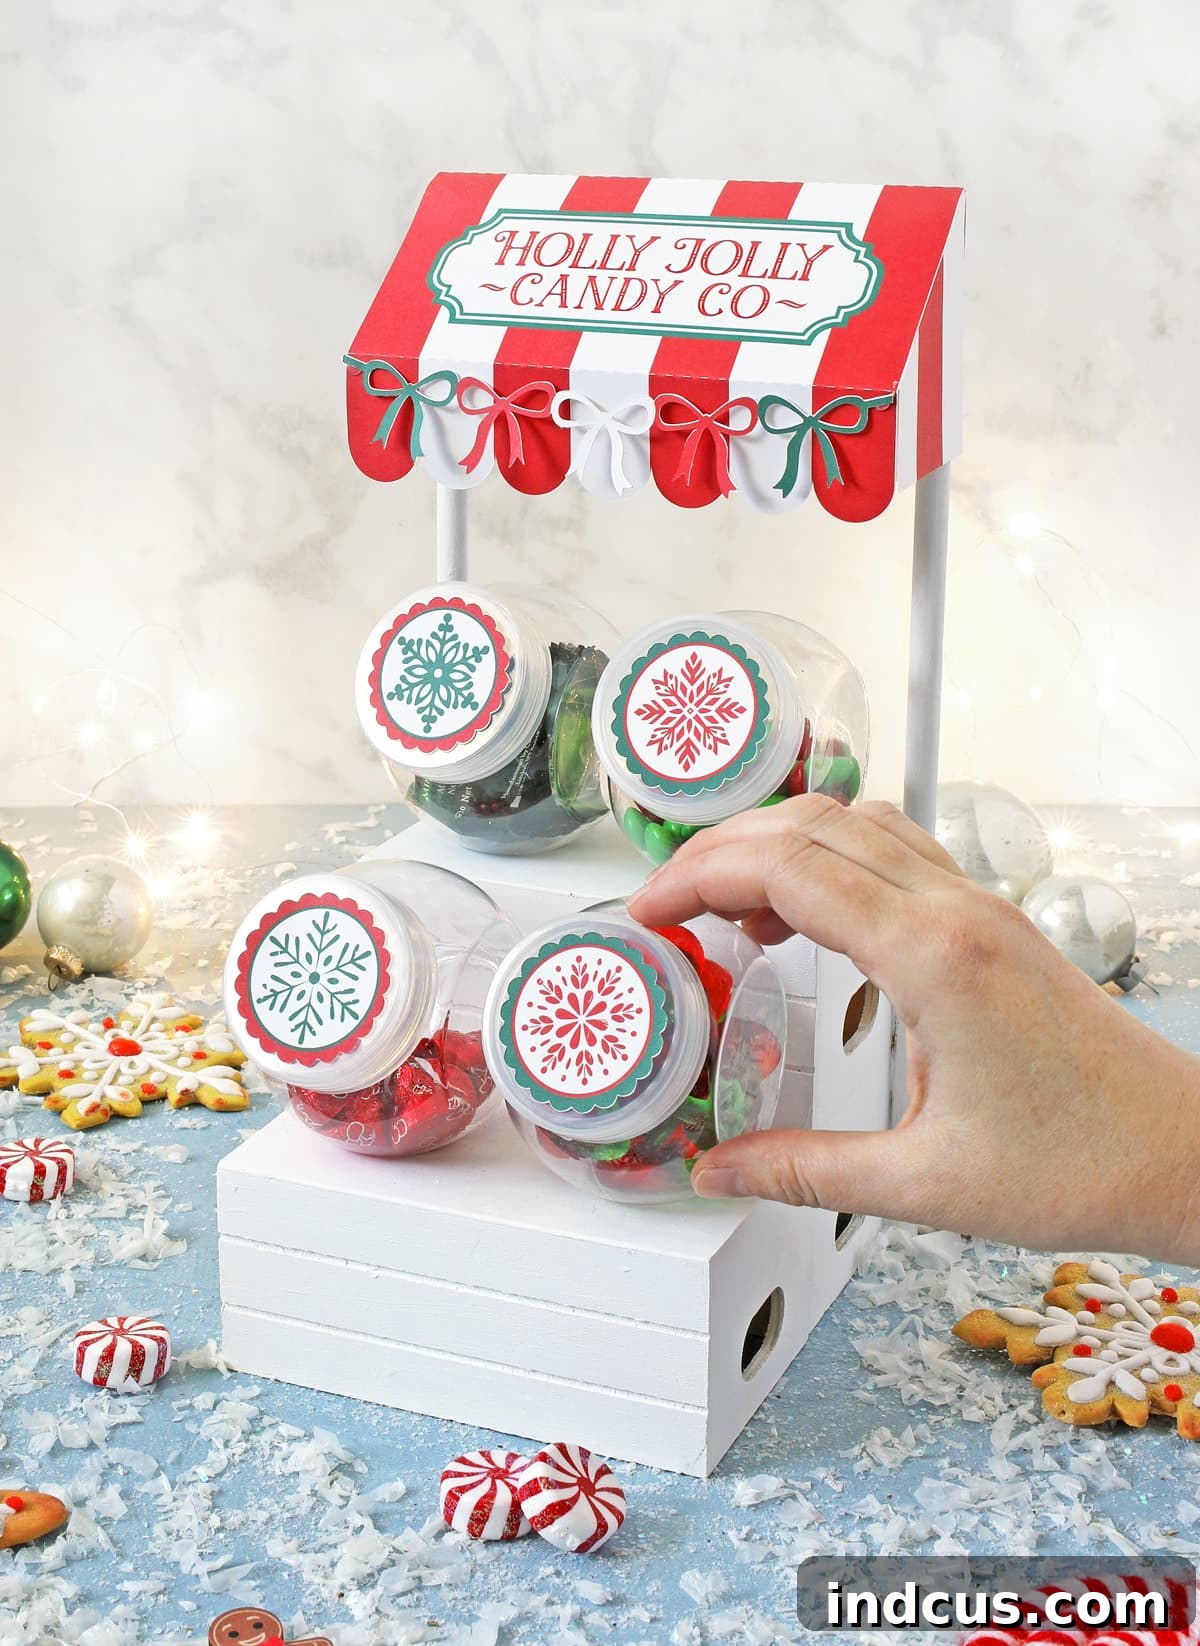
Throughout the year, I’ve embarked on a delightful crafting journey, creating seasonal candy shop displays that capture the essence of various holidays. From Valentine’s Day to Halloween, each miniature shop has brought immense fun and garnered countless smiles. As the year draws to a close, there’s no better way to celebrate the festive spirit than with our grand finale: a charming Christmas-themed candy shop that truly embodies the magic of the holidays. Get ready to build the “Holly Jolly Candy Co.” – a sweet addition to your holiday decor that promises to be a conversation starter and a source of sugary delight for everyone who sees it.
Imagine the gleam in your children’s eyes, the appreciation from co-workers, or the sheer joy of your grandkids discovering a personalized confectionery haven. This display isn’t just about candy; it’s about creating memorable moments and spreading cheer. It’s an imaginative way to present holiday treats, elevate your Christmas decorations, or even serve as a unique party centerpiece for festive gatherings. Let me show you exactly how I made my dollar store candy shop so you can make one too, proving that stunning holiday crafts don’t have to break the bank. Follow my step-by-step guide to bring this enchanting Dollar Tree Christmas candy shop to life.
Gather Your Supplies: Everything You Need for Your DIY Christmas Candy Shop
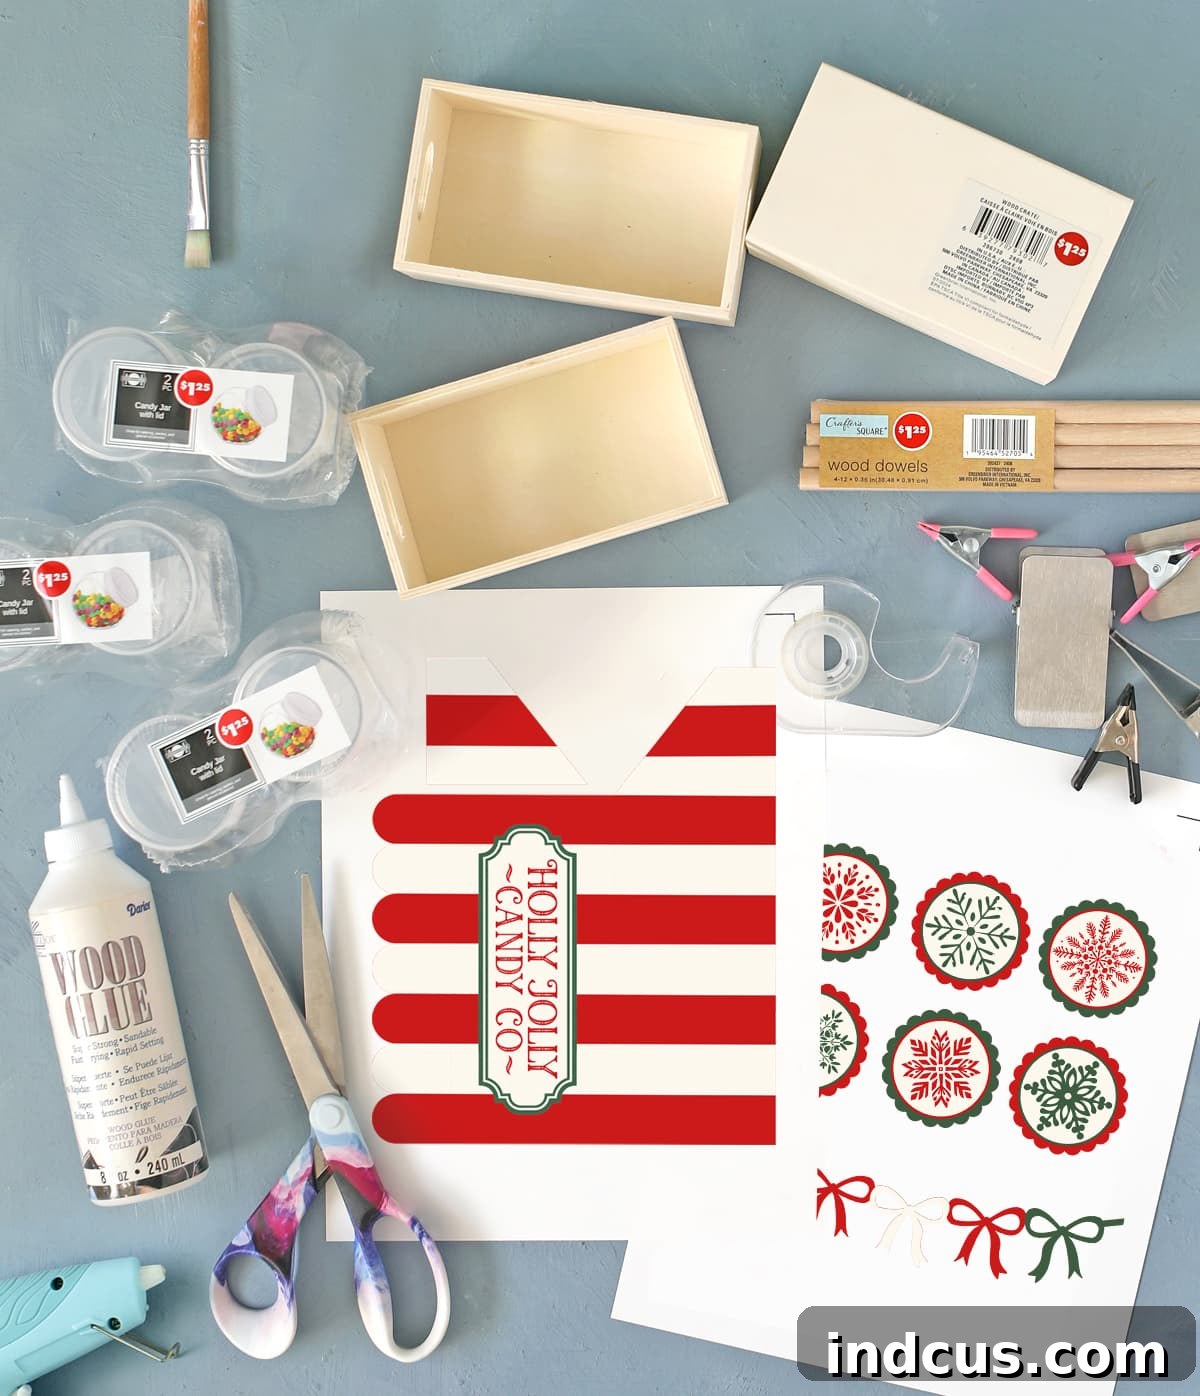
Materials for Your Miniature Holly Jolly Candy Shoppe:
- Printable Christmas Awning (easily download this custom design at the bottom of this post)
- 3 Wooden Crates (look for Crafter’s Square brand, typically found in the craft aisle)
- Wooden Dowels (a single 4-count pack should provide more than enough for this project)
- Small Candy Jars with Lids (you’ll need 4 total for this specific display, often sold in convenient 2-packs)
- White Cardstock (essential for crisp, vibrant printables and a sturdy awning)
- Wood Glue (for a strong, lasting bond when assembling the wooden crates)
- Craft Clamps (invaluable for holding crates securely while the glue dries)
- Hot Glue Gun + Glue Sticks (your go-to tool for quick, reliable adhesion, especially with dowels)
- Clear Tape (perfect for temporary or easily changeable attachments, like the awning)
- White Craft Paint + Paint Brush (or any color you prefer for the shop’s base, white offers versatility)
While I’ve provided convenient links to the exact Dollar Tree products online for your reference, please note that these items are often sold in bulk cases for online orders. For the best value and quantity suitable for a single project, I highly recommend visiting your local Dollar Tree store. You’ll find everything you need in their craft section, usually stocked year-round and ready for your next DIY Christmas adventure.
Originally, I purchased six small candy jars, thinking I might use a slightly different arrangement for the front display. However, during the assembly process, I found that four jars perfectly complemented the overall aesthetic and balance of the “Holly Jolly Candy Co.” If you wish to expand your display, create more elaborate arrangements, or add extra decorative elements to the base, feel free to incorporate additional jars – this project is all about personalization and making it uniquely yours!
Step-by-Step Guide: Building Your Festive Dollar Tree Candy Shop
Get ready to unleash your inner artisan! Follow these detailed instructions to construct your charming miniature Christmas candy shop display. Remember, crafting is a journey, so enjoy each step, take your time, and don’t be afraid to infuse your own special touch and creativity into this festive project.
Instructions:
Step 1: Constructing the Shop Base with Wooden Crates
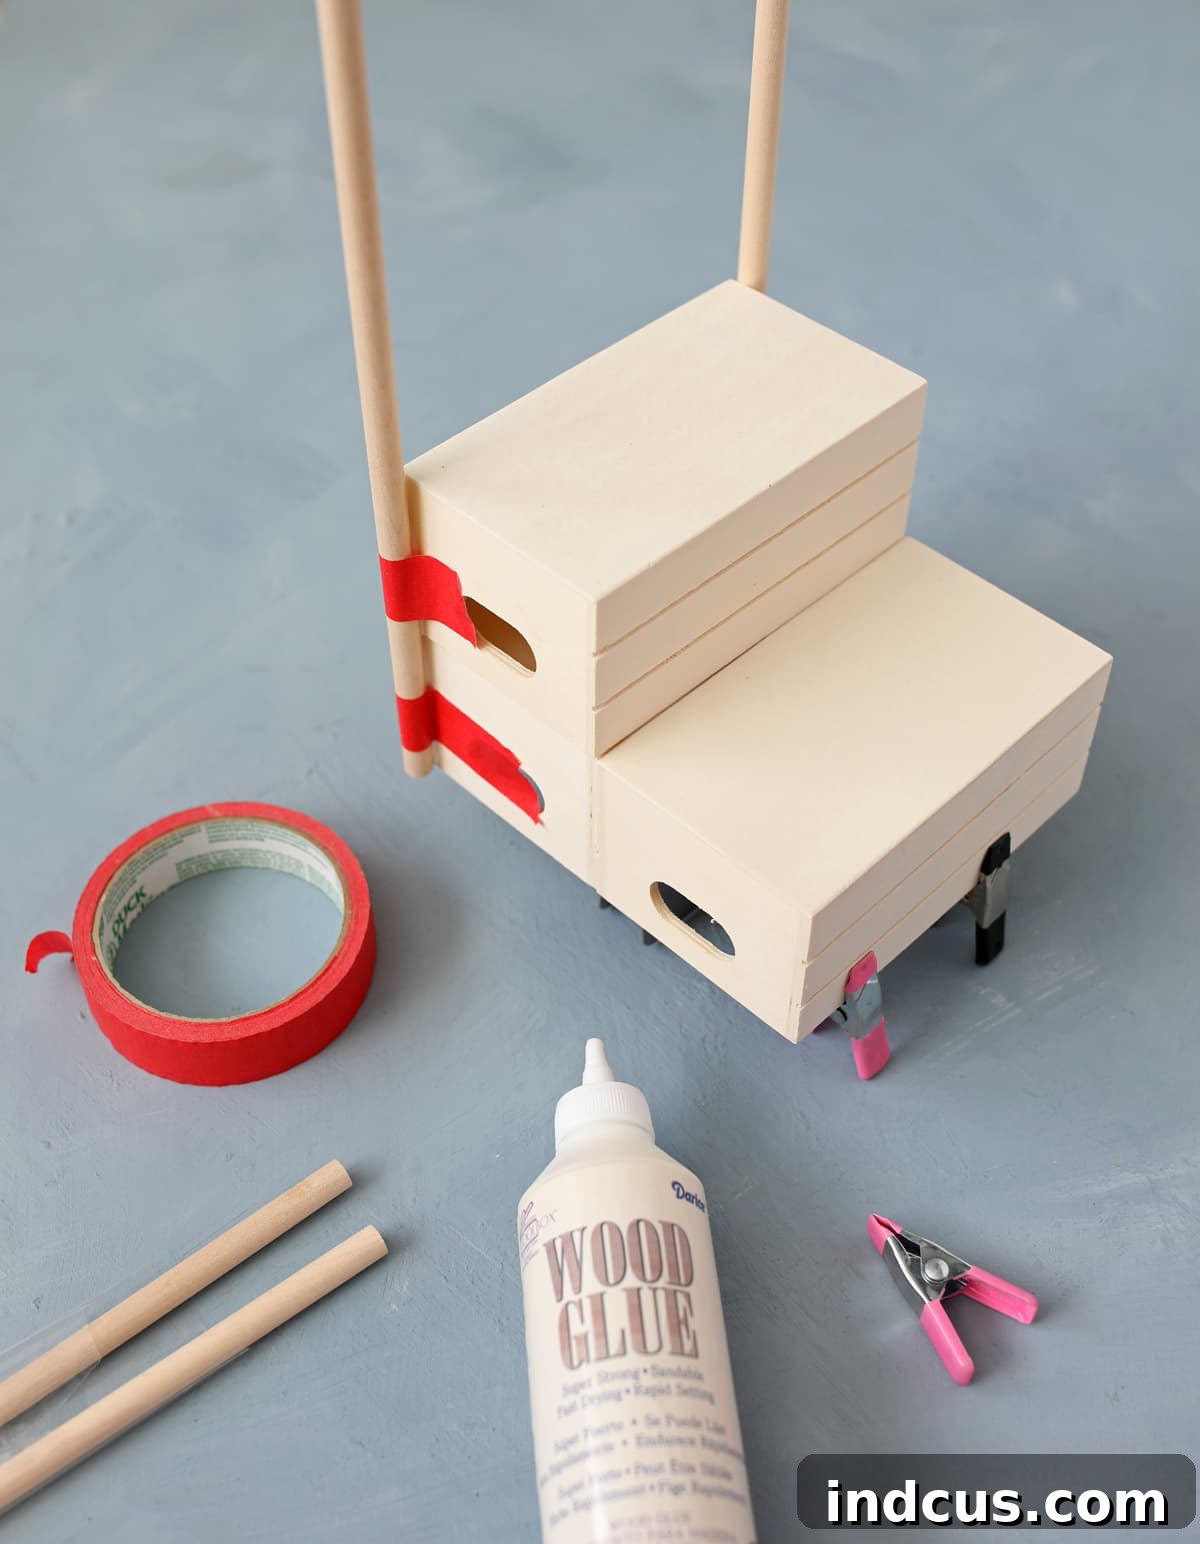
Begin by carefully removing any store stickers or price tags from all three wooden crates. A clean surface ensures better adhesion and a professional finish. These Dollar Tree crates are incredibly versatile and will form the sturdy, multi-tiered foundation of our candy shop. Using a high-quality wood glue, attach the crates together as shown in the accompanying image: two crates should form the bottom layer, placed side-by-side to create a wide base, and the third crate should be carefully centered and stacked on top. For the best display surface and a polished look, position the crates upside down so that their solid bottom panels face upwards, creating smooth, flat shelves perfect for holding your candy jars and other decorations.
Once the crates are perfectly aligned and glued, use your craft clamps to secure them firmly. Proper clamping is absolutely crucial for a strong, stable bond that will last. This pressure helps the wood glue penetrate and hold effectively. Allow the wood glue to dry completely for at least one hour, or even longer if possible, to ensure maximum stability and durability before moving on to the next step. Patience at this stage will prevent your structure from shifting or weakening later on, guaranteeing a well-built and resilient miniature candy shop.
Step 2: Attaching the Awning Supports (Wooden Dowels)
Next, we’ll create the essential supports for our charming Christmas awning. Position two wooden dowels vertically, one on each side of the top, stacked crate. While your initial instinct might be to reach for wood glue, my extensive crafting experience has consistently shown that hot glue is far superior and more effective for this specific task. The hot glue quickly molds around the cylindrical dowels, efficiently filling any small gaps or uneven surfaces between the dowel and the crate, providing instant and robust adhesion. Simply apply a generous bead of hot glue along the edges where the dowel will meet the crate and press firmly into place. Hold for a few seconds until the glue cools and sets. This method ensures your awning supports are perfectly stable, securely attached, and ready for decoration.
Step 3: Painting Your Miniature Candy Shop Base
Now comes the truly transformative part: adding color and character! With all the structural elements securely in place and thoroughly dried, it’s time to paint your entire assembled candy shop structure. You have excellent options here: use a fast-drying white spray paint for an incredibly smooth, even finish with minimal effort, or opt for traditional white craft paint and a brush for a more hands-on, detailed approach. I highly recommend painting your shop a crisp, clean white. Not only does white evoke a classic, wintry Christmas aesthetic that beautifully highlights your decorations, but it also provides an ideal neutral base. This strategic choice offers incredible flexibility, allowing you to easily swap out your awning designs for different holidays and seasons in the future. This gives your craft year-round appeal and endless decorating possibilities, making it a truly versatile piece.
Step 4: Preparing Your Festive Christmas Awning
The awning is the vibrant focal point that truly brings your “Holly Jolly Candy Co.” to life and sets its festive tone. Start by printing out the specially designed Christmas awning template. For the best results in terms of appearance and durability, it is crucial to always print this template onto sturdy white cardstock. Cardstock provides the necessary rigidity for the awning to hold its shape beautifully, maintain crisp folds, and withstand handling throughout the holiday season.
To accommodate various crafting preferences and equipment, I’ve thoughtfully created two distinct variations of the awning file: an SVG file, perfectly optimized for seamless use with electronic cutting machines like Silhouette or Cricut, and a convenient PDF version for those who prefer the traditional method of cutting by hand. Both file types are conveniently located in the same download folder at the very bottom of this post, ensuring easy access. Double-check to select the correct file that best suits your specific crafting method to guarantee a smooth experience.
Each printable design strategically includes a large main awning shape and one smaller, separate piece, which will form one side of the awning. This modular design was carefully implemented to ensure that the entire template could efficiently fit onto a standard 8.5″ x 11″ piece of paper, making it easily accessible for home printing without special large-format printers. While I’ve occasionally reused tutorial photos from my “Cupid’s Candy Shoppe” series to expedite bringing you these festive crafts more quickly, rest assured the assembly methods for the awning remain identical and straightforward across all seasonal versions.
Detailed Instructions for Electronic Cutting Machine Users:
For crafters fortunate enough to own a Silhouette or Cricut machine, utilizing the provided SVG file allows for a seamless, precise, and incredibly fast print-and-cut process, saving you valuable time and ensuring professional-quality results. If you’re new to using your Silhouette machine’s print-and-cut feature or simply need a quick refresher on the process, this comprehensive Print and Cut tutorial offers excellent, step-by-step guidance to master this technique.
Important Notes for Achieving a Perfect Cut:
- Registration Marks are Key: Before sending your design to the printer, it is absolutely essential to remember to activate your registration marks within your cutting machine’s software (e.g., Silhouette Studio, Cricut Design Space). These crucial marks are what guide your machine to precisely locate the printed design on the page, ensuring that the cut lines align perfectly with your printed graphic. Skipping this vital step can lead to frustrating misaligned cuts and wasted cardstock.
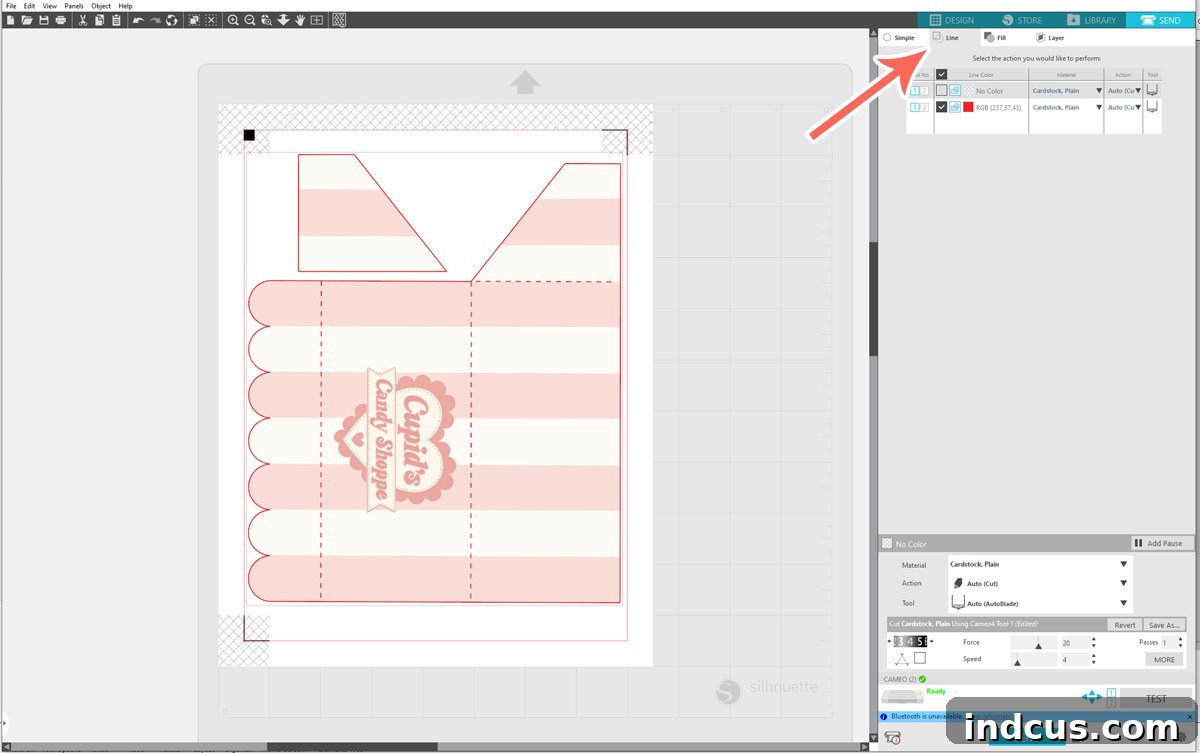
- Optimizing Cut Settings for Precision: When you navigate to the “SEND” tab in your software to prepare your design for cutting, you might initially observe numerous cut lines appearing across the entire design, even in areas where you don’t intend to cut. To prevent unintended cuts and ensure that only the awning’s outline is precisely cut, select the “LINE” sub-tab or adjust your cut settings to “Cut by Line Color.” This setting will instruct your machine to cut exclusively along the specified design lines, resulting in a clean, professional finish. Your screen should closely resemble the image below when correctly configured and ready to send to your machine for cutting.
Detailed Instructions for Hand-Cutting Your Awning:
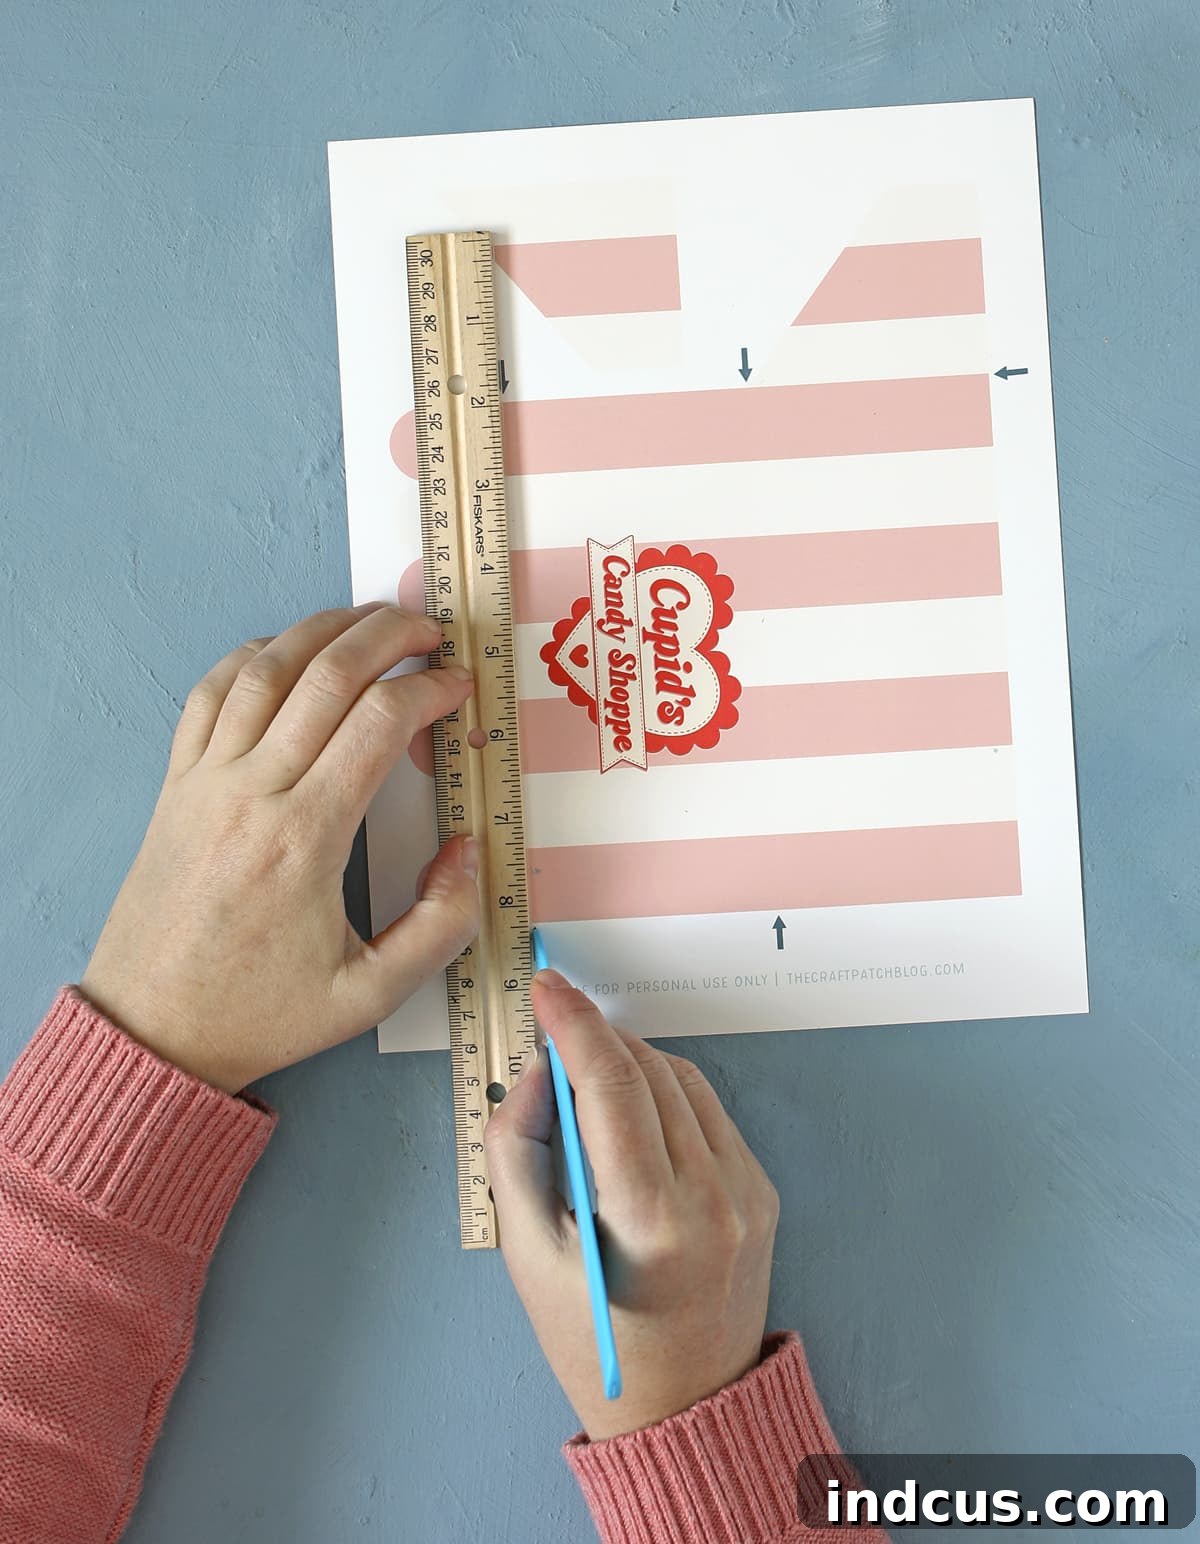
Even without the convenience of an electronic cutting machine, you can absolutely create this stunning craft with beautiful results! Simply download the PDF version of the awning design and print it onto sturdy white cardstock. Before you begin cutting, take a moment to carefully locate the subtle gray arrows subtly integrated into the template. These arrows precisely indicate where your fold lines should be. Using a scoring tool (or a suitable alternative like a dull butter knife or an empty pen) and a ruler, gently score along these designated lines. Scoring creates a clean, crisp crease that makes folding much easier and results in sharper, more professional-looking edges. Once scored, carefully cut out both the main awning shape and the small separate side piece using sharp scissors or a craft knife. This clever design ensures that no visible cutting or folding lines detract from your finished project, giving it a polished and professional look even when meticulously cut by hand.
Once you’ve carefully cut out both the main awning shape and the smaller side piece according to your chosen method, it’s time for assembly. The photo below provides a clear outline of the shapes to help clarify your cutting lines, especially highlighting the smaller piece and precisely where it will attach to the main awning. Paying close attention to precision during cutting and initial placement will lead to a beautifully structured and professional-looking awning for your miniature candy shop.
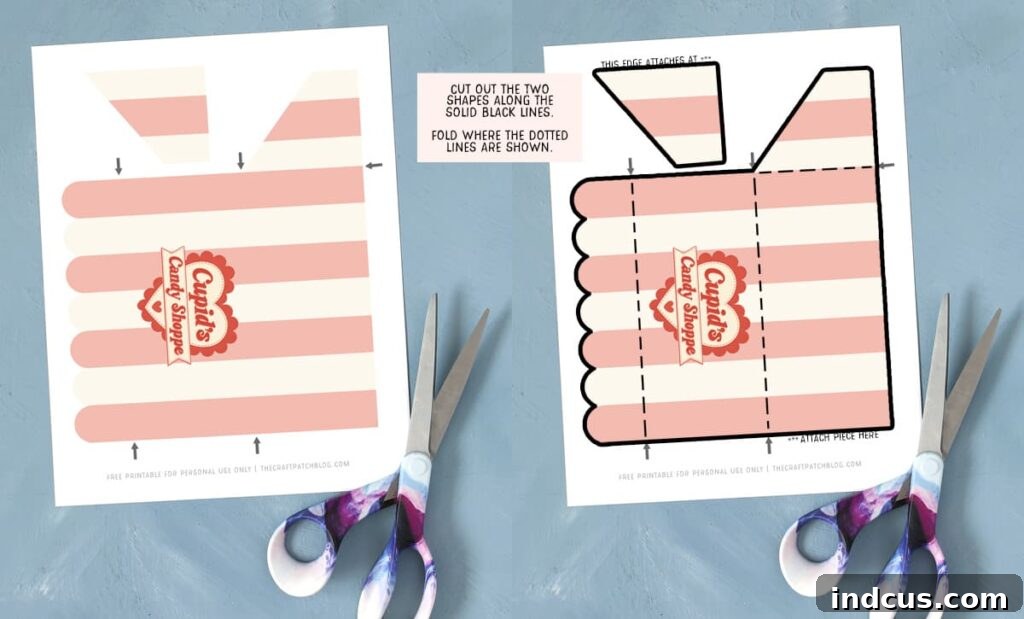
With your pieces perfectly cut and ready, the next essential step is folding. Carefully fold all designated lines away from you. This precise folding creates the crucial three-dimensional structure of the awning, giving it depth and realism. Then, using small pieces of clear tape, carefully attach the smaller side pieces of the awning to the main center section. The clear tape offers a discreet, secure, yet somewhat flexible hold. If you’re unsure about the exact folding and attachment process, please refer to the embedded video tutorial below for a clear visual guide – it makes this step incredibly clear and easy to follow!
Step 5: Attaching Your Festive Christmas Awning
Carefully position your beautifully crafted cardstock awning onto the wooden dowel supports you previously attached. Secure it in place with a few small pieces of clear tape. The strategic beauty of using clear tape here is its temporary and forgiving nature: you can easily peel it off without causing damage to your delicate awning or the painted dowels. This clever method allows you to effortlessly swap out your Christmas awning for a new design – perhaps a Valentine’s, Easter, or Halloween theme – for different holidays and celebrations throughout the year. This incredible versatility ensures your miniature candy shop remains a dynamic, engaging, and fresh decoration all year long, adapting to every season with ease.
Step 6: Adding Decorative Touches & Personalization
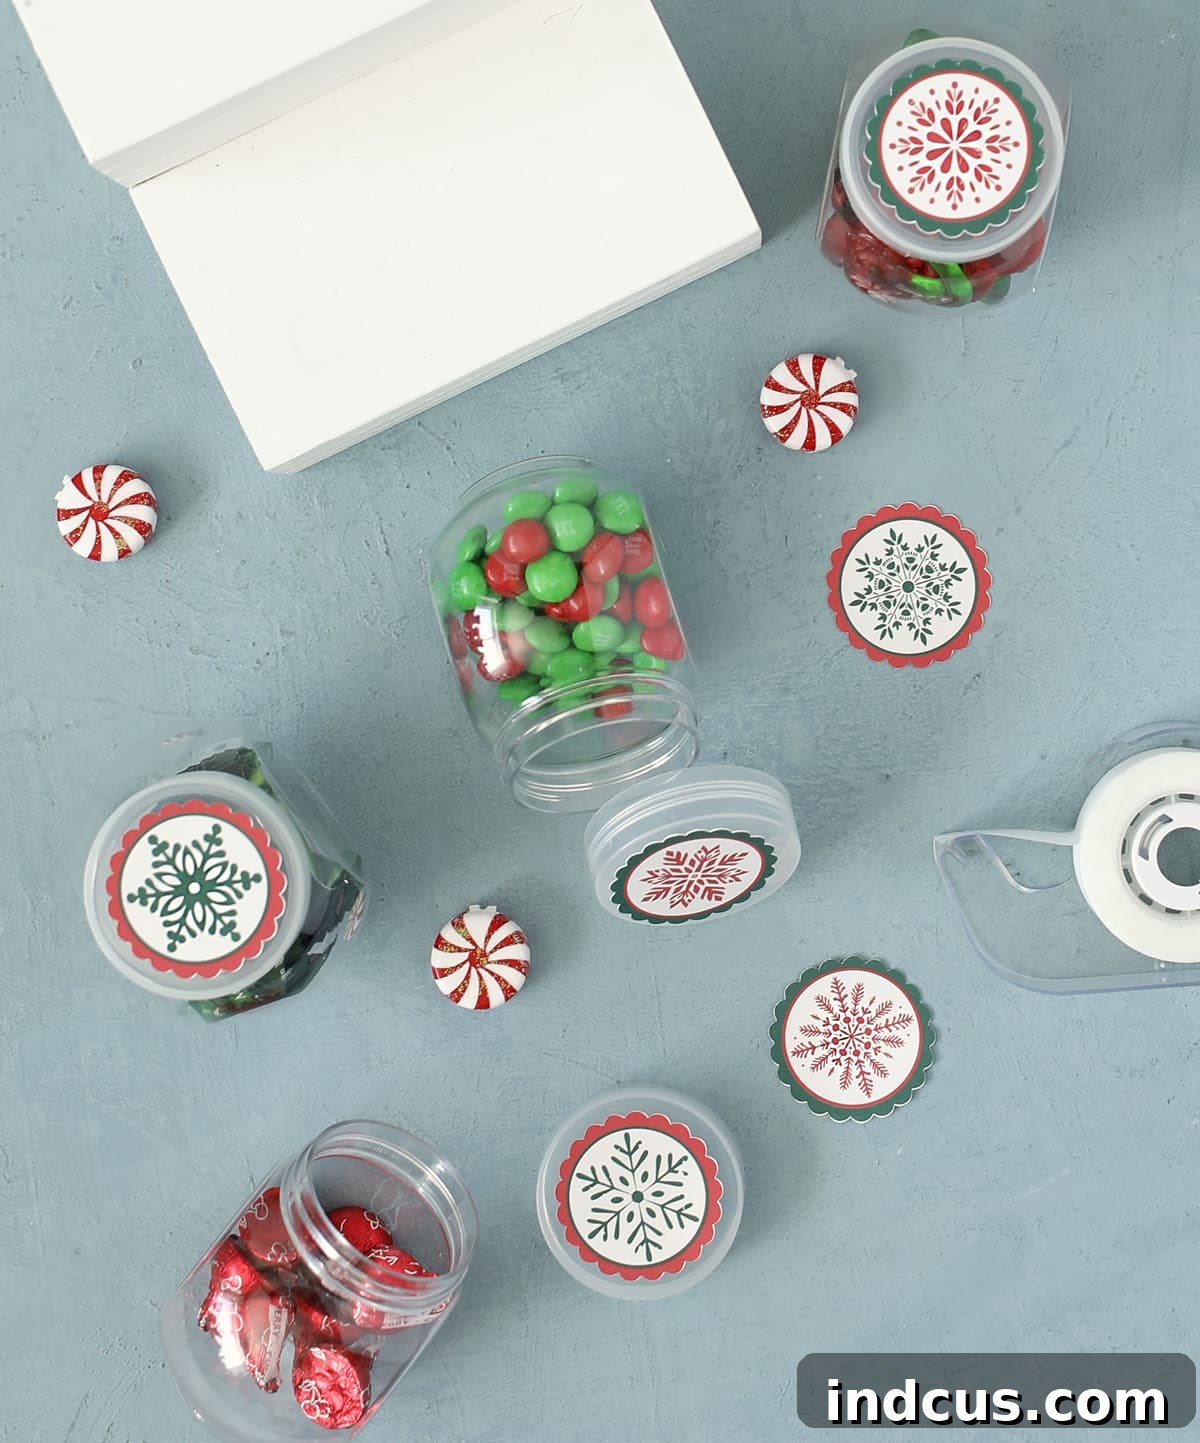
To truly elevate your “Holly Jolly Candy Co.” and add those charming, cohesive finishing touches, I’ve designed matching printable accessories specifically for your candy jar lids. These delightful, themed designs are conveniently included in the same download folder as your awning, allowing for a perfectly coordinated and polished look for your entire display. Simply print them onto white cardstock, carefully cut them out using scissors or your cutting machine, and then attach them to the center of each small jar lid using a small loop of clear tape. This simple addition instantly transforms ordinary Dollar Tree jars into festive, branded confectionery containers – it’s an easy, quick, and incredibly effective way to enhance your shop’s appeal!
As an additional, truly enchanting detail, I’ve also included a delicate bow garland printable within the download folder. This garland is perfectly sized to stretch elegantly across the front of your awning, adding an extra layer of intricate festive charm and visual interest. However, due to its highly intricate design and small details, I would strongly recommend using an electronic cutting machine if you choose to incorporate this specific bow garland. Hand-cutting this particular piece would be quite challenging and exceptionally time-consuming, requiring extreme precision and patience to achieve the desired delicate effect.
Watch the Magic Unfold: Video Tutorial for Your DIY Candy Shop
Visual Guide to Crafting Your Miniature Christmas Candy Shop
Seeing the steps in action can often clarify any questions you might have and provide valuable insights that written instructions alone can’t convey. This comprehensive video tutorial walks you through each stage of assembling your Dollar Tree Christmas candy shop, from securely gluing the crates together to precisely attaching the final decorative awning. It’s a perfect visual companion to the written instructions, ensuring you have all the guidance needed for a successful, enjoyable, and stress-free crafting experience, resulting in a beautiful holiday display.
Unleash the Holiday Spirit with Your Handmade Candy Shop Creation
Isn’t this miniature “Holly Jolly Candy Co.” an absolutely delightful craft for the holiday season? It’s far more than just a decoration; it’s a tiny beacon of festive cheer, embodying the warmth, generosity, and sweet spirit of Christmas. I’ve heard from so many enthusiastic readers who have lovingly created these charming displays for their grandchildren, and I genuinely believe it’s one of the sweetest, most thoughtful gift ideas imaginable. Imagine the pure delight and wonder on a child’s face when they visit Grandma’s house, only to find a new, beautifully decorated candy shop waiting for them, thoughtfully filled with their favorite holiday treats! This thoughtful gesture creates lasting memories and cherished family traditions that will be treasured for years to come.
Beyond being a fantastic and heartwarming gift, this versatile Dollar Tree Christmas craft serves beautifully as an eye-catching centerpiece for your holiday dining table, a charming and unique addition to a festive mantelpiece, or even a delightful desk decoration at work, spreading cheer and a touch of holiday magic wherever it goes. It stands as a wonderful testament to how simple, affordable materials, when combined with a little creativity and care, can be transformed into something truly magical and memorable. So, gather your supplies, put on some cheerful Christmas carols, and embark on this wonderful crafting adventure to create a truly special piece for your home or as a heartfelt gift!
Explore All Our Seasonal Miniature Candy Shop Crafts
Loved creating your enchanting Christmas candy shop? The fun doesn’t have to stop here! Discover our full collection of miniature candy shop printables and comprehensive tutorials, meticulously designed for every season and major holiday throughout the year. Each craft offers a unique theme, making them perfect year-round projects, delightful collectible decorations, or thoughtful seasonal gifts. Click on any of the engaging links below to find your next favorite crafting adventure and expand your charming candy shop collection!
-
Cupid’s Candy Shoppe: Valentine’s Day Craft
-
Shamrock Sweets Shop: St. Patrick’s Day Craft
-
DIY Easter Candy Shop
-
Patriotic Candy Shop Craft
-
Farmer’s Market Fruit Stand Candy Shop Craft
-
Halloween Candy Shop Craft
-
Christmas Candy Shop Craft







