
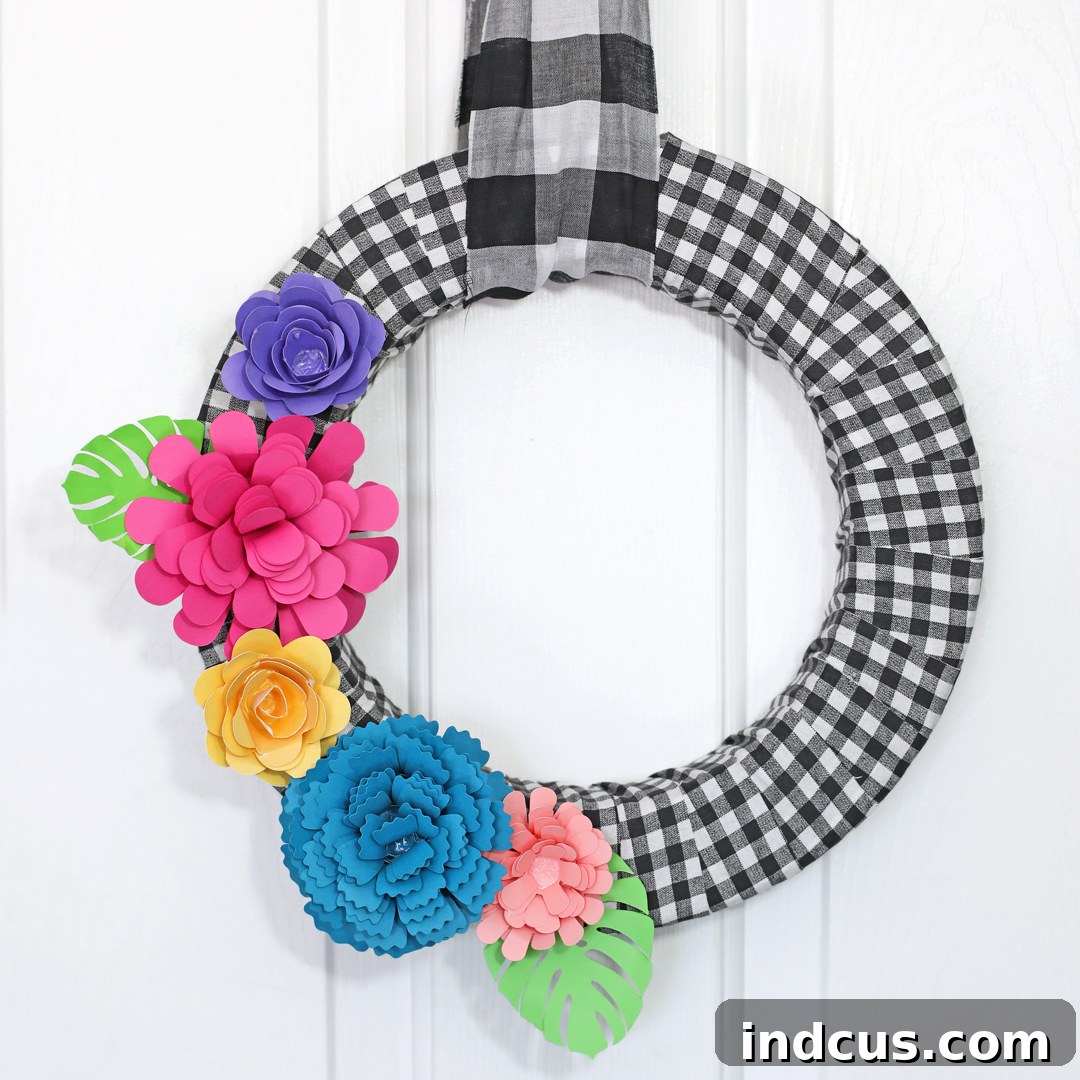
Create a Stunning DIY Buffalo Check Wreath with Vibrant Rolled Paper Flowers
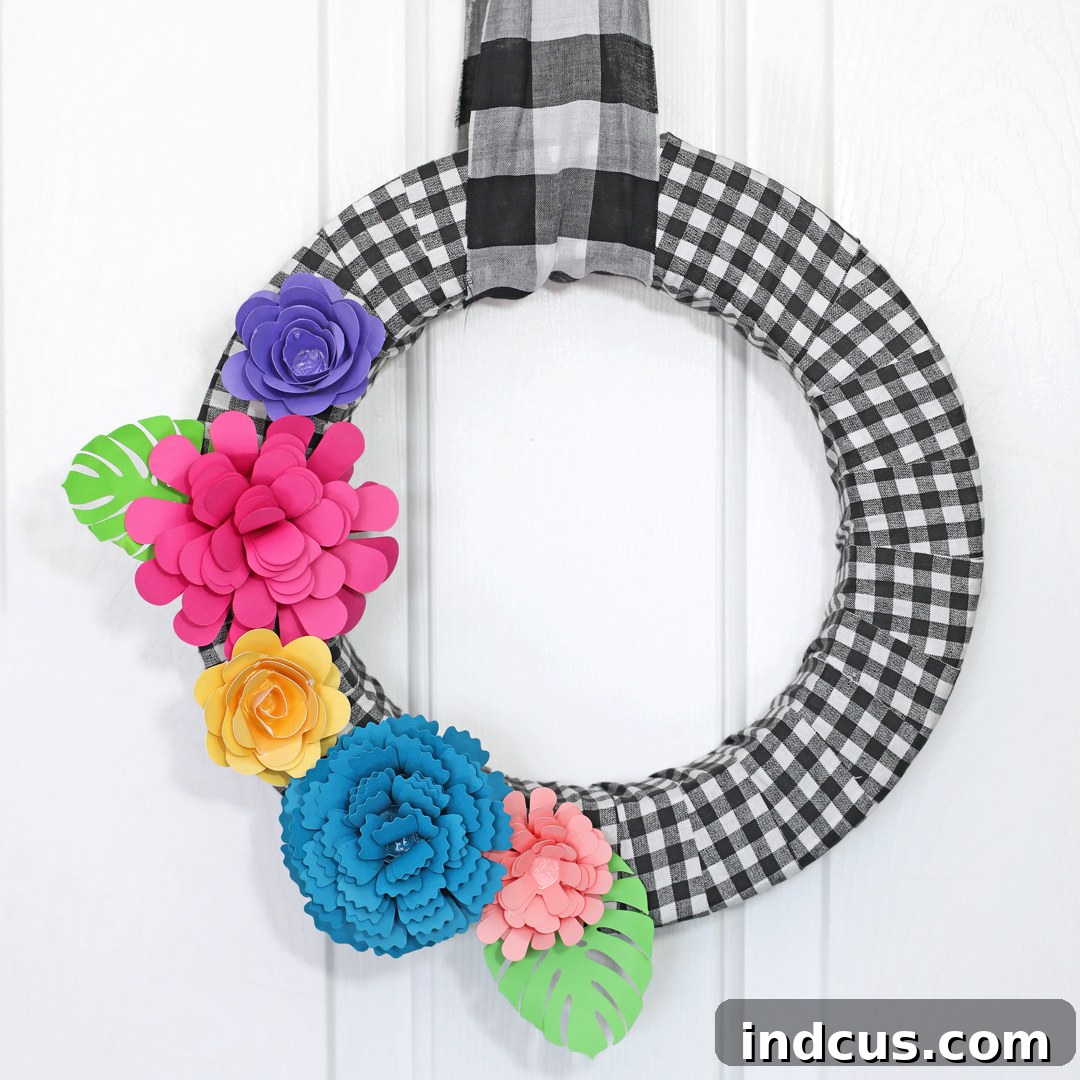
Embrace the charm of farmhouse chic with a delightful twist! This DIY buffalo check wreath project combines the timeless appeal of black and white plaid with a burst of cheerful, colorful rolled paper flowers. The result is a fresh, fun, and incredibly versatile piece of home decor that adds a vibrant touch to any door or wall. Whether you’re looking for a seasonal refresh or a year-round statement piece, this craft offers both beauty and a wonderful sense of accomplishment. Get ready to transform simple materials into a stunning decorative accent that truly reflects your personal style.
Crafting this eye-catching wreath is a rewarding two-part process. First, we’ll create the classic buffalo check base by wrapping a foam wreath form with fabric, laying the perfect foundation for our floral display. Second, we’ll dive into the enchanting world of paper flowers, using a cutting machine to create intricate designs that will bring our wreath to life with color and dimension. This tutorial will guide you through each step, ensuring a beautiful finished product that you’ll be proud to display.
Essential Supplies for Your Buffalo Check Wreath Project
Before we embark on this creative journey, gathering your materials is key. Having everything at hand will make the crafting process smooth and enjoyable. Here’s what you’ll need:
- Foam Wreath Form: Choose a sturdy foam base of your desired size. This will be the foundation for your fabric wrap.
- Buffalo Check Fabric: Approximately 1-2 yards, depending on the size of your wreath form. Black and white is classic, but feel free to explore other color combinations! Cotton or flannel work wonderfully for easy wrapping.
- Straight Pins: A box of sharp, sturdy pins is essential for securing the fabric securely to the foam.
- Hot Glue Gun and Glue Sticks: Your trusty tool for attaching the paper flowers firmly to the wrapped wreath.
- Cardstock in Various Colors: A selection of your favorite bright and cheerful colors. Choose cardstock with a weight of 65lb to 80lb for best results in rolling.
- Electronic Cutting Machine (Highly Recommended): A Silhouette Cameo or Cricut machine will significantly simplify the flower cutting process. Its precision and speed are unmatched for intricate designs.
- Paper Flower Cut Files: Downloadable designs from the Silhouette Design Store or similar platforms. We’ll suggest some favorites, but the possibilities are endless!
- Pencil or Dowel: For shaping the flower petals and aiding in the rolling process.
- Scissors (Optional): If you plan to cut fabric strips manually or don’t have a cutting machine for paper flowers.
Part 1: Crafting the Classic Buffalo Check Wreath Base
The foundation of our stunning wreath begins with a simple yet effective fabric wrapping technique. This step sets the stage for the vibrant paper flowers and introduces the iconic buffalo check pattern.
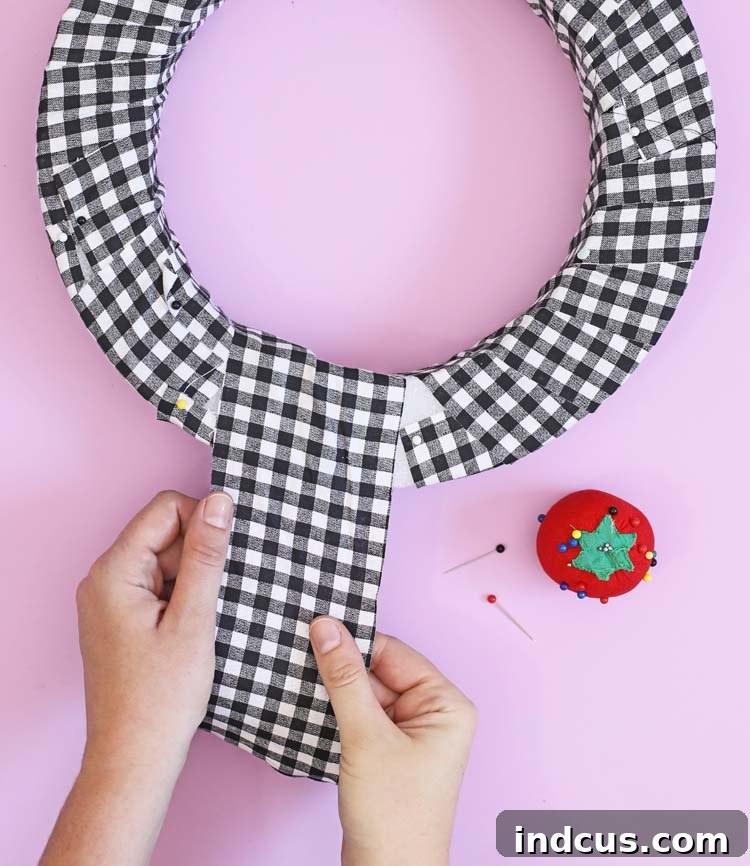
Step-by-Step Wrapping Guide:
- Prepare Your Fabric: Begin by cutting your buffalo check fabric into strips that are approximately 3-4 inches wide and as long as your fabric allows (usually the width of the fabric, around 42-44 inches). The width of the strips will determine how many wraps you need and the overall look of the base. Ensure your cuts are as straight as possible for a neat finish.
- Secure the Starting Point: Take one end of a fabric strip and firmly pin it into the back of your foam wreath form. Positioning pins on the back will keep them hidden from view once the wreath is hanging.
- Begin Wrapping: Start wrapping the fabric strip tightly and smoothly around the foam wreath form, slightly overlapping each pass. This overlapping technique is crucial for ensuring full coverage and preventing any foam from showing through. Maintain a consistent tension as you wrap to achieve a uniform and taut appearance.
- Connecting Fabric Strips: When you reach the end of your fabric strip, pin the end securely into the back of the wreath form, just as you did with the start. Take a new strip, overlap its beginning slightly with the pinned end of the previous strip, and pin its start into place. Continue the wrapping process, ensuring a seamless transition between strips.
- Complete Coverage: Repeat this process, adding new strips as needed, until the entire foam wreath form is completely covered with the buffalo check fabric. As you work, periodically check the back of the wreath to ensure all pins are neatly tucked away and not protruding. The goal is a smooth, evenly wrapped base that proudly displays the iconic plaid pattern.
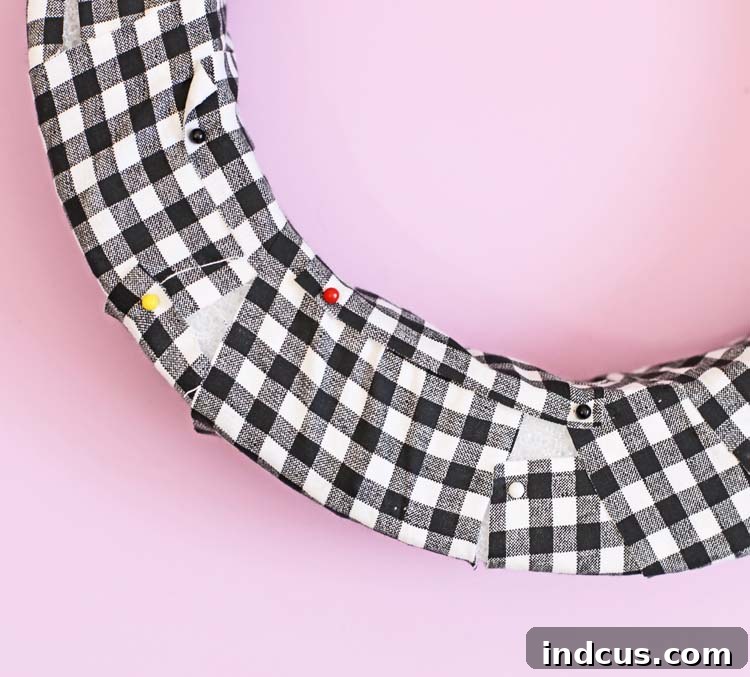
Tips for a Flawless Finish:
- Consistent Overlap: Aim for a consistent overlap of about half the width of your fabric strip. This not only ensures full coverage but also creates a pleasant visual texture.
- Hidden Pins: Always strive to place your pins on the back or inner edge of the wreath form. This attention to detail will ensure your finished wreath looks professional and clean from any angle when displayed on your door or wall.
- Troubleshooting Wrinkles: If you notice any wrinkles or bunching, gently unwrap that section and re-wrap it, pulling the fabric tauter. Patience here pays off for a pristine base.
- Fabric Choice Matters: While cotton and flannel are easy to work with, consider a slightly stiffer fabric for a more structured look, or a softer one for a cozier feel. The buffalo check pattern itself is key, so choose colors and scale that appeal to you.
Part 2: Designing and Crafting Exquisite Rolled Paper Flowers
Now for the truly exciting part: bringing vibrant color and intricate detail to your wreath with beautiful rolled paper flowers. These handmade blooms offer endless possibilities for customization and add a personal touch that sets your wreath apart.
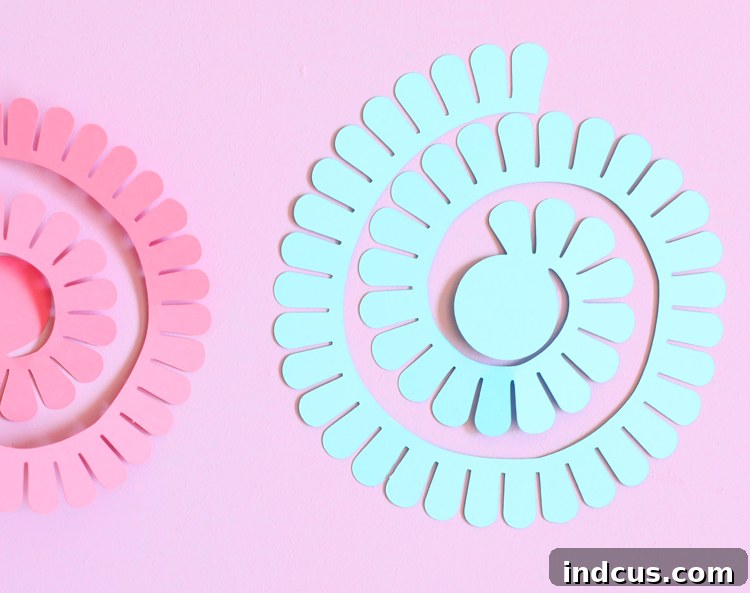
The Power of an Electronic Cutting Machine:
If you’re serious about paper crafting, an electronic cutting machine like the Silhouette Cameo is an absolute game-changer. Seriously, if you don’t have one yet, it’s an investment worth considering for any crafter. These machines allow you to cut intricate designs with unparalleled precision and speed, transforming sheets of cardstock into complex shapes in minutes. For projects like rolled paper flowers, where dozens of identical spirals are needed, a cutting machine saves immense time and ensures uniformity, which is crucial for a professional-looking finish. It opens up a world of design possibilities that would be arduous, if not impossible, to achieve with scissors alone. For this project, it’s truly your best friend!
Choosing Your Designs and Cardstock:
The Silhouette Design Store is a treasure trove of creative assets, offering hundreds of paper flower cut files. For this project, I utilized a few favorite designs that create beautiful, dimensional blooms:
- Rolled Carnation: Offers a lovely, ruffled texture.
- Rolled Daisy: Provides a classic, cheerful floral shape.
- Rolled Rose: A timeless choice for elegant blooms.
However, don’t limit yourself to these! Feel free to browse the Design Store and select any flower shapes that capture your imagination. The beauty of paper flowers lies in their versatility. Experiment with different styles, from tightly wound buds to more open, whimsical blossoms. When selecting your cardstock, opt for a variety of bright, contrasting colors to make your wreath pop against the buffalo check background. Consider different shades within a color family for added depth, or go bold with a rainbow of hues. Cardstock weight between 65lb and 80lb generally works best, offering enough sturdiness to hold its shape while remaining pliable enough to roll without cracking.
Assembling Your Rolled Paper Flowers:
Once your chosen flower designs are perfectly cut from your colorful cardstock sheets, it’s time to bring them to life. This process is meditative and satisfying, transforming flat spirals into three-dimensional blooms. Follow these steps carefully for beautiful results:
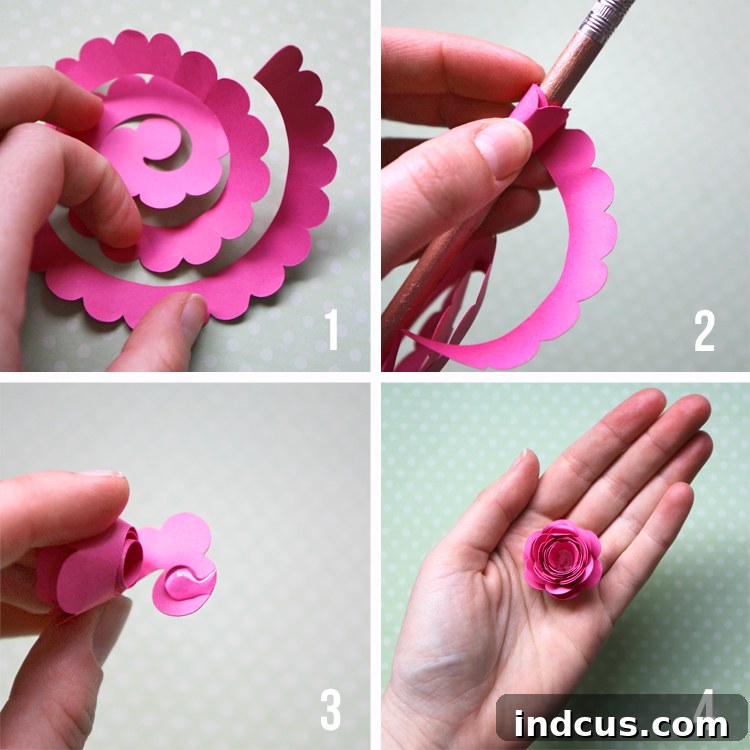
- Shape the Flower Petals: Before you start rolling, gently curve the outer edges of the flower spiral. You can do this by wrapping them lightly around a pencil, a thin dowel, or even your finger. This subtle curling adds a natural, lifelike dimension to each petal, making your finished flowers appear softer and more realistic rather than stiff and flat.
- Begin Rolling the Spiral: Start at the outside edge of the intricate paper spiral. Begin rolling the paper tightly inwards, keeping the flat outer edge of the spiral as even as possible as you go. Consistency is key here to ensure a well-formed flower. Roll tightly at first, and then you can slightly loosen your grip towards the end if you want a more open bloom, or maintain tightness for a compact flower.
- Secure the Base with Hot Glue: Once you’ve rolled the entire spiral, you’ll notice a small circular tab at the very end of the design. This is the base of your flower. Add a dab of hot glue to this circular center part. Immediately press the rolled portion of the flower into this hot glue, holding it firmly for a few seconds until the glue sets. This secures all the rolled layers into place, preventing the flower from unraveling.
- Add a Decorative Center (Optional but Recommended): For an extra touch of charm, consider adding a center to your flowers. While I didn’t include them in this specific project, a small gemstone, a pearl, a contrasting button, or even a tiny rolled paper circle can elevate the look of your flowers. Simply use a dab of hot glue to attach your chosen embellishment to the center of each finished bloom.
Continue making a generous assortment of flowers in various colors and sizes. The more flowers you have, the fuller and more vibrant your wreath will be. Aim for a mix of larger and smaller blooms to create visual interest and depth.
Incorporating Tropical Leaves for Added Dimension and Color
To further enhance the visual appeal and inject even more color into the wreath, I decided to add some tropical leaves into the mix. This provides a lovely contrast to the delicate flowers and adds an extra layer of texture. Just like the flowers, these leaves were also precisely cut using my trusty Silhouette machine, making it easy to create a uniform and striking addition.
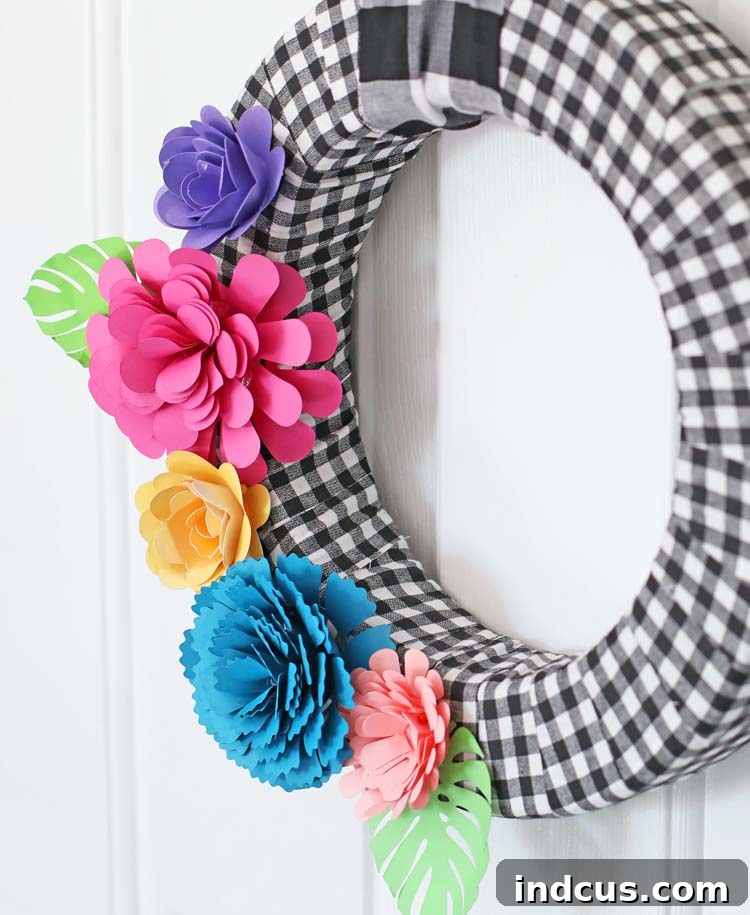
The addition of these leaves breaks up the floral clusters and introduces a touch of greenery, even if it’s paper greenery! They can be tucked behind flowers, arranged in small clusters, or used to frame certain sections of the wreath, offering more creative freedom in your final design.
Assembling Your Masterpiece: Attaching Flowers to the Wreath
With your beautiful buffalo check base ready and a collection of colorful paper flowers (and optional leaves) at hand, the final step is to bring it all together. This is where your vision truly comes to life.
Planning Your Layout:
Before you commit with hot glue, it’s highly recommended to arrange your flowers on the wreath form. Experiment with different configurations: clustering them on one side for an asymmetrical look, distributing them evenly around the wreath, or creating a focal point. Play with varying sizes and colors of flowers to create depth and visual interest. Place the leaves first if you’re using them, then position your flowers around and over them. Take a step back and look at your arrangement from a distance. Are the colors balanced? Is there a good mix of shapes? Adjust as needed until you are happy with the composition.
Hot Gluing Technique:
Once you’ve finalized your desired layout, it’s time to secure everything. Apply a generous dab of hot glue to the back of each flower and leaf, then firmly press it onto the fabric-wrapped wreath form. Hold each piece in place for a few seconds until the glue sets. Work systematically, starting with the larger pieces and filling in with smaller ones, or working from one section to another. The hot glue will adhere well to the fabric, ensuring your beautiful paper blooms stay firmly in place.
The last step to making this cute wreath is truly as easy as pie. Simply hot glue all your meticulously crafted flowers and leaves onto the fabric-wrapped wreath form. This simple action transforms your individual components into a cohesive and stunning piece of decor. Easy peasy, and incredibly rewarding!
Embracing Versatility and Seasonal Transformations
I absolutely adore how this buffalo check wreath turned out. It radiates happiness and is perfectly suited for summer decor, bringing a vibrant, playful energy to any space. But the true beauty of this DIY project lies in its incredible versatility. The buffalo check base provides a timeless, neutral foundation that can be adapted for any season or holiday with minimal effort.
Imagine the possibilities! When fall approaches, I’m already envisioning gently peeling off the summer flowers and crafting a new collection in rich autumn colors. Think warm oranges, deep reds, golden yellows, and rustic browns, perhaps even incorporating some paper leaves to mimic falling foliage. Wouldn’t that be absolutely charming? The buffalo check pattern would seamlessly transition from a bright summer backdrop to a cozy fall accent.
And the versatility doesn’t stop there! When the festive season of Christmas rolls around, I might even remove the autumn flowers and adorn the wreath with elegant paper poinsettias, glittering snowflakes, or festive holly sprigs. The possibilities are truly endless, allowing you to enjoy a freshly decorated wreath year-round without needing to store multiple wreaths. This project truly embodies the spirit of a good, versatile craft!
This adaptability not only makes the wreath an economical decor choice but also a truly sustainable one. Instead of buying new wreaths for every season, you simply update the floral embellishments, giving your creative spirit endless opportunities to play with colors and themes. It’s a craft that keeps on giving!
Display and Care for Your Handcrafted Wreath
Once your DIY buffalo check wreath with its vibrant paper flowers is complete, finding the perfect spot to display it is the final touch. This beautiful piece is designed to brighten up any area of your home, and with a little care, it will remain a cherished decoration for seasons to come.
Where to Display Your Wreath:
- Front Door: A classic choice! Your wreath will offer a warm and inviting welcome to guests. If hanging outdoors, ensure it’s in a covered area (like a porch or overhang) to protect the paper flowers from direct rain or prolonged sun exposure, which can cause fading.
- Interior Walls: Adorn an empty wall in your living room, dining room, or entryway. It can serve as a charming focal point above a console table or as part of a gallery wall.
- Above the Mantel: A mantelpiece is a prime spot for seasonal decor. Your colorful wreath can be the centerpiece of a festive display.
- Kitchen or Nursery: The cheerful design makes it perfect for adding a pop of color to a kitchen or a whimsical touch to a child’s room.
Caring for Your Paper Flower Wreath:
- Dusting: Over time, paper flowers can accumulate dust. Gently dust them with a soft brush, a can of compressed air, or a hairdryer set to a cool, low setting.
- Avoid Moisture: Paper is susceptible to water damage. Keep your wreath away from high-humidity areas, direct rain, or sprinklers.
- Protect from Direct Sunlight: Prolonged exposure to direct sunlight can cause the colors of your cardstock to fade. If displaying outdoors, choose a shaded spot. Indoors, try to position it away from windows that receive intense, direct sun all day.
- Storage: When changing out your flowers for a new season, gently remove the old paper flowers. Store them carefully in a box to reuse if desired, or dispose of them if they are beyond their prime. The wrapped wreath base can be stored in a sturdy box in a cool, dry place until its next transformation.
Conclusion: A Wreath That Blooms with Creativity
There’s immense satisfaction in creating something beautiful with your own hands, and this DIY buffalo check wreath with rolled paper flowers is a prime example. From wrapping the classic plaid base to meticulously rolling each vibrant paper bloom, every step is an act of creation that culminates in a truly unique piece of home decor. This project not only allows you to express your creativity but also provides a versatile decoration that can evolve with the seasons, ensuring your home always feels fresh and inviting.
The charming combination of timeless buffalo check and a riot of colorful paper flowers creates an aesthetic that is both sophisticated and playful. It’s a testament to the fact that even simple materials can yield spectacular results when paired with a little imagination and effort. So, gather your supplies, unleash your inner crafter, and enjoy the process of bringing this delightful wreath to life. We encourage you to personalize your design, experiment with different flower shapes and color palettes, and truly make it your own. Once complete, your handcrafted wreath will not only beautify your space but also serve as a proud display of your crafting prowess.
We’d love to see your creations! Share your DIY buffalo check wreaths and paper flower designs with us and inspire fellow crafters to embark on their own decorative journeys.







