
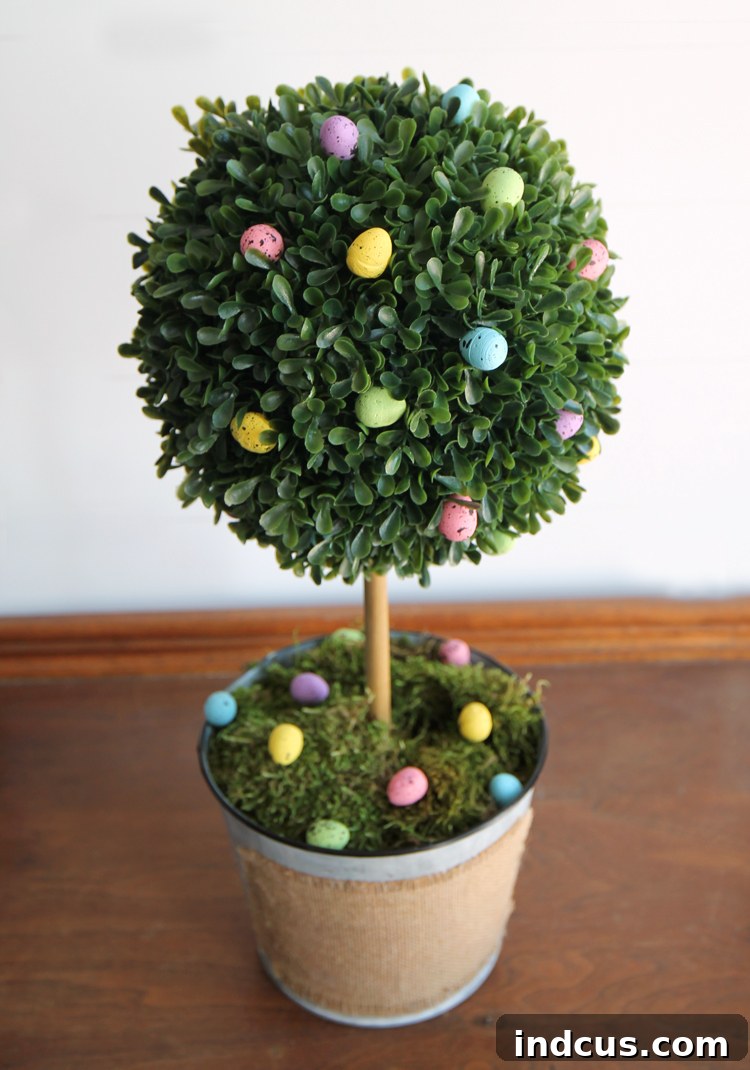
Craft Your Own Elegant Boxwood Topiary: A Versatile DIY Easter & Spring Decoration
As the vibrant energy of spring awakens around us, there’s a natural inclination to refresh our living spaces and infuse them with the season’s cheerful spirit. If you’re feeling that familiar itch to decorate, you’re in the right place! Today, we’re embarking on an incredibly simple yet profoundly charming DIY project: creating your very own boxwood and speckled egg spring topiary. This craft isn’t just about celebrating Easter; it’s ingeniously designed for maximum versatility. The delightful speckled eggs are completely removable, allowing your beautiful topiary to gracefully transition from a festive Easter centerpiece to a sophisticated, timeless accent that will brighten your home all summer long and beyond.
Topiaries have long been cherished elements in home decor, celebrated for their classic beauty and their ability to bring a touch of sculpted greenery indoors. While high-end store-bought versions can often come with a substantial price tag, crafting your own offers both significant cost savings and the immense satisfaction of a personalized, handmade touch. This project is perfectly suited for crafters of all skill levels, from complete beginners to seasoned DIY enthusiasts, requiring minimal tools and effort for maximum decorative impact. Get ready to transform basic craft supplies into an elegant focal point for your entryway, mantel, or dining table!
Why Choose a DIY Boxwood Topiary for Your Home Decor?
The decision to undertake a DIY project, especially one as rewarding as creating a boxwood topiary, comes with a host of appealing benefits. Primarily, it’s an incredibly budget-friendly alternative to purchasing ready-made decor. High-quality faux topiaries from home decor stores can be surprisingly expensive, but by carefully selecting your materials, you can achieve an identical, if not superior, aesthetic for a fraction of the cost. This allows you to allocate your decorating budget to other areas or simply enjoy the savings.
Beyond the financial advantages, customization is a significant draw. When you DIY, you’re in complete control of the design. You get to choose the precise size of your boxwood ball, the style and material of your vase or pail to perfectly match your existing decor, and the specific colors and textures of your decorative eggs. This ensures that the finished piece is not just another decoration but a personalized accent that truly reflects your taste and complements your home’s unique palette.
Furthermore, there’s a deep, intrinsic satisfaction that comes from creating something beautiful with your own hands. Crafting can be a wonderfully therapeutic activity, offering a chance to unwind, express creativity, and take pride in a tangible outcome. This particular topiary’s design, with its removable Easter eggs, also makes it an exceptionally sustainable and adaptable decoration. You’re not making a piece for just one holiday; you’re crafting a versatile item that can be enjoyed through multiple seasons, easily refreshed with minor changes to suit different occasions or simply appreciated for its timeless green elegance year-round.
Gather Your Materials: Everything You’ll Need for Your Topiary Project
The true charm of this DIY boxwood topiary lies in its straightforward material list. You won’t need to hunt for obscure items; most of these components are readily available at any major craft store, home goods retailer, or can be conveniently purchased online. We’ve curated a list of essential items to help you assemble your beautiful spring and Easter decoration with ease:
Detailed Materials List:
- Faux Boxwood Ball: This is the crown jewel of your topiary. Choose a high-quality faux boxwood ball in a size that suits your desired topiary height and width. Most faux boxwood balls feature an internal plastic grid structure, which is vital for securely mounting it onto the dowel.
- Mini Easter Eggs: Look for lightweight, decorative speckled eggs. The beauty of these particular embellishments is their seasonal flexibility; they can be effortlessly nestled in and removed without the need for permanent attachment, preserving your topiary’s versatility.
- Vase or Pail: Select a sturdy and aesthetically pleasing container that complements your home decor style. Options abound, from classic terracotta pots and rustic galvanized pails to elegant ceramic vases or even upcycled decorative tins. Ensure the opening is wide enough to comfortably accommodate the floral foam.
- Preserved Moss: This natural element serves to conceal the floral foam base and adds a beautiful, organic texture. You can choose from various types like sheet moss, Spanish moss, or vibrant reindeer moss, depending on the look you’re aiming for.
- Floral Foam: Crucial for providing a stable and secure anchor point for your wooden dowel. Opt for dry floral foam blocks, which are dense and firm, rather than the softer green foam used for fresh flower arrangements, as the latter can degrade over time.
- Wooden Dowel: This piece will function as the sturdy “trunk” of your topiary. Select a dowel of appropriate thickness to support the boxwood ball and sufficient length. Remember, you can easily cut it to achieve your desired topiary height.
- Hot Glue Gun + Hot Glue Sticks: Your indispensable adhesive for securely bonding all the components of your topiary together. Ensure you have plenty of glue sticks on hand!
Step-by-Step Instructions: Crafting Your Perfect Boxwood Topiary
With all your materials neatly laid out, it’s time to bring your beautiful boxwood topiary to life. These instructions are designed to be simple and straightforward, allowing you to enjoy the creative process. Take your time with each step, and don’t hesitate to make minor adjustments to achieve the perfect look for your decorative piece.
Step 1: Preparing and Securing the Base Foam
The foundation of a stable topiary is a well-secured base. Begin by taking your floral foam block and carefully cutting it to fit snugly into the bottom of your chosen vase or flower pot. You might find a utility knife or craft knife helpful for precise trimming. The goal is for the foam to sit firmly, preventing any wobbling once the topiary is assembled. Once you’re satisfied with the fit, apply a generous amount of hot glue to the bottom of the foam block. Press it firmly into the base of your pot, holding it steady for several seconds until the glue cools and forms a strong bond. This foundational step is crucial for ensuring your topiary remains upright and robust.
Step 2: Inserting and Stabilizing the Wooden Dowel (The Trunk)
Now, let’s establish the “trunk” of your topiary. Carefully poke one end of your wooden dowel into the very center of the secured floral foam. Aim for it to be as vertical as possible, visually aligning it with the center of your pot. Once you’ve achieved the desired depth and perfect vertical alignment, gently pull the dowel out. Apply a liberal amount of hot glue into the hole you just created in the foam. Immediately reinsert the dowel, twisting it slightly as you push it down to ensure the glue coats the dowel’s surface and the inside of the hole. Hold the dowel steady and perfectly upright until the hot glue completely cools and hardens, creating an unshakeable bond. Remember, the length of your dowel will dictate the final height of your topiary, so ensure it’s cut to your preferred dimension before this step.
Step 3: Attaching the Faux Boxwood Ball
It’s time to add the lush boxwood foliage that defines your topiary. Most faux boxwood balls feature a sturdy plastic grid structure just beneath their leafy exterior. This grid is designed for easy attachment. Carefully locate one of the holes in this internal grid that best aligns with the center of your boxwood ball. Gently push the free end of your wooden dowel through this hole. As you guide the boxwood ball down towards the pot, ensure it is perfectly centered and level on the dowel. For maximum stability, the tip of the dowel should ideally rest against one of the “T” shaped intersections within the plastic grid. This visual check ensures your topiary will appear balanced and professionally finished.
Once you are absolutely confident in the placement and level alignment of your boxwood ball, apply a generous dab of hot glue directly onto the exposed end of the dowel where it meets the plastic grid of the ball. Firmly press the boxwood ball down onto the glue and hold it in place without any shifting until the hot glue has completely cooled and solidified, forming an extremely strong and lasting bond. This secure attachment is fundamental to the overall stability and longevity of your elegant topiary.
Step 4: Concealing the Base with Preserved Moss
With the main structure of your topiary complete, it’s time to add the beautiful finishing touches to the base. Take your preserved moss and begin artfully arranging it over the exposed floral foam, ensuring it’s completely covered. The moss serves a dual purpose: it conceals the utilitarian foam, creating a much more polished look, and it adds a wonderful, organic texture and vibrant color that beautifully complements the green boxwood. You can simply nestle the moss into place, gently pressing it down to create an even layer. While a few small dots of hot glue can be used to secure the moss if you desire, it’s often not strictly necessary as the moss tends to stay put once arranged. This simple step truly elevates your creation from a basic craft to a refined decorative piece.
Step 5: Adding the Festive Speckled Eggs (And Beyond!)
Now for the most exciting and delightful part: personalizing your topiary with those utterly adorable mini speckled Easter eggs! This is where you can truly let your creativity shine. Gently nestle the eggs among the dense leaves of the boxwood ball. The ingenious beauty of this design is that you don’t even need to use glue to secure them. The inherent structure of the boxwood foliage will hold them firmly in place, allowing you to effortlessly remove them once the Easter celebrations have concluded. For an extra touch of whimsical charm and a pop of coordinating color, sprinkle a few additional eggs onto the preserved moss at the base of your topiary. Doesn’t it look absolutely charming and perfectly ready for spring? This effortless addition instantly transforms your elegant topiary into a festive Easter statement piece, ready to delight all who see it.
Styling Your DIY Boxwood Topiary: Tips for Display
Your newly crafted boxwood topiary is far more than just a decoration; it’s a versatile styling element that can dramatically enhance various areas of your home. During the Easter season, proudly place it on your entryway table to create a warm and welcoming first impression, complete with its festive speckled eggs. It also makes an exquisite centerpiece for your dining table, especially when thoughtfully paired with a coordinating table runner, elegant candlesticks, or a cluster of pillar candles for a cozy ambiance.
Consider positioning it on a mantelpiece, flanked by other spring-themed accents such as delicate ceramic bunnies, charming bird figurines, or small, fresh floral arrangements. For those who prefer a more minimalist aesthetic, allow the topiary to stand alone on a console table, a bookshelf, or even a bathroom vanity, letting its inherent elegance and simplicity command attention. The true magic lies in its adaptability: once Easter has passed, simply remove the eggs, and your topiary is instantly transformed, ready to grace your home through summer, autumn, and even winter. For a touch of fall, you might tuck in a few mini faux pumpkins or colorful autumn leaves; for the festive winter months, tiny red berries, delicate snowflakes, or miniature ornaments could be added. The possibilities for seasonal adaptation are truly endless, making this a truly enduring piece of decor.
Caring for Your Faux Boxwood Topiary: Longevity and Maintenance
One of the most significant advantages of choosing a faux boxwood topiary over a living plant is its remarkably low maintenance. Unlike its botanical counterparts, your artificial topiary requires no watering, specific sunlight conditions, or meticulous pruning. To ensure your beautiful creation remains fresh and vibrant year after year, simply dust it occasionally with a soft cloth, a feather duster, or even a can of compressed air for hard-to-reach areas. If it accumulates a bit more dirt or grime over time, a gentle wipe with a slightly damp cloth can easily restore its pristine luster. When not on display or if you’re swapping out seasonal embellishments, storing your topiary in a cool, dry place away from direct sunlight will further ensure its longevity, allowing you to cherish and enjoy your handmade masterpiece for many seasons to come, a testament to sustainable and thoughtful decorating.
Conclusion: A Timeless Piece for Your Home, Handcrafted with Love
And there you have it – a wonderfully simple yet utterly charming DIY boxwood topiary, perfectly suited for celebrating Easter and beautifully adaptable for all seasons beyond! This project stands as a delightful testament to how easily you can transform basic craft supplies into a sophisticated, high-end piece of home decor. We sincerely hope this comprehensive, step-by-step guide has not only been easy to follow but has also inspired you to tap into your creative spirit and add a touch of handcrafted elegance to your spring decorations and throughout your home.
The enduring beauty of this topiary lies not only in its immediate aesthetic appeal but also in its remarkable adaptability and the personal touch it brings. As you proudly display it on your entryway table, grace your mantelpiece with its presence, or use it as a captivating dining centerpiece, take immense pride in knowing that you’ve created a versatile and lasting decoration. It’s a piece that promises to bring joy, a fresh touch of greenery, and a personalized charm to your space, gracefully evolving with the changing seasons. Happy crafting and happy decorating!







