
Crafting Your Own Custom Pleated Pillow Covers: An Easy DIY Guide to Budget-Friendly Elegance
The quest for beautiful, high-quality home decor often leads to sticker shock, especially when it comes to decorative throw pillows. A single accent pillow can easily retail for $30, $50, or even more, making it an expensive endeavor to outfit your living space or bedroom with the desired aesthetic. This was precisely the dilemma I faced last Christmas when my sister-in-law was preparing a thoughtful bedding gift for my mother-in-law. Knowing that a complete bedding set deserved equally charming and comfortable pillows, I immediately recognized an opportunity to leverage my sewing skills and create custom pleated pillow covers that perfectly complemented the gift, all while saving a significant amount of money.
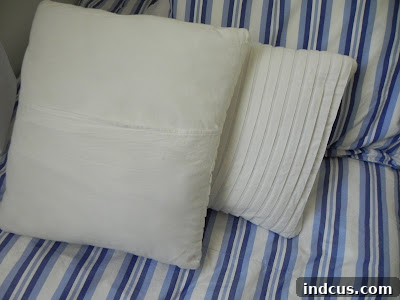
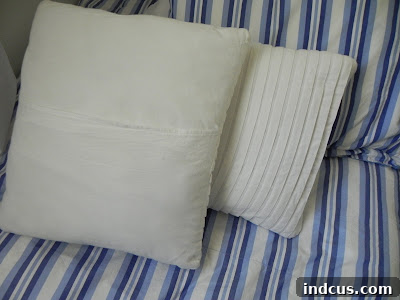
The beauty of handmade items lies not just in their unique charm but also in the personal touch they carry. These particular pillow covers, designed with elegant pleats and a practical envelope-style back, offer both sophisticated style and ease of care. The envelope closure allows for quick removal of the pillow form, making washing a breeze—an essential feature, especially for white fabrics. Although I didn’t capture the initial creation process, I managed to snap a few pictures during a recent visit. Please excuse the casual photography; low light, holiday relaxation, and un-ironed pillowcases all contributed to the relaxed vibe, but the essence of their handcrafted appeal shines through.
Here you can see the finished product: beautifully pleated pillows, offering a subtle texture and refined look that instantly elevates any bedding or sofa arrangement. The crisp white fabric provides a clean, versatile base, ready to blend seamlessly with various decor styles. These aren’t just decorative accents; they are a testament to how simple DIY projects can yield stunning results, transforming ordinary materials into something truly special.
Why Opt for DIY Pillow Covers? The Unbeatable Advantages of Handmade Home Decor
Beyond the immediate cost savings, there are numerous compelling reasons to embark on a DIY pillow cover project. Creating your own decorative pillows allows for unparalleled customization, a feature rarely found in mass-produced items. You have complete control over every aspect: the fabric choice, color palette, texture, and specific design elements like pleats or embellishments. This means you can perfectly match your existing home decor, experiment with seasonal themes, or craft a truly unique gift tailored to someone’s taste.
For budget-conscious decorators, the difference in cost is astounding. Commercial throw pillows often come with inflated price tags that reflect brand, design, and retail markup. By contrast, sourcing your own fabric and investing a little time and effort can slash these costs dramatically. Fabric remnants, sale bins at craft stores, or even repurposing existing textiles can provide high-quality materials for a fraction of the price. The satisfaction of knowing you’ve created something beautiful and functional with your own hands is an added bonus, contributing to a sense of accomplishment and a more personal connection to your living space. Furthermore, DIY projects promote sustainability by encouraging the use of durable, long-lasting materials and reducing reliance on disposable decor items.
Understanding the Design: Pleats and the Practical Envelope Back
The pleated design is what gives these pillows their distinctive texture and visual interest. Pleats are folds of fabric that are pressed or stitched into place, adding dimension and a tailored look. For this project, we primarily use knife pleats, which are single folds all facing the same direction, creating a clean, rhythmic pattern across the fabric surface. These pleats transform a flat piece of fabric into a dynamic, textured surface that catches light beautifully, adding depth and sophistication to any room.
Equally important for functionality is the envelope-style back. Unlike zippered or buttoned closures, an envelope back consists of two overlapping fabric panels that create an opening without the need for additional hardware. This design is incredibly user-friendly for several reasons: it’s simpler to sew (no zippers to install!), it creates a smooth, comfortable surface on both sides of the pillow (no hard zippers to contend with), and most importantly, it allows for effortless removal of the pillow form for washing. This ease of maintenance is crucial for keeping white pillow covers looking pristine, ensuring they remain a fresh and inviting element in your home for years to come.
Gathering Your Materials: What You’ll Need for Your DIY Pleated Pillow Project
One of the joys of this project is that it requires only a few basic and readily available supplies. Here’s a comprehensive list to get you started:
- Fabric: For the pillow shown, I used inexpensive broadcloth purchased on sale for around $2/yard. Broadcloth is a fantastic choice for beginners due to its stable weave, ease of cutting, and crisp finish, which helps pleats hold their shape. Other suitable fabrics include quilting cottons, cotton twill, linen blends, or even light canvas for a more durable feel. When selecting your fabric, consider its weight and drape – a fabric with a little body will hold pleats better than something too flimsy. Remember to pre-wash and iron your fabric before cutting to prevent shrinking after your pillow is made.
- Pillow Forms: Choose good quality pillow forms that will maintain their shape. The size of your pillow form will determine the final dimensions of your cover. A common trick for a plump, professional-looking pillow is to make your cover slightly smaller than your pillow form (e.g., a 17-inch cover for an 18-inch form) to ensure a snug fit.
- Basic Sewing Supplies:
- Sewing Machine: Any standard sewing machine will work perfectly.
- Thread: All-purpose polyester thread that matches your fabric color.
- Fabric Scissors: Sharp scissors are essential for clean cuts.
- Pins: To hold fabric layers in place.
- Iron and Ironing Board: Absolutely crucial for crisp pleats and a professional finish.
- Measuring Tape or Ruler: For accurate measurements.
- Disappearing Ink Fabric Pen or Fabric Chalk: This is a game-changer! It allows you to mark lines on your fabric that vanish with heat or water, leaving no trace.
- Optional but Recommended: A rotary cutter and self-healing mat for quick, precise cuts, especially for straight lines.
Step-by-Step Guide: Crafting Your Elegant Pleated Pillow Covers
This project may look intricate, but it’s surprisingly straightforward. Follow these steps, and you’ll have beautiful custom pillows in no time!
Step 1: Fabric Preparation and Cutting the Pillow Front
First, pre-wash and thoroughly iron your chosen fabric. This step is vital to prevent future shrinkage and ensures your fabric is smooth and ready for precise marking and cutting. Next, determine the desired finished dimensions of your pillow front. For example, if you have an 18×18 inch pillow form, you’ll want your finished pillow cover front to be 18×18 inches. Now, here’s the crucial part for the pleated front: you need to cut a piece of fabric that is significantly wider than your desired finished width to allow for the pleats. A good rule of thumb is to cut your fabric 2 to 2.5 times the finished width, maintaining the desired finished height. So, for an 18-inch wide pillow, you might cut a piece that is 36-45 inches wide by 18.5 inches high (adding a 1/2-inch seam allowance to the height). The exact multiplier depends on how deep and how close together you want your pleats to be.
Step 2: Marking the Pleats
Lay your cut fabric for the pillow front wrong side up on a flat surface. Using your disappearing ink pen and a ruler, begin drawing parallel lines across the width of the fabric. For the pillows in the picture, I drew lines two inches apart. This measurement is flexible; you can adjust it to create narrower or wider pleats for a different aesthetic. A simple trick is to use the width of your ruler for consistent spacing, making the marking process incredibly fast and easy. Ensure your lines are perfectly parallel to achieve even pleats.
Step 3: Forming and Securing the Pleats
Once your lines are marked, it’s time to form the pleats. Starting from one edge, fold the fabric along the first marked line, bringing it to meet the next marked line (or a line a specific distance away, depending on your pleat style). Crucially, ensure all your folds go in the same direction. Pin each pleat securely as you go to hold it in place. After pinning, take your pleated fabric to the iron and carefully press each pleat flat. Ironing at this stage is essential for creating crisp, professional-looking folds that will maintain their shape. This process compresses the fabric, reducing its overall width to closer to your desired finished width.
Step 4: Trimming and Preparing the Pleated Panel
With all your pleats pinned and pressed, you’ll need to secure them before further assembly. Machine stitch along the raw side edges of your pleated panel, about a quarter-inch from the edge, to temporarily hold all the pleats in place. This prevents them from unfolding as you work. Now, measure the width of your pleated fabric. It should be close to your desired finished width. Trim the pleated panel down to the exact finished dimensions of your pillow front, adding a 1/2-inch seam allowance on all four sides. For an 18×18 inch finished front, your trimmed pleated panel should now be 19×19 inches.
Step 5: Creating the Envelope Back
The envelope back consists of two rectangular fabric pieces that overlap to form the opening. For an 18×18 inch pillow, you’ll cut two pieces that are 18.5 inches high (matching the pleated front height including seam allowance) by approximately 12-14 inches wide each. The extra width allows for a generous overlap. On one long edge of each of these two back pieces, create a neat hem. Fold the edge over 1/4 inch, press, then fold over another 1/2 inch, press again, and stitch in place. This creates a finished edge for your envelope opening. Once hemmed, lay out your pleated front piece right side up. Then, place your two back pieces right side down on top of the front piece, aligning the raw edges. The two hemmed edges will overlap in the middle, creating the envelope opening. Pin all layers securely around the entire perimeter.
Step 6: Assembling the Pillow Cover
With all layers pinned together (pleated front right side up, two back pieces right side down, overlapping in the center), it’s time to sew! Using a 1/2-inch seam allowance, stitch around all four sides of the pinned rectangle. Be sure to backstitch at the beginning and end of your seam for added durability. For extra strength, especially at the overlap points, you might want to stitch over those sections a second time. Once sewn, trim the corners close to the stitching line (being careful not to cut the stitches) to reduce bulk when you turn the cover right side out. Turn the pillow cover right side out through the envelope opening. Use a blunt tool (like a chopstick or turning tool) to gently push out the corners for a crisp, defined shape. Give your finished cover a final press with the iron, and then insert your pillow form. Voila! Your beautiful, handmade pleated pillow cover is complete.
Tips for Success and Customization Options
Achieving a professional finish is all about attention to detail. Always measure twice and cut once. Use an iron frequently throughout the process, especially when forming and pressing pleats, as this makes a significant difference in the final look. Don’t be afraid to experiment with different pleat depths and spacing – a wider spacing creates a bolder look, while closer pleats offer more texture. You can also customize your pillows further by adding piping around the edges before sewing, or by using a contrasting fabric for the envelope back for a hidden pop of color. Mix and match different fabrics – perhaps a textured linen for the front and a smooth cotton for the back – to create unique tactile experiences. Small embellishments like decorative buttons or subtle embroidery can also add a personalized touch.
Maintenance and Care for Your Handmade Pillows
The beauty of these envelope-back pillow covers is their ease of care. When your pillows need refreshing, simply remove the pillow form through the overlap opening. Refer to your fabric’s care instructions for specific washing guidelines, but generally, cotton broadcloth can be machine washed in cold water on a gentle cycle and tumble dried on low. For white fabrics, using a non-chlorine bleach or a brightening agent can help maintain their pristine appearance. The ability to easily remove and wash the covers ensures that your handmade decorative pillows will remain a fresh and hygienic part of your home decor for many years to come.
Embrace the Joy of DIY Home Decor
This pleated pillow cover project perfectly illustrates how a seemingly complex design can be broken down into simple, manageable steps, making it accessible even for beginner sewers. The satisfaction of transforming inexpensive fabric into elegant, functional home accents that save you money is truly rewarding. So, the next time you find yourself browsing costly decor items, consider the immense value and personal touch a DIY approach can offer. Gather your materials, set up your sewing machine, and start creating beautiful, custom pleated pillow covers that perfectly reflect your style and elevate your living space.







